Using the Program Guide
| If you want to find out what's on TV, the way to start is by accessing the guide itself. The easiest way to get there is to press the Guide button on the remote control. However, you can also navigate to the guide by using Media Center's onscreen menus :
The guide's initial view (see Figure 7.2) shows the channel you are on, and the current listing for what's playing now. You can use the Right ( Figure 7.2. The guide displays an hour and a half of programming on your current channel, and the next six channels in your local channel lineup. You can use the Up and Down navigation buttons to view listings on other channels, or you can press Ch/Pg+ or Ch/Pg-to scroll through the listings page by page (seven channels at a time). If you're using your keyboard instead of the remote, press the Page Up or Page Down keys to achieve the same effect. tip
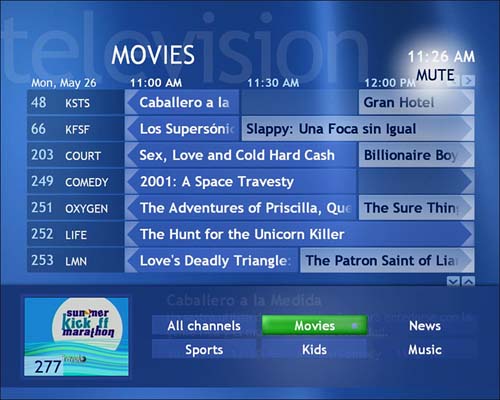
When you find a show you want to tune to, just highlight the listing and press OK. My TV will change the channel and switch from the Guide view to full-screen mode. Sorting the Program GuideHere's a great undocumented feature of the guide that will help you zero in on exactly what you're in the mood to watch: While the guide is displayed onscreen, press the Guide button again. The program description at the bottom of the screen will be replaced by a series of categories: All Channels, Movies, News, Sports, Kids, and Music (see Figure 7.3). Select one of these categories and you will automatically sort your guide so that it displays only programs matching that description. Figure 7.3. Pressing the Guide button on the remote control twice gives you access to six ways to sort the EPG by program type. tip
Customizing Your Program GuideNow that you know how to get around in the program guide, you may want to take a minute and fine-tune your EPG listings. Among the things you can do:
Hiding ChannelsWhen you come across listings for channels you don't actually receive from your TV programming service, or if you keep coming across listings for channels you can get but don't actually want, it's a simple procedure to hide those listings from view:
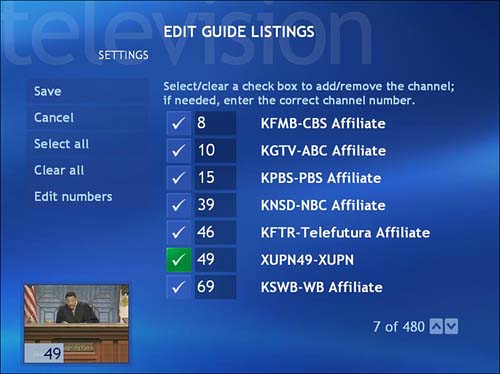
If you find that very few of the channels you receive are actually worth keeping, you may want to start from a clean slate by choosing Clear All and then placing check marks by the channels you want to appear in your listings. By the same token, you can choose Select All to add all channels back into your guide listings. Finally, you can also use the controls on the Edit Guide Listings page to micromanage your channel numbers (see Figure 7.5). This will come in handy if there is a discrepancy between the downloaded listing data for your area and the actual channel where a particular TV station is received. To edit the channel number, just do the following:
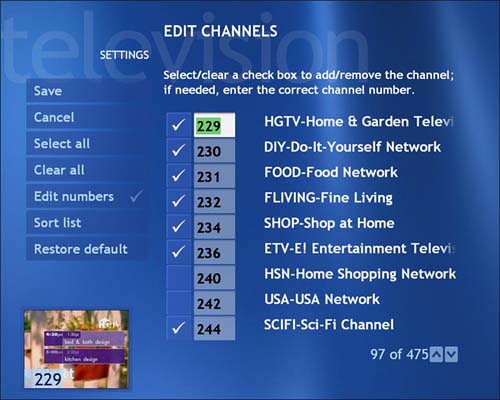
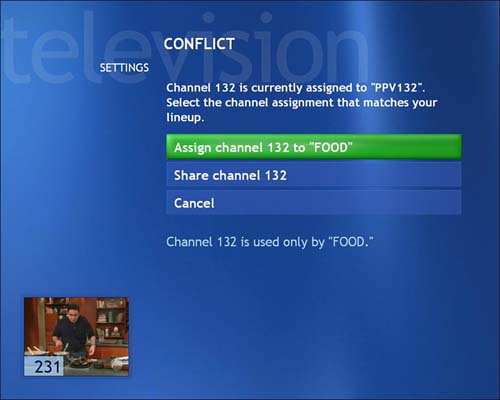
Figure 7.5. This screen allows you to change individual channel numbers in the event of a discrepancy between the EPG and your TV service provider. If you make changes that you later regret , you can always go back and choose Restore Default to wipe out your changes and return to the original EPG settings. If Media Center detects a conflict between the new channel number you've entered and an existing channel, you'll be presented with a conflict resolution screen (see Figure 7.6) that offers several options for resolving the conflict. Figure 7.6. This warning screen lets you know that the reassigned channel number is already in use. You can choose to go ahead and reassign the channel number essentially overwriting the existing station listed at that number locationor you can have two stations share the same channel number. A third option is to cancel the operation altogether. Changing Your Channel LineupMissing one or more channels? You may first want to check the Edit Channels screen as described in the preceding section, and make sure that you didn't accidentally deselect it from your channel list. If that doesn't solve the problem, it could be that you selected the wrong TV subscription package or programming provider when you did your initial setup (see the section "Setting Up Your TV Signal" in Chapter 3, "Getting Started and Taking the Tour"). It's also possible that your TV service provider has simply changed your channel lineup. Whatever the reason, it may be time to go in and make some channel lineup changes of your own. Here's how:
caution
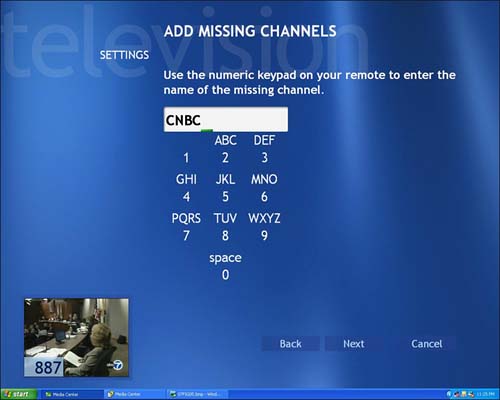
Another option for adding a single channel that's missing from your lineup is to use the Add Missing Channels utility (see Figure 7.7), also available from the Television Settings menu. Figure 7.7. After entering the call letters for the TV station you want to add, using the text input buttons on your remote control, you'll be prompted for the channel number of the station. Downloading Guide DataAlthough Media Center is designed to automatically download your guide data via the Internet from designated providers such as www.Zap2it.com, there may come a time when you want to initiate a download manually. For example, a manual download may be called for if you think that programming changes may have taken place since your last download occurred, or if you see discrepancies between your EPG data and program information published elsewhere. tip
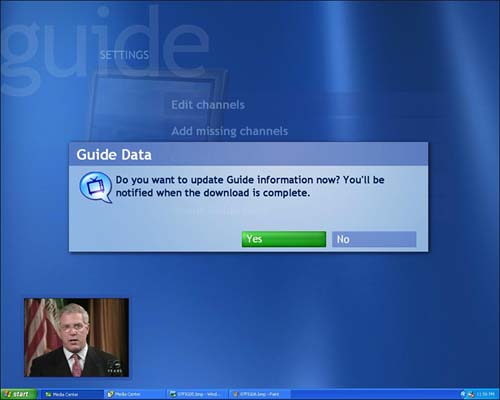
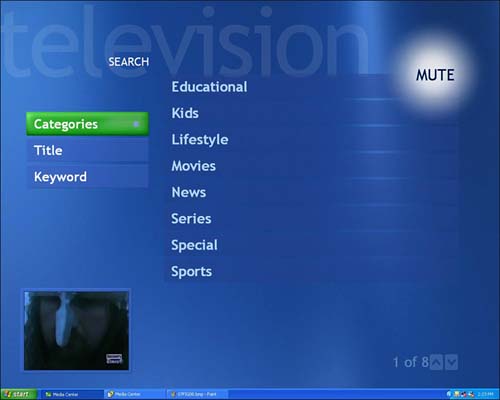
Whatever your reason, here's how to make sure that your guide data is as up-to-date as possible. Follow the steps outlined previously to reach the Guide Settings menu. Then select Get Guide Data, and follow the onscreen prompts to complete the manual download process (see Figure 7.8). Figure 7.8. After you select Get Guide Data, you'll see this confirmation screen. Choose Yes to continue. The actual download time can take many minutes or only a few seconds, depending on the speed of your Internet connection and how out-of-date your guide data is. Searching with Your Remote ControlWhen you select My TV, then Search, you'll be greeted by the option to search by Categories, Title, or Keyword (see Figure 7.10). Let's look at each of these search methods individually. Figure 7.10. Media Center's My TV main search page allows you to launch a programming search based on the genre , the program name , or a specific attribute contained in the show description. Searching by CategoriesSelecting Categories brings up a set of eight initial search choices: Educational, Kids, Lifestyle, Movies, News, Series, Special, and Sports. Nested within each of these program genres are still more category choices. For instance, when you select the News category, you then need to choose All, Business, Current Events, Interview, Public Affairs, Sports, Weather, or Other. In all, My TV search categories contain more than 80 topic areas. Table 7.1 offers a complete listing of search categories and subtopics. Table 7.1. My TV Search Categories and Subtopics
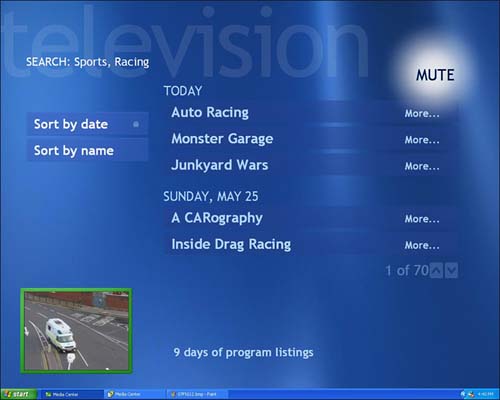
When you select a category and subtopic, Media Center will display the first page of items that fit within that category (see Figure 7.11). At the bottom right of the listings, Media Center displays the total number of listings available that meet the search criteria. At this point, you can sort the search results by name or date. Just select the corresponding Sort By tab. Figure 7.11. This example shows a category search using the search terms Sports and Racing, sorted by date. Searching by TitleTitle search is probably the quickest way to find a specific program. Unlike the search features on dedicated PVRswhich require you to type in a full or partial title name and then select Done and wait for the search to run its courseMedia Center begins searching as soon as you enter the first letter. This blazing-fast search method (compared to the rather sluggish speed of TiVo, ReplayTV, or UltimateTV searches) often completes the search and successfully finds your program before you can even finish entering the complete name of the show. Entering text with your remote-control keypad is very similar to adding names to your mobile phone's address book, or navigating a company's automated phone system by entering the name of the party you're trying to reach. Number keys represent letters, beginning with the 2 key, which represents letters A, B, and C, and so on. Simply press once for A, twice for Byou get the idea. tip
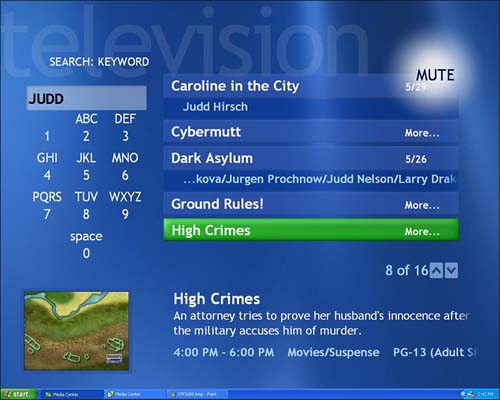
Along with the number/letter input keys, the Media Center remote control offers two additional keys that are important to the text-entry process: Clear and Enter. Clear performs the same function as Backspace on your PC keyboard, erasing the last character you entered. Enter can be used to speed up the text-entry process by pressing it every time you find the character you want to use. That way, you can immediately proceed with entering the next character. Otherwise, you may have to wait a few seconds between entering characters particularly when adjacent letters are both represented by the same number key. To enter a space between words, press 0. Searching by KeywordSearching by keyword operates more or less the same way as searching by titleat least from the user 's standpointhowever, the search itself is much more exhaustive. Instead of just looking at show titles for a match, Media Center compares the search term to the entire description provided in the program guide. Among other attributes, it will search for names of actors, directors, and characters in a particular show, along with subject matter, from Alaska to zebras. The more specific or obscure your search term , the fewer results you will get from your search. See Figure 7.12 for an example of keyword search results. Figure 7.12. A keyword search for "judd" turns up listings with actors Judd Hirsch, Judd Nelson, Ashley Judd, and more. Searching with Your MouseTo reach the search menus with your mouse alone, you'll need to start from the Media Center Start menu, selecting My TV and then Search. Unfortunately, to conduct a keyword or title search, you'll have to reach for your remote control or keyboard to perform any text entry. Although the text search interfaces display an onscreen keypad, it's there only for reference to your remote control's keypad and isn't mouse-enabled.
|
 ) navigation button on the remote to scroll ahead and view what's coming up in the next several hours. (Unfortunately, you can't scroll to the left past the channel listing itself. There is no support for viewing listings of shows that already airedbut what's the point of living in the past, anyway?)
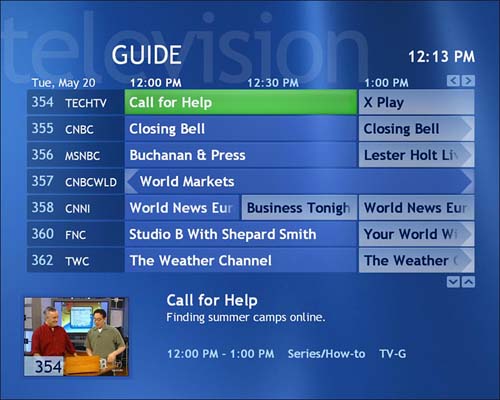

EAN: 2147483647
Pages: 159