| The Effects menu in Picture It! includes the following one-step special-effects options: -
Antique -
Black and White -
Negative Each of these options provides a simple way to create stunning changes in your pictures. Simply choose the corresponding tab to apply a sepia-toned patina to your photo by using Antique, to change it from a color to a monochrome image by using Black and White, or to completely reverse the colors by choosing Negative. If you like the results, click Done. If not, click Cancel to return to the original image. Two of the Effects options provide a little more leeway for customization and creativity. Here's how they work: -
Hue and Saturation This feature allows you to fundamentally change the color properties of your image, using an inventive and functional interface (see Figure 20.12). When you move the cursor over your picture, the cursor becomes an eyedropper. Click to select an area of your picture to use as the basis for your color changes. Then click and hold the clear dot in the colored bulls-eye on the left. As you drag the dot around the circle, you'll see the image's color properties change. When you find the spot where the colors suit your taste to a tee, simply click Done to proceed. If you want to start over, click Reset. Figure 20.12. Using Hue and Saturation instead of the Black and White one-step Effects tab produces a more pleasing monochrome image. 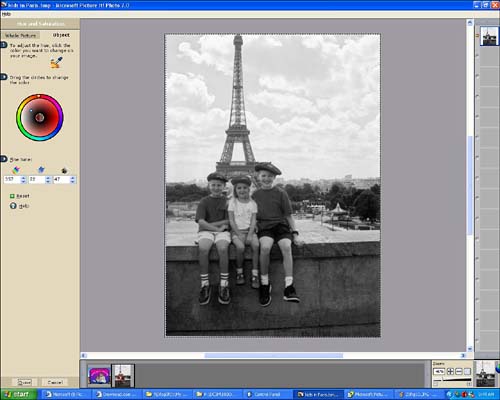 -
Freehand Painting This option is designed to bring out the Rembrandt in each of us. To hand-color your image (see Figure 20.13), follow these steps: -
Choose a paint tool. The options include brush, airbrush, pencil, eraser, marker, and charcoal. -
Pick a paint color. You can choose from one of the eight colors displayed, or click on the palette icon to explore the full range of color choices. -
Choose the brush size you want to use. When you move the cursor over your image, you'll be able to see how large the brush you've chosen is in relation to the image. -
Begin painting by clicking and dragging your brush across the image. Figure 20.13. This image was altered using the Antique effect, and then some of the detail was brought back using the Brightness and Contrast controls. 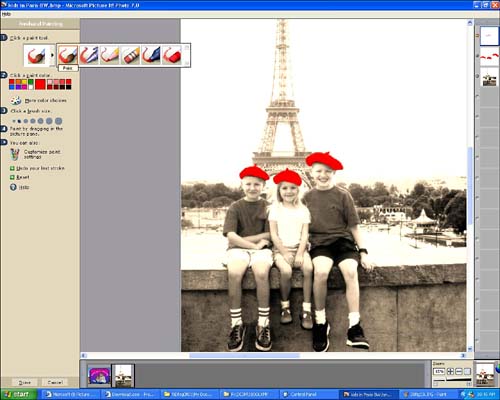 tip  | You can't use the Hue and Saturation command on a black and white image, because it is essentially a color correction tooland that requires the presence of color. However, you can use the controls to create a black and white image. If you find that using the instant Black and White special effects tab creates an image that is either too dark or too washed out, try using the Hue and Saturation controls to create a more customized monochrome effect. This method produced excellent results in the image shown in Figure 20.12. |
tip | | To get finer detail in your painting, try selecting a smaller brush size and increasing the magnification of the photo using the Zoom control (see Figure 20.4). To avoid mistakes, use shorter brush strokes and pause frequently. This way, if you do make a mistake, you can use the Undo Your Last Stroke command to remove the error, and you won't have to repeat a great deal of your handiwork. |
 |