Advanced Concepts of C Language
|
| < Day Day Up > |
|
Advanced Concepts of C++ Language
The Kylix 3 product from Borland Software Corporation consists of two powerful tools, the Delphi and the C++ languages. The previous section focused on discussing the principles of the Delphi (Object Pascal) language to a considerable extent in order to familiarize the readers with the language principles so that they can quickly start programming in Kylix. However, in the current section, an attempt will be made to present an overview of the C++ language, and focus on some of the advanced concepts. While doing so, the focus will be toward the Kylix 3 platform’s implementation of C++ and Borland’s extensions to the standard C++ language.
C++ has been one of the very stable object-oriented languages for more than a decade. There are innumerable C++-based applications in the industry on various platforms. As it is a UNIX-born operating system, the de facto standard programming language for the Linux operating system is C++. In simple words, C++ and Linux go hand in hand. Almost since the inception of Linux, the GNU C++ has been very popular for developing Linux applications. However, the most recently added tool to the Linux platform, Kylix 3, comes with its own version of C++ compiler designed by Borland. As part of the Kylix 3, the C++ development environment shares a common library of components and objects with the Delphi environment. This common library is known as the Component Library for X-platform development (‘X-platform’ means the cross platform), or CLX. The CLX architecture will be discussed in detail in Chapter 6, while the rest of the current chapter will establish the necessary foundation in the concepts of C++ programming. The Kylix 3 version of C++ adds the RAD (Rapid Application Development) feature to the C++ language and certainly scores over the GNU C++ in this respect. In the past, Linux programmers were not concerned with RAD development tools. However, the introduction of Kylix 3 to the Linux community has brought the RAD features to Linux development, and the time has come for Linux developers to look at these features because the scope of Linux has expanded from a home-based system to the Enterprise-level and desktop-level system. Today’s Enterprises are looking toward economic solutions and alternate desktop and server systems to the traditionally used systems. Therefore, the Linux developer base is also expanding to such an extent that many non-UNIX–based programmers are considering Linux as the alternate platform for their careers. RAD tools such as Kylix are going to be very useful and impressive for non-UNIX (or Windows)-based developers who want to switch to Linux development.
Overview of C++ Language
It is an accepted fact that C++ language originated from the C language, and therefore many constructs are borrowed from it. C++ is a highly typed and case-sensitive language. An executable C++ program consists of a main() function at the minimum. Similar to the Delphi units, a C++ program can contain individual unit files with .cpp extension and the main program is another .cpp file having the main() function. This approach makes the application modular. Hence, it is easy to maintain. As in any object-oriented language, in C++ we often work with the class data type to create object definitions. Typically, each of the individual unit files contains one or more class declarations and their implementation. Conventionally in C++ programs, the class declarations are made in separate files called header files with the .h or .hpp extension and their implementations are made in the corresponding .cpp files. For example, class definitions for employee-related objects might be created in a file called employee.h with the corresponding implementations in the employee.cpp file. In the employee.cpp file, there is an include directive that specifies inclusion of the header file before compiling the rest of the program. The include directives in a typical C++ program might look something like this.
#include <stdio.h> #include <stdlib.h> #include <employee.h>
The #include directive is known as the pre-processor directive and is used to include the source code from another header (.h or .hpp) or program (.cpp) file. One such #include directive should be used for each file to be included. In addition to the #include directive, there are other pre-processor directives used for different purposes. The #define directive defines a macro. From the point of definition, every occurrence of the macro is replaced by the token represented by the macro. To undefine a macro, the #undef directive should be used. The conditional directive #ifdef is used to test if a particular macro or identifier is defined, and the conditional directive #ifndef is used to test that a particular macro or identifier is not defined. A #ifdef or #ifndef conditional directive is properly ended with a #endif directive. There are other conditional directives—#if, #else, #elif—used in support of the conditional compilation. Here are a few example lines of code to demonstrate some of these directives.
#define TEST_ON #ifdef TEST_ON /* conditional code if the identifier TEST_ON is defined */ #endif #undef TEST_ON
In addition to these directives, Kylix C++ defines a set of #pragma directives, which might be used to provide directives specific to the Kylix C++ compiler. If other compilers do not recognize specific #pragma directives, they just ignore them instead of generating a compilation error. Some of the #pragma directives are discussed here. The #pragma hdrstop directive, included by Kylix IDE in all applications by default, is used to indicate the compiler that all the header files included before this directive could be used in generating precompiled headers. Pre-compiled header files, if properly used, improve compilation speeds in a C++ application. For example, if a C++ application has several source files, and there is a common set of header files used in every source program (as is usual in every C++ project), these common header files could be compiled once to create an image of the precompiled headers, such that these files are not compiled when every source program is compiled. If precompiled header files are not used, every time the project is compiled the compiler will go through every source program in the project and will attempt to compile the included header files (and any more header files included by these header files and so on), thus increasing the compile times even for a small project or for a small change. Use of precompiled headers certainly improves compilation speeds and hence productivity of the developers. However, it should be noted that the list of header files and the order in which they are listed before the #pragma hdrstop directive should be the same in all the source files. This is because the compiler creates an image of the precompiled headers when it compiles all the headers included up to the point it encounters the #pragma hdrstop directive in the first source program it compiles, stores this image onto the disk, and then onward when it compiles every other source program in the project it compares the list and the order of the header files included up to the point where the #pragma hdrstop directive appears; if the list and order of these header files matches with the precompiled header file list, then instead of compiling all these header files again it loads the pre-compiled headers image stored in a specific file on the disk. Any header files not common to all the source programs should be placed after the #pragma hdrstop directive. The #pragma hdrfile “<filename>” directive is used to specify the file name to store the pre-compiled headers. This file name can also be specified in the Kylix project options page from the IDE, which will be discussed in Chapter 6. The #pragma link “<object filename>” directive is used to specify an object file to be linked to the executable. The linker searches for the specified object file in the path specified with the –L linker option. To make it simple, the path name of the file may be specified within the #pragma link directive along with the file name. If a file extension is not provided, the linker assumes the default .o file extension, which is the default object file extension on the Linux system. When the #pragma package(smart_init) directive is used, the compiler is directed to initialize all the required packages in the order as determined by their dependencies. The #pragma resource “*.xfm” is used to specify that the source .cpp file corresponds to a Kylix form and therefore the corresponding form file with the same name as the source program and .xfm extension should be present in the same directory where the source program is present. The form variable declaration should immediately follow this #pragma directive. When the applications are created using the Kylix IDE, these pragma directives are automatically added to the source files as required. More details on the forms will be discussed in Chapter 6 while creating applications using the Kylix IDE.
Like Delphi and many other object-oriented languages, C++ also provides a number of constructs to control the program flow. The if and switch …case conditional constructs and looping constructs such as while …, do …while, and for are all syntactically similar to the C programming language and therefore not discussed here. The struct data type is enhanced from the way it is used in the C language, and the class data type is the new addition in C++ and does not exist in C. These two are discussed in more detail in this section.
C++ Struct, Union, and Class Data Types
The struct data type is typically used to represent record structures and is functionally similar to the Delphi Record data type. The individual members of a struct data type are the ordinal data types supported in C++, such as the int, float, double, and char arrays. Unlike Delphi and Java languages, C++ does not support intrinsic string data type. However, null-terminated character arrays are used as strings. Fixed length arrays can be defined by specifying the maximum array size. Dynamic arrays are defined through the pointer mechanism; by defining a character pointer and programmatically allocating memory using the new operator. Memory allocated for the dynamic arrays should be disposed off programmatically using the delete operator, while the memory allocated for the fixed arrays is automatically disposed off when the variable goes out of scope. Because character strings in C++ are null-terminated character arrays, it is very important to keep in mind to allocate one extra byte additional to the maximum size of the data array to be stored, for the purpose of storing the null character (\0) either for the fixed size arrays or dynamic arrays. The general syntax of a struct data type with an example is provided here.
struct <structure name> { variable1 <data type1>; variable2 <data type2>; . . . . . . variableN <data typeN>; }; struct emp_record { char first_name[50]; char last_name[50]; char title[40]; salary double; }; In the example, we defined only member variables; but C++ structures permit us to define member functions (as in the class data type) enabling them to behave more like objects rather than dumb records. When a struct data type is defined this way, only the template of the data structure is defined, and therefore no memory is allocated for the structure. Memory is allocated only when individual objects are created using the structure definition. From the example it can be noticed that emp_record is the name of the structure template, which is used while creating the actual record objects, as shown here.
emp_record emp1; emp_record emp2;
Here emp1 and emp2 are two objects of the emp_record structure. When these objects are created, the memory for the member arrays is also allocated, as they are fixed size arrays. The individual members of the object are accessed through the . member access operator, as in emp1.first_name, emp2.last_name and so on. We can also declare an array of objects of emp_record structure using the syntax similar to emp_record employees[10], which creates 10 objects of the structure. Array members in C++ have index starting from 0 to N-1, where N is the maximum size of the array. In the previous example, the individual objects of the employees array are accessed as employees[0], employees[1], . . .employees[9].
The union data structure looks very similar to the struct data type, but is different in the way it works. All the members of a union data structure share the same memory location, and hence only one of them is active at any given point of time. Setting a value to one of the members in a union will overwrite the existing value (if any), which might be representing yet another member variable until the time it was overwritten. When an object of a union data structure is created, memory is allocated to store the largest member variable. A typical example of a union data structure is shown here.
union one_choice { char name[80]; char title[40]; char company[100]; }; Objects of the example union declaration will allocate the space required to store the largest variable; in this case it is 100 bytes.
The most predominantly used C++ data structure is the class, which will be discussed now. Although structures in C++ are enhanced with object-like features such as encapsulation making them resemble like classes, the class data type is the complete data structure bringing the object-oriented concepts such as encapsulation, inheritance and polymorphism to a C++ program. The class declaration looks very similar to the struct declaration, as shown here in Listing 5.10.
Listing 5.10: Sample class Declaration
class computer { private: char mboard_manufacturer[20]; int mboard_bus_speed_mhz; char processor_manufacturer[20]; int processor_speed_mhz; int processor_count; public: computer(); ~computer(); void set_mboard_manufct(char*); void set_mboard_speed(int); void set_processor_manufct(char*); void set_processor_speed(int); void set_processor_count(int); char* get_mboard_manufct(); int get_mboard_speed(); char* get_processor_manufct(); int get_processor_speed(); int get_processor_count(); };
The class declaration shown here is very simple but is adequate for our discussion. Typically, the member variables of a class are declared (or desired to be declared) with private access specifier because the member variables represent the data contained in an object and therefore they should be protected from external objects directly accessing them. The method computer(), which has the same name as the class name, is the constructor, and the method ~computer(), which has the same name as the constructor and prefixed with the tilde ~ character, is the destructor. The constructor method is automatically invoked when the object created, and the destructor is automatically invoked when the object is destroyed. Constructors and destructors in C++ should not have any return data types. The only way the class member variables are accessed by external objects is through the access methods such as the set_ and get_ methods. In the example, the access methods are shown for all the member variables, but it is not required to do so; only those member variables that need to interface with the external objects should be exposed through the public methods. The protected access specifier is another level of access specifier that provides higher level of access than the private specifier but lower level of access than the public specifier. The protected members are accessible by every other member function within the same class and also by member functions of a class that is derived from this class.
Typical C++ applications developed with strict (or at least moderate) adherence to the object-oriented principles usually pass through special phenomena as described here. The main executable program contains the main() function, which is the entry point of the application. The application may involve using several classes and other related data structures. Objects are instantiated from the respective class declarations at different points of time throughout the duration of the application. Depending on the way they are instantiated, the objects may be allocated memory either from the stack or the heap (the difference between the two will be discussed shortly). The objects exchange data among themselves in a controlled way. Objects that have been better encapsulated have better control over their private data compared to those that have not been better encapsulated. Better encapsulation of an object means the corresponding class design does not expose the private data and hence does not violate the object-oriented principles. Once the objects have completed their tasks, they should be destroyed. Objects created on the stack are automatically destroyed when they go out of scope; those created on the heap should be programmatically destroyed after ensuring that they are no longer needed.
Pointers and Dynamic Memory Management
Many C++ programmers (or those who consider pursuing C++ as their career) are concerned about one important aspect of the language—the dynamic memory management. The discussion in this section will throw some light on this topic regarding the myths and facts about dynamic memory management. The computer RAM (random access memory) is a continuous chunk of memory slots, each capable of storing one byte (or 8 bits). From the point of view of an application, there are three independent memory chunks that the application works with; the global space belonging to the application, the application stack, and the free memory called the heap. Variables and objects can be created in all the three independent chunks of memory, as explained in this section.
Typically, when a variable or object is created in the program, what actually happens is that the variable is assigned a specific address location in the memory. For example, when a variable (say myInt) of int data type is created, a memory location of four bytes is allocated to store an integer and the variable represents that storage location (though the value of the integer variable is retrieved when the variable is accessed by name); however, the address of that storage location should be accessed by prefixing an ampersand & before the variable name (as in &myInt). Similarly, when a fixed size character array of 10 bytes is declared in the program, typically 10 continuous one-byte memory slots are allocated for that variable and the starting address of this 10-byte memory chunk is assigned to the array variable. Therefore, whenever a string array is declared, the name of the array variable itself represents the address of the first one-byte slot of the chunk allocated to that variable (without prefixing an ampersand & before the array variable name). Notice the subtle difference between a character array and other data types; with a character array, the name of the array itself represents the address of the first byte of memory location while with other data types (such as int, float, and double) the name represents the value, and the address of the memory location is obtained by prefixing an ampersand & before the variable name. The following example declarations will help in understanding this concept. In these declarations, the addresses of variables are not assigned to the corresponding pointer variables, as some of the readers would expect; this will be done while discussing the pointer variables, later in this section.
int myInt; ® int variable declaration &myInt ® address of myInt float myFloat; ® float variable declaration &myFloat ® address of myFloat char myCharArray[10]; ® character array of size 10 bytes myCharArray ® address of myCharArray
Objects and variables created in the program outside of any function have their scope beginning from the point they are declared to the end of the program file in which they are declared; they are accessible by all the functions and class declarations within that program file and therefore are called as global objects and global variables, respectively. However, declaring global objects and variables is not a recommended practice as the application global space is limited and also because it violates the principles of object-oriented design.
Next, objects and variables created in a function have their scope (and hence lifetime) limited to the end of the function and are named local objects and local variables, respectively; also, the local objects and variables are created on the application stack. When a function is invoked and one or more arguments are passed, the calling function first creates its own stack, frame and pushes it onto the stack, then pushes the called function arguments onto the stack, and finally the program execution jumps to the called function. A stack frame is a piece of information that identifies the current state of execution of the current function, including any values of its own local variables. When the program execution returns from the called function, the current function should be able to continue execution from where it jumped to the called function. Therefore, every function creates a stack frame on the stack to preserve its current status information before calling any other function. The application stack is also a very scarce resource and needs to be used properly; otherwise it will result in stack overflow errors or similar errors.
The next type of memory chunk available to the application is the heap, which is a much larger chunk when compared with the global space and the stack. Dynamic memory management is the concept of allocating and de-allocating blocks of memory in the program during run time. On the other hand, statically allocating memory means the compiler knows while compiling, the size of memory allocated to the objects and variables. Because objects can grow larger during the lifetime of an application, it is always preferable to manage the memory dynamically, because static memory allocation might create data structures not sufficient to hold the amount of data needed during run time, or might create data structures much bigger than needed, thus wasting the application global space or stack space. In short, an application that does not use the heap would be simply chaos and thus easily susceptible to failure. Effective C++ applications make the best use of the heap memory and need careful attention from the programmers; however this does not mean that understanding the principles involved in the heap management needs a rocket scientist; rather it requires attentive programming practice, which can be acquired through experience. To understand how to use the heap, it is necessary to understand the concepts behind defining and using the pointer variables.
A pointer is also a variable that stores the address of another variable or object. On a 32-bit computer system, a pointer variable occupies four bytes of memory. The core of C++ language is focused on two concepts; first, the class data type and next, the pointer variables. Typically, it is unthinkable to write a true C++ application without using either the class or pointer data type. In C++, pointers are strongly typed, which means that a pointer variable declared to point to an integer should only be assigned the address of an integer variable, or a pointer variable declared to point to a specific object type should only be assigned the address of an object of that specific type. A pointer variable is declared by prefixing the variable name with an asterisk *, or by suffixing the asterisk to the data type. Consider the example given here. In the example, strPtr is a pointer to the char data type.
char* strPtr; char str_array[10]; strPtr = str_array;
The name of the array variable, str_array points to the first byte of the 10-byte memory chunk allocated to the array. When this variable is assigned to the str_ptr pointer variable, the address of the first byte of array is stored in the pointer variable. Now the character array is accessible two ways; through the char array variable and through the char pointer variable. The relationship between the array and the pointer variable is shown in Figure 5.1.
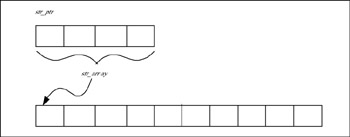
Figure 5.1: Pointer variable containing address of the char array.
From the example, it should be noted that a pointer variable merely contains the address of a memory chunk; the memory chunk may be allocated for a character array or an object. It really doesn’t matter; in principle both are one and the same. Therefore, it can be interpreted that unless some memory is allocated to the variable or object pointed by the pointer variable, the pointer really contains nothing, and any attempt to access the variable or object through the pointer before allocating the memory will cause (memory) access violation errors. This is the first concept that should be remembered by all the professionals who desire to become C++ programmers, no matter whether they write Linux-based applications or Windows-based applications or whichever C++ compiler they use.
Before continuing this discussion further, it is necessary to understand the difference between the creation of objects on the global space, stack, and on the heap. All those scope rules that are applicable to the variables are also applicable to the objects. Objects created on the global space are available globally to all other objects and live to the end of the program, while those created on the stack are automatically destroyed when they go out of scope, and those created on the heap are not destroyed automatically, and their lifetime management should be handled by the programmers explicitly. Examples of creating objects on the stack and on the heap are provided here, using the sample class declaration provided in the previous section.
// creating the object on the stack or on the global space // object memory assigned at compile time computer myComputer; // dynamically creating the objects on the heap // object memory is assigned during runtime computer* myComputerPtr; myComputerPtr = new computer(); // same as previous declaration, but combines // two statements into one computer* myComputerPtr = new computer(); // destroying the dynamically created object delete myComputerPtr;
It can be noticed from the example that the first declaration style creates the object on the stack or on the global space, and therefore the compiler determines the memory requirement at compile time. The variable myComputer represents an object of the computer class. The lifetime of the object is governed by where the object is declared. If the object is declared with global scope (in the program file outside of any function), then the object is created on the application global space and therefore is accessible by every function or class declaration. Such objects live to the end of the program and should be considered carefully before creating objects with this level of scope. Though this type of declaration is not recommended, it is not uncommon to come across global object declarations in some circumstances. If the same declaration style is used within a function, then the object is declared locally and hence created on the stack. The life of the object ends when the function ends and the control returns back to the calling function. This type of declaration is also not unusual, but really not useful if the object needs to be manipulated by functions called from within this function. When objects are declared using this style of declaration, the object’s members are accessed using the dot . operator, as in myComputer.set_mboard_speed(1000).
In the second type of declaration, first a pointer myComputerPtr to the computer class type is declared and then in the second step the object is created using the new operator and assigned to the previously declared pointer variable. This is a two-step process as is noticed from the declaration. The third declaration style gives identical result as the second one, the only difference being that the two statements are combined into one. To dynamically create objects, either the second type or the third type declaration can be used, depending on convenience. For example, if there is sufficient gap between the times when the pointer variable is to be declared and then when the actual object is to be created, then it is convenient to use the second declaration style. Whatever style is used, dynamic creation of objects involves two inherent steps; the pointer variable declaration and the object creation and assignment. Let us analyze the two steps involved in this process. The pointer variable declaration also consumes some memory; but it is only four bytes because memory locations on a 32-bit system are represented by four bytes. When the object is created, the memory required by the object is determined by its class declaration, and the object is created with that memory on the heap. After the object is created, it is assigned to the pointer variable. It is this assignment that makes the pointer variable a gateway to access the object’s contents. If the object is not created, or the assignment is not done, or the assignment is broken by some means (which happens when the object is destroyed), then the pointer again becomes useless and no attempt should be made to access the object’s contents through this pointer. When an object is created using the second (or third) style declaration, the object’s members are accessed using the arrow ® operator, as in myComputer®set_mboard_speed(1000).
Looking at the fourth code snippet in the example, it can be noticed that the object is destroyed through the delete operator. The statement might look deceiving because it appears to be deleting the pointer variable; but it is actually instructing to delete the object pointed to by the pointer variable, because the pointer variable is acting like a gateway to the object. This statement deletes the object and the pointer variable remains available to be reused for another object assignment. When the object is deleted or destroyed, then the pointer is again floating and does not point to anything. When the pointer is not assigned to an object, or when the object it is pointing to is deleted, then the pointer is said to be pointing to Null. Let us examine the groups of code segments provided here to see what happens in each of these situations.
// code segment group1 computer* myComputerPtr; myComputerPtr = new computer(); delete myComputerPtr; myComputerPtr->set_mboard_speed(1000) // causes access violation // code segment group2 computer* myComputerPtr; new computer(); delete myComputerPtr; // causes access violation // code segment group3 computer* myComputerPtr; myComputerPtr = new computer(); myComputerPtr = NULL; delete myComputerPtr; // causes access violation
In the code segment group1, an attempt is made to access the object’s member function after the object is deleted, thus causing access violation error. In the code segment group2, the object is not assigned after being created. Therefore, any attempt to access the object’s contents or delete the object would cause access violation error. In the code segment group3, after the object is assigned to the object pointer, the pointer is set to NULL, so the pointer does not act like the object’s gateway any longer and any attempt to access the object’s contents or delete the object would cause an access violation error. In the last two code segment groups, a careful observation would reveal an interesting point; after losing the connection between the object pointer and the object, the object becomes an orphan and can neither be accessed nor be deleted. This is the kind of situations that cause memory leaks in the application because the memory used by the object cannot be reclaimed within the application. The following discussion will identify some more situations that might cause either access violations or memory leaks.
Because the object pointer is the gateway to accessing the contents of the object, if for any reason the object pointer is not accessible, then the object is neither accessible nor destroyable even though the object still exists on the heap. One might wonder what could cause this type of situation. If the object pointer is a local variable in a function and the object is not destroyed before the function ends, this type of situation would arise causing memory leak, because the object pointer goes out of scope once the function exits. For this reason, it is always recommended that before the object pointer goes out of scope, the object should be destroyed, be assigned to another object pointer, or be given to an object container which would further assist in managing the object lifetime. An object container may be another object such as a linked list or some other tool as applicable to the particular scenario. When the object pointer is defined at the global scope, the dangerous situation of the object pointer going out of scope does not arise, and the actual object can be created and deleted anywhere in the program. In another situation where an array of objects is created on the heap, then while attempting to release the memory occupied by the array, we should delete the array using a slightly different form of the delete operator, as shown here.
computer* myComputerPtr; myComputerPtr = new computer[10]; delete myComputerPtr; // wrong way to delete the object array delete[] myComputerPtr; // right way to delete the object array
Frequently, objects contain other objects. Such objects should be designed to take care of the lifetime of the objects they contain within themselves. The destructor of a class is automatically called when an object of that class is destroyed explicitly (using the delete operator) or when it goes out of scope (when the object is created on the stack). Class destructors are a convenient place to release the memory acquired from the heap; however, it is not always necessarily the place to release the memory, as there are occasions to release memory before the object pointer goes out of scope, as discussed before.
When objects are needed to be passed as function arguments, usually it is advantageous to pass them by reference or pointer, because only the object pointer (four bytes) is copied to the stack compared to copying the whole object’s contents. This is even more beneficial when an object is passed across several levels of functions, such as, from one function to another, and then to another function, and so on. The other advantage of this method is that the called function can directly access the contents of the original object rather than working with a copy of the object.
There is much more to discuss on dynamic memory management than what is presented here. However, this discussion is mainly focused on teaching newcomers to the C++ programming field to take care of basic precautions in object life cycle management. The readers are encouraged to experiment with different scenarios discussed in this chapter and experience the kinds of problems they should be prepared to face while developing Enterprise-class applications.
Object References
An object’s reference is an alias to the object and contains the address of the object. The object reference should not be confused with the pointer objects. Pointers are themselves objects and have independent existence, while references do not. At a particular instance in the program, even though a pointer object does not typically point to any specific object of the type for which it is declared, still the pointer exists and occupies four bytes of memory. The address of a pointer object exists in the physical RAM, and is different from the address of the object that it points to. However, the reference of an object does not have a separate existence from the object it refers to. If the object does not exist, its reference also does not exist, or the object reference goes out of existence when the object goes out of scope. This also means that an object reference cannot be NULL, whereas a pointer object can be set to NULL. Object references appear to be more conceptual than physical and are a higher-level abstraction from object pointers. When the program is compiled, the compiler stores all the identifier information in a symbol table. In the symbol table, object references are stored as entries that point to real compiled objects and not as separate entities. Because the object reference is the object’s address, it is identified by prefixing an ampersand & to the object’s name. For example, if the object is identified by the name myObject, then its reference is identified as &myObject.
Object references are useful mainly while passing as arguments to functions. When so used, they can be treated by the called function in a way similar to the object pointers; the object members are accessed using the arrow ® operator. When the called function receives an object reference as an argument, it does not have to check the object to be not NULL, because, as mentioned above, an object reference exists only when an object exists. However, when the function receives an object pointer as an argument, it is wise to make sure that the pointer is not NULL before attempting to access the object’s members, because the object pointers have independent existence and can be NULL. An example program is provided here in Listing 5.11 to show all the different ways of passing function arguments, by value, by reference, and by pointer. From the example, it can be seen that the value of the original object’s private variable does not change when it is passed to a function as an object by value. This is because the called function operates on a copy of the object and not on the original one. This listing is available on the accompanying CD-ROM.
Listing 5.11: FunctionArguments.cpp
#include <clx.h> #include <iostream> #pragma hdrstop using std::cout; using std::endl; #pragma argsused class MyClass { private: int intVar; public: // class implementation MyClass() { }; int getIntVar() { return intVar;}; void setIntVar(int value) { intVar = value; }; }; void ObjectByValue(MyClass myObj) { myObj.setIntVar(10); } void ObjectByReference(MyClass& myObj) { // when object references are passed, it is not required // to perform a NULL check as we do in case of object pointers. myObj.setIntVar(25); } void ObjectByPointer(MyClass* myObj) { // when pointers are passed, it is required to make sure that the // pointer is not NULL, before we access the object through the // pointer if (myObj != NULL) { myObj->setIntVar(30); } } int main() { MyClass myObj; myObj.setIntVar(20); cout << "Initial value of intVar = " << myObj.getIntVar() << endl; // pass object by value ObjectByValue(myObj); cout << "Value after passing (by value) to function = " << myObj.getIntVar() << endl; // pass object by reference ObjectByReference(myObj); cout << "Value after passing (by reference) to function = " << myObj.getIntVar() << endl; // pass object by pointer ObjectByPointer(&myObj); cout << "Value after passing (by pointer) to function = " << myObj.getIntVar() << endl; return EXIT_SUCCESS; }
This program should be compiled using the Borland C++ compiler bc++, which is provided with Kylix. The compiler is located in the bin directory of Kylix, which is by default /usr/local/kylix3/bin. If this directory is included in the PATH environment variable, then the compiler can be invoked at the shell command prompt without prefixing the full path, as shown here.
$ bc++ FunctionArguments.cpp
The successful compilation of the program will create the default output executable file with the same name as the source program, but without any extension. When the program is executed, the output displayed at the command prompt is as shown in Figure 5.2.
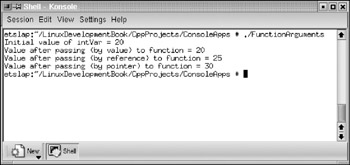
Figure 5.2: Output of the console application demonstrating object references.
Virtual Methods and Polymorphism
As discussed earlier in this chapter, polymorphism is a core principle behind the object-oriented languages, by virtue of which a class hierarchy can exhibit a multitude of behaviors through a single method signature, each of them being inherited from one of its predecessor classes (and overridden in the descendant class). To understand this concept more clearly, it is necessary to recall that the behavior of a class is characterized by one or more of its public methods. Also, from one of the earlier discussions it is evident that a descendant class object can be accessed through the pointer to one of its ancestor (or base) classes. In such a scenario, only those methods of descendant class that are inherited from the ancestor class are visible through the ancestor class pointer. If a method is declared as ‘virtual’ in the base class, and is overridden in the descendant class, then through the base class pointer we can access either the base class implementation or the descendant class implementation of the same method (or method with the same signature) by assigning to the base class pointer an object of the base class or the descendant class accordingly. However, if the descendant class does not override the base class method, then the base class method is automatically invoked. The runtime determination of the object to which the base class pointer is pointing is the mechanism behind this polymorphic behavior. A simple example is shown in Listing 5.12 demonstrating this concept. The Car class in the example serves as the base class with a single virtual function HelloMessage, which displays a simple greeting message. Both the two derived classes MyCar and YourCar override the base class HelloMessage method with their own implementation of a modified greeting. The third derived class NewCar does not override the base class method. In the example, all three objects are sequentially accessed through the base class object pointer. With the first two derived classes, the overridden method is invoked, whereas with the third derived class the base class method is invoked because the derived class does not override the base class method. This listing is available on the accompanying CD-ROM.
Listing 5.12: VirtualFunctions.cpp
#include <clx.h> #include <iostream> #pragma hdrstop using std::cout; using std::endl; #pragma argsused class Car { public: Car() { }; virtual void HelloMessage() { cout << "Hello Message from an object of Car class" << endl; }; }; class MyCar : public Car { public: MyCar() { }; void HelloMessage() { cout << "Hello Message from an object of MyCar class" << endl; } }; class YourCar : public Car { public: YourCar() { }; void HelloMessage() { cout << "Hello Message from an object of YourCar class" << endl; } }; class NewCar : public Car { public: NewCar() { }; }; int main() { // create a base class object Car* bc = new Car(); bc->HelloMessage(); // delete the base class object and assign it to MyCar object delete bc; bc = new MyCar(); bc->HelloMessage(); // delete the base class object and assign it to YourCar object delete bc; bc = new YourCar(); bc->HelloMessage(); // delete the base class object and assign it to NewCar object delete bc; bc = new NewCar(); bc->HelloMessage(); delete bc; return EXIT_SUCCESS; }
Templates
Templates are a very powerful feature of the C++ language that is often ignored. By using the concept of templates, a pattern of class definitions can be created to operate on any data type, even though the data type is not defined at the time of compilation. Similarly, function templates are patterns that can be created to operate on different data types. In both cases, the pattern is usable for data types or object types that are not defined at compile time. Without templates, if we try to compile a C++ program for object types whose definition does not exist at compile time, the program does not compile error free. However, when template classes and functions are declared, this problem does not arise because templates are parameterized types, whereas parameters can be any (existing or nonexisting) data types. Templates avoid situations of duplicating the (same) code for different data types. Thus, they can be used to create a family of functions that use the same logic for different data types. There is also another place where templates can be used. This is in situations in which we use void pointers when we cannot use a specific data type. In such situations, we cannot write code that needs to operate on typed data because void pointers do not point to data of any specific type. However, when templates are used, they replace the void pointers, and any type-specific operations can be performed on the templates. An example is provided in Listing 5.13 to demonstrate the definition and use of template classes. From the program listing, it should be noted that even though the generic parameter type <class T> is used while defining template classes, the class template can be used in conjunction with any data type including the intrinsic data types normally supported by C++. This listing is available on the accompanying CD-ROM.
Listing 5.13: TemplateClass.cpp
// This example is written to demonstrate the use of // template classes that implement a generic stack class. #include <clx.h> #include <iostream> #pragma hdrstop using std::cout; using std::endl; #pragma argsused template <class T> class tmplStack { T* StBuffer; int availPos; int maxSize; public: tmplStack(int n); // constructor ~tmplStack(); // destructor void push(T item ); // push an item to the stack top T pop( void ); // pop an item from the stack top int getSize(); // return the stack size }; template <class T> tmplStack::tmplStack(int n) { availPos = n; maxSize = n; StBuffer = new T[n]; } template <class T> tmplStack::~tmplStack() { delete[] StBuffer; } template <class T> void tmplStack::push(T item) { if (availPos > 0) { StBuffer[maxSize - availPos] = item; --availPos; } return; } template <class T> T tmplStack::pop( void ) { if (availPos < maxSize) { T Obj = StBuffer[maxSize - (availPos+1)]; ++availPos; return Obj; } else return NULL; } template <class T> int tmplStack::getSize() { return (maxSize - availPos); } int main() { tmplStack <char*> chptrStack(10); char myStr[6][25]; strcpy(myStr[0],"Borland Kylix"); chptrStack.push(myStr[0]); strcpy(myStr[1],"Borland Delphi"); chptrStack.push(myStr[1]); strcpy(myStr[2],"Borland JBuilder"); chptrStack.push(myStr[2]); strcpy(myStr[3],"Borland C++Builder"); chptrStack.push(myStr[3]); strcpy(myStr[4],"Borland OptimizeIt Suite"); chptrStack.push(myStr[4]); strcpy(myStr[5],"Borland Together"); chptrStack.push(myStr[5]); int stackSize = chptrStack.getSize(); cout << "Items on the char string stack = " << stackSize << endl; cout << "String stack items are listed top to bottom " << endl; for (int j=0; j < stackSize; ++j) { cout << chptrStack.pop() << endl; } tmplStack <int> intStack(5); intStack.push(100); intStack.push(50); intStack.push(25); intStack.push(15); stackSize = intStack.getSize(); cout << "Items on the int stack = " << stackSize << endl; cout << "Int stack items are listed top to bottom " << endl; for (int j=0; j < stackSize; ++j) { cout << intStack.pop() << endl; } return EXIT_SUCCESS; } As mentioned earlier, the program is compiled with the following command.
$ bc++ TemplateClass.cpp
The successful compilation of the program will create the default output executable file with the same name as the source program, but without any extension. When the program is executed, the output displayed at the command prompt is as shown in Figure 5.3.

Figure 5.3: Output of the console application demonstrating template classes.
Namespaces in C++
Namespaces are used in C++ programs to permit using duplicate names (for identifiers such as variables, classes, and functions) by defining a new level of scope, which means identifiers defined with the same name in different namespaces can coexist in the C++ applications. However, identifier names within a single namespace must be unique. Frequently, we come across programming situations involving large teams working independently on different modules and having identical names for their identifiers. By assigning a different namespace to each of the individual team/module combinations, the teams are free to use their own names without worrying about the possibility of duplicate names. Namespaces introduce new declarative regions, and all the identifiers declared within a region are accessible outside the region by prefixing the name of the namespace to the identifier names. A typical namespace declaration using identical identifier names is displayed here for a better understanding of the concept.
namespace first { class myClass { }; } namespace second { class myClass { }; } namespace outer { namespace inner { class myClass { }; } } The third namespace in the example shows how namespaces can be nested. The identifiers declared in a namespace may be accessed in different ways. These different ways do not replace each other; rather, they provide different levels of convenience in different situations as discussed in this subsection. In one style, the identifier name is prefixed with the namespace name and the :: operator, as shown here.
first::myClass object1; Second::myClass object2; outer::inner::myClass object3;
However, if this notation is preferred, then every identifier (and its every occurrence) should be prefixed this way. The advantage of this way of qualifying the identifier names with the names of the namespaces is that any number of namespaces can be used within the application without introducing any name clashes. But, if the name of the namespace is to be prefixed many times, then it is worth considering the second style, where the namespace name is mentioned once using the using namespace <name> directive and then accessing the identifiers within the namespace without qualifying the identifiers with the namespace name.
using namespace first; myClass object;
As can be noticed from the second style, when the using namespace directive is used, there is no need to qualify the identifiers declared in the namespace with the name of the namespace, as shown in the example. Also the using namespace directive is transitive in nature and provides access to all of the namespaces (and identifiers) included by the directive. However, the using namespace directive might introduce unintended ambiguities, particularly when multiple namespaces are used with this directive (or namespaces are nested) and there is duplication of names within these namespaces. In such situations, the third style of using declaration (instead of the using namespace directive) can be used with respect to specific identifiers, thus creating local declaration to avoid name clashes, as shown here.
using first::myClass; myClass object1; using second::myClass; myClass object2;
The fourth style of using the namespace aliases is useful, particularly with the nested namespaces, as shown here.
namespace ns = outer::inner; ns::myClass object1;
The program in Listing 5.14, which is available on the accompanying CD-ROM, demonstrates the using declarations for the cout and endl identifiers of the std namespace, an example of nested namespace and a namespace alias. The program should be compiled using Borland C++ compiler bc++, as has been done with the previous examples.
Listing 5.14: NameSpaces.cpp
// This example is written to demonstrate the use of // namespaces to avoid duplicate identifier name conflicts #include <clx.h> #include <iostream> #pragma hdrstop using std::cout; using std::endl; #pragma argsused namespace outer { namespace inner { int myFunc() {return 100;}; } } int myFunc() {return 200;}; int main() { int x = myFunc(); int y = outer::inner::myFunc(); namespace k = outer::inner; int z = k::myFunc(); cout << "value of x is " << x << endl; cout << "value of y is " << y << endl; cout << "value of z is " << y << endl; } Every C++ program behaves like a single global namespace, even though it does not contain any explicitly defined namespaces. This may also be viewed from the fact that the identifiers defined in a program with global scope should all be unique. Namespaces do not always have to be named; rather, we could define unnamed namespaces, as shown here.
namespace { int myFunc() {return 100;}; } namespace { int yourFunc() {return 100;}; } In a single program unit, any number of unnamed namespaces can be defined. In such a case, the compiler treats all the unnamed namespaces as belonging to the single (program level) global namespace but preserving the identifier ownership at the individual namespace level. This situation mandates that the identifiers in all the unnamed namespaces should be explicitly named uniquely. The unnamed namespaces allow their identifiers to be visible within the entire program unit yet not visible externally because they are effectively qualified by a name unique to their program unit. Unnamed namespaces serve as a good replacement for static declaration of identifiers.
C++ Casting
Typically, casting is the process by which a pointer to one of the classes in a class hierarchy may be converted to point to an actual object of a different class within the same class hierarchy. However, casting is not limited to objects alone, as will be learned from the following discussion. Conversions of data types are sometimes performed by the compiler automatically (or implicitly) without the intervention or notice of the programmer. There are instances where it is necessary to perform data type conversions (or casting) explicitly, as examined in this subsection. Earlier discussion showed that in a situation involving a base class and one or more derived classes within a class hierarchy using a pointer to the base class, it is possible to access the base class virtual functions residing (inherited or overridden) in the derived class because of the polymorphic behavior of the derived class. Object casting is not necessary to achieve this result because the base class virtual methods are certainly contained within the derived class.
An object of the derived class contains the implementations of all the methods (virtual or not) of all of its base classes and therefore is considered to be a complete object while each of its parent base classes is considered a subobject contained within the complete object because they contain only a subset of methods when compared with the derived class. For this reason, a pointer to a derived class can be cast (or converted) to point to one of its base classes safely. This type of casting up in the class hierarchy is known as up casting. It is also possible to cast (or convert) a pointer to the base class to point to an object of one of its derived classes, provided it is established that the object is a complete object belonging to the same class hierarchy and is derived from the class whose pointer is being cast. This type of casting down in the class hierarchy is known as down casting. During down casting, it is necessary to ensure safe conversion to the correct object type, because we are attempting to access methods of the derived class, which do not exist in the base class. C++ provides four types of casting operators, the dynamic_cast, the static_cast, the const_cast and the reinterpret_cast, each of which is explained in the discussion that follows.
dynamic_cast
The dynamic_cast operator is the most suited for up casting and down casting between objects in a class hierarchy. It is used in conjunction with pointer and reference types. The up casting utilizes the compile time (or static) information of the types and therefore can be used with both the polymorphic and non-polymorphic types. On the other hand, the down casting depends on the runtime (or dynamic) information of the type, and thus should be used only with the polymorphic types; hence down casting is necessary to be performed in a safe type-checking environment. The dynamic_cast operator also makes necessary runtime type checking to ensure that the operation is safe. For this reason, it consumes additional time to perform the operation. Therefore, whenever a simple static_cast is sufficient (as explained later), we can avoid the dynamic_cast to improve the application performance. The syntax of usage for this type of casting is shown here.
dynamic_cast< T >(expression);
In this casting operation, the operand T must be a pointer or reference to a previously defined class type or a void pointer, whereas the expression type must be a pointer if T is a pointer or an l-value if T is a reference. Listing 5.15, which is available on the accompanying CD-ROM, provides a few examples of how to use the dynamic_cast operator.
Listing 5.15: Examples Using dynamic_cast Operator (DynamicCast.cpp)
// This example includes 3 classes in a class hierarchy #include <clx.h> #include <iostream> #pragma hdrstop using std::cout; using std::endl; #pragma argsused // base class class baseCar { public: // class implementation baseCar() { }; virtual void WhoAreYou() { cout << "I am base car" << endl; }; }; // first derived class class firstModel : public baseCar { public: // class implementation firstModel() { }; virtual void WhoAreYou() { cout << "I am first model car" << endl; }; void WhatIsYourHistory() { cout << "I am a child of the base car" << endl; }; }; // last derived class class secondModel : public firstModel { public: // class implementation secondModel() { }; void WhoAreYou() { cout << "I am the second model car" << endl; }; void WhatIsYourHistory() { cout << "I am a child of the first model car" << endl; }; void HowAreYouBorn() { cout << "I am the grand child of the base car" << endl; }; }; // code samples demonstrating the use of dynamic_cast operator int main() { cout << "==================================================" << endl; cout << "Assertion from secondModel car" << endl; secondModel* secondModelCar = new secondModel; secondModelCar->WhoAreYou(); secondModelCar->WhatIsYourHistory(); secondModelCar->HowAreYouBorn(); // The following conversion (upcasting) is permitted // because firstDerivedCar is the direct base class firstModel* firstModelCar = dynamic_cast< firstModel* >(secondModelCar); cout << "==================================================" << endl; cout << "Assertion from second Model upcast to firstModel" << endl; firstModelCar->WhoAreYou(); // The following conversion (upcasting) is also permitted // because baseCar is the indirect base class in the hierarchy baseCar* bCar = dynamic_cast< baseCar* >(secondModelCar); cout << "==================================================" << endl; cout << "Assertion from second Model upcast to baseCar" << endl; bCar->WhoAreYou(); // Create an object of the first derived class // and assign to base class pointer (downcasting) firstModel* firstModelPtr = new firstModel; baseCar* baseCarPtr = firstModelPtr; cout << "==================================================" << endl; cout << "Assertion from baseCar pointing to first Model car" << endl; baseCarPtr->WhoAreYou(); // The following method invokation is invalid; hence commented. // baseCarPtr->WhatIsYourHistory(); // The following conversion (downcasting) is permitted // if the base class has virtual functions // CLX event handlers usually pass the base TObject pointer for the // Sender parameter. The appropriate (derived) object pointer may be // obtained by syntax similar to this. firstModel* anotherFirstModel = dynamic_cast< firstModel* >(baseCarPtr); cout << "==============================================" << endl; cout << "Assertion from baseCar downcast to firstModel" << endl; cout << "Accessing both virtual and non-virtual methods" << endl; cout << "==============================================" << endl; anotherFirstModel->WhoAreYou(); anotherFirstModel->WhatIsYourHistory(); cout << "==============================================" << endl; // The following conversion is not permitted // because base2 does not point to derivedLast object //secondModel* anotherSecondModel = dynamic_cast< //secondModel*>(baseCarPtr); // The following conversion is permitted, but we cannot execute the // methods of baseCarPtr using the vPtr. The vPtr should be // converted back // to a firstModel or baseCare ptr, in order to make method calls. void* vPtr = dynamic_cast< void* >(baseCarPtr); return EXIT_SUCCESS; }
When the dynamic_cast operation succeeds, then it returns a valid pointer of the requested data type; however, if it fails, the null pointer (of zero value) is returned in case of a pointer cast. On the other hand, if dynamic_cast fails in case of a reference cast, it throws an exception. Either way, we will come to know whether the casting succeeded or not. As mentioned earlier, this type of casting relies on the Run Time Type Information (RTTI) of the objects. When the program in this listing is compiled using the bc++ compiler and executed at the shell prompt, the output obtained is similar to the one shown in Figure 5.4.
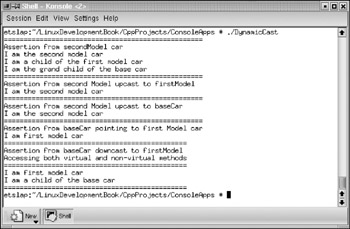
Figure 5.4: Output of the console application demonstrating dynamic_cast operator.
static_cast
Unlike the dynamic_cast operator, the static_cast operator is used in casting with the non-polymorphic data types, for example, with the intrinsic data types char, int, and so on. The static_cast operator relies on the types provided in the expression and on the programmer to ensure safe conversion, and therefore does not perform runtime type checking. For this reason, the static_cast operator may be used with caution in place of dynamic_cast operator, if we are sure that the conversion is going to succeed. If the conversion fails, it will return as if nothing went wrong. This is not a desirable situation as the pointer obtained from such unsafe conversion does not point to the appropriate object, and therefore would ultimately result in access violations. The syntax of using this operator is given here.
static_cast< T >(expression);
const_cast
In C++, identifiers (typically variables and objects) qualified with the const reserved word are known to contain constant values, and the program cannot change the values of such variables or objects. The const_cast type conversion is performed on such variables or objects to add or remove the const-ness. This means, that identifiers declared as const type will be converted to have the const modifiers removed; those that are not declared as const can have the const modifier added. The syntax of using this operator is given here.
const_cast< T >(argument);
In the expression, the type T and the argument must be of the same data type, with the only exception being the reserved word const; if one has the const modifier, the other does not. The return value of this expression is of the requested type T.
// sample code showing how to use the const_cast operator void sampleFunction() { // first example; const int is converted to int. const int p = 25; int q = const_cast< int >(p); // second example; int is converted to const int. int m = 20; const int n = const_cast< const int >(m); } The const_cast operator can also be used on the identifiers qualified with the volatile modifier, in a similar context like the const identifiers. Identifiers qualified as volatile are changeable by a background routine, an interrupt routine, or an I/O port. Declaring an identifier to be volatile warns the compiler that its value could change at any moment and thus prevents the compiler from making it a register variable.
reinterpret_cast
The reinterpret_cast conversion is inherently unsafe as it can convert a pointer to any data type to a pointer to any (other) data type. This type of casting is used only for simple bit-level interpretation of data held by any identifier or object. Therefore, when using a pointer obtained through this type of conversion, one should not attempt to access the object or identifier directly. Data read through a pointer obtained through this type of conversion should only be used to reinterpret the data in a different way. The syntax of using this operator is given here.
reinterpret_cast< T >(argument);
As learned from this subsection, different types of casting operators are designed for different purposes, and as long as they are used for the appropriate purpose in the appropriate context, casting is a very useful phenomenon of the C++ language. Every object-oriented language provides casting in one way or another.
Borland’s Keyword Extensions
Borland Kylix comes with a high performance C++ compiler and the CLX component library. The CLX component library provides common components for both the Delphi and C++ platforms. The component design is based on the Delphi object model and extended to the C++ environment. Although both the languages are object-oriented by design, due to the inherent differences between the languages, some of the concepts of the CLX library cannot be exposed in the C++ environment without some language extensions. For this reason Borland made some keyword extensions to the Kylix implementation of C++, as discussed below.
__classid
The __classid operator is used to obtain the metaclass from the class. Internally, this operator is used by the compiler to generate a pointer to the vtable for the specified class name. The general syntax of using this operator is provided here.
__classid(ClassName)
The return value of this expression is an instance of TMetaClass, which permits users to perform operations on the class type rather than on the instances (or objects) of the class. One obvious use of this operator is when registering custom-built components with the component palette of the IDE.
__closure
Standard C++ permits us to assign an object of a derived class to the corresponding base class pointer. We can also access the member functions of the derived class through the base class pointer if those member functions are defined as virtual in the base class. But it is not usually possible to assign a derived class member function to a base class member function pointer. The __closure keyword extension may facilitate this when it is used in the function pointer declaration. In other words, a function pointer declaration with the __closure keyword declares a generic function pointer with a specific signature (i.e., a set of input parameter types in a specific order and a specific return value type). A member function that has the same signature (i.e., which accepts the same set of input parameter types in the same order and having the same return value type) as the function declared with __closure keyword prefix, and belongs to any object (base or derived) can be assigned to the function pointer with the __closure prefix. It needs to be remembered that the assignment is to an object instance’s member function and not to the class member function. Then the closure function may be executed by its name and by providing the necessary input parameters. The return value may be assigned to a variable or object of appropriate type. Listing 5.16 shows a console application to demonstrate the use of the __closure keyword extension. This listing is available on the accompanying CD-ROM.
Listing 5.16: ClosureDemo.cpp
// This program is used to demonstrate the use of // the __closure keyword extension. #include <clx.h> #include <iostream> #pragma hdrstop using std::cout; using std::endl; #pragma argsused class baseClass { int baseValue; public: baseClass(); void getBaseValue(); void setBaseValue(int value); }; baseClass::baseClass(){ cout << "In base class constructor " << endl; } void baseClass::getBaseValue() { cout << "In base class getBaseValue method " << endl; } void baseClass::setBaseValue(int value) { baseValue = value; cout << "In base class setBaseValue method " << endl; } class derivedClass : public baseClass { int derivedValue; public: derivedClass(); // constructor void getDerivedValue(); void setDerivedValue(int value); }; derivedClass::derivedClass() { cout << "In derived class constructor " << endl; } void derivedClass::getDerivedValue() { cout << "In derived class getDerivedValue method " << endl; } void derivedClass::setDerivedValue(int value) { derivedValue = value; cout << "In derived class setDerivedValue method " << endl; } int main(int argc, char* argv[]) { void (__closure *closureFunction1)(int); void (__closure *closureFunction2)(void); baseClass* mybaseObject = new baseClass(); derivedClass* derivedObject = new derivedClass(); closureFunction1 = mybaseObject->setBaseValue; closureFunction2 = derivedObject->getDerivedValue; closureFunction1(4); closureFunction2(); return EXIT_SUCCESS; }
When the program is compiled using the bc++ compiler, and executed at the shell prompt, the output is similar to the one shown in Figure 5.5.
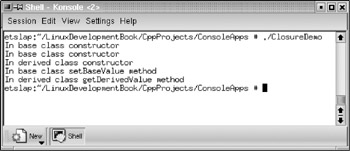
Figure 5.5: Output of the console application demonstrating __closure keyword extension.
__property
As mentioned earlier, the Kylix development environment comes with a very robust component framework, in addition to providing a powerful C++ compiler. The component framework is common to the Delphi and C++ languages and will be the main topic of discussion in Chapter 6. However, it is expected that such a framework should support the concept of exposing the object’s behavior through properties. This concept is implemented by the newer object-oriented languages such as Java, whereas the same result is achieved by Borland in the component framework with the introduction of a couple of keyword extensions. The new keyword extension __property is used to declare an attribute of a class through public member methods. The attributes declared through the __property keyword completely control the access to the corresponding properties, and so there are no restrictions on how to implement the properties within a class. In simple terms, for every property there could be a read method to get the value of the property and a write method to set the value of the property. More details about properties and their uses will be discussed in Chapter 6 while addressing the CLX component development.
__published
Earlier in the chapter, the published access specifier is mentioned to identify those properties of the object that are to be made available in the Kylix IDE during design time. The published access specifier is built in to the Delphi language itself. However, C++ language doesn’t have any such specifier, and therefore Borland introduced the __published keyword extension to the standard C++ language as an equivalent of the published access specifier in Delphi. Properties of CLX components declared within the __published section will be made available in the Kylix IDE during design time through the Object Inspector, for the benefit of the programmer. However, the published properties (along with the unpublished ones) can be accessed during runtime. The published members follow the same visibility rules as the public members of a class. Internally, the Delphi-style runtime type information (RTTI) is generated for data members and properties declared in the __published section. RTTI enables an application to dynamically query the data members, member functions, and properties of an otherwise unknown class type. Constructors and destructors cannot be published. However, properties, Delphi intrinsic data types, CLX-derived data members, member functions, and closures are allowed in a __published section. The property type defined in a published section must be one of several types, such as an ordinal type, a real type, a string type, a set type, a class type, or a method pointer type.
__declspec
The __declspec keyword is used with special arguments to provide C++ language support for the CLX component library. Macros for these __declspec arguments are defined in the sysmac.h header file, which is located in the \include\vcl\ directory under the Kylix3 home directory. When it is necessary to use them, they are used through the macros. These arguments, their purpose, and the corresponding macros are explained in Table 5.3 below.
| __declspec Argument | Description |
|---|---|
| __declspec(delphiclass) | Used for declarations for classes derived from TObject. These classes will be created with compatibility for (a) Delphi-compatible RTTI, (b) CLX-compatible constructor-destructor behavior, (c) CLX-compatible exception handling. Any class declaration that has been translated from Delphi to C++ should have this modifier for the compiler to know that the class is derived from CLX component framework. This also means that the class was implemented as Delphi source file and only a class declaration is provided in the header file. This declaration is identified by the macro RTL_DELPHICLASS in the sysmac.h header file. There are some restrictions that the CLX compatible C++ classes should follow, which are (a) no virtual base classes are allowed, (b) multiple inheritance is not allowed, except that they can implement CLX-style interfaces, (c) objects of CLX-style C++ classes must be instantiated dynamically on the heap using the global new operator, (d) copy constructors and assignment operators are not compiler-generated for CLX-style C++ classes; rather they should be explicitly implemented, and (e) they must have destructors. |
| __declspec(delphireturn) | It is used internally by CLX component framework in the C++ IDE for declaration of classes that were created in the C++ IDE to support Object Pascal’s built-in data types and language constructs because they do not have a native C++ type. These include Currency, AnsiString, Variant, TdateTime, and Set. This argument identifies C++ classes for CLX-compatible handling in function calls as parameters and return values. This modifier is needed when passing a structure by value to a function between Object Pascal and C++. This declaration is identified by the macro RTL_DELPHIRETURN in the sysmac.h header file. |
| __declspec(delphirtti) | This argument causes the compiler to include runtime type information in a class when it is compiled. When this argument is used, the compiler generates runtime type information for all the fields, methods and properties that are declared in the __published section. For interfaces, the compiler generates the runtime type information for all the methods. If a class is compiled with runtime type information, all its descendants also include the runtime type information. Because the class TPersistent is compiled with runtime type information, it means that there is no need to include this argument to compile any classes that have TPersistent as an ancestor. This declaration is identified by the macro DECLSPEC_DRTTI in the sysmac.h header file. |
| __declspec(dynamic) | This argument is used for declaration of dynamic functions. Dynamic functions are similar to virtual functions except that they are stored in the vtables for the objects that define them, not in the descendant object’s vtables. If a dynamic function is called and that function is not defined in the object, the vtables of its ancestors are searched until the function is found. Dynamic functions are valid only for classes derived from TObject. This declaration is identified by the macro DYNAMIC in the sysmac.h header file. |
| __declspec(hidesbase) | This argument preserves the Object Pascal program semantics when porting Object Pascal virtual and override functions to CLX C++. In Object Pascal, virtual functions in the base class can appear in the derived class as a function of the same name, but as a completely new function, without any explicit relation to the earlier one. This declaration is identified by the macro HIDESBASE. The Delphi compiler generates this function with the HIDESBASE qualifier. If such a qualifier is not specified by the Delphi compiler, the C++ compiler would have to interpret that the derived class overrides the function implementation of the base class. |
| __declspec(package) | This argument indicates the code defining the class can be compiled in a package. The compiler automatically generates this modifier when the packages are created in the Kylix3 IDE. This declaration is identified by the macro PACKAGE in the sysmac.h header file. |
| __declspec(pascalimple mentation) | This argument indicates that the code defining the class was implemented in Object Pascal. This modifier appears in the Object Pascal portability header file for Kylix C++. The portability header file will have the file extension .hpp. |
Apart from the macros for the basic arguments as described above, macros for combinations of basic arguments are also defined in the sysmac.h header file. They are listed below in Table 5.4.
| __declspec Argument | Macro |
|---|---|
| __declspec(pascalimplementation, package) | PASCALIMPLEMENTATION |
| __declspec(delphireturn, package) | DELPHIRETURN |
| __declspec(delphiclass, package) | DELHICLASS |
| __declspec(hidesbase, dynamic) | HIDESBASEDYNAMIC |
__interface
Most of the time, we have to inherit the behavior of multiple-base classes to a derived class while programming in a true object-oriented environment that is implicitly supported by the C++ language. However, when developing applications in CLX C++, as noted before, we are not permitted to derive a class from multiple-base classes. However, some object-oriented languages such as Delphi and Java support this requirement through the interface construct, which is not supported by the standard C++ language specification. Apart from supporting multiple inheritance for the ANSI-compliant applications, CLX C++ extends the concept of interfaces to the CLX-based applications through the __interface keyword. The __interface keyword is a macro definition that maps to the class keyword. While programming in CLX Delphi, a class can be derived from one base class and can implement any number of interfaces. In short, the concept of interfaces in CLX Delphi takes the role of additional base classes in a C++ program.
The Delphi interfaces contain all pure virtual methods with no implementation and no data members. By following certain conventions as outlined here, we can make a class in CLX C++ behave just like a CLX Delphi interface construct.
All the method signatures of the class should be declared as pure virtual methods and not contain any data members, as it is the fundamental requirement for a class to behave like an interface. The __interface keyword should be used in place of the class keyword. By doing this, we are only trying to simulate the definition of an interface without violating the rules of the language. The name of the interface should be started with the letter I, as in ISampleInterface. This notation helps us a great deal by hinting that a particular declaration refers to an interface or a class. This notation is only for convenience but does not have to be followed. It is also recommended to assign a globally unique identifier to an interface, as most of the code that works with interfaces expects to see the interface definition with such a globally unique identifier. The CLX Delphi interface IInterface is also available in CLX C++. Therefore, deriving a class (or another interface) from the IInterface interface provides the default basic interface management routines, such as those needed for querying another interface and for object lifetime management.
As interfaces enjoy intrinsic support from CLX Delphi, the Object Pascal compiler automatically handles the interface-related tasks when working with interfaces in CLX Delphi. However, the CLX C++ provides a template class by name DelphiInterface to give the same result. This template class has a constructor, copy constructor, assignment operator, and destructor in order to implement the reference count manipulation. In addition to these, there are other operators provided by this template class to access the underlying interface pointer, which do not perform the reference counting; while using these operator methods, the object lifetime management methods must be explicitly called. Therefore, it is very useful to define a class of DelphiInterface to make it convenient to work with the interfaces.
As mentioned earlier, although traditional ANSI C++ compatible applications can easily be built with Kylix C++, while building CLX applications, we should refrain from attempting to inherit a derived class from multiple-base classes; rather, the same result can be achieved by inheriting from one base class and implementing one or more interfaces (or interface-style classes).
C++ Object Construction Sequence in Kylix
When a class is a member in a class hierarchy, it is important that we understand the object construction sequence. It should always be remembered that Kylix C++ has two flavors of C++ implementation built into the same product: the standard ANSI-compliant style C++ and the CLX style. This dual nature of Kylix C++ can be attributed to the fact that the CLX component libraries originated from Object Pascal as the base language of implementation. Both the Object Pascal and C++ languages differ in the way and in what sequence they construct the members in a class hierarchy, when a class in the hierarchy is instantiated.
In a standard ANSI-compliant C++ program, when an object of a derived class is instantiated, the order in which the objects are created starts from the (first) virtual base class from where the class hierarchy originates, next moves to the base classes in the order in which they exist in the class hierarchy, and finally creates the derived class object. The C++ syntax uses the constructor initialization list to call the base class constructors. At any point of time, the runtime type of the object is that of the class that is being constructed. Therefore, the runtime type of the object changes dynamically as the object construction process progresses. For example, if the class hierarchy starts with the class A, which is inherited by class B, and finally class C is inherited from class B, then the object construction sequence is A, B, and C.
In an Object Pascal class hierarchy, only the constructor of the final derived object (or the class that is being instantiated) is guaranteed to be called, though memory is allocated for each of the base classes. The immediate base class constructor is called only by explicitly using the inherited keyword in the constructor of the subsequent derived class. However, to make sure that all the base classes are constructed in the CLX architecture, the classes in these component libraries make it a convention to explicitly use the inherited keyword in the derived class constructor to call the non-empty constructors of the immediate ancestor class, although it is not a requirement imposed by the Object Pascal language. In this scenario, the runtime type of the object is established as that of the class that is being instantiated and will not change as the constructors of the base classes are executed. This is a notable difference between C++ and Object Pascal language styles.
Based on the discussion on how the C++ and Object Pascal instantiate the constructors, the object construction sequence in a typical CLX-based application in Kylix C++ is a mix of both the concepts, as explained here. When we build our application in Kylix CLX C++, the program is written in the C++ language and is going to be compiled by the C++ compiler underlying the Kylix C++ product; but the base classes that are ancestors to the C++ class are libraries written, compiled, and packaged in Object Pascal style. Thus, the C++ interfaces are header files containing class definitions and method signatures translated to C++ style.
Now we’ll see what happens when the C++ compiler takes charge of our derived C++ class (or classes). Because the program is compiled by the C++ compiler, the compiler tries to construct the base classes first, as per C++ language semantics and rules, followed by the derived classes. As the base classes (of CLX component library) are in Object Pascal, the object construction sequence is opposite to the C++ style, which means the last (base) class in the CLX hierarchy is first constructed and the sequence moves backwards until it reaches TObject, which is the first CLX class in the component library. After TObject is constructed, the attention is moved toward the set of C++ classes as per the sequence in the hierarchy, which means the first base C++ class is constructed first (after the TObject construction) and the sequence moves forwards until it reaches the final derived class in the hierarchy, which is the leaf class. The runtime type of the object is established (in Object Pascal style), as that of the instantiated class, and will not change through the object construction process. Listing 5.17 shows sample code that illustrates the runtime type of the object, with the help of virtual functions being called from the constructor, for both standard C++ style and CLX style classes. This listing is available on the accompanying CD-ROM.
Listing 5.17: ObjectConstructionSequence.cpp
#include <clx.h> #include <iostream> #pragma hdrstop using std::cout; using std::endl; #pragma argsused // standard C++ style base class and derived class class BaseComputer { public: BaseComputer() { DisplayMessage(); }; virtual void DisplayMessage() { cout << "C++ style - Base Computer" << endl;}; }; class Intel : public BaseComputer { public: Intel() { DisplayMessage(); }; void DisplayMessage() { cout << "C++ style - Intel Computer" << endl;}; }; // CLX C++ style base class and derived class class CLXBaseComputer : public TObject { public: CLXBaseComputer() { DisplayMessage(); }; virtual void DisplayMessage() { cout << "CLX style - Base Computer" << endl;}; }; class CLXAmd : public CLXBaseComputer { public: CLXAmd() { DisplayMessage(); }; void DisplayMessage() { cout << "CLX style - Amd Computer" << endl;}; }; int main() { Intel* intel = new Intel(); CLXAmd* Amd = new CLXAmd(); delete Amd; delete intel; return EXIT_SUCCESS; } When the program is compiled and executed, the output displayed in the console window is similar to Figure 5.6.
From the figure, it can be noticed that while constructing the simple C++ objects, the runtime type of the object is changing dynamically; it starts from the base class and continues forward to the (final) derived class. On the other hand, while constructing the CLX style classes, the runtime type of the object is always the final class being constructed, as in Delphi.
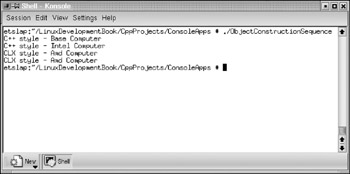
Figure 5.6: Output of the console application demonstrating object construction sequence.
|
| < Day Day Up > |
|
EAN: 2147483647
Pages: 86