Simple Administration and Monitoring
|
| < Day Day Up > |
|
If you are the sole owner (or user) of your Linux system (which is true most of the time), you should be familiar with some, if not all, of the administrative tasks. However, in any event, it is recommended that you be familiar with all the administrative tasks on your Linux system (just as you are on your own Windows NT/2000/XP system). This section will introduce you to some of the most common administrative tasks.
Maintain User Accounts and Groups
The root account is automatically established by the system during installation. In addition, the installation process also establishes some other default accounts to enable execution of certain specific processes. Most of the software is usually installed by root, although some software demands that you should install with a non-root account or an account directed by the specific vendor software. As an example, when you install Oracle Database Management System on Linux, you need to use a non-root account (which is oracle by default).
You may create additional user accounts either during the installation or at a later time. The user accounts are stored in the /etc/passwd file, and the group definitions are stored in the /etc/group file. The /etc directory is very important for the proper operation of the system, and hence only the root account is permitted write- and execute-level access to files and subdirectories under this directory. Other users may be permitted to view the contents.
A user account can be created by the useradd command at the command line, as preferred by most UNIX-based professionals. Similarly, the groupadd command may be used to add new groups. But today’s popular desktops are equipped with appropriate tools that also let you add users and groups. Every time a user is added (either in command mode or using graphical tools), a line is added to the /etc/passwd file, and every time a new group is added, a new line is added to the /etc/group file. A user account is identified by a numerical id, the user account name (a string of characters without spaces), the encrypted password, the primary group to which the user belongs, the real name of the user, and the default shell for the user login session. A group account is identified by a numerical group id, group account name (a string of characters without spaces), and the list of users associated with the group.
In Red Hat Linux 8.0/9.0, you can invoke the graphical tool by clicking the red hat (startup) icon and selecting System Settings ® Users and Groups. The displayed window looks like Figure 2.14. In SuSE Linux 8.1/8.2, the YaST2 tool provides separate screens to maintain users and groups. The YaST2 application on the SuSE Linux 8.1/8.2 provides screens for many of the administrative tasks. Please note that the administrative tools are not part of the KDE or GNOME desktop environment and are mostly specific to the Linux distribution such as Red Hat, SuSE, Mandrake, and so on. This is one area where each of the individual vendors may try to supersede the others in providing eye-catching tools.

Figure 2.14: Red Hat User Manager.
Monitor Running Processes
Every time a command is executed, a new process is started by the kernel. For commands that run for a very short duration, the process life is also short, but some processes might be running for a longer duration, and we can check the process status at any point of time by choosing the menu option System Tools ® System Monitor in the Red Hat system. The displayed window looks like Figure 2.15.
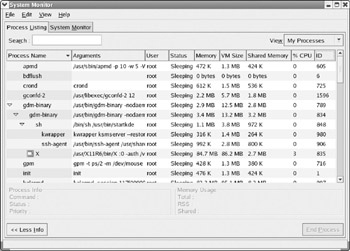
Figure 2.15: Red Hat System (Process) Monitor.
The first tab in the page, titled Process Listing, displays processes owned by you (identified as My Processes), or all processes, or those that are currently active, as you choose from the View menu toward the top right corner. You may configure the details that you wish to see in the list by choosing Edit ® Preferences. The second tab in the screen titled System Monitor, displays the CPU usage pattern and memory usage pattern. Toward the bottom of the second tab, you can also see the current usage of the different file systems mounted in the current boot session. Windows users can recognize that this is very similar to the Windows Task Manager that is displayed when you click CTRL + ALT + DEL, and then click the Task Manager button in the displayed dialog.
View System Log Files
The system maintains log files for different activities. These include the boot log file, which contains messages displayed during the boot process, the log file generated by the system task scheduler program cron, the log file generated by the FTP (File Transfer Protocol) server, and so on. These log files may be viewed through a system log viewer program, which is invoked by selecting System Tools ® System Logs option from the Startup menu. The displayed window looks like Figure 2.16. You can also see the list of packages installed within your Linux system.
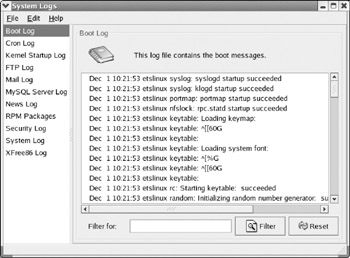
Figure 2.16: Red Hat System Log file viewer.
Configure Services and Run-Levels
Specific services are provided by different server applications. The server applications are usually called daemons in Linux/UNIX environment. This is the reason these programs are named with a trailing ‘d’, such as httpd for the HTTP server daemon, ftpd for the FTP server daemon, and so on. Earlier in this chapter, we learned that different run levels are used to setup different sets of processes to be run while booting. The service configuration dialog invoked by the Startup menu option Server ® Settings may be used to do this, as shown in Figure 2.17. The dialog may be used to configure services for different run levels.
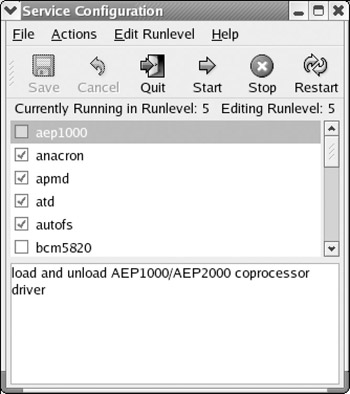
Figure 2.17: Red Hat system Service Configuration dialog.
The Hardware Browser
The hardware devices installed/attached to your system can be viewed from the Hardware Browser window, which is invoked by selecting the Startup menu option System Tools ® Hardware Browser. The window displays what hardware devices are installed, such as the floppy drive, CD/CD-R/CD-RW/DVD drive, the hard disks, sound card, video card, network adapter, and so on. Figure 2.18 displays the Hardware Browser window in the Red Hat Linux 8.0/9.0 system.
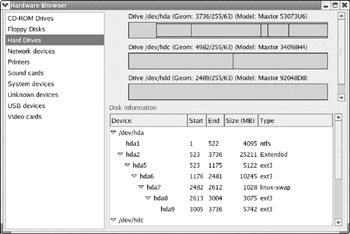
Figure 2.18: Red Hat system Hardware Browser window.
The Disk Manager
The Disk Manager is another useful administrative tool. It can be used to view the disk partitions and their mount points on the Linux system. You can format a particular partition and edit the mount point if desired. Figure 2.19 displays this window. The program is invoked by selecting the startup menu option System Tools ® Disk Manager.
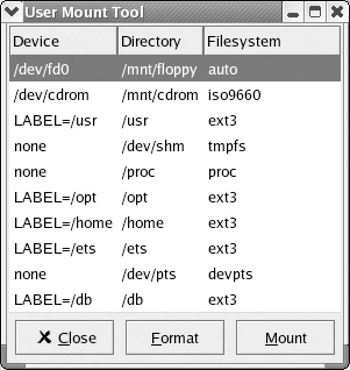
Figure 2.19: Red Hat system Disk Manager window.
Internet Connection Wizard
Usually during the installation, you will get the opportunity to set up your network card configuration and Internet connection settings. However, you can always change these settings after the installation. The Internet Connection Wizard is invoked by selecting the Startup menu option System Tools ® Internet Connection Wizard, and the window displayed looks like Figure 2.20. For simplicity, the different screens displayed by this wizard are not presented here. But, as you notice from the figure, you can choose the type of network connection (such as Ethernet connection, ISDN connection, Modem connection, DSL connection, Wireless connection, and so on); accordingly, subsequent windows will be displayed, and you will be given the opportunity to enter the necessary configuration information.
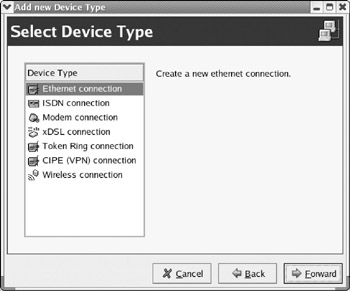
Figure 2.20: Red Hat system Internet Connection Wizard.
The Task Scheduler
UNIX-based developers are usually aware of the cron task scheduler. As mentioned earlier, the cron service is also a daemon identified by the crond program. Jobs to be run on specific days and specific times are setup using the crontab configuration. It is a file that stores the job scheduling information such as the program or process script to be run, the days (of week or month) it should be run, the time of day it should be run, and so on. Usually on a typical UNIX system, these are manually edited using crontab. On the Linux system, we can set these manually as we do on a UNIX system, or we can use the graphical Task Scheduler utility provided in Red Hat Linux 8.0/9.0. This tool is invoked by selecting Startup menu option System Tools ® Task Scheduler. The screen displayed looks like Figure 2.21. In the opening window, the list of all the users defined in the system is displayed along with the jobs scheduled by them. You can select the Tasks subitem for a user, and choose the Edit menu item. Then you will be presented with another window, as shown in Figure 2.22, where you can enter the job scheduling information and click the OK button to accept the details. As you notice from these screens, task scheduling is very simple in the Linux system.
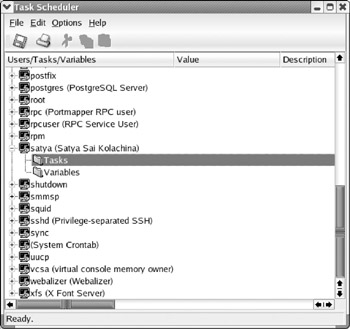
Figure 2.21: Red Hat system Task Scheduler main window.
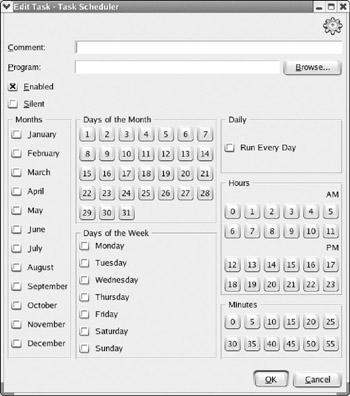
Figure 2.22: Red Hat system Task Scheduler Edit Task window.
In this section, we have discussed a few administrative tools that are useful for performing simple day-to-day administrative tasks. In fact, the Linux system also comes with a number of such tools that are not discussed here due to space constraints.
Check Free Disk Space
Often, you need to know the available free disk space on any partition (or file system). You can find this out using the standard command-line program df. If you do not give any options, the output lists in terms of blocks (number of blocks remaining, number of blocks used, and so on), as shown here.
[root@etslinux root] df
The output looks like this:
Filesystem 1K-blocks Used Available Use% Mounted on /dev/hda1 6198404 520608 5362924 9% / /dev/hda4 4767460 3312288 1212996 74% /opt /dev/hda3 7224600 1780460 5077056 26% /usr shmfs 257572 0 257572 0% /dev/shm
If you provide the option -h (for human-readable form), the output is displayed in terms of megabytes and gigabytes, as shown here.
[root@etslinux root] df -h
The output looks like:
Filesystem Size Used Avail Use% Mounted on /dev/hda1 6.0G 509M 5.2G 9% / /dev/hda4 4.6G 3.2G 1.2G 74% /opt /dev/hda3 6.9G 1.7G 4.9G 26% /usr shmfs 252M 0 252M 0% /dev/shm
However, there is a KDE application kdf, which displays the information graphically, as shown in Figure 2.23. The program may be invoked by typing ‘kdf’ at the command line or selecting the appropriate menu option from the startup menu. The screenshot shown is taken in SuSE Linux 8.1 desktop, and hence looks different from the Red Hat Linux 8.0/9.0 screenshots. As mentioned earlier, Red Hat implemented a new desktop theme named Blue Curve from its Linux 8.0 release, by which they are able to make both the GNOME and KDE desktops look very similar. A desktop theme is a configuration setting that you can use (along with a style) to change the look and feel of the graphical windows and other graphical elements.
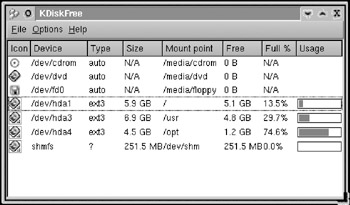
Figure 2.23: KDiskFree Window.
On the other hand, SuSE Linux preserves the individual look and feel of both the GNOME and KDE desktops. There are different themes available on both these desktop systems. However, when you use SuSE Linux, you will see a noticeable difference in the look and feel of the two desktops, while in Red Hat 8.0 and 9.0 you will not notice much difference. A particular application such as kdf (of specific version) provides the same functionality without regard to whether you are using Red Hat Linux, SuSE Linux, or another one; the look and feel may be different as it is dependent on the desktop theme.
Viewing Contents of Zipped Files
Another useful graphical utility developed on the GNOME desktop is file-roller, which is very similar to the WinZip program on the Windows operating system. The file-roller utility is used to open archive files of different formats, including the standard UNIX/Linux-based tar format, compressed tar files of tar.gz type, Java-based jar format, and the WinZip-based zip format, among others. You can also create archive files using this utility. The utility may be invoked by typing ‘file-roller’ at the command line or by selecting the appropriate menu option from the Startup menu in either of the Linux (Red Hat or SuSE) systems. The graphical window looks similar to Figure 2.24.
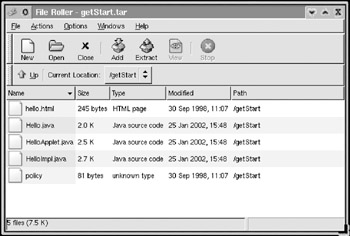
Figure 2.24: GNOME-based File Roller window.
|
| < Day Day Up > |
|
EAN: 2147483647
Pages: 86