Using the Microsoft Backup Program
|
|
Using the built-in Backup program is the officially recommended method of backing up Windows registry. The Backup version supplied with Windows NT 4.0 required a Windows NT-compatible tape device to be installed in the local system, which represented one of the most serious shortcomings of this utility. Furthermore, the list of supported tape devices that could be used with Windows NT Backup in Windows NT 4.0 is also quite limited. Moreover, this utility doesn't allow you to perform registry backup of remote systems, even if the user attempting to perform this operation has all the required access rights to the remote system.
The Backup version included with Windows 2000 has improved and extended functionality, including support for various types of backup media. This allows the user to back up information using any media supported by the operating system, including floppy disks, hard disks, floptical media, or other supported devices besides streamers. Windows XP and Windows Server 2003, in turn, provide several new technological improvements and enhancements.
| Note | Starting with Windows XP, Microsoft has introduced volume snapshots, a technology that provides a copy of the original volume at the instant a snapshot is taken. A snapshot of the volume is taken at the time a backup is initiated. Data are then backed up from the snapshot rather than from the original volume. The original volume continues to change as the process goes on, but the snapshot of the volume remains constant. This is helpful if users need access to files while a backup is taking place, since it significantly reduces the time required to accomplish the backup procedure. Additionally, the backup application can back up files that are kept open. In previous versions of Backup, including the one supplied with Windows 2000, files open at the time of the backup were skipped. |
Besides working with the integrated Backup application, the Volume Shadow Copies function in Windows Server 2003 provides snapshots ("point in time copies") of files on network shares. To enable Volume Shadow Copies, right-click a drive or volume in Windows Explorer or My Computer, select the Properties command, and go to the Shadow Copies tab (Fig. 2.2). Select a volume from the Select a volume list, then click Enable and confirm your choice by clicking Yes in the Enable Shadow Copies window.
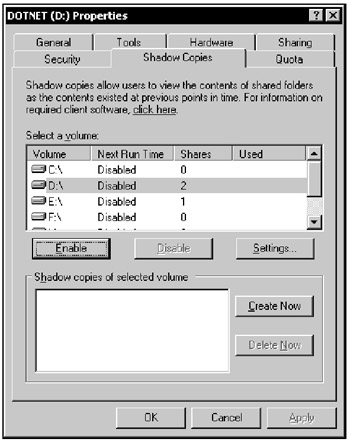
Figure 2.2: The Shadow Copies tab of the disk properties window
| Note | Volume Shadow Copies are enabled only in shared folders, since the feature is designed primarily for documents, which often happen to be accidentally deleted or overwritten with other versions. Besides this, it also provides you with version-checking capabilities while working with documents. However, the usage of this new feature also has some limitations:
|
Despite its convenience, the Volume Shadow Copies functionality is not a substitute for regular backups. To start the Backup utility in Windows XP and Windows Server 2003, select the All Programs | Accessories | System Tools | Backup commands from the Start menu. If you use this utility often (and you should do so), create a desktop shortcut for this program.
| Note | Like in all Windows NT-based systems, in order to backup and restore files, the user must be assigned appropriate privileges. For example, members of local Administrators or Backup Operators groups can back up and restore any files on a local computer. Users whose accounts don't belong to these groups must have at least read access permissions to the files that they need to back up. For computers participating in Windows 2000 or Windows Server 2003 domains, these abilities are greatly influenced by Group Policies. Detailed information on this topic will be provided in Chapters 9 and 10. |
Besides the traditional method of starting the Backup utility, you can also start it using the right-click menu. Open the Windows Explorer or My Computer window, right-click on the disk that you need to back up, and select the Properties command from the context menu. A tabbed window will open. Navigate to the Tools tab, click the Backup Now button in the Backup group, and the Backup or Restore Wizard window will open (Fig. 2.3). The Backup utility can run in two modes: the wizard mode (in which it starts by default) and advanced mode, recommended for power users. If you want to change the default settings, clear the Always start in wizard mode checkbox and select the Advanced Mode option. The Backup Utility window will appear, opened at the Welcome tab (Fig. 2.4).
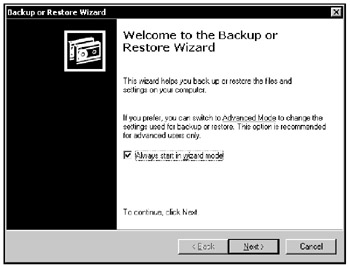
Figure 2.3: The Backup or Restore Wizard window
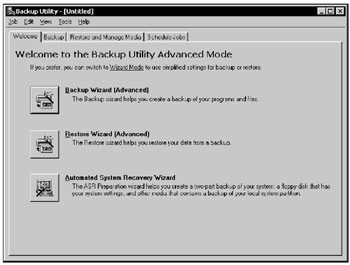
Figure 2.4: The Welcome tab of the Backup Utility window
| Note | Before proceeding with a backup operation, check the file system of the disk you need to backup. This is important, because you need to have a usable backup copy. Remember that the backup software (including the Backup tool supplied with Windows 2000, Windows XP, and products of the Windows Server 2003 family) can't recognize errors and inconsistencies in user data. Note that the method we just described provides a convenient way of performing this operation - you simply need to click the Check Now button on the same tab. You also need to consider the defragmentation software used to defragment your hard drives. Microsoft recommends that everyone use the built-in defragmentation software supplied with the operating system. If you're planning to use a third-party defragmentation utility, make sure that this software is compatible with Windows Server 2003 and holds the "designed for Windows" status. Detailed information on software tested for compatibility with Windows 2000/XP or Windows Server 2003 can be downloaded from http://www.microsoft.com. |
One of the most important goals of Windows XP and Windows Server 2003 development was to create an operating system, which would combine all the advantages of Windows 9x/ME with the traditional strong points of Windows NT/2000. Most of the attention was paid to tasks such as making the new operating system easy to use even for beginners, simplifying administrative tasks and making the system more reliable. Most tools and utilities were rewritten, and the Backup tool is no exception. Besides the traditional functionality of backing up and restoring data, the new version of this utility supplied with Windows XP and Windows Server 2003 includes a function for preparing the Automated System Recovery (ASR). Although Automated System Recovery (ASR) actually debuted in Windows XP, it is new to Windows Server platform. ASR lets you backup operating system, system state, and hardware configuration so that they can be recovered in case of a system emergency. Automated System Recovery is a two-part recovery system that allows you to restore the operating system states by using files saved to tape media and hard disk configuration information saved to a floppy disk.
| Note | Most experienced users will recall the ERD functionality that existed in Windows NT/2000. In earlier versions of Windows NT, there was a special Rdisk.exe utility used to perform this task. Windows 2000 combines the functionality of the Backup and Rdisk utilities, and in Windows XP/Windows Server 2003, as was already mentioned, ERD functionality was replaced by ASR. |
Preparing for Automated System Recovery
The easiest method of using the Backup program is with the special wizards, which are similar to all other programs of this type. These wizards display dialogs prompting users to select options and provide instructions on selecting the options. Normally, these windows contain the following three buttons: Back, Next, and Cancel. When the user clicks the Back button, a window appears, allowing the user to correct the data entered after completing the previous step. To open the next window, the user needs to click the Next button. To cancel the whole operation, the user needs to click the Cancel button. This method is the easiest one for novice users who have little or no experience of working with the system.
| Note | The materials provided in this section shouldn't be considered a complete description of the Backup program functionality, and in no circumstances should these materials be considered as a replacement for the user manual. This book is intended to describe the system registry. Because of this, this chapter provides only the most basic information related to using the Backup program for backing up and restoring the system registry. If you are interested in a detailed description of the Backup program or step-by-step instructions on performing typical tasks, you can find this information in the Backup Help system. Any user who intends to edit the registry should read this information very carefully. |
To prepare for Automated System Recovery, proceed as follows:
-
If your computer is equipped with a tape device, prepare the backup media. If this is not the case, you will have to perform the backup operation on the hard disk. Therefore, make sure that you have sufficient disk space. In any case, you'll also need a blank formatted diskette.
-
Click the Automated System Recovery Wizard button at the Welcome tab of the Backup Utility window or, alternatively, select the ASR wizard command from the Tools menu. Click the Next button in the first window of the ASR wizard.
-
In the next window, you need to select the backup-media type and specify the backup destination (Fig. 2.5). If your computer is equipped with a tape backup device, select this device from the Backup media or file name list. Notice that if there is no tape backup device in your system, the File option will be set by default in the Backup media type field. Enter the path to the backup media or file into the Backup media or file name field (backup files always have a default BKF filename extension) or click the Browse button to navigate through the file system.
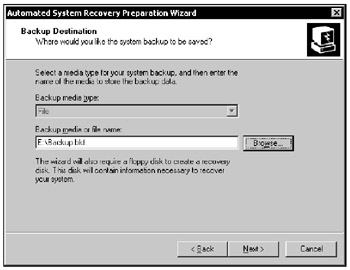
Figure 2.5: The ASR preparation wizard prompts you to specify the backup-media type and select the backup media or file name -
In the last window of the ASR preparation wizard, click the Finish button to start the backup process.
-
The Backup utility will scan your system and list files to save for an ASR backup. Next, it prompts you to provide backup media. Insert backup media when prompted by Backup and follow the directions on-screen. The wizard will display a series of messages such as: Mounting the media and Preparing to backup using a shadow copy. Then the Backup Progress window will appear (Fig. 2.6), reflecting the ASR backup progress.
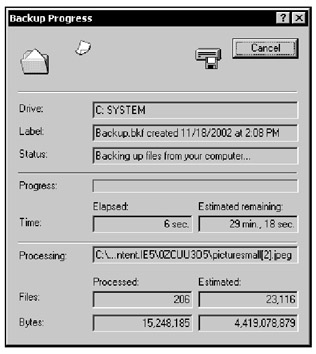
Figure 2.6: The Backup Progress window -
When the backup operation is completed, the ASR wizard prompts you to insert a blank floppy disk (Fig. 2.7), to which it saves hard disk configuration information, such as disk signatures, the partition table, volume data, the hardware configuration of your system and the list of files to be restored. No user data will be recorded to this diskette. If you run the ASR restore operation later, ASR Restore will configure disks using data saved to the ASR floppy disk.
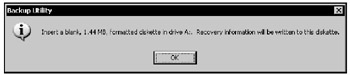
Figure 2.7: As the final step of the ASR backup procedure, the wizard prompts you to provide a blank formatted diskette to store the recovery information -
When the ASR backup wizard finishes creating the ASR diskette, it displays a message box with a message recommending you to label the diskette as the ASR recovery disk and store it in safe place. Click OK to close this message box. If you want to view a report on the results of the backup operation, click the Report button in the Backup progress window (Fig. 2.8).
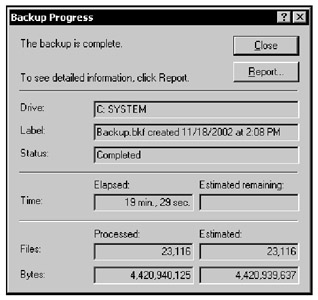
Figure 2.8: The Backup Progress window informs you about completion of the backup operation and allows you to view the report
Performing the Automated System Recovery
The process of restoring a damaged system using the ASR procedure relies on the Windows XP/Windows Server 2003 Setup program; therefore, besides your backup media and the most recent ASR floppy disk, you will also need the distribution CD. In fact, this process is very similar to an unattended setup of the operating system, since ASR will restore your disk configuration using the data saved to the ASR floppy, reformat your %Systemdrive% partition (the one where the Windows XP or Windows Server 2003 copy to be recovered is installed), and then reinstall Windows XP or Windows Server 2003 on that partition and restore the system files using the backup media.
| Note | ASR is not a replacement for regular backup procedures, since it doesn't eliminate the danger of data loss. Remember that ASR doesn't back up application files and user data. As has already been mentioned, it only formats the %Systemdrive% partition as part of the recovery process and doesn't restore personal data or application files that may reside on that drive. Therefore, if you store user-data files or install applications on the system partition, these data will be lost. Because of this, always consider other recovery options, such as Recovery Console, before using ASR. More detailed information about Recovery Console will be provided later in this chapter. |
To recover your system using ASR, proceed as follows:
-
Prepare everything that you'll need during the ASR restore process, including:
-
The most recent ASR floppy disk
-
The Windows XP or Windows Server 2003 distribution CD
-
The most recent ASR backup media set, typically removable media such as data-tape cartridges
-
-
Start the Setup program. Insert the distribution CD into your CD-ROM drive and reboot the computer.
-
Press any key to answer the Press any key to boot from the CD... prompt.
-
The Setup program will start. When you see the Press F2 to run Automated System Recovery (ASR) prompt, press the <F2> key to start the ASR restore process.
-
Insert an ASR floppy disk when prompted.
-
The Setup program will display the following message:
Preparing to ASR, press <ESC> to cancel
Note that at this stage you still have a chance to cancel the ASR by pressing the <ESC> key when prompted. This is important since, if you decide to continue, your %Systemdrive% partition will be formatted as a next step.
-
If you don't react to the message prompting you to cancel the ASR restore process, Setup will display a series of messages:
Setup is starting the ASR... Setup is loading files Setup is starting Windows
After that, the ASR process will reformat your %Systemdrive% partition and check other partitions that it may determine as requiring repair.
Note Besides formatting the %Systemdrive% partition, ASR might also initialize volumes that it determines to require repair. As has already been mentioned, it only restores operating system files. Therefore, there is also a risk to user files stored on these volumes.
-
When formatting and disk checks are completed, ASR will build a list of files to be copied and prompt you to insert your ASR backup media (typically one or more removable media, such as data-tape cartridges). If you saved the ASR backup to a file, you will not be prompted to insert the media.
| Note | You must use locally attached devices, because restoring from network shares is not an ASR option. Examples of locally attached devices include tape backup drives, removable disks, or other hard disks. Concerning other hard disks, bear in mind that ASR supports FAT16 volumes up to 2.1 GB (32K maximum cluster size) and does not support 4 GB FAT16 partitions (64K maximum cluster size). If you start the ASR using a 4 GB FAT16 partition, the process will stop at this point. If this is the case, first convert that partition from FAT16 to NTFS before using ASR. Furthermore, if you are using local hard disks to store ASR backup sets, never save ASR backup on the System or Boot partitions. The reason is very simple-remember that, at the first stage of the ASR-restore process, the disk will be repartitioned and the %Systemdrive% partition will be reformatted. Thus, your BKF file will be destroyed and, when it comes to the actual restore process, the ASR-restoration procedure will fail. |
Backing up and Restoring the System State Data
Besides other extended capabilities, the built-in Backup utility supplied with Windows XP and Windows Server 2003 allows the user to complete the procedure of backing up the whole set of system-configuration files-the so-called System State Data. As has already been mentioned, the registry is one of the most important system components, vital even at the early stages of the boot sequence. Because of this, the registry has to be included in this essential set of system files. However, there are some other files besides the registry that are included in the System State Data set. Let's take a look at these files.
The concept of System State Data was first introduced with Windows 2000. As you probably remember, in Windows NT 4.0 and earlier, built-in Backup programs can selectively back up and restore operating-system files, allowing for incremental backup and restore operations of most operating system files. Windows 2000/XP and the products belonging to Windows Server 2003 family, however, don't allow incremental backup and restoration of vitally important operating system files, which must be backed up and restored as a single entity. This is the first, and the most important, thing that you should know about System State Data.
The second interesting thing related to the System State Data is the fact that this set differs slightly for different platforms. The System State Data set defined for client workstations running Windows 2000 Professional and Windows XP Professional operating systems and for servers (running Windows 2000 Server or Window Server 2003) that are not joined to a domain includes the following files:
-
The registry
-
COM+ classes registration database
-
Boot files, which are necessary to boot the system
The System State Data set for server platforms joined to a domain contains the same components included in the System State Data set for Windows 2000/XP Professional, plus the following data:
-
The Certificate Services database, if the server is a certificate server.
-
The Active Directory database and the \SYSVOL directory, if the server is a domain controller.
-
All information required to restore the cluster, if the server runs the cluster service. This information includes the registry checkpoints and quorum resource log, containing information on the cluster database.
Since the registry is included in the System State Data set, the procedures of backing up and restoring the system-state data can be considered a method of backing up and restoring the system registry.
Backing up the System State Data
It is recommended that you perform the procedures of backing up the System State Data on a regular basis. The simplest method of performing this operation is using the Backup Wizard. There are two methods of starting the Backup Wizard: you can click the Backup Wizard button on the Welcome tab of the Backup program main window, or you can select the Backup Wizard command from the Tools menu. To back up the System State Data, select the Only back up the System State data option displayed in the second dialog (Fig. 2.9), then click Next, and follow the instructions provided by the wizard.
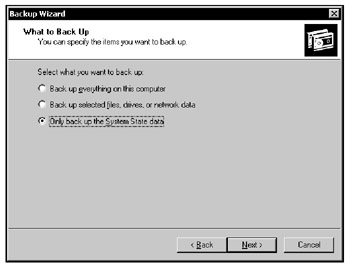
Figure 2.9: To backup the System State Data, set the Only back up the System State data in the second dialog displayed by the Backup Wizard
The same procedure can also be carried out manually. To perform manual backup of the System State Data, start the Backup program, go to the Backup tab, and select the System State option (Fig. 2.10). When the user selects the System State option, the right pane of the Backup window will display the list of files to be included in the backup. As was mentioned previously, the System State Data set will be different for workstations and server platforms. As has also already been mentioned, the Backup utility doesn't allow the user to select options from this list to perform a selective backup-the checkboxes beside all the right pane options are grayed. Microsoft provides an explanation for this by stating that all the components included in the System State Data set are interrelated.
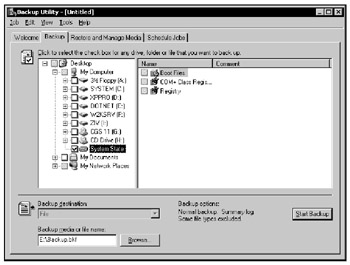
Figure 2.10: Set the System State checkbox to include the System State data in the backup
If you need to perform a backup operation, and your computer is equipped with a tape backup device, select this device from the Backup destination list. Otherwise, select the File option from this list. If your computer isn't equipped with a tape device, the File option will always be set by default.
If you need to back up data to a file, specify the file path in the Backup media or file name field, or click the Browse button to specify the path to the backup file. If you perform the backup to tape, select the tape to which you need to backup your data. To specify additional backup options, select the Options command from the Tools menu. To start the backup procedure, click the Start Backup button. The Backup Job Information window (Fig. 2.11) will open. Although you cannot perform a selective backup of the System State Data, you are still able to specify advanced backup options. To do so, click the Advanced button in the Backup Job Information window to open the Advanced Backup Options dialog (Fig. 2.12).
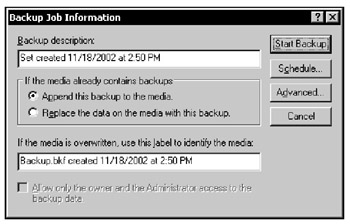
Figure 2.11: The Backup Job Information window
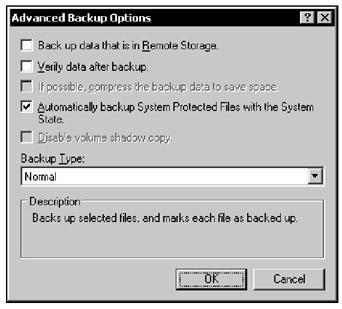
Figure 2.12: The Advanced Backup Options window
The advanced-backup options, along with their brief descriptions, are listed below:
-
Back up migrated Remote Storage data. If you select this option, the Backup utility will back up data that has been designated for Remote Storage.
Note You can restore Remote Storage data only to an NTFS volume that is used with Windows 2000, Windows XP, or any product of the Windows Server 2003 family. Also note that Remote Storage is available only on Server-based computers.
-
Verify data after backup. This option verifies that the backed up data are exactly the same as the original data. To ensure that you have a correct and usable backup copy, it is strongly recommended that you select this checkbox, despite the fact that this can substantially increase the time required to complete the backup procedure.
-
Use hardware compression, if available. This option is useful if you need to save more data on a tape. Hardware compression is only available for tape devices. Therefore, if it is grayed, you do not have a tape drive on your computer or your tape drive cannot compress data.
-
Automatically backup System Protected Files with the System State. Although you cannot change the components of the System State that are backed up, you can choose to include all system-protected files in the backup copy or to exclude them from the backup operation. By default, this option is enabled, but you can disable it by clearing this checkbox.
Note The system-protected files only change if you install a service pack or application, or upgrade your operating system. Typically, system-protected files represent a very large portion of System State data-the size of the default, including the protected files, is about 180 MB. Include these system-protected files only if new programs have been installed, otherwise a restore operation causes the new application to fail.
-
Disable volume shadow copy. This allows you to disable volume-snapshot technology. As mentioned earlier in this chapter, the volume-snapshot technology introduced with Windows XP allows the Backup application to run together with other applications and services. By default, Windows XP and Windows Server 2003 use free disk space on any NTFS volume to store the snapshot data until the backup is completed. The amount of disk space temporarily consumed depends on how much file data on the volume has changed during backup. Windows XP and Windows Server 2003 products use volume-snapshot technology by default, but you can disable it if you only want to back up a few files or directories.
Note If there is not sufficient disk space in your system for temporary storage of the snapshot data, Windows XP and Windows Server 2003 are unable to complete a volume snapshot, and Backup skips open files. Thus, you must provide sufficient disk space to create a snapshot of open files. Also note that you can't disable volume snapshot when backing up System State Data.
The following information should also be noted when backing up the System State Data:
-
To back up the System State Data, you need to login to the system as a user with administrative rights (Administrator or member of the Administrators group) or backup operator (member of the Backup operators user group).
-
The Backup utility will allow you to perform the System State Data backup only for a local system. You can't perform System State Data backup for remote systems.
-
To ensure that the system starts properly, it is strongly recommended that you also back up the Boot and System volumes.
Restoring the System State Data
The System State data backup will be very helpful if you need to reinstall the operating system if it didn't boot.
To restore the System State Data, call up the Backup utility, go to the Restore and Manage Media tab, and select the System State option from the list of available media items (Fig. 2.13). The Restore files to combobox allows you to select one of the following options:
-
Original location-the files will be restored to their original location.
-
Alternate location-the files from the backup copy will be restored to a specified alternative folder. This option allows you to preserve the original folder structure.
-
Single folder-the files from the backup copy will be restored to a specified alternative folder without preserving the original folder structure.
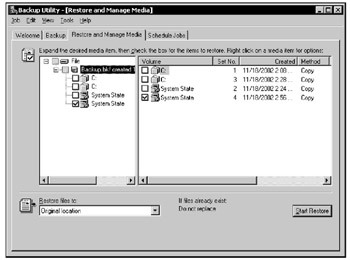
Figure 2.13: The Restore and Manage Media tab of the Backup window
Click the Start Restore button, and the Backup utility will restore the System State data using the options you have specified.
The Help system supplied with the Backup utility provides more detailed information on the System State Data, as well as step-by-step instructions on performing the backup and restore operations. All the limitations of the System State Data backup procedure are also applicable when performing the restore operation. These limitations are as follows:
-
To perform this operation, you need to have administrator or backup operator authorization for the local system.
-
Since all of the components of the System State Data set are interrelated, you can back up or restore this data only as a whole set.
-
You can restore the System State Data only in the local system.
| Note | If you don't specify an alternative folder when restoring the System State Data, the Backup utility will replace the current System State Data with the files restored from the backup copy. Note that, because all the components included in the System State Data set are interdependent, the Backup utility only allows backing up and restoring this data as a whole set. However, it is possible to restore the System State Data to an alternative folder. In this case, Backup will restore only the registry files, the files stored in the \SYSVOL directory, cluster database files, and boot files. Active Directory database, the certificate sever database, and COM+ information will not be restored. |
The following fact is important from a registry-backup point of view: when performing the System State Data backup, the system saves current copies of the registry files in the %SystemRoot%\repair folder. If the registry hives become corrupted, you can use these copies to restore the system without performing the procedure of restoring the System State Data. However, only advanced users should use this method.
|
|