12.2 Importing External Data
12.2 Importing External Data
This section deals with the Excel menu command DataGet External Data and the associated QueryTable object for executing database queries.
| Pointer | The QueryTable object can also be used for importing text files or HTML documents. These uses are described in Chapters 5 and 14. |
Importing Data from Databases (MS Query)
It sometimes happens that you are managing your data with a regular database program but you wish to analyze or process data with Excel. In this case the first step consists in importing the data into an Excel worksheet. To do this you execute the command DataGet External DataNew Database Query. A query wizard appears to help you with the importation.
| Remarks | To be precise, we are dealing here not with one of the many traditional Excel forms or wizards, but with a freestanding program with the name MS Query ( Msqry32.exe ).We are dealing also with a supplementary program to the Office suite, which is usually installed in the directory OfficeDirectory\Office . Alas, the program has never been famous for user -friendliness, and in comparison to the other Office components , the program's interface seems more antiquated than ever. |
Selecting a Data Source
The definition of a new query begins with selecting a so-called data source. (By a query is meant all parameters with the help of which MS Query creates a list ordered and filtered according to various criteria from a database.)
There are three possibilities for selecting a data source:
-
The usual case consists in simply naming a database. This can be done in two ways:
In simple cases ”for example, in dealing with an Access file ”you simply select this database type with a double click. Then a dialog appears in which you can select the name of the database file (see Figure 12-4).
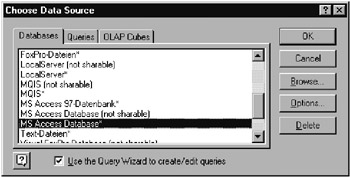
Figure 12-4: Selecting a data sourceOn the other hand, when the database is managed by a database server, you must define a new data source. For this you select the first entry of the listbox, <New Data Source>. A double click leads to a sequence of further dialogs, in which you declare the name of the data source, the driver for the database (for example, SQL server), and the connection information (name of the server, name of the database, password if required). As a result you obtain a new ODBC data source, which is then cited in the dialog Choose Data Source. The advantage of this elaborate process is that the connection data are saved as an ODBC data source and can be easily reused with additional queries. (If you wish to edit an existing data source, you simply carry it out in the control panel at the point Odbc Data.)
-
If you have already set up a query with MS Query and saved it in a *.dqy file, you can use this query file as the starting point for a new query.
-
A third option is the so-called OLAP cubes. This variant is of interest only in combination with pivot tables and therefore will be discussed in the next chapter (and there not in great detail).
Introductory Example: Product List
After a successful selection of a database file or data source, the next step consists in selecting the table or fields in a table from which you wish to read data. In the dialog are shown tables as well as predefined queries (Access) or so-called views (database server). Since this is somewhat confusing at the outset, you can use the Options button to restrict the selection to tables.
For our first example of the use of MS Query we would like to import into Excel a list of all Northwind products (consisting of product ID, name, and price). To this end the three fields ProductID , ProductName , and UnitPrice are selected from the table Products (Figure 12-5).
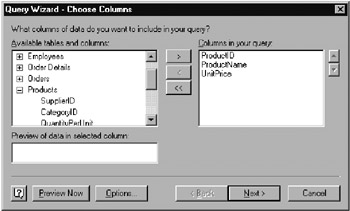
Figure 12-5: Selecting the table fields
The following two dialogs make it possible to filter the data (for example with UnitPrice<10 , to select only inexpensive products) and to sort them (for example, by product name). We shall not make use of these possibilities here.
In the final dialog (Figure 12-6) you have three possibilities: You can return the selected data to Excel, you can view the data in MS Query and there process the query further, or you can create an OLAP cube from the data (see the next chapter).
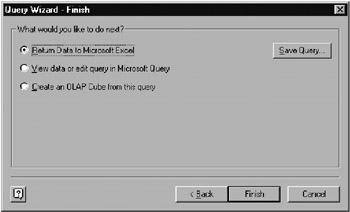
Figure 12-6: Final dialog of the MS Query Wizard
The first option makes sense only if your query (as in the current example) is so trivial that further refinement is unnecessary. In this case a further dialog appears, in which you specify where and how the data are to be placed in Excel (Figures 12.7 and 12.8). As a rule, you need to give only the start cell and click OK . (The numerous options are described somewhat further below.)
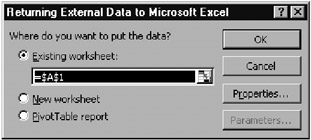
Figure 12-7: Inserting data into Excel
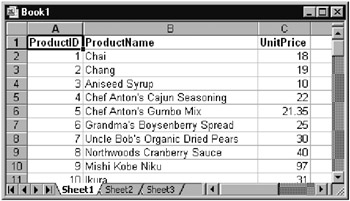
Figure 12-8: Data imported into a worksheet
Updating Data, Altering Queries
The data that have been imported into Excel are a copy of those in the database. If the database is altered , the imported Excel table must be updated. To this end Excel keeps track of the query parameters. To update the data, place the cell pointer in the data range and execute DataRefresh Data.
| Caution | Updating the data works only if the data source has not changed its location. For example, if the database file has been moved to another folder, Excel displays an error message when updating is attempted. The new location of the database file can be given in the login dialog that then appears. Particularly annoying is the condition that the file names of database files must be stored absolutely , that is, with complete drive and directory information. Therefore, if you rename a directory with your Excel application together with the associated Access database, Excel will no longer be able to locate the database file. This problem, which existed in earlier versions of Excel as well, can be solved with a few lines of program code (see below). |
Perhaps you have also discovered that the imported data do not quite meet your requirements. In this case you can summon the Query wizard again with the command DataGet External DataEdit Query. The previous settings serve as the default setting.
Example: A Listing of All Orders
As our second example we would like to create a listing of all Northwind orders, where the list consists of order number, order data, name of the salesperson, and name of the customer. The construction of the query begins again with selecting the database. Then the worksheet field must be selected. Instead of spending time with the convoluted wizard, simply select the Orders table and skip the further dialogs. In the last step select the option View Data Or Edit Query In Microsoft Query in order to formulate the query more conveniently there.
Figure 12-9 shows the user interface of MS Query, when it is not hidden by the wizard. The advantage over the wizard is that you can actually see the data that result from the query.
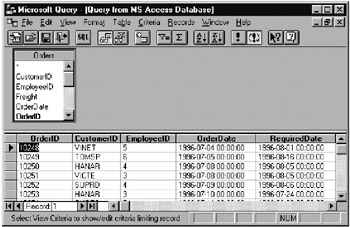
Figure 12-9: The program MS Query with the Orders table
First of all, these data in fact do not yet correspond to the requirements of this example: On the one hand, instead of the customer and employee name, only the employee ID numbers and customer letter codes are displayed, while on the other hand, the table contains a host of information that is of no interest.
To delete unwanted columns , simply click on the header row and press the Delete key . In this way you can get rid of all columns other than OrderID and OrderDate . (With Shift you can select several columns for deletion.)
The customer and employee names are not accessible in the Orders table. However, with TableAdd Tables you can easily integrate the tables Customers and Employees into the query. MS Query recognizes the connections between tables on its own and represents these connections with linkage lines. From the tables Customers and Employees you can use Drag & Drop to move the fields CompanyName and LastName into the table. Finally, to order the table by order date, first click the OrderDate column and then the Sort button. The result is displayed in Figure 12-10.
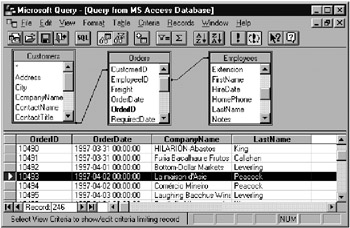
Figure 12-10: A listing of all Northwind orders
If you wish to change the column headings (say, salesperson instead of LastName ), you can access the appropriate dialog (see Figure 12-11) by double clicking on the column head. The heading holds as well for the resulting Excel table.
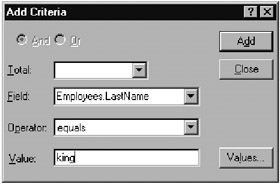
Figure 12-11: Filter criterion for the orders
If you wish to restrict the table to those orders, say, executed by salesman King , execute the command CriteriaAdd Criteria. In the Criteria dialog you may specify that the last name of the employee should equal King . (Theoretically, it is possible that several employees have the surname King . To avoid such ambiguity, you could use the criterion EmployeeID=7 . The result is shown in Figure 12-12.
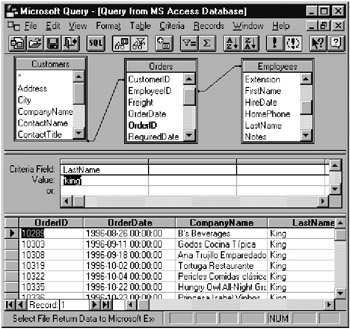
Figure 12-12: A listing of orders of the employee King
Tables and Relations
If a database query affects several tables, a relation among these tables must be established. Unfortunately, MS Query is capable of recognizing relations among tables on its own only if the tables are linked by like-named data fields. If that is not the case, you must establish the connection yourself via TableJoins. This, however, presupposes a good knowledge of the structure of the database.
| Tip | There exist various possibilities for defining a relation between the data fields of two tables. With a double click on the linkage lines between tables, or via the command TableJoins, you can select from among three different relation types and among several join operators. A change in the standard setting (join type 1, operator "=") is rarely required and presupposes a deep understanding of relational databases. In this book we shall consider only relations with the standard setting. |
Example: Sales by Employee
The goal of this example is to calculate the sales achieved by each employee. To do this, the product of Quantity and Unit Price must be obtained for each item ordered ( Order Details ). These products must then be summed for each employee.
The underlying data are to be found in three tables: Order Details for the actual numbers, Orders to allocate the different items sold to the different employees, and, finally, EmployeesK for the names of the salespersons. In MS Query you add two columns to the result table: Lastname for the employee name and Quantity for the quantity of each individual item sold.
A double click on the Quantity field opens the dialog Edit Column. (See Figure 12-13.) There you input as data field the formula Quantity*UnitPrice ”you are not interested merely in the quantity ordered, but in the product of this quantity with the price of the corresponding article. For this reason the column head should be changed to something like Sales . Finally, indicate that the result is to be summed. MS Query recognizes from context (that is, since the query contains only one additional column, with the employee name) that the sum is to be taken for each employee. After you have sorted the Sales column in increasing order, the result should look like Figure 12-14. Peacock appears to be the most successful salesman.
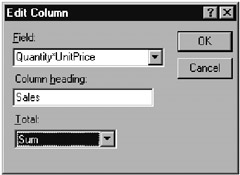
Figure 12-13: MS Query can execute calculations for each column
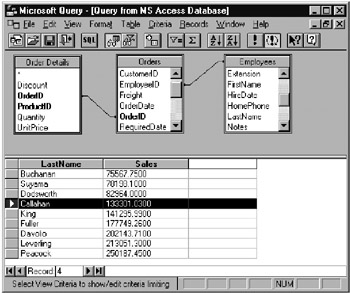
Figure 12-14: A listing of the total sales of each employee
In addition to the summation formula presented here, MS Query recognizes four additional calculational functions (minimum, maximum, average, and count). Basically, these functions come into play only when the list contains identical data records ”with the exception of the data field of the current column. In this case these data records are united into a single record, where the calculational function is then applied. However, it is impossible in MS Query to group and sum data records that have only one field in common but differ in other fields. Such advanced analytical methods are available only after the entire list has been imported into Excel in the form of a pivot table.
Sort and Filter Criteria
With the sort symbol (A_Z) you can sort the database according to the current column or selected columns. The command RecordsSort allows sorting according to several criteria. However, these criteria ”as compared to the corresponding dialog in Excel ”are quite confusedly ordered in a list. Sorting takes place first according to the first entry in the list, then the second, and so on.
In setting the filter criteria it is a good idea to activate the third window area provided in MS Query with ViewCriteria. There then appears between the table and list area a list of criteria. For the criteria there generally holds a similar control as in Excel for the so-called special filters: In the table, adjacent formulated conditions must be satisfied simultaneously (logical "and"), while conditions formed one below the other are connected by a logical "or."
The insertion of a new filter criterion is accomplished with CriteriaAdd Criteria or with a double click on the column head in the criteria table. In the dialog that appears you must specify the data field, the operator ("equals," "is greater than," etc.), and a comparison value or text. Again, a join of several data fields (for example, quantity*unitprice ) is allowed as data field.
With the button Values you can choose comparison values. Note that a multiple selection is possible. In specifying several filter criteria you must always be aware that the criteria must be joined either with "and" or with "or."
An immediate change in the entries of the criteria table can be accomplished via the keyboard as well as in the dialog obtainable by a double click. The criteria can be deleted entirely with CriteriaRemove All Criteria. You can also select and remove individual columns of the criteria table with the mouse.
A Look at SQL Code
SQL ("standard query language") is a standardized language for the formulation of database commands. MS Query uses SQL internally to express and evaluate queries that you input with the mouse and keyboard.
If you would like to see how your queries look in SQL, you can look at the SQL code with ViewSQL. (For database pros, this is also a method by which you can determine, more reliably and quickly than with the on-line help or documentation, how MS Query actually functions.)
The SQL code can be edited; then MS Query reconstructs the query on the monitor on the basis of this code. Changing SQL code assumes a certain degree of technical knowledge. Moreover, MS Query recognizes only a subset of SQL. Therefore, it is not possible simply to construct a query in Access and then copy the SQL code from there into MS Query.
More clearly formatted, the SQL code in Figure 12-15 looks as follows :
SELECT Employees.LastName, Sum(Quantity*UnitPrice) AS 'Sales' FROM 'D:\code\Xl-2000-engl\Nwind'.Employees Employees, 'D:\code\Xl-2000-engl\Nwind'.'Order Details' 'Order Details', 'D:\code\Xl-2000-engl\Nwind'.Orders Orders WHERE Employees.EmployeeID = Orders.EmployeeID AND 'Order Details'.OrderID = Orders.OrderID GROUP BY Employees.LastName ORDER BY Sum(Quantity*UnitPrice) DESC
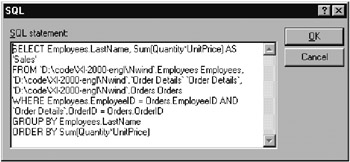
Figure 12-15: SQL code for the query of Figure 12-14
| Pointer | A brief introduction to SQL can be found later in this chapter. |
Queries Executed on Request
MS Query executes at once every change in a query, whether a new sort order or a new filter criterion. This is practical for experimentation with small databases, but with larger quantities of data it can lead to unbearable wait times. Therefore, there exists the possibility of deactivating automatic queries via RecordsAutomatic Query. Excel now no longer updates the list of data records in the lower window region automatically, but only on request via the command RecordsQuery Now.
Options for Inserting External Data
Immediately before data resulting from a new query are imported into Excel, the dialog Returning External Data To Microsoft Excel appears. With its Properties button you can select a host of options (see Figure 12-16). These same options can be set after the fact with DataGet External DataData Range Properties.
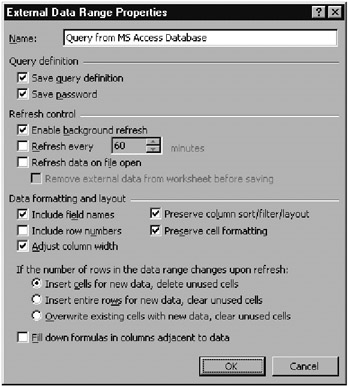
Figure 12-16: External Data Range Properties
SAVE QUERY DEFINITION means that in Excel not only the data from the database are inserted, but also the definition of the query in MS Query. This has the advantage that the data can easily be updated later or the query parameters edited.
| Tip | Sometimes, you would like precisely the opposite :You wish to import data once and then never alter them. Above all, you wish to be spared the constantly recurring question of whether you wish to update the data. This holds in particular when you wish to pass the Excel file to another user without the underlying database. In this case you should deactivate the option Save query definition. The data remain in the table, but Excel no longer knows where they came from. (It is as if the data had been input from the keyboard.) Ideally, you could first store the code of the SQL query in MS Query in a small file, so that you can access it if at some later time you need to insert the data again. |
The option Save Password is useful only for queries that apply to a passwordsecured database. If the option is activated, Excel stores the password together with the other parameters of the query. The advantage is that the password need not be typed in each time the data are updated. The disadvantage , of course, is that every user with access to the Excel file can use MS Query to access, and even alter, the database. You have thus created a security risk.
The refresh options specify whether the data are to be updated automatically when the Excel file is loaded. This costs time, of course, and is useful only for data that change often.
The data formatting options govern whether column headings and row numbers should be added, whether Excel should attempt to format the table automatically, and how Excel should behave when the data set changes during an update.
Loading and Saving Queries
When MS Query is used from within Excel, the basic information of the query is carried over into Excel and stored in the worksheet. In addition, there exists the possibility in MS Query to save the query data via FileSave. In this case only the parameters of the query are saved ”such as tables, data fields, sort and filter criteria ”and not the list of the data records. These must be regenerated when the query is loaded. For this reason query files with the suffix *.dqy are very small.
The QueryTable Object
Inside MS Query
Internally, Excel creates a Name object and a QueryTable object for every imported table. The Name object defines a name for the affected range of cells . You may retrieve a list of all defined Name objects in the immediate window with the following instruction:
For Each n In Names: ?n.Name & " " & n.Value: Next
For the file MS-Query.xls , with the three examples of the foregoing section the loop returns the following result:
Sheet1!sample1 =Sheet1!$A:$C Sheet2!sample2 =Sheet2!$A:$D Sheet3!sample3 =Sheet3!$A:$B
The associated QueryTable object saves the settings of the above displayed options dialog in a host of properties. The most important properties are Connection , with path information about the database file; CommandText , with the SQL code of the query; and Connection , with the cell into which the data are to be inserted. ( Destination thus refers to a Range object. CommandText replaces the property Sql , which is available only for reasons of compatibility.) Once again, you can see the details in the immediate window:
For Each ws In Worksheets: For Each q in ws.QueryTables: _ ?q.Name, q.CommandText, q.Connection, q.Destination.Address: _ Next: Next
For the query from the first worksheet the results (suitably formatted) are as follows:
Name = "sample1" Sql = "SELECT Products.ProductID, Products.ProductName, Products.UnitPrice FROM 'I:\Code\XL-2000\NWIND'.Products Products" Connection = "ODBC;DBQ=I:\Code\XL-2000\NWIND.MDB; DefaultDir=I:\Code\XL-2000; Driver={Microsoft Access Driver (*.mdb)};DriverId=25; FIL=MS Access;MaxBufferSize=2048;MaxScanRows=8;PageTimeout=5; SafeTransactions=0;Threads=3;UID=admin;UserCommitSync=Yes;" Destination.Address = "$A" The QueryTable Object
The function of the QueryTable object is, then, to store all information that is necessary for the importation of the data. In this book, QueryTable was presented for the first time in Chapter 5 on the subject of Textimport . QueryTable is thus responsible not only for importation from databases, but for the most varied sources of data. In addition to databases and text files there are also web pages to be considered (Chapter 14).
The property QueryType gives information about the data source. If the importation took place via MS Query, as in the preceding section, then this property always has the value xlODBCQuery (1) . An instance of the correct setting of Connection and CommandText for this case is given in the above example. It is also made clear that it is not quite a simple matter to set this character string manually (not least because the documentation for the construction of character strings is meager; usable information is to be found only in the ODBC documentation or in the description of comparable properties of DAO objects).
If you wish to edit QueryTable objects via program code, the usual modus operandi is first to create a query using MS Query and then use this character string as the starting point for your program code.
A similar way of proceeding was also chosen to get around the greatest deficit of QueryTable objects. If you open the example file MS-Query.xls on your computer, under normal circumstances Excel cannot update the data, because it cannot find the database file (unless you happen to have installed the database file Nwind.mdb in the same folder as that on the author's computer, namely, I:\Code\Xl-2000\ ).
To help remedy this sad state of affairs, in the procedure Workbook_Open the Connection and CommandText properties are set to the valid path. An updating of the data is now possible, provided that MS-Query.xls is in the same folder as the database Nwind.mdb .
The two For loops are used to ensure that all QueryTable objects will run through all tables. The additional program code has, in fact, rather little to do with database programming, but rather demonstrates the use of character string functions: In ExtractDir the setting of the default directory is determined from the Connection character string. (It is a question of the path to the database file.) In what follows this path will be replaced , using Replace , by the path to the Excel file.
' MS Query.xls, ThisWorkbook Private Sub Workbook_Open () Dim oldDir$, newDir$ Dim ws As Worksheet Dim qt As QueryTable newDir = ThisWorkbook.Path If Right(newDir, 1) = "\" Then newDir = Left(newDir, Len(newDir) - 1) For Each ws In Worksheets For Each qt In ws.QueryTables If qt.QueryType = xlODBCQuery Then ' extract previous path from Connection string oldDir = ExtractDir(qt.Connection) ' if successful: replace previous path by new one If oldDir <> "" Then qt.Connection = Replace(qt.Connection, oldDir, newDir, _ Compare:=vbTextCompare) qt.CommandText = Replace(qt.CommandText, oldDir, newDir, _ Compare:=vbTextCompare) End If End If Next Next End Sub ' extracts "xyz" from "abc;DefaultDir=xyz;abc" Public Function ExtractDir $(connStr$) Dim pos1&, pos2& pos1 = InStr(1, connStr, "DefaultDir", vbTextCompare) If pos1 = 0 Then Exit Function pos1 = pos1 + Len("DefaultDir=") pos2 = InStr(pos1, connStr, ";", vbTextCompare) If pos2 = 0 Then pos2 = Len(connStr) ExtractDir = Mid(connStr, pos1, pos2 - pos1) ' remove \ character at the end of the string If Right(ExtractDir, 1) = "\" Then ExtractDir = Left(ExtractDir, Len(ExtractDir) - 1) End If End Function | Caution | Please note that the above program code depends on the path to the database file being saved in the attribute DefaultDir of the Connection property. This was the case with all the author's experiments with MS Query in accessing Access databases. However, the exact construction of the Connection character string is not documented. It is thus unclear whether this way of proceeding will function under all circumstances, that is, with other database systems or in future versions of Excel. |
| Tip | A function similar to that of QueryTable is fulfilled for pivot tables by the object PivotCache. Here, too ”just as in the case of QueryTable ”the parameters for the database are stored. In contrast to QueryTable, PivotCache can also store a copy of the data (without these data being immediately visible). In this way the situation is avoided that each time the structure of the pivot table is changed the data must be read again from the database. |
Syntax Summary
| QUERYTABLE OBJECT | |
|---|---|
| ws.QueryTables(n) | access to the QueryTable object of a table |
| ws.QueryTables.Add | create a new object |
| qt.BackgroundQuery | background updating ( True/False ) |
| qt.Connection | (array of) character string(s) with information on the data's origin |
| qt.Destination | cell range ( Range ), in which the data are to be displayed |
| qt.QueryType | type of data source (such as xlODBCQuery ) |
| qt.CommandText | SQL command for the query |
| qt.Refresh | update data (method) |
Exporting Excel Data
Exporting to a Database
The main topic of this chapter is actually the importation of data, but sooner or later one is faced with the converse , namely, exporting Excel tables. For this Excel offers a number of options:
-
In executing FileSave As you can specify "dBase III" or "dBase IV." Then the current database (the range of cells in which the cell pointer is currently located) of the active worksheet is saved. If a range of cells is selected before the command is executed, then only this range is copied . Excel thus behaves in a manner similar to that for the execution of various DATA commands. The column labels are shortened to ten characters , with any spaces being replaced by the underscore character "_". (Take care that columns have unique labels.) The first data record of the table determines the data format.
-
The command DataConvert To Ms Access is provided for such conversion. The command is available only if the Accesslinks Add-In has been activated.
-
Finally, you can also tackle the problem of exporting an Excel table to Access from the opposite direction: To do so, save and close the file in Excel. Then launch Access and execute FileGet External DataImport. In the file selection form that opens choose your Excel file, which takes you to the import wizard (see Figure 12-17). (Many other database systems are capable of importing Excel tables.)
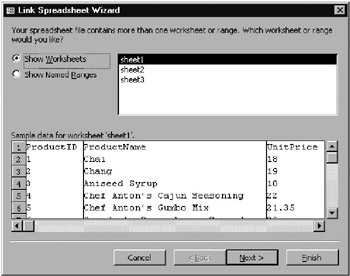
Figure 12-17: The Access import wizard during the importation of an Excel table
Exporting as a Text File; Form Letters in Word
| Pointer | Various possibilities for exporting Excel tables in the form of text files are described in Chapter 5.You can also use Excel files as the basis for form letters in MS Word. Information on this topic together with a brief example can be found in Chapter 11. |
EAN: 2147483647
Pages: 134