Chapter 2. Introduction to XMLXSL
| CONTENTS |
Chapter 2. Introduction to XML/XSL
IN THIS CHAPTER
- What Is XML?
- Rules of XML
- On to Using XML
- XSL
- Summary
The goal of this chapter is to walk you through the basics of XML and XSL. If you have never used XML or XSL before or know only a little bit about them, consider this your whirlwind course to get you on your feet.
One of the wonderful aspects of XML is its simplicity. It really doesn't take much to get up and running with XML. Therefore, this chapter is geared to race through the basics of XML. We will cover enough XML to enable you to use the rest of this book with confidence. After discussing XML, we will plunge into XSL. If you are already comfortable with XML, don't hesitate to skip ahead to the XSL section.
What Is XML?
XML is the Extensible Markup Language. It's called extensible because the modular nature of its structure enables you to make modifications easily by changing or adding data features. More importantly, XML is actually a "meta-language." That is, XML is really a specification that dictates how to describe languages and data.
XML's design gives us the following powerful features:
-
XML simplifies communication because it is self-describing. When an XML document is created, the structure has also been created. It is this structure that describes the data therein. This permits programs to easily query an XML document for specific data without having to perform difficult parsing. The self-describing nature of XML makes it simple to share XML data between people and applications. XML permits you to create custom markup (your own tags). This permits XML to represent a limitless number of documents.
NOTE
Document is the term used for a single collection of XML data. A document can be stored as a file, as an object, or within a database. It is not where the document is stored, but rather the collection of data constituting the document that is the defining feature of an XML document.
-
Data can be stored and arranged in a way that is customizable for your needs. Documents may be organized exactly how you want them.
-
Unicode (an international standard for text) is the standard character set for XML and thus an immense number of languages and characters are supported. Documents can be created in nearly any language.
-
XML is based on simple character text, which makes it easy to transport an XML document between systems or across the Internet.
-
Document structure and quality can be checked. This means it is possible to validate the overall document, syntax, and data types before the data is processed by an application. Therefore, it is possible to add more robust and complete error detection within an application.
-
XML can easily be mixed with stylesheets to create almost any output desired. An XML document should only consist of data. You can reuse the data in many different ways. It is easy to reuse a single set of data and reformat the data to display differently just by swapping stylesheets. In addition, once a stylesheet is built, it can be reused against many different XML documents as long as they have the same structure. Later in the book we will show the full power of stylesheets as we build some reports.
-
Virtually any type of data can be expressed as an XML document. XML merely provides the rules that tell how to describe the data. The data itself is usually easily expressible using XML's rules.
When combined, these features create a means of describing data that is independent of any language or system. This permits us to reuse XML data across systems and businesses. It all comes down to a set of very simple and well-thought-out rules.
Rules of XML
To help explain XML, we've created the sample XML file shown in Listing 2.1.
Listing 2.1 Sample XML Document shows.xml
<?xml version="1.0"?> <SHOWS> <PERFORMANCE> <TITLE>Fairy Princess</TITLE> <AUTHOR/> <DESCRIPTION> Scratch sound with emphasis on color, texture. </DESCRIPTION> <DATE status="canceled">09/11/2001</DATE> </PERFORMANCE> </SHOWS>
Use a text editor to create this file and save it to your hard disk as shows.xml. Over the next few sections we will refer back to this file to illustrate the structure of XML. Later, this file will be used for showing examples within a browser.
Tags and Elements
All XML markup consists of tags. Here is a sample tag:
<PERFORMANCE>
Tags are used to build an element. Here is a sample element:
<PERFORMANCE></PERFORMANCE>
An XML file author creates tags to describe the data that the file contains. These tags are very similar to HTML tags. Elements are the foundation of XML documents.
Tag and Element Basics
First, let's cover three commonly used terms with regard to tags. The terms are opening tag, closing tag, and empty tag. An opening tag is the first tag of a pair; in our sample element in the preceding section, <PERFORMANCE> is an opening tag. The closing tag is the end tag of a pair; in our sample element, </PERFORMANCE> is the closing tag. Finally, an empty tag is a standalone tag that has no data, and looks like this:
<PERFORMANCE/>
An element consists of an opening tag, a closing tag, and everything in between. All data within an XML document is expressed with tags. Elements can contain other elements, data or text, or can be empty and contain nothing between the tags. Elements can also contain a mix of data and other elements.
<PERFORMANCE> Marks Bros. Theater <TITLE>Fairy Princess</TITLE> </PERFORMANCE>
Here are the basic rules for using tags:
-
Tags are case sensitive. This means that <NAME> and <Name> are different tags. Take care to ensure that the case of opening and closing tags match.
-
No whitespace is permitted at the beginning of a tag. An example of disallowed whitespace would be < NAME>. However, whitespace at the end of tags is allowed, as in <NAME >.
-
The tag name must start with either a letter or an underscore.
-
The tag name may contain any of the following: letters, numerals, hyphens (-), periods (.), or underscores (_).
-
Each tag must be closed. This means that, where an opening tag is created, there must eventually be a closing one of the same name. When a tag contains no data, you can either close it immediately after opening it (<AUTHOR></AUTHOR>, for example) or use an empty tag (for instance, <AUTHOR/>).
-
Each element must be appropriately nested before another tag is opened. Unlike HTML, which is tolerant of inappropriately nested tags, XML has strict nesting rules. In XML, if a tag is opened inside an element, it must be closed inside that element also. For example, in HTML the following will work:
<B><FONT color="red">text here</B></FONT>
However, in XML this is not valid because the font tag is opened within the bold tag and is closed after the end of the bold tag. This violates the rule that a tag must be closed within the same element in which it was opened. In this case, the font tag was not closed within the bold element. A correct version would look like this:
<B><FONT color="red">text here</FONT></B>
Root Element
Every XML document must have one and only one root element, also known as the document element. This is an author-defined element that contains the rest of the XML document. Only two types of statements can reside outside the root element: A document declaration (which is always the first line of the XML document) and processing instructions.
In the shows.xml example document (see Listing 2.1) the root element is <SHOWS>. Notice that <SHOWS> is the first tag that is neither an XML declaration in the document nor a processing tag, and the closing tag </SHOWS> is the last. Finally, note that every other tag is inside the SHOWS element.
Attributes
Attributes are another important part of XML documents. An attribute is a name/value pair that can be found in an opening tag. Attributes provide additional information to a particular element. Embedded in a tag, an attribute looks like the following:
<DATE status="canceled">09/11/2001</DATE> Attributes are useful for providing properties of an element. In the preceding code snippet, notice that the property name/value pair is status="canceled". This is relevant to the date of the performance if the information regarding that performance were requested, it would be important to note that it had been canceled. Many times, attributes and elements can be interchangeable in their functionality. That is, data expressed as an attribute could also be expressed as an element. In XML, it just doesn't make a difference because data is data. However, it will make a difference when you are processing an XML document. Here is a simple set of guidelines:
-
Any data that needs to be displayed should be stored as an element.
-
Any data meant to modify the way an element displays should be stored as an attribute.
Keep in mind that these are just guidelines. With experience, you will get a sense of whether data would be best stored as an attribute or an element.
Several rules exist regarding attributes:
-
Attributes consist of a property name, an equal sign, and the property value in quotation marks (for instance, status="canceled").
-
The property name is case sensitive. An attribute named Status is not the same as one named status.
-
There can never be two properties of the same name in any one tag.
-
There can be more than one attribute per tag.
-
There must be quotation marks around the value of an attribute. Either single quotes or double quotes may be used. If you need to use single quotes or double quotes within the actual value (for example, owner="bill 'slim' jones"), use the other type of quotation marks to contain the value.
The XML Declaration
Let's take a closer look at shows.xml (see Listing 2.1). The first line is called the XML declaration and looks like this:
<?xml version="1.0"?>
This line exists to tell the XML processor that this is indeed an XML file. It tells us that the file is based on version 1.0 of the XML specification. Notice that the version property name/value pair is an attribute that follows the earlier rules.
Some of the more useful properties of the document declaration are listed here:
-
version Sets the version of the XML specification being used by the XML document. Currently there is only one version of the specification (version 1.0). However, by declaring this property, you can ensure that the XML processor will know which version of the specification the XML document uses when the next version is released and thus maintain backwards compatibility.
-
encoding Defines the character encoding. The default is UTF-8. This is the character set used within the XML document. The character set defines the numeric value of each character in a file.
-
standalone Declares whether or not the XML document has other files that must be processed, such as an external stylesheet or document type definition (DTD). When you are working with a standalone XML document, you will see a performance gain in document processing when you use the standalone attribute.
Here are two document declaration examples:
<?xml version="1.0" encoding="UTF-8" ?> <?xml version="1.0" standalone="yes" ?>
Document Type Declaration
The beginning of an XML file may contain other things after the XML declaration. The document can specify entity declarations, the root element, instructions to XML parsers, or the document type definition (DTD) that should be used to validate the XML document.
The DTD describes the structural requirements of an XML document. This means that a DTD can define the following:
-
The elements and attributes that can appear in a document
-
Which elements are child elements and what number, order, and placement they must have
-
The default values for elements and attributes
It is used to ensure that each XML document follows a specific document model, and thus is in the exact format required for whatever processing may come its way.
Listing 2.2 shows a DTD for the shows.xml file found in Listing 2.1.
Listing 2.2 External DTD File shows.dtd for shows.xml
<?xml version="1.0" encoding="UTF-8"?> <!ELEMENT SHOWS (PERFORMANCE*)> <!ELEMENT PERFORMANCE (TITLE?, AUTHOR?, DESCRIPTION?, DATE?)+ > <!ELEMENT TITLE (#PCDATA)> <!ELEMENT AUTHOR (#PCDATA)> <!ELEMENT DESCRIPTION (#PCDATA)> <!ELEMENT DATE (#PCDATA)> <!ATTLIST DATE status (canceled) #IMPLIED>
A DTD begins with the XML declaration. Then it starts defining the required structure of the XML document through the use of element declarations like the following:
<!ELEMENT TITLE (#PCDATA)>
The content of each element declaration begins with the element name it's defining. In this case, it's the TITLE element. Then it describes the content that is permitted therein. In our sample code snippet, the element TITLE may contain #PCDATA.
Possible values for contents include
-
A list of other elements
-
The keyword EMPTY (no contents)
-
The keyword ALL (anything possible)
-
The keyword #PCDATA (parsed character data only)
-
Any reasonable mix of the above
This brings us to the question of how to combine these elements in a way that the DTD understands. They can be combined using the following operators:
-
The comma (,) is used as an and operator. An example is (TITLE, AUTHOR). The element being described must have one TITLE element and one AUTHOR element as children.
-
The pipe (|) is used as an or operator. An example is (TITLE | AUTHOR). The element being described must have either a TITLE or an AUTHOR child element.
-
The question mark (?) means that the element is optional. An example is (AUTHOR, TITLE?). The element being described must have a child AUTHOR element and may also have a child TITLE element.
-
The plus sign (+) is used to signify one or more. An example is (TITLE+). The element being described must have at least one TITLE child element.
-
The asterisk (*) is used to signify that any number may exist. An example is (TITLE*). The element being described can have any number of child elements named TITLE.
-
Parentheses are a way to force processing. For example, (A | (B, C)) means that the element being described must have either an A child element or both B and C child elements.
Attributes, like elements, can be defined within a DTD. The syntax is similar except that the tag looks like this:
<!ATTLIST DATE status (canceled) #IMPLIED>
Again, the contents begin with the name of the element whose attributes we are describing. Next, we list the name of the attribute, and then we define either its data type or a list of literal values that it can have. Last, we describe the behavior of the attribute.
Some possible data types and values used to describe attributes are
-
An enumerated list of values that may be in the name/value pair. For example, ( canceled | onschedule ) indicates that the value of the attribute being described is either canceled or onschedule.
-
CDATA This is governed by the same rules regarding content as text data found within elements.
-
ID This type of attribute gives an element a label guaranteed to be unique in the document.
Next, we have several values that can be used in the DTD to describe the behavior of the attribute:
-
When a string in quotes is given, it becomes the default value. If the user doesn't include the attribute, it will be created with the default value in the document structure when it is parsed.
-
#IMPLIED The attribute is optional.
-
#REQUIRED The attribute is required, and no default value is assumed.
For more information regarding DTDs and how to build them, check out http://www.xml101.com/dtd/, which offers some very helpful tutorials.
In order for the XML document to be validated against the DTD when the DTD is contained within another file, we have to add a DTD reference to the XML document.
The DTD can be an external file that is referenced by the XML document, or it can be completely included within the document.
Listing 2.3 adds a DTD reference (see boldface print) to the shows.xml file from Listing 2.1.
Listing 2.3 shows.xml with DTD Reference Added
<?xml version="1.0"?> <!DOCTYPE SHOWS SYSTEM "shows.dtd"> <SHOWS> <PERFORMANCE> <TITLE>Fairy Princess</TITLE> <AUTHOR/> <DESCRIPTION> Scratch sound with emphasis on color, texture. </DESCRIPTION> <DATE status="canceled">09/11/2001</DATE> </PERFORMANCE> </SHOWS> The contents of this reference begin with the root element to which the DTD applies; in this case it is SHOWS. Then the SYSTEM keyword is used to state that the DTD is unpublished and that the location of the following file is the DTD for this XML document. The other option is to use the keyword PUBLIC in place of SYSTEM and the Uniform Resource Identifier (URI) . The PUBLIC keyword means that the DTD is available to the public for validating documents. This option is usually used when XML documents are being passed between companies it enables them to make sure that their XML documents have the expected structure.
Schemas
Many programmers feel that DTDs aren't flexible enough for current programming needs. Fortunately, schemas will replace DTDs in most Web applications. Schemas are much like DTDs in that they define the legal building blocks of an XML document. Unlike DTDs, however, schemas are written in XML and thus are extensible to future additions. They can also handle namespaces and data types.
Schemas have the following advantages over DTDs:
-
Schemas are XML documents themselves; they can be validated and programmatically extended.
-
Schemas have the ability to describe the data type of element text data.
-
Unlike DTDs, which describe an entire XML document, a schema describes elements and attributes. This means that adding elements to the validated XML document won't break the validation provided they are of a different namespace.
Character Entities
Some characters may not appear in any data part of an XML document, or within an attribute value. This is due to the fact that they are delimiters to the XML parser. One example of a delimiter is the less than character (<), which is used as the opening of a tag. Consider this example:
<TITLE> less than : < </TITLE> The text in this example will cause the parser to report errors. The parser will believe that the extra < is an opening tag and will be confused when it isn't closed.
To get around this problem, there is a special solution: You can replace single characters that serve as delimiters with their character entities. The character entity is the name for the character. The characters not permitted in XML documents and their replacements are shown in Table 2.1.
| Character | Name |
|---|---|
| < | < |
| & | & |
| > | > |
| ' | ' |
| " | " |
So, in our last example, the code should be rewritten with the character entity value
<TITLE> less than : < </TITLE>
This is also true for attribute values. If an attribute value contains &, >, or <, the value should be replaced with the replacement characters found in Table 2.1.
CDATA Sections
Sometimes it can be tedious to replace characters with their character entities. This is especially true when dealing with large blocks of text data. This is where the CDATA sections come in handy.
CDATA sections are areas in which the parser doesn't process the XML data. The parser knows that this part of the document contains no markup, just text. Therefore, the parser can handle characters that would normally delimit markup because it's not looking for any markup.
CDATA sections are delimited as follows:
<![CDATA[ your data ]] >. All characters inside the innermost square brackets are treated as text with no markup. This means that the sequence of characters ]] > cannot be a part of the text in a CDATA section. This sequence instead can be represented by ]]>.
Here is an example of an element with a CDATA section:
<EQUATION><![CDATA[ x > y && z < x & z > y ? ]] ></EQUATION>
CDATA sections are very useful when there is text in the document that needs to be passed through the parser unprocessed. This is especially true when XML is being used to send output to a browser, as it offers a simple way to prevent the parser from reacting to offending characters in JavaScript.
Comments
Comments may be put anywhere in the document, except for the first line, which is always reserved for the document declaration, and inside tags. XML comments have the same form as HTML comments. Here's an example of an XML comment:
<!-- comment goes here -->
The following rules apply for XML comments:
-
<!-- starts a comment, and --> ends a comment.
-
Comments may not be nested.
-
Double dashes (--) cannot be used within a comment because this is the delimiter that tells the processor that the comment is finished.
The following example will cause an error:
<!-- --the extra dashes in this comment will cause an error-- -->
Well-Formed and Validated Documents
XML gives you an immense amount of power to create custom markup languages and elements. This flexibility could wreak havoc on XML parsers if there weren't enough syntactical rules regarding markup. XML documents that follow all the XML syntax rules are referred to as "well-formed" documents. Following all the rules outlined in the previous sections of this chapter will ensure that your XML is well-formed. In brief, a well-formed document has
-
A single root element
-
Properly nested tags
-
Properly closed tags
-
Attribute values within quotation marks
-
Only one value per attribute
-
No offending characters
All XML documents that are processed must be well-formed, but they may also have to be valid. A valid XML document is one that conforms to the DTD or schema written to describe its structure. That is, the valid XML document meets all of the requirements declared in the DTD or schema.
On to Using XML
We've just given you a very brief introduction to XML. The preceding section introduced elements, attributes, nesting, and offending characters. Later, there will be more coverage of other specifics of XML. For now, however, let's start processing the XML that we have.
Processing
Once we have an XML document, we're ready to use the data. We might want to display it in a browser or have our JSP process some of the data. Let's look at what happens when you load an XML file into a browser.
No matter what the purpose of an XML file may be, it is parsed immediately upon being loaded. If any part of the file is in violation of a well-formed document rule, an error will be prominently displayed.
If the XML parser is a validating parser, it will read the DTD or schema associated with the XML document to determine whether the XML document conforms to it. If it conforms, all is well and processing will continue. However, if it does not conform, an error will be displayed and, depending upon the parser, the processing will cease.
If the parser is non-validating, it is able to read the DTD or schema, but cannot check to make sure that the XML document conforms to it.
You may find the pickiness of some parsers to be downright frustrating. However, in the long run this pickiness is very helpful because it prevents errors further down the software chain. It's much better that the parser finds errors early on, instead of later when your XML document has been sent to another business or application.
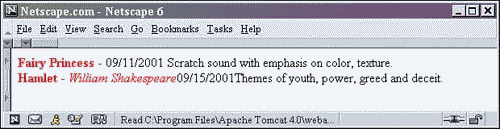
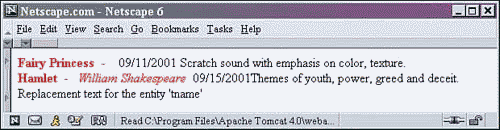
Let's work with an example now. This example will use the shows.xml file from Listing 2.1. Start Netscape and open the XML document by using the Open option in the File menu. Netscape will display the output shown in Figure 2.1.
Figure 2.1. Netscape 6.1 displaying shows.xml.
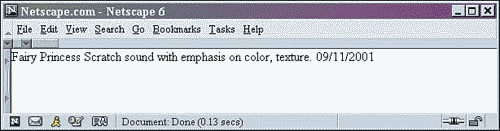
Notice that only the data within the XML elements is displayed. This is because Netscape reads the XML tags as markup, much like HTML. The difference is that these tags are undefined markup for the browser.
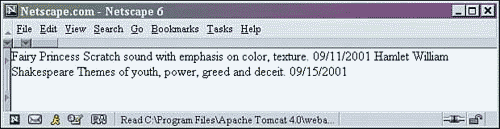
At this point, we would like to comment on a difference between Internet Explorer (IE) and Netscape. IE has more built-in XML support and thus will display some things differently. It will display the entire XML file, tags included, because it recognizes that it's indeed XML (see Figure 2.2).
Figure 2.2. IE 6.0 displaying shows.xml.
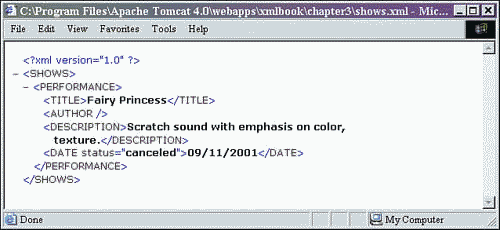
If shows.xml were renamed shows.html, Internet Explorer would display the same output as shown in Figure 2.1.
Now let's see what happens when your XML isn't well-formed. Let's take the shows.xml file, open it in a text editor, and introduce a mistake. Change the text case of one of the tags, save it, and refresh Netscape. An error will be prominently displayed with information about the offense, as shown in Figure 2.3.
Figure 2.3. Netscape 6.1 displaying an error from shows.xml.
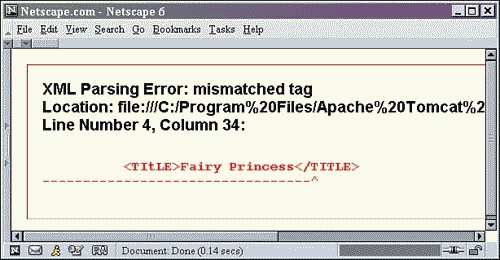
Loading an XML document into a browser is a quick way to check its structural integrity, and fix it if necessary.
The internal parser for Netscape is parsing the XML document. Internet Explorer and Netscape both have XML parsers included in their browsers to make XML easier to use. This is great, but how do we make XML display in the way we want? We'll see how in the next section.
XSL
XSL stands for Extensible Stylesheet Language. This language is what we'll use to transform an XML source into what we want. With the data we could output any format: HTML, more XML, or anything else. It is important to note that XSL is based on XML. This means that XSL must follow the same well-formed rules as XML: There are quotation marks around all attribute values, all tags are case sensitive and must be properly nested, and data must not contain the markup characters listed in Table 2.1. In the following examples, we are going to format some XML as HTML using XSL Transformations (XSLT).
Stylesheet Linking
First, we are going to add another processor instruction to the top of the XML file that we created. Add the following line after the document declaration in the shows.xml file and save it as shows2.xml. This will become the second line of the XML document.
<?xml-stylesheet type='text/xsl' href='shows.xsl'?>
Let's look at this more closely. This stylesheet processing instruction informs the XML processor where to find the associated stylesheet for the XML document. It contains the type of the associated stylesheet through the type name/value pair (or attribute). If, for example, the stylesheet were a cascading stylesheet (CSS), this value would be text/css. Next, this processing instruction indicates where to find the corresponding stylesheet using the href attribute. In our case, it can be found in the same directory as the XML file, and the filename will be shows.xsl. This association causes the XML to be transformed relative to the instructions of shows.xsl.
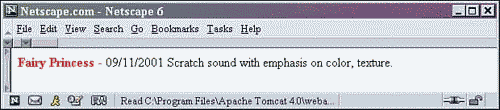
Listing 2.4 contains the shows.xsl file. Save the file to the same directory as shows2.xml. The line numbers have been added to aid in the following stylesheet analysis.
Listing 2.4 Example Stylesheet shows.xsl
1 <xsl:stylesheet version="1.0" 2 xmlns:xsl="http://www.w3.org/1999/XSL/Transform"> 3 <xsl:template match="/"> 4 <HTML> 5 <HEAD> 6 <TITLE>First Performance Stylesheet</TITLE> 7 </HEAD> 8 <BODY> 9 <xsl:for-each select="SHOWS/PERFORMANCE"> 10 <FONT color="red"> 11 <B><xsl:value-of select="TITLE" /></B> - 12 <I><xsl:value-of select="AUTHOR" /></I> 13 </FONT> 14 <xsl:value-of select="DATE" /> 15 <xsl:value-of select="DESCRIPTION" /> 16 <BR/> 17 </xsl:for-each> 18 </BODY> 19 </HTML> 20 </xsl:template> 21 </xsl:stylesheet>
This example takes each PERFORMANCE element found within a SHOWS element and displays the TITLE, AUTHOR, DATE, and DESCRIPTION formatted with HTML. The output is shown in Figure 2.4:
Figure 2.4. Output with stylesheet shows.xsl applied.
The stylesheet starts out with the root element spanning two lines:
1 <xsl:stylesheet version="1.0" 2 xmlns:xsl="http://www.w3.org/1999/XSL/Transform">
The xsl:stylesheet element is always the first tag of any XSL stylesheet. The entire content of the stylesheet will reside within this element. The version attribute tells the processor which XSLT version to use. Currently the only option is 1.0, but in the future this may change. Next, the attribute xmlns:xsl is listed. This attribute is called a namespace.
Namespaces
A namespace is a group of elements and attributes that are recognizable by their prefix. A namespace is declared so that all elements and attributes of that namespace are validated against the correct DTD, and can be distinguished from tags of the same name from a different source. Namespaces become very important when the content of one XML document comes from various sources.
For example, let's assume company A has an author element that requires a first name, last name, and date of birth, and company B has an author element that doesn't require anything. If these companies combined their data using XML, there could be collisions when validating these elements. Using namespaces with the DTDs would permit each company to validate its own author elements properly.
In Listing 2.5, notice how the tags are prefixed with placeholders such as coA:. The prefixes are linked to the full names using the attribute names starting with xmlns: found in the element authors. Notice that the full namespaces are URLs. The URLs don't actually point to anything they are used to ensure that the namespaces are unique.
Listing 2.5 XML Document with Two Namespaces Defined
<?xml version="1.0"?> <coB:authors xmlns:coA="http://www.companyA.com/books" xmlns:coB="http://www.companyB.com/"> <coA:author> <coA:fname></coA:fname> <coA:lname></coA:lname> <coA:dob></coA:dob> </coA:author> <coB:author> <coB:ssn/> </coB:author> </coB:authors>
Getting back to our shows.xsl stylesheet from Listing 2.4, we find our one namespace is xsl. It is used to differentiate between data elements and elements that are used for processing XML. All elements for processing data in the stylesheet contain the prefix xsl, then a colon, and then the tagname. This xsl namespace will always be present in XSLT stylesheets, as it is the namespace for the processing tags.
Templates
Next, in Listing 2.4 we find the beginning of the XML processing with this XSL markup:
3 <xsl:template match="/">
This uses the xsl namespace, and is a template tag. A template element makes formatting and transformation possible. The template element's match attribute or property tells the XSL stylesheet which elements of the XML document to match, and thus to format or transform. A single stylesheet can contain many template elements. In this case, the match attribute is matching with the forward slash (/) expression. The forward slash indicates the root of the XML document. Therefore, starting at the root, the entire XML document will pass into this template as one unit.
Next we see some HTML:
4 <HTML> 5 <HEAD><TITLE>First Performance Stylesheet</TITLE></HEAD> 6 <BODY>
This HTML will be output to the browser. (Except for XSL markup, any characters encountered in a stylesheet will be directly output to the browser.)
Next, there is more XSL markup:
9 <xsl:for-each select="SHOWS/PERFORMANCE">
This xsl:for-each tag is used to select each element of a repeated structure. The value of the select attribute indicates what repeated patterns to choose. In our example, all PERFORMANCE elements within the SHOWS element will be selected in turn and processed within the body of the xsl:for-each element. In our example file, there is only one path like this. All content found within the PERFORMANCE element will be processed according to the contents of the xsl:for-each tag.
The next XSL markup found is the following:
10 <xsl:value-of select="TITLE" />
This tag selects the data from the current element and displays it. The value of the select attribute determines the source from which to select the data. In our example, this tag will select the data from the TITLE element, whose value is Fairy Princess. The select attribute can also select the data from an attribute. It does so by including an at sign (@) before the case-sensitive attribute name surrounded in quotes. Notice that the xsl:value-of tag has no content. That is, it is an empty tag. You may use separate opening and closing tags; however, everything in between will be replaced with the data from the selected XML element or attribute.
Next, we find the closing xsl:for-each tag. This tag closes the body of XSLT against which the chosen attributes and elements will be processed. Again, these elements and attributes are chosen through the expression found in the select attribute of the opening xsl:for-each tag. Then the template tag is closed. After this point, elements of the XML document are no longer matched against anything. This is because there is no longer a template element against which to match.
Finally, the stylesheet itself is closed.
The final output of the transformation of the XML and XSL will appear as follows:
<HTML> <HEAD> <TITLE>First Performance Stylesheet</TITLE> </HEAD> <BODY> <FONT color="red"> <B>Fairy Princess</B> - <I></I> </FONT> 09/11/2001 Scratch sound with emphasis on color, texture. </BODY> </HTML>
NOTE
If you look at the source as given by the browser through the View Source menu option, you will only see the original XML document. This is because viewing the source displays the original buffer that was sent to the browser, which is the XML document, and not the final output that is stored elsewhere.
This is similar to creating DHTML elements dynamically on the client side and not seeing those HTML elements when using the browser to view the source.
Notice how the data from the XML file replaces the xsl:value-of tags of the XSL stylesheet. Also notice that the other data, the dash and HTML markup, were output to the browser. With XSL stylesheets, XML data can be formatted and output with HTML with the appropriate placement of the text.
Repeating Patterns
Add the following XML fragment to the shows2.xml file:
<PERFORMANCE> <TITLE>Hamlet</TITLE> <AUTHOR>William Shakespeare</AUTHOR> <DESCRIPTION>Themes of youth, power, greed and deceit.</DESCRIPTION> <DATE>09/15/2001</DATE> </PERFORMANCE>
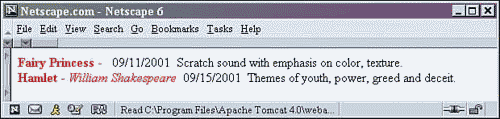
This fragment should go within the SHOWS element, after the PERFORMANCE element. Refresh the browser and you will see the output in Figure 2.5.
Figure 2.5. Output from shows2.xml with a repeating structure.
Notice how both PERFORMANCE elements were formatted and displayed using the same XSL stylesheet. This is a result of the for-each tag choosing each element of PERFORMANCE nested within the SHOWS element. In this case, there were two XML fragments that satisfied this requirement.
Stylesheet Errors
Now is a good time to demonstrate what happens when there is an error in the stylesheet. Delete the dash in the xsl:for-each tag in the shows.xsl stylesheet. Save the file and refresh the browser. Figure 2.6 shows the result.
Figure 2.6. Output of shows2.xml with a stylesheet error.
Notice that all formatting that the stylesheet applied is missing. If there is an error in the stylesheet, it will fail parsing just as an XML document that is not well-formed will. Remember, an XSLT stylesheet has to follow the same rules as an XML file. When a stylesheet can't be parsed, there is a simple way of checking to see what the problem is. Instead of opening the XML document, open the shows.xsl file in a browser, as shown in Figure 2.7.
Figure 2.7. Output of a stylesheet error found in shows.xsl.
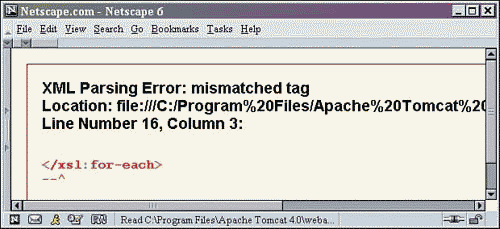
We found it! In our example, the browser output clearly shows a problem with the xsl:for-each tag. If all formatting is lost from an XSLT stylesheet linked from an XML document, load the stylesheet into the browser and fix the errors found.
Whitespace and Encoding
We need to add some spacing after the AUTHOR element data and the DATE element data. XML strips out whitespace that is present outside of element data. So how do we add whitespace? We will answer that question shortly, but first a little background is in order.
XML was designed to support most languages. It does this through the use of an international 31-bit encoding system called ISO 10646, which can handle a huge number of different languages and symbol sets.
A character is any piece of text or signal that can be represented as one position in the character encoding system used. When text is typed on a keyboard, the letters and symbols on the screen are translated into numbers. The mapping of characters and symbols to numeric values creates a character set. XML allows multiple sets of characters to be used so that XML can be used with any language. The default encoding used by XML is UTF-8. This is an 8-bit character encoding.
NOTE
If you'd like to learn more about character encoding as it relates to XML, check out the excellent tutorial at http://skew.org/xml/tutorial/.
Also, you can find a table of characters and their octal encodings at http://www.htmlhelp.com/reference/charset/latin1.gif. This table only contains the Latin subset of the UTF-8 encoding used by default with XML. (This is the only encoding subset that we will be using here.)
The code 160 is a non-breaking space. We can use that character code within our XML and XSL and it will be output properly as a space. The addition of the leading ampersand (&) indicates that it is a character entity to be translated and displayed, and the pound sign (#) indicates that it is a number representing a character code. If we wanted to use hexadecimal numbers instead, we would use an x after the pound sign and before the numeric value. 160 converted to hexadecimal is A0, so   would become   as seen in an XML document.
Add   after the value-of tag selecting the DATE element and the AUTHOR element found in the stylesheet of Listing 2.4. Those three lines of code will now look like this:
12 <I><xsl:value-of select="AUTHOR" /></I>  13 </FONT> 14 <xsl:value-of select="DATE" /> 
Save the file and refresh the browser. There will now be a space after the AUTHOR and DATE element data. The output will now look like Figure 2.8.
Figure 2.8. Output of shows2.xml with whitespace added.
Entity Declarations
Another way to add spaces or other characters is by using an entity declaration. An entity declaration is a statement found in the DTD that states that a particular sequence of characters should be replaced upon parsing. The character entity is replaced with the declared replacement string throughout the XML document or stylesheet. Entity declarations are useful in that they may improve readability.
NOTE
If you have done any HTML authoring, you might be familiar with the entity . If this is easier to remember than the encoding for a space, you can declare it in the DTD and then use it throughout the document.
The document type declaration for a character entity is as follows:
<!DOCTYPE xsl:stylesheet [<!ENTITY nbsp " ">]>
This declaration starts with the literal string <!DOCTYPE, then declares the root element to which this declaration should be applied (in this case it is the root element of the stylesheet). Each entity must then be declared in the following format, where name is the entity to be replaced and value is the string with which to replace it:
<!ENTITY name "value" >
The replacement string, like the entity name, can be anything. Place this command at the very top of the stylesheet, before the root element. If we were to use our document type declaration example, the character entity nbsp could be used throughout the document and it would be replaced by the parser with the actual sequence   to properly display spaces in the browser.
It is important to stress that for this replacement, the entity name nbsp can be anything. For example, the declaration string could be space. Let's build an example where we add our own arbitrary entity called tname. The tname entity will be replaced with some text. The declaration will then look like this:
<!DOCTYPE xsl:stylesheet [ <!ENTITY space " "> <!ENTITY tname "Replacement text for the 'entity tname'"> ]>
Add this to the beginning of the shows.xsl file. Then replace those Unicode spaces with the entity reference &space; and add &tname; after the closing xsl:for-each tag. Save and refresh the browser. The XSL stylesheet with changes is shown in Listing 2.6.
Listing 2.6 shows.xsl with Entity Declarations Added
<!DOCTYPE xsl:stylesheet [ <!ENTITY space " "> <!ENTITY tname "Replacement text for the entity 'tname'"> ]> <xsl:stylesheet version="1.0" xmlns:xsl="http://www.w3.org/1999/XSL/Transform"> <xsl:template match="/"> <HTML><HEAD><TITLE>First Performance Stylesheet</TITLE></HEAD> <BODY> <xsl:for-each select="SHOWS/PERFORMANCE"> <FONT color="red"> <B><xsl:value-of select="TITLE" /></B>&space; - &space; <I><xsl:value-of select="AUTHOR" /> &space;</I> </FONT> <xsl:value-of select="DATE" /> <xsl:value-of select="DESCRIPTION" /> <BR/> </xsl:for-each> &tname; </BODY> </HTML> </xsl:template> </xsl:stylesheet>
The result of running the stylesheet is shown in Figure 2.9.
Figure 2.9. Output from shows.xsl with entity declarations.
Notice the replacement text and the spaces.
Trees, Nodes, and Family
Before we can begin to understand XML, XSL, and XPath, it is very important to establish some vocabulary for describing the positions of elements relative to each other. In more complex XML documents, these relationships quickly become impossible to describe with the limited vocabulary that we currently have. That's where tree structures, nodes, and the familiar family relationships become very useful.
Tree Structures
In thinking about an XML document in terms of a tree and branches, we begin with the root element. The root element is the starting point, and therefore the essential part of this tree structure. Each element found within the root element creates a branch from the root. Other elements in turn branch from the elements that contain them. For example, let's look at the following XML fragment:
<TITLE> <AUTH> <LNAME/> </AUTH> <AUTH/> </TITLE>
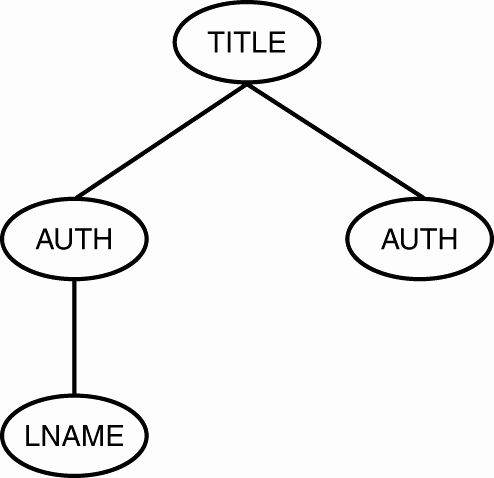
In this code, each AUTH element is nested directly within the TITLE element. This is reflected in the tree diagram shown in Figure 2.10. In the same way, LNAME is nested directly within the AUTH element, and indirectly within the TITLE element. Notice that this structure also exists in the tree diagram. The LNAME element is branched directly from the AUTH element. Also, notice that the LNAME element is indirectly branched from the TITLE element. The XML document and the tree diagram contain the same information, but when dealing with more complicated XML, it is much simpler to think of it in terms of a tree structure.
Figure 2.10. Example of XML document tree structure.
Nodes
A node is any one of the circles in the tree diagram shown in Figure 2.11. In the previous example, all the nodes are elements. However, that isn't always the case. Several other parts of XML can be drawn as nodes in a tree diagram. These include text data and attributes. Elements are always nodes, and will have lines drawn between them and other nodes.
Figure 2.11. Tree diagram of XML family relationships.
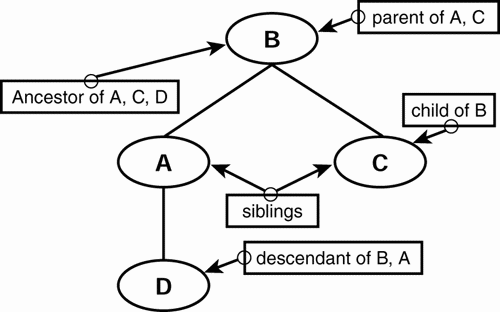
Family
When describing the treelike structure of an XML document, it is helpful to be able to concisely describe relationships between elements in that structure. These relationships are defined in the same way as the structure of families. The common terms used are parents, children, descendants, ancestors, and siblings. You probably already know what most of these relationships mean. Now all we have to do is see how they apply to XML documents.
Descendants are your children, grandchildren, and so forth. In XML, a descendant is any element A nested within another element B. This means that every element of an XML document is a descendant of the root element. In the following example, element A is a descendant of B, but more specifically, it is a child of element B because no other elements exist in between; A is directly nested in B.
<B> <A> <D/> </A> <C></C> </B>
Ancestors are your parents, grandparents, and so on. In XML, the ancestors are all the elements in which an element is nested (either directly or indirectly). Along the same lines, all elements that are nested within other elements have ancestors namely, those elements in which they are nested. Let's go back to the previous example to clarify. In this example, element B is an ancestor of element A. (More specifically, element B is the parent of element A simply because the relationship between them is direct; there aren't other elements between them.) All elements within an XML document have the root element as an ancestor, except for the root element itself.
XPath
XPath is a language used for the identification of parts of the input XML document to be processed. XPath provides the mechanism for matching and then outputting selected parts of an XML document. Those parts can be a single element, one element and everything within it, a single attribute, several attributes of different elements, or any combination thereof.
XPath can also be used for numeric calculations, string manipulation, or testing Boolean conditions.
In some ways the addressing that XPath uses to select parts of documents is similar to the way in which file system paths select files and folders. When a folder is selected in a file system, all files within that folder are selected as well. With XPath, when one element is selected, all elements within it are also selected. Basically XPath provides a way of selecting parts of an XML document based on various criteria.
Selection Statements
Selection statements are the foundation of XPath. They are the logical syntax used to select which nodes are processed.
For the remaining examples in this chapter, we will be using the XML file shown in Listing 2.7. Type this into a text editor and save it as xpath.xml. Note that three elements (besides the root element) are used throughout this document. They are creatively named AA, BB, and CC.
Listing 2.7 xpath.xml
<?xml version="1.0"?> <?xml-stylesheet type='text/xsl' href='xpath.xsl'?> <ROOT> <AA property="no">AA element within the ROOT <BB property="YES">BB element within AA <CC property="no">CC element within BB and AA </CC> </BB> </AA> <AA property="yes">2nd AA element within the ROOT <BB>2nd BB element within 2nd AA </BB> <CC property="NO">CC element within 2nd AA </CC> </AA> <BB property="NEVER">BB element within ROOT <CC>CC element within BB element </CC> </BB> </ROOT>
This XML document has three children in the ROOT element. Two of them are AA elements and the other is a BB element. Notice that both AA elements have BB children. The first CC element in the document is a child of a BB element, and the second CC element is a sibling of a BB element. It is important to notice the various nesting levels of these elements. Knowledge of the relationships between the elements will aid you in understanding which elements will be selected and processed for output.
Next, type the code from Listing 2.8 into a text editor, and save it as xpath.xsl. This file will be constantly changing as we walk through the remaining examples in this chapter. Note that if you downloaded the code, the file allxpath.xsl will contain each of the xpath expressions found throughout this chapter.
Listing 2.8 xpath.xsl; Absolute XPath Expression
1 <xsl:stylesheet version="1.0" 2 xmlns:xsl="http://www.w3.org/1999/XSL/Transform"> 3 <xsl:template match="/"> 4 <HTML><HEAD><TITLE></TITLE></HEAD> 5 <BODY> 6 <!-- select each element BB child of element AA child of element ROOT --> 7 XPath is: /ROOT/AA/BB <BR/> 8 <xsl:for-each select="/ROOT/AA/BB" > 9 <xsl:value-of select="." /><BR/> 10 </xsl:for-each> 11 <BR/> 12 </BODY> 13 </HTML> 14 </xsl:template> 15 </xsl:stylesheet>
This stylesheet is very similar to our first XSL example. The main difference is that only part of the XML document is selected for output. With XPath, there will be times when the nodes selected for output will not appear to be directly related to each other. However, their relationship is simply that they each satisfy the XPath selection statement.
Let's review the logic of our example and what is happening behind the scenes. The group of elements that are selected with the XPath statement will constitute a set. This set is created according to the XPath statement found in the value of the select attribute of the xsl:for-each tag. Once this set is created, each element in turn will be used to walk through the body of the xsl:for-each element and will be processed accordingly.
The next line of interest is the line that selects the current element combined with an HTML break tag:
9 <xsl:value-of select="." /><BR/>
The select attribute of the xsl:value-of tag chooses the current element. The dot notation (.) simply means to select and output the data that is currently passing this line of code that is, each element of the set that the XPath selection statement has chosen, one at a time, followed by an HTML line break.
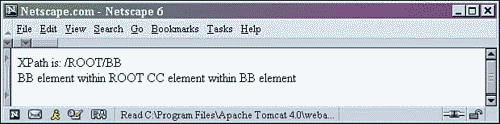
In this particular example, the XPath statement is selecting each BB element descending from an AA element. The AA element in turn must be descending from the ROOT element. The notation looks like this: /ROOT/AA/BB.
The beginning forward slash (/) indicates that the path is absolute. The path defined starts from the root of the document (in this case, the ROOT element). Note that the forward slash is the same as the match attribute of the xsl:template tag used in line 3 of Listing 2.8.
Once this node-set has been selected with the XPath expression, each node in turn is processed according to the body of the xsl:for-each element. The only processing we find in this body is the xsl:value-of element. This tag selects the current node being processed in the body. This is done with the dot notation (.), which is equivalent to saying "select the current item of the set selected by the XPath statement."
Figure 2.12 shows the output from this selection.
Figure 2.12. Display of xpath.xml rendered with the xpath.xsl stylesheet.
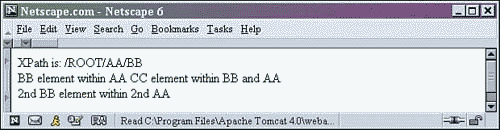
The first line of the output is text that we wrote in the stylesheet. Next out are two distinct elements that match the selection statement. (It's simple to see that they are distinct because they have an HTML break between them.)
The elements from Listing 2.7 that matched the selection criteria are noted in boldface type here:
<ROOT> <AA property="no">AA element within the ROOT <BB property="YES">BB element within AA <CC property="no">CC element within BB and AA </CC> </BB> </AA> <AA property="yes">2nd AA element within the ROOT <BB>2nd BB element within 2nd AA </BB> <CC property="NO">CC element within 2nd AA </CC> </AA> <BB property="NEVER">BB element within ROOT <CC>CC element within BB element </CC> </BB> </ROOT>
When an element is selected through XPath, all child elements are also selected. The first BB element is selected, as is its child element, CC. This is why both the text data from within the first BB element and that from BB's child element are output on one line. This is equivalent to loading only the following XML without a stylesheet:
<BB property="yes">BB element within AA <CC property="no">CC element within BB and AA </CC> </BB>
In Figure 2.1, we loaded an XML document without a stylesheet, and the text was displayed without formatting. The output in this case is the same.
Next, the second element whose path matches that of the XPath statement is output. We put a break tag after each item output with the xsl:value-of tag. This is to make clear the distinction between each fragment meeting the XPath selection requirements, and those elements that are children of elements selected. When a new line is displayed, the next item in the set that met the requirements is being output. In this case, the BB element does not have any children and only the text of that element is output.
Let's do another example. We will again be using xpath.xsl. In this file, change lines 6 8 as shown in Listing 2.9 and save the file.
Listing 2.9 xpath.xsl; Another Absolute XPath Statement
1 <xsl:stylesheet version="1.0" 2 xmlns:xsl="http://www.w3.org/1999/XSL/Transform"> 3 <xsl:template match="/"> 4 <HTML><HEAD><TITLE></TITLE></HEAD> 5 <BODY> 6 <!-- select each element BB in ROOT --> 7 XPath is: /ROOT/BB <BR/> 8 <xsl:for-each select="/ROOT/BB" > 9 <xsl:value-of select="." /><BR/> 10 </xsl:for-each> 11 <BR/> 12 </BODY> 13 </HTML> 14 </xsl:template> 15 </xsl:stylesheet>
Notice that in changing this stylesheet file, we only really changed one line of XSL. The other changes are text data that will help us to see what our XPath selection statement is when we load the file in a browser and a code comment briefly explaining the XPath selection statement.
When you refresh your browser, the output shown in Figure 2.13 will appear.
Figure 2.13. Output from an absolute XPath expression.
The first line is text data found in the stylesheet. Then the one element that was selected with the XPath statement is output. In this case it is each BB element found within the ROOT element. The line starts with the forward slash that denotes an absolute path. Then the root element is selected, followed by the BB elements contained therein. Only one element of xpath.xml matches this selection statement; it is noted in boldface print here:
<ROOT> <AA property="no">AA element within the ROOT <BB property="YES">BB element within AA <CC property="no">CC element within BB and AA </CC> </BB> </AA> <AA property="yes">2nd AA element within the ROOT <BB>2nd BB element within 2nd AA </BB> <CC property="NO">CC element within 2nd AA </CC> </AA> <BB property="NEVER">BB element within ROOT <CC>CC element within BB element </CC> </BB> </ROOT>
Relative Paths
Relative paths are those that don't have a specific starting point. Rather, they are a set of conditions under which elements are selected. Any elements that satisfy the path criteria are selected with the use of double forward slashes (//). For example, we could search for all folders named "sherbet" in a file system. The resulting set would include every folder with that name. It wouldn't matter where the folder was found. There could be one in the root of the C: drive, and another one ten folders deep.
The relative XPath selection statement selects all elements found in an XML document that meet some path criterion. That criterion could be an element name found anywhere in the XML document (such as //BB), or an element that is a child of an element (such as //AA/BB).
Let's look at an example. Change lines 6 8 from Listing 2.8 to match the example shown in Listing 2.10 and save the file as xpath.xsl.
Listing 2.10 xpath.xsl; Relative XPath Statement
1 <xsl:stylesheet version="1.0" 2 xmlns:xsl="http://www.w3.org/1999/XSL/Transform"> 3 <xsl:template match="/"> 4 <HTML><HEAD><TITLE></TITLE></HEAD> 5 <BODY> 6 <!-- select each BB element found anywhere --> 7 XPath is: //BB <BR/> 8 <xsl:for-each select="//BB" > 9 <xsl:value-of select="." /><BR/> 10 </xsl:for-each> 11 <BR/> 12 </BODY> 13 </HTML> 14 </xsl:template> 15 </xsl:stylesheet>
Refresh your browser and you will see the output shown in Figure 2.14. (The output order may depend on whether you use Netscape or IE due to XML processor differences.)
Figure 2.14. Output with a relative XPath expression.
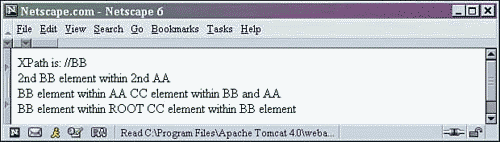
Three elements meet the selection criteria (any element named BB found anywhere in the XML document hierarchy). The double forward slashes (//) mean that the selection match can start anywhere in the document. The processor will look at each element in turn to see whether it matches the path.
The selected parts of the xpath.xml document from Listing 2.7 are noted in boldface print here (all BB elements and their descendants are selected and output):
<ROOT> <AA property="no">AA element within the ROOT <BB property="YES">BB element within AA <CC property="no">CC element within BB and AA </CC> </BB> </AA> <AA property="yes">2nd AA element within the ROOT <BB>2nd BB element within 2nd AA </BB> <CC property="NO">CC element within 2nd AA </CC> </AA> <BB property="NEVER">BB element within ROOT <CC>CC element within BB element </CC> </BB> </ROOT>
Let's look at another example. For the rest of the examples in this chapter, we are not going to display the entire stylesheet. Instead, we are only going to show you the code that will replace existing lines of the stylesheet.
Replace lines 6 8 from Listing 2.8 with the following lines and resave the file.
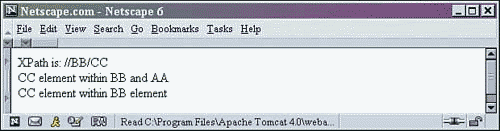
6 <!-- select CC element child of any BB element --> 7 XPath is: //BB/CC <BR/> 8 <xsl:for-each select="//BB/CC" >
Notice that the selection statement is //BB/CC. It starts out as a relative path with //. Then it has an absolute path to each CC child of BB. This XPath statement selects any element CC, found anywhere in the document hierarchy, that has a parent BB.
This does not select the BB elements involved in this path. Instead, it only requires that the CC elements have BB parents. Only those elements and their descendants that are listed last in the path are actually selected for output. The rest of the path denotes requirements for those elements that are finally output.
The elements of xpath.xml noted here in boldface print are selected:
<ROOT> <AA property="no">AA element within the ROOT <BB property="YES">BB element within AA <CC property="no">CC element within BB and AA </CC> </BB> </AA> <AA property="yes">2nd AA element within the ROOT <BB>2nd BB element within 2nd AA </BB> <CC property="NO">CC element within 2nd AA </CC> </AA> <BB property="NEVER">BB element within ROOT <CC>CC element within BB element </CC> </BB> </ROOT>
As expected, the output consists of the elements shown in Figure 2.15. (There are other BB elements and CC elements in the document that were not selected because they are siblings and don't have the parent-child relationship required by the select statement.)
Figure 2.15. Output from a second relative XPath expression.
Asterisks and Elements
Now that you have an understanding of absolute and relative paths, let's see what the asterisk (*) can do. The asterisk means, in essence, "match all, no matter the name." This means that we can write selection statements that use every element meeting a requirement, even though the element name might not be used.
For example, change lines 6 8 of the stylesheet in Listing 2.8 to the following. Resave the file and refresh the browser.
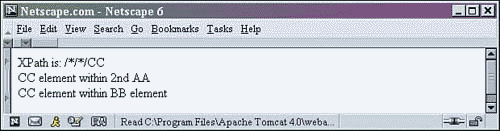
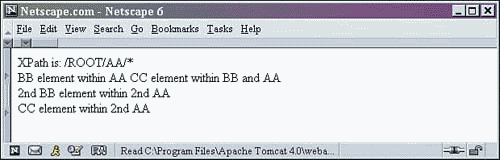
6 <!-- select each grandchild element CC of any element --> 7 XPath is: /*/*/CC <BR/> 8 <xsl:for-each select="/*/*/CC" >
Wherever there is an asterisk in the selection statement, any element name can match it as long as the rest of the path is satisfied. The single forward slash found at the beginning of this statement indicates that it is an absolute statement. The forward slash signifies that this XPath is starting from the root. Then there is an asterisk that matches all. (In this case, it can only match the root element because there are no other tags at the root level.) Next, the statement has another forward slash, indicating a child of the previously matched elements. The following asterisk matches any child of the ROOT element no matter what the element name. The select statement ends with the element CC. This statement selects any grandchild element named CC starting from the XML document root.
The selected elements of xpath.xml are noted in boldface print here:
<ROOT> <AA property="no">AA element within the ROOT <BB property="YES">BB element within AA <CC property="no">CC element within BB and AA </CC> </BB> </AA> <AA property="yes">2nd AA element within the ROOT <BB>2nd BB element within 2nd AA </BB> <CC property="NO">CC element within 2nd AA </CC> </AA> <BB property="NEVER">BB element within ROOT <CC>CC element within BB element </CC> </BB> </ROOT>
Note that the first CC element found in this document was not selected. This is because it is a great-grandchild of the ROOT, and not a grandchild. The selection statement is absolute, not relative; therefore, only grandchild elements can be selected.
The output looks like Figure 2.16.
Figure 2.16. Output from an XPath expression with an asterisk.
Here is another example using the asterisk. Replace lines 6 8 of the stylesheet in Listing 2.8 with the ones that follow, save the file, and refresh the browser.
6 <!-- select each element that is a child of AA found within ROOT --> 7 XPath is: /ROOT/AA/* <BR/> 8 <xsl:for-each select="/ROOT/AA/*" >
This is another path using the asterisk, but this time we are going to select each element, no matter the name, that meets the other parts of the selection requirements as stated in the XPath statement. The statement starts off as an absolute path again with the forward slash. Then it matches each child element AA found in the ROOT element. Once that has been done, the forward slash and asterisk select every child element found therein. There is another way to read this statement: Select each grandchild element no matter what the element name, as long as its parent is an AA element and its grandparent is the ROOT element.
<ROOT> <AA property="no">AA element within the ROOT <BB property="YES">BB element within AA <CC property="no">CC element within BB and AA </CC> </BB> </AA> <AA property="yes">2nd AA element within the ROOT <BB>2nd BB element within 2nd AA </BB> <CC property="NO">CC element within 2nd AA </CC> </AA> <BB property="NEVER">BB element within ROOT <CC>CC element within BB element </CC> </BB> </ROOT>
Three items satisfy this selection statement (see the boldface code lines). Notice that the sibling elements BB and CC that satisfy this XPath statement are separate items.
The output is shown in Figure 2.17.
Figure 2.17. Output from an absolute XPath expression with an asterisk.
Expressions in Square Brackets
Square bracket expressions found within XPath statements can further specify which elements or attributes to select. These expressions act much like filters for those items already selected.
A number in the square brackets gives the position of the element to select. For example, suppose three siblings named GG are nested within the root element:
<ROOT> <GG/> <GG/> <GG/> </ROOT>
The statement /ROOT/GG[2] would select only the second GG element. The statement /ROOT/GG[1] would only select the first GG element.
The last() function can also be used within square brackets to specify the last of some same-named siblings. This function will also select an element that is an only child, because it is not followed by any same-named siblings. For a demonstration of the last() function at work, replace lines 6 8 of Listing 2.8 with the following code, save it, and refresh the browser.
6 <!-- select each BB element that is the last --> 7 XPath is: //AA[last()] <BR/> 8 <xsl:for-each select="//AA[last()]" >
We know that this is a relative expression because of its starting double forward slashes. The statement begins by selecting each AA element found anywhere within the XML document. However, the selection is narrowed down by the filter expression in the square brackets. That expression is the method last(). This statement selects the last AA element of each AA sibling set.
Notice that in the output shown in Figure 2.18 there is only one selected item.
Figure 2.18. Output from a relative XPath expression with square brackets.
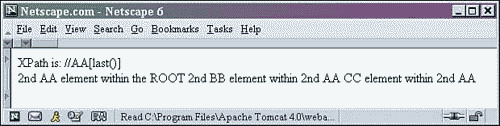
This is because there are only two AA elements, and they are siblings. This selection statement chooses the last of those two elements.
If there had been other AA elements in the XML document that were not siblings of the previously selected elements, they would have been selected and output. However, if there had been more than one AA sibling, only the last one would have been output.
Notice in xpath.xml that only the second AA element (see the boldface print) is selected:
<ROOT> <AA property="no">AA element within the ROOT <BB property="YES">BB element within AA <CC property="no">CC element within BB and AA </CC> </BB> </AA> <AA property="yes">2nd AA element within the ROOT <BB>2nd BB element within 2nd AA </BB> <CC property="NO">CC element within 2nd AA </CC> </AA> <BB property="NEVER">BB element within ROOT <CC>CC element within BB element </CC> </BB> </ROOT>
With regard to the xpath.xml document structure, the statement //AA[2] is equivalent to the statement //AA[last()]. This is because the last sibling of the AA sibling set is also the second sibling. It is very important to be able to select a particular sibling from a set of siblings sharing the same name.
Selecting Attributes
We can select attributes in much the same way as elements. They can be selected using relative paths, absolute paths, or asterisk notation. The only difference is that we must use the at sign (@) before the attribute name to indicate that we are referring to an attribute.
Here's another example. Replace lines 6 8 of the stylesheet from Listing 2.8 with the following, and save the file.
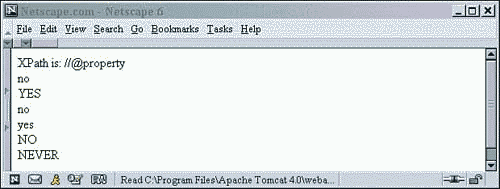
6 <!-- select each attribute named property found anywhere --> 7 XPath is: //@property <BR/> 8 <xsl:for-each select="//@property" >
This relative path statement selects each value of the attribute named property found anywhere in the XML document. It's just the same as selecting all AA elements with the statement //AA, except that we are selecting attributes.
Notice in the output, shown in Figure 2.19, that each property value is on its own line. Each attribute value is selected and added to the set of items that satisfy this statement. Then they are output one at a time.
Figure 2.19. Output from an XPath expression selecting attributes.
Asterisks and Attributes
The asterisk notation that we've already used with elements can also be used with attributes. By putting an asterisk after the at sign (@), we are selecting all attributes, no matter what their name, that satisfy the rest of the XPath selection statement.
Change lines 6 8 of the xpath.xsl file from Listing 2.8 to the following, save the file, and refresh the browser.
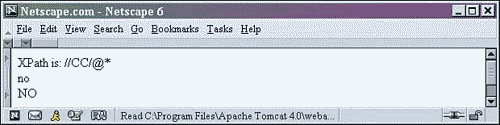
6 <!-- select each attribute of each CC element that has an attribute --> 7 XPath is: //CC/@* <BR/> 8 <xsl:for-each select="//CC/@*" >
This selection statement begins by selecting every CC element in the XML document with the statement //CC. Then it further selects each attribute contained within those CC elements using @*. Figure 2.20 shows the output.
Figure 2.20. Output from an asterisk XPath expression selecting attributes.
You may have noticed that there is a forward slash (/) between the element selected and the attribute value of that element. Considering that we previously used the forward slash to signify a parent-child relationship between elements, it may be confusing to see one used between an element and the attributes of that element.
The explanation is simple: The treelike structure that is used to represent XML's document structure shows attributes as branching from the element node in which they are contained. This tree structure also displays the text data contained within an element as another node branched from the element node.
Figure 2.21 and the following code illustrate this point. In the code, the BB element contains text data and an attribute. In the tree diagram, the attribute name/value pair is its own node. The attribute node branches from the element node, as does the text data.
Figure 2.21. Tree/node diagram of attributes and text data.
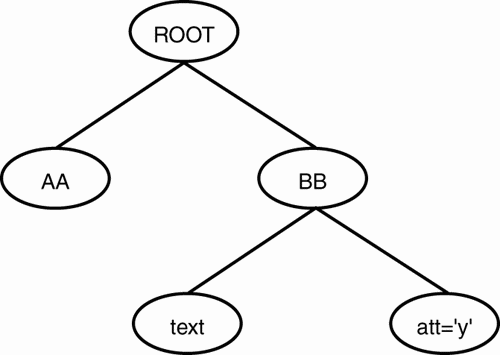
<ROOT> <AA/> <BB att='y'>text </ROOT>
Every element in a tree diagram can be thought of as the root of another subtree. With this in mind, look at the BB element in the tree diagram. If this element were separated from the rest of the XML document, it would become the root element, and the attribute and text data would be the only two branching nodes.
When writing select statements, you must use the forward slash to address the attribute node that branches from the element node.
The next example combines the things you've learned so far. We will use relative paths, square bracket statements, attributes, and asterisks. Change lines 6 8 in the stylesheet from Listing 2.8 to read as follows:
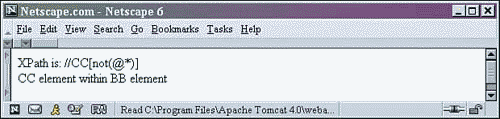
6 <!-- select each CC element that does not have any attributes --> 5 XPath is: //CC[not(@*)] <BR/> 7 <xsl:for-each select="//CC[not(@*)]" >
Boolean Values
The only Boolean values are true and false. Sometimes when writing XPath statements, we use a logical condition. This is a test that, if successful, will resolve to (or be evaluated as) true. If the test is unsuccessful, it will resolve to false. With XPath, all of the items selected at this point are used in the statement to see whether each resolves to true or false for that item. If it resolves to false, that item is no longer a member of the set of items selected by the XPath statement.
Square bracket statements can resolve to either a number or a Boolean value. When a statement resolves to a number, that number indicates which numbered sibling to select. For example, the statement //AA[2] selects the second AA element of siblings found anywhere in the XML document.
When a square bracket statement resolves to a Boolean value, the value tells whether the item will continue to be selected or not. If the value is true, the item will continue to be selected. Otherwise, it will be discarded from the selected set.
In the most recent change to Listing 2.8, the select statement starts out with the relative path indicator (//), then the element CC. This effectively selects each CC element found within our sample XML document. Next, we have a square bracket expression that resolves to a Boolean value. Each CC element must be checked to see whether it has an attribute. The @* in the square brackets is asking, Does the element have an attribute, no matter the name? If the answer is true, the not() method will reverse the value, and the element will be discarded. If the CC element does not have any attributes, the answer will be false, and the not() method will reverse it to true. Then that element will continue to be selected. Notice in our output, shown in Figure 2.22, that there is only one CC element that meets this condition. Every other CC element has at least one attribute.
Figure 2.22. Output from a Boolean XPath expression.
Save the file and refresh the browser to see the output.
You may be wondering why the statement wasn't written like this: //CC/[not(@*)], with an extra forward slash. After all, we're looking at the attribute node, which is branched from the element node. That forward slash is not needed because when we are resolving square bracket statements we have access to all the nodes that are branched from the current element. This includes the text data and each attribute.
Next, we are going to write a selection statement that uses a square bracket statement within it, before the end of the statement. Update lines 6 8 of the xpath.xsl file from Listing 2.8 to match this, save it, and refresh the browser.
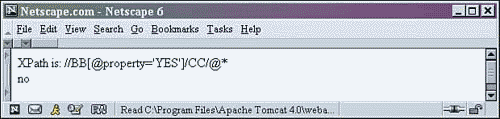
6 <!-- select each attribute of each CC element that has an attribute --> 7 XPath is: //BB[@property='YES']/CC/@* <BR/> 8 <xsl:for-each select="//BB[@property='YES']/CC/@*" >
This statement starts out by selecting every BB element found in the document. Next, the square bracket statement is resolved for each currently matched item in turn. The Boolean statement is asking, Does the current item have an attribute named property whose value is 'YES'? There is only one BB element that resolves this statement to true, and thus will remain selected. Next, the statement matches the CC child element of the currently selected item. Then it outputs the value of each attribute of each selected CC element. In this case, there is only one CC element that has a BB parent with a property attribute equal to 'YES'.
Figure 2.23 shows the output.
Figure 2.23. Output from an XPath expression that tests attribute values.
Next, we have another example with a square bracket statement. This one uses the count() function and a new Boolean operator.
Just as we have square bracket statements evaluate to a Boolean, we can have multiple statements do the same. We do so by using the logical and to connect the two statements. Then each item will have to meet all the selection criteria to be selected. The following example demonstrates the use of the and within a square bracket statement. Replace lines 6 8 of Listing 2.8, save the stylesheet, and refresh the browser.
6 <!--select each element that has only one BB child and one CC child --> 7 XPath is: //*[count(BB)=1 and count(CC)=1] <BR/> 8 <xsl:for-each select="//*[count(BB)=1 and count(CC)=1]" >
Figure 2.24 shows the output.
Figure 2.24. Output from an XPath expression using the and operator.
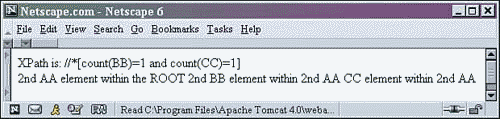
Only one item is selected and output in this example. Let's walk through the XPath statement. The statement begins with a relative path selecting all elements using the asterisk. Those elements are then filtered using the square bracket statement.
In this statement, we are selecting those items that have one child element named BB and one child element named CC. Notice how the two statements are connected with the logical and. If both resolve to true, the item is selected and output.
We can also connect two square bracket statements with a logical or using the pipe character (|). When you place a pipe character between two statements, the item will be selected if either statement resolves to true. Only if both statements resolve to false will the item be discarded from the selection.
Here is one more example. This example uses sibling counting, an absolute path, and an asterisk. Replace lines 6 8 in Listing 2.9 with the following:
6 <!-- select the second child of the second AA element found in ROOT --> 7 XPath is: ROOT/AA[2]/*[2] <BR/> 8 <xsl:for-each select="ROOT/AA[2]/*[2]" >
Save the file and refresh the browser. The output is shown in Figure 2.25.
Figure 2.25. Output from an XPath expression with multiple square brackets.
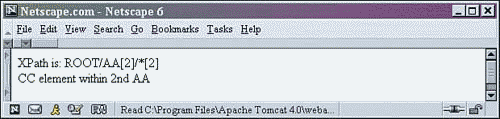
This XPath statement begins by using an absolute path. It selects each AA element found within the ROOT element using ROOT/AA. Then it uses the square bracket to select only the second sibling of the AA elements already selected. Next, the path selects the second child of the selected AA elements no matter the element name. It does this by using an asterisk to select all children of the previously selected item, then using the square bracketed number 2 to select only the second siblings. Note that the second sibling, when selected with an asterisk, doesn't have to have the same element name as the first sibling.
In this case, there is only one element that meets the criteria, and it is output as shown in Figure 2.25.
Summary
This chapter gave you a solid introduction to XML, XSL, and XPath. If you are interested in learning more about XSL and XPath, refer to Appendix D,"XSL Reference," for more information.
In the next chapter, we will examine Web services. We will see how XML has created an entirely new way to do business by allowing the exchange of data over the Internet in a new way.
| CONTENTS |
EAN: N/A
Pages: 26