Appendix A. Setting Up
| CONTENTS |
IN THIS APPENDIX
- Installing the JSP Environment
- NetBeans
- The MySQL Database Server
- Summary
In order to run the examples in this book, the environment running on your machine must meet some minimum requirements. You can create such an environment for both Linux and Windows machines. This appendix will explain what needs to be installed and configured for the examples. We will first run through the installation of Apache Tomcat, the JSP container on which all of the examples were tested. Next, we will install NetBeans, an integrated development environment that is useful for the creation of JSPs, Java classes, and other JSP components. Finally, we will install the MySQL database, and create all the tables used in the book examples.
If you already have a JSP container and editor with which to work, we suggest you skip ahead to the database section.
Installing the JSP Environment
Most readers probably have a Java SDK installed on their machines already. This section is for those who still need to install it or who are relatively new to Java.
The Java Software Development Kit (SDK)
The Java SDK is a development kit necessary for writing any Java programs. Made by Sun's JavaSoft division, it contains everything a Java developer needs. This includes software and tools for compiling, debugging, and running applications written using the Java programming language. More specifically, it includes the most common class files, a compiler, a debugger, and a Java Virtual Machine (JVM). If your machine doesn't already have the Java SDK, you can download it along with the documentation from http://java.sun.com/j2se/. The site offers versions for Windows, Linux, and Solaris.
All the examples throughout this book use the Java SDK version 1.3.1 build 01.
If you have minimal experience with the Java programming language we recommend that you work through some Java tutorials to gain a better understanding of the language behind JSPs. Sun has a complete set of tutorials at http://java.sun.com/docs/books/tutorial/.
If you just need a review of JSPs, check out Appendix B,"Introduction to JSP and How Things Work," after finishing the installations described here.
If you need help compiling a Java program, visit http://java.sun.com/docs/books/tutorial/getStarted/cupojava/.
Finally, you might occasionally have more complicated Java questions. The Sun Java forum and the JavaRanch site are two good places to visit and ask a few questions. They are located at http://forum.java.sun.com/ and http://www.javaranch.com/, respectively.
The Tomcat Server
Now that we've gotten what we need for the Java language, it's time to install the JSP container. The Tomcat server is a Web container that controls the execution of JSPs and servlets. Tomcat is the result of one subproject of the larger open source project called Jakarta. Jakarta organizes many different projects that fulfill the goal of providing production-quality server applications developed cooperatively based on the Java platform.
Tomcat is the standard reference JSP and Java servlet container. This means that any JSP code developed in Tomcat should work in any other container that follows the JSP specifications. Usually this is true, but sometimes you will have to modify code from one JSP container to another. This is not a problem with Tomcat, but some other servers don't implement the exact specification.
Tomcat 4.0 supports the Servlet 2.3 and JSP 1.2 specifications. As a pure Java server, it requires a Java runtime environment that was included in the Java SDK that we installed previously.
To install Tomcat, go to http://jakarta.apache.org/tomcat/. Under the download menu on the left side, choose binaries. Choose the latest release build of Tomcat. (We are using version 4.0.) Then download and install the appropriate file for your platform.
For more information on how to set up Tomcat, go to the Web site and look at the documentation. http://jakarta.apache.org/tomcat/tomcat-4.0-doc/RUNNING.txt describes platform-specific installation issues for all platforms and explains how to start and stop the server.
It is important to review the documentation on how to start up and shut down the Tomcat server for your operating system because there will be times when this is necessary. One of those times is when a new .war file is added to the webapps directory under the Tomcat installation directory.
A .war file is a compressed package of files in some ways similar to a .zip file. When the Tomcat server is stopped and restarted after a new .war file is placed in the webapps directory, Tomcat will automatically expand the file with the directory structure in the file maintained. This is very helpful when installing an entire Web application, and many tools used throughout this book will supply example Web applications in a .war file.
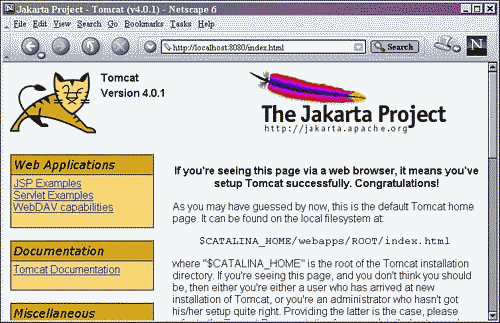
Once you have the Tomcat server installed, make sure it's working as expected. Open a Web browser and type http://localhost:8080/. If you don't see a Web page similar to the one in Figure A.1, use the link given for installation issues earlier in this section to fix the problem. While earlier versions of Tomcat required quite a bit of hand-tweaking to install correctly, Tomcat version 4.0 self-installs extremely well. Most users will not have to do anything special on the Tomcat installation.
Figure A.1. Tomcat server welcome Web page.

Creating a Web Site for the Book
The next step is creating a Web application for the book. In Tomcat 4.0, this will initially be as easy as adding a few directories to the webapps directory found in your Tomcat installation. We named the Web application xmlbook, so we need to create an xmlbook directory under the webapps directory. Then we need to create WEB-INF and META-INF under the xmlbook directory Web application structure as shown in Listing A.1.
Listing A.1 Directory Structure of xmlbook Web Site
webapps xmlbook chapter1 META-INF WEB-INF
Be warned that Tomcat and JSP are case sensitive when referring to filenames. Make sure you have the case correct when referring to and saving files and directories. For users of Unix this won't be a problem, because Unix uses case-sensitive filenames. However, if an example doesn't work because a file isn't found, always check to make sure that you have the case correct in the file- and pathnames.
NetBeans
NetBeans is a free open source integrated development environment (IDE) that is used for developing Java programs. Among other things, this tool can be used to debug, compile, and edit Java programs. We recommend its use for developing and debugging JSPs and Beans. We will be using only those features available in the core download. The choice of whether or not to use NetBeans is a personal one. Some programmers prefer to use a text editor, while others like to use the NetBeans IDE. As authors, we ourselves are split in our own personal choices. One of us uses NetBeans and the other uses a simple text editor. The point is that NetBeans is intended to be a helpful tool. However, if you don't like it, stay with your favorite editing tool.
To install NetBeans, download it from http://www.netbeans.org/downloads.html#builds.
Make sure that you select the latest release to download. No matter which platform you are using, you can find help at http://www.netbeans.org/articles/faqs/installation.html.
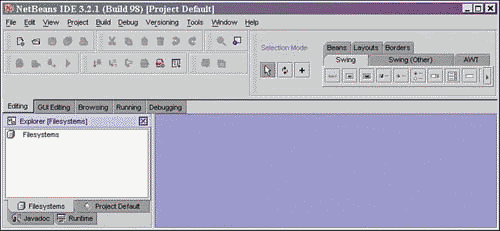
The NetBeans interface is shown in Figure A.2.
Figure A.2. View of NetBeans IDE.

Notice that on the left-hand side is the NetBeans Explorer. This is where directories will be mounted and used in JSP development. When a directory is mounted, its contents are available to NetBeans for use in executing code. Along the same lines, when the contents of a .jar file are used to execute a JSP, the .jar file must be mounted so that the class files are available. The webapps directory of the Tomcat installation should always be mounted. Through this directory, any JSP in Tomcat can be executed.
Also notice that there are several tabs located near the top on the left-hand side. These are useful for flipping between different views, such as Running and Editing.
NetBeans has a lot to offer the Java programmer and may take some time to get used to. Many options and properties are available through the mouse menus. Keep exploring and use the very helpful documentation and FAQ found on the NetBeans Web site.
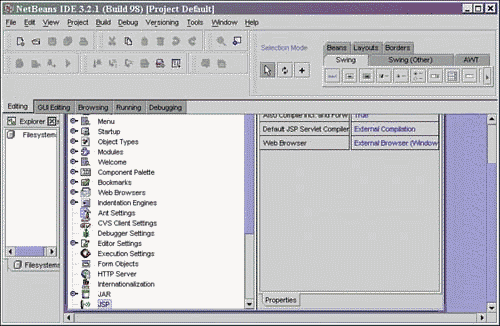
We need to change some configuration options in NetBeans. Go to the Tools menu and select Options. Then click the JSP option and note the properties that are available (see Figure A.3).
Figure A.3. JSP Web browser options in NetBeans IDE.

Change the Web Browser option to the External Browser for the platform you are using. This will enable the JSP output to go to the external browser and will make it easier to use.
The MySQL Database Server
The key to building any Web site is information management. Using a database to store and access information is a fast and efficient way to do this in many cases.
MySQL is an open source database server. A database is a collection of information that is organized in an efficient manner such that data can be quickly returned in response to requests.
To install MySQL, visit http://www.mysql.com/products/. Choose the link for the latest stable release of MySQL. This book uses MySQL version 3.23.41.
Scroll down to your platform and download the file. Upon the completion of your download, extract the files and install.
To make sure that the database server is running, go to the bin folder of the installation directory using a command prompt. To start the MySQL server, type mysql and press Enter.
You should then see some text about accessing help, and the mysql command prompt will appear. If you don't see this, use the installation documentation help at http://mysql.com/doc/I/n/Installing.html.
It is important to point out that at the end of each command given to the database server is a semicolon. This means that it doesn't matter whether you use a single line or multiple lines for commands. What is important is that the semicolon is used at the end to tell the server that the command is finished.
Creating a MySQL Database
Now that we have our database server running, we are going to create the database and tables used throughout the book. If you have downloaded and extracted our examples, you will find a file named dbscript.txt. This file has a script to create the database and tables used in the examples. Place a copy of this file in the bin directory of the MySQL installation and execute it by typing the following:
mysql> source dbscript.txt;
This script will create three tables within a newly created database named xmlbook. The three tables are as follows:
-
BannerAds Used to hold information for each banner ad used in our examples.
-
ReportClientData Used in Chapters 11 13, this table contains data about each client at our fictitious medical clinic.
-
ReportClientAilment Also used in Chapters 11 13, this table contains data about all the ailments that each client has.
If you don't have the script, use the following directions to create these tables.
To start out, we must create the database to hold the three tables. Type the following at the command prompt to do this:
mysql> create database xmlbook;
Now that we've created the database, we need to add tables within it to hold data. To do this, use the following command to choose the database that we are using:
mysql> use xmlbook;
This tells the MySQL server which database the commands that follow refer to. This command will be used each time a command should only be applied to a specific database.
Next, we will create the BannerAds table. Type the following command to create the new table structure:
create table BannerAds ( name varchar(50) not null, link varchar(255) not null, linktext varchar(255) not null, starttext varchar(255) null, endtext varchar(255) null );
It is not important to have this or any command span multiple lines. If you want another line, press Enter and the continue character sequence (->) will appear.
Next, we will add a primary key to the newly created BannerAds table with the following command:
mysql> alter table BannerAds -> add primary key (name), -> type=MyISAM;
The next table to create is ReportClientData. Create this using the following command:
mysql> create table ReportClientData -> ( RCD_index bigint not null auto_increment, -> RCD_lname varchar(100) not null, -> RCD_fname varchar(100) null, -> RCD_clinic tinyint not null, -> RCD_dob date not null, -> RCD_color varchar(8) not null, -> primary key (RCD_index) );
Finally, we will create the ReportClientAilments table. This is done with the following command:
mysql> create table ReportClientAilments -> ( RCA_medicalailment varchar(50) not null, -> RCA_datefound date not null, -> RCA_clientID bigint not null, -> primary key (RCA_clientID, RCA_medicalailment) );
At this point, the database is almost ready for the examples in Chapter 1, "Integrating JSP and Data." We've created the database and a table to be used in it, but we haven't installed the JDBC yet. This is the component that will allow our JSPs to issue commands to the MySQL database server, and thus to our xmlbook database.
Now we have to close the MySQL database. This can be done by typing quit or exit at the command line. Whenever you run an example that requires the database, make sure that MySQL is up and running.
NOTE
You can find GUI interfaces to use with MySQL. About a half dozen exist within the marketplace last time we checked the Internet. You can find one of my favorites for Windows at http://www.scibit.com/Products/Software/Utils/Mascon.htm. In this book, this isn't important, as we perform most of our database connectivity through the code.
Installing a JDBC Driver
For MySQL, there is a decent database driver to be found at http://mmmysql.sourceforge.net/. Once there, scroll to the bottom of the page and pick the latest driver released that is not in beta. We use the 2.0.6 version here. This file is distributed as a self-extracting .jar file. After you extract the file, make sure to place the file mm.mysql-2.0.6.jar (or your version) into the lib directory of the Tomcat server installation. Then stop and restart the Tomcat server.
Summary
Now that we've installed the major components necessary to re-create the examples throughout this book, it's time to begin reading. If you are familiar with JSP, we suggest you start at Chapter 2, "Introduction to XML/XSL." Otherwise, begin with the first chapter.
| CONTENTS |
EAN: N/A
Pages: 26