Section D. Changing the document tree
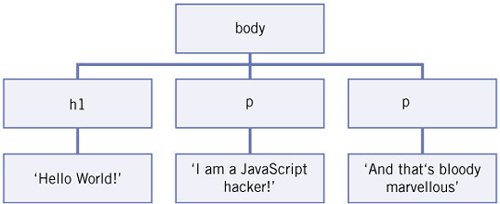
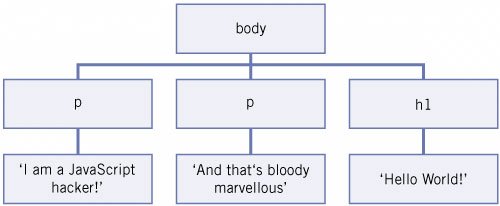
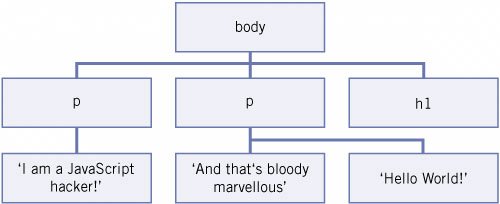
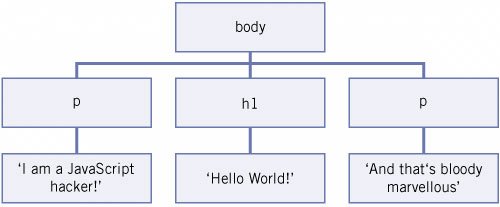
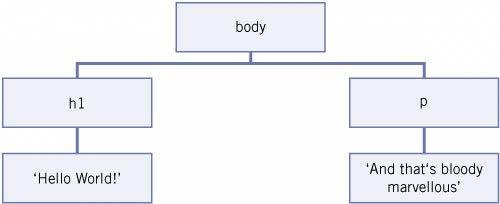
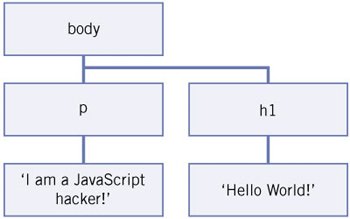
D. Changing the document treeThe W3C DOM contains four methods for changing the document tree. You'll use appendChild() and insertBefore() often, and removeChild() and replaceChild() more rarely. General rulesAll four methods return a reference to a node they acted on. For instance, in Sandwich Picker, for each sandwich the user orders, I append a <tr> to the order table: [Sandwich Picker, line 148] document.getElementById('ordered').appendChild(node); I could also have done this: var newSandwich = document.getElementById('ordered'). appendChild(node); Now the node is appended, and the return value of appendChild() is assigned to newSandwich, so that it contains a reference to the node. We rarely need this reference, and therefore usually don't assign the return value of the methods to a variable. Nonetheless, remember that these references are available; occasionally you'll need them. The four methods are all defined on the parent node of the node you want to do something with. So if you want to remove node x, you write: x.parentNode.removeChild(x); The following simple HTML page will serve as an example during the explanation of the four methods: <html> <head> <title>Hacking JavaScript</title> </head> <body> <h1>Hello world!</h1> <p>I am a JavaScript hacker!</p> <p>And that's bloody marvellous</p> </body> </html> Figure 8.4. The DOM tree of the HTML example shows only the <body> tag and its descendants. appendChild()The appendChild() method allows you to append a node as the last child of an element. If the node you append is already present in the document, it is removed from its current position. The node retains all its child nodes; these are also moved to the new position. Example: var x = document.getElementsByTagName('h1')[0]; x.parentNode.appendChild(x); Figure 8.5. The <h1> is removed from its position and becomes the last child of the body. Its child nodethe text node 'Hello World!'also moves. Of course you can also append text nodes: var y = x.firstChild; var z = document.getElementsByTagName('p')[1]; z.appendChild(y); Now the text node 'Hello World!' is removed from the <h1> and appended as the last child of the second <p>. Return valueappendChild() returns a reference to the appended node: var x = y.appendChild(z); Now x contains a reference to node z. Figure 8.6. The <h1>'s text node has become a child of the second <p>. Note that the <p> now contains two text nodes; they aren't automatically merged. ExampleI use appendChild() many times in the example scripts. Take, for instance, this function from Sandwich Picker: [Sandwich Picker, lines 184-186] function addExtraButton() { document.getElementById('extraButtonTarget'). appendChild(extraButton); } The extra button says 'Collect all orders', and it should appear when the user has ordered sandwiches but hasn't yet moved them to the order table. I prepared the extraButton node in advance (we'll discuss that in the next section), and now I append it to the <td> with ID="extrabuttonTarget". insertBefore()The insertBefore() method allows you to insert a node before another node, and therefore you use it every time you want to append a child but don't want it to become the last child. Just as with appendChild(), if the inserted node is already present in the document, it is removed from its current position, and the inserted node retains all its child nodes. var x = document.getElementsByTagName('p')[0]; var y = document.getElementsByTagName('h1')[0]; x.parentNode.insertBefore(x,y); Figure 8.7. The first <p> has been inserted before the <h1>. Now the first <p> becomes the <body>'s first child. The <h1> remains in the document, but now appears between the paragraphs. As before, it retains its child text node. Return valueinsertBefore() returns a reference to the inserted node: var x = y.insertBefore(z,a); Now x contains a reference to z. ExampleI use insertBefore() less often than appendChild(), but still quite a lot. For instance, take this line from Usable Forms: [Usable Forms, line 126] insertPoint.parentNode.insertBefore(Elements[i],insertPoint); When a form field that was initially hidden should return to the visible form, I insert it before its insert point. (This insert point is a marker that exists only to mark the point where the <tr> should be inserted, and it is a <tr>, too. We'll discuss markers in 8L.) I first move to the parent node of the insert point <tr> and execute insertBefore() from there. removeChild()The removeChild() method allows you to remove a node and its child nodes. For instance: var x = document.getElementsByTagName('p')[0]; x.parentNode.removeChild(x); Figure 8.8. The first <p> has been removed entirely, and its child text node is removed, too. Return valueremoveChild() returns a reference to the removed node: var x = y.removeChild(z); Now x contains a reference to z. ExampleWe already saw the addExtraButton() function from Sandwich Picker. There's also a removeExtraButton() function that removes the button if the user has moved all his ordered sandwiches to the order form: [Sandwich Picker, lines 188-191] function removeButton() { if (extraButton.parentNode) extraButton.parentNode.removeChild(extraButton); } First I check if extraButton is in the document. (Why? See 8K.) Then I move to its parentNode and remove extraButton. replaceChild()The replaceChild() method allows you to replace one node by another. Just as with appendChild() and insertBefore(), if the inserted node is already present in the document, it is removed from its current position. The inserted and replaced nodes retain all their child nodes. For instance: var x = document.getElementsByTagName('h1')[0]; var y = document.getElementsByTagName('p')[1]; x.parentNode.replaceChild(x,y); Figure 8.9. The second <p> has been replaced by the <h1>. Now the <h1> moves to its new position, and the second <p> is removed from the document tree. Both take their child text nodes to their new positions. The replaced node (y in the example) is now gone from the document, and unless you take precautions, you'll not be able to use it any more. We'll discuss this further in 8K and 8L. Return valuereplaceChild() returns a reference to the replaced node: var x = y.replaceChild(z,a); Now x contains a reference to a. ExampleI use replaceChild() only one single time in the example scripts, in Usable Forms's initialization function: [Usable Forms, line 49] hiddenFields[0].parentNode.replaceChild(newMarker,hiddenFields[0]); hiddenFields[0] is a <tr> that should be hidden. I replace it with newMarker, an empty marker <tr> (see 8L). Removing all child nodesOccasionally you want to wipe an element clean; you want to remove all of its child nodes before appending new ones. There are two simple ways of doing this: while (x.childNodes[0]) x.removeChild(x.childNodes[0]); This simple while() loop continues to work as long as the element has a first child node (childNodes[0]). It removes this first child node, and, as we'll see in 8I, the childNodes[] nodeList is immediately updated. Therefore the second child node becomes the first one, and the process is repeated until x has no more child nodes. (Of course, you could also use firstChild instead of childNodes[0].) The other way is even simpler: x.innerHTML = ''; Just set the innerHTML of the element to an empty string. We'll discuss this property further in 8F. |
EAN: N/A
Pages: 116