Section 8.4. VBA
8.4. VBAFormatting is the most important feature of this application but it also uses VBA to interact with the user. When the user clicks on one of the charts, a small macro assigned to the chart runs. This is the code assigned to the OCR chart: Public Sub OCR_click( ) Call GetData("OCR") End Sub To add this code to the project, click on Tools All this first macro does is run another macro named GeTData, passing in the name of the queue associated with this chart. Using a separate macro to do the work eliminates the need to duplicate the code for all the charts. There is a separate macro for each chart and they all consist of one line of code passing the name of the selected queue to the GeTData macro. Here is the Getdata macro: Public Sub GetData(MyType as String) Dim WritePoint As Integer Dim ReadPoint As Integer Dim ToGet As String ' This macro reads all the rows on the data sheet and copies the ' ones with the selected queue type to the Report sheet. ' The selected queue type is in MyType which is passed by the ' calling code. ' Turn off screen updating - This keeps the user from seeing all of the ' screen changes. Application.ScreenUpdating = False ' Excel will try to recalculate every time we change value. We will be ' moving a large number of rows and this will cause a lot of unnecessary ' recalculation and will slow down the process. Turning calculations off will ' speed things up. Application.Calculation = xlManual ' First we need to get rid of any old data on the Report sheet. Sheets("Report").Select ' Select the Report sheet Range("A8:J5000").ClearContents ' Clear the cells that might contain old data WritePoint = 7 ' WritePoint is the next row to be used on the Report ' We need to skip the first seven rows because of the ' summary and headings ReadNext: ' This is a named location in the program and lets ' us set up a loop to check all of the rows on ' the Data sheet ReadPoint = ReadPoint + 1 ' ReadPoint is the row number of the next row to ' check on the Date sheet. The value starts ' at zero by default so each time we go ' through the loop we add one. If Range("data!a" & ReadPoint).Value <> "" Then ' If column A of the current row is ' empty we are at the end of the data. If Range("data!a" & ReadPoint).Value = MyType Then ' Check to see if the ' current row is in the ' selected queue. ' At this point we know the current row has data we want ' on the Report sheet. WritePoint = WritePoint + 1 ' Add one to the WritePoint ToGet = ReadPoint & ":" & ReadPoint ' Build a reference to the ' entire row Sheets("Data").Select ' Go to the data sheet Rows(ToGet).Copy ' Copy the current row - toget contains ' the reference Sheets("Report").Select ' Go back to the Report sheet toput = "A" & WritePoint ' Build a reference to the A column of ' the current row Range(toput).Select ' Select the cell ' Paste the row onto the Report sheet Selection.PasteSpecial Paste:=xlPasteValues, Operation:=xlNone, SkipBlanks _ :=False, Transpose:=False End If GoTo ReadNext ' Go back and check the next row on the data sheet End If ' At this point the macro is done Application.ScreenUpdating = True ' Turn screen updating back on Application.Calculation = xlAutomatic ' Set calculations back to automatic Range("A1").Select ' select the upper left cell End Sub We want to let the user see the source documents for the work. There are two problems with this. First, there is nothing to click on, no button or chart. So, we have to make the sheet respond to a click on itself. Second, we don't know what kind of document we will be working with. In this case it is an image, perhaps a TIFF or BMP. But, in a real world situation it could be a text file, a WAV file, or even an Excel workbook. We need a way to show it to the user without even knowing what it is. Making that work requires some code. The report worksheet is an object, and like any object it has events. We need to assign a macro to an event on the Report sheet so that when the user selects a row we can show them the document. We start in the Visual Basic editor, but instead of working in a code module, we click on the Report sheet as shown in Figure 8-11. Figure 8-11. Adding code to a worksheet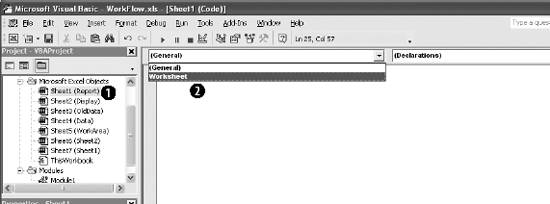 Clicking on the sheet (Item 1) brings up the code window for the sheet. By default we are in Declarations. We need to access the worksheet's events, so we select Worksheet from the drop-down box indicated in Item 2. This displays the code window in Figure 8-12. Figure 8-12. Inside the worksheet's code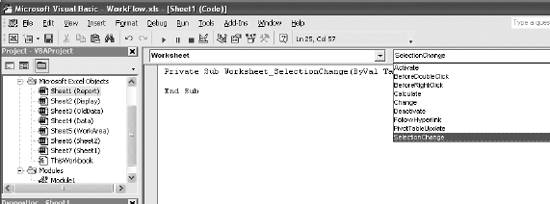 The worksheet's events are now available in the box in the upper-right part of the window. We can launch code with any of them. For this application we are interested in the Worksheet_SelectionChange event. This event fires every time the user selects a cell, range, row, or column on the sheet. Select SelectionChange in the box to create an empty macro in the code window and enter the following code in it: Private Sub Worksheet_SelectionChange(ByVal Target As Range) Dim MyPath As String Dim MyFile As String Dim q As Double ' The user has selected something on the Report sheet. We need to know ' if the selection is a row containing data. If the selection is an ' entire row the count of cells selected will be 256 and the column ' selected will be one. ' We know that rows 17 contain the summary and heading. If the user ' selected one of those rows we do nothing. ' This if statement checks to be sure that 256 cells were selected, that ' the selection is column one, and that the row selected is greater ' than seven. If Target.Count = 256 And Target.Column = 1 And Target.Row > 7 Then ' We still need to be sure that the row selected ' contains data. If Range("a" & Target.Row).Value <> "" Then ' This is not how it would be done in production. ' In this example the files are in the same folder ' as the worksheet. So, we use the same path. But ' in the real world this would probably be a path ' on a local network or perhaps a path contained ' in the data. MyPath = ActiveWorkbook.Path & "/" ' This is the file name from the data. MyFile = Range("g" & Target.Row).Value ' Here we create a batch file that can be run by MS-DOS. Open MyPath & "ExampleShell.bat" For Output As 1 ' The start command will associate the file type ' with the appropriate application. Print #1, "Start " & MyPath & MyFile Close 1 ' The shell command executes the batch file. q = Shell(MyPath & "ExampleShell.bat", 1) End If End If End Sub This code displays a file, but the file can only be viewed using a program. The registry knows what program to use based on the file type, as indicated by the extension at the end of the file name. For example if you open a file with a .xls extension it will be displayed using Excel. The start command in MS-DOS associates a file with the correct program and brings it up in a new window. We can execute a start command by putting it in a batch file, a file with a .bat extension. The shell command executes the batch file and the desired file is displayed. If you are working with several users they may not all use the same program to view a TIFF. Different systems use different viewers. This technique eliminates the need for the application to know what program to run and where to find it. |
 Macro
Macro EAN: 2147483647
Pages: 101