Oracle
Because of SQL Server's world-class reporting and business intelligence tools, more and more shops running Oracle rely on SQL Server for their reporting needs. Luckily, importing data from Oracle is much like importing from other sources, such as a text file or another SQL Server instance. In this section, you'll learn how to access data from a sample Oracle database.
Client Setup
An Oracle data provider is supplied with SQL Server 2005. The caveat is that the Oracle Client 8-1.7.0 or greater must be installed in order to use the data provider. The Oracle Client can be installed by running the Oracle Universal Installer. See your Oracle administrator for help. Alternately, the free Instant Client can be downloaded from the Oracle Web site at www.oracle.com/technology/tech/oci/instantclient/instantclient.html. If you use the Instant Client, be sure to install the Basic and ODBC packages.
Installing the Instant Client is as simple as copying some files, setting some environment variables, and running a batch file. You are not going to look at the steps here, as Oracle could modify them in the future.
Once the Oracle Client is installed, a tnsnames.ora file must be placed in the Oracle Home directory. The tnsnames.ora file is used for the same purpose as ODBC Data Source connections. It contains all of the information required to locate the Oracle database. An alias for the database is defined. The alias is used later when setting up the connection in SSIS or any other client application.
Here is a sample section from a tnsnames.ora file:
ORCL = (DESCRIPTION = (ADDRESS = (PROTOCOL = TCP)(HOST = VPC-XP)(PORT = 1521)) (CONNECT_DATA = (SERVER = DEDICATED) (SERVICE_NAME = orcl) ) )
In this example, the alias, ORCL, is used to connect to an Oracle database named orcl. Your Oracle administrator can provide more information on how to set up your tnsnames.ora file to point to a test or production database in your environment.
Importing Oracle Data
Create a new Integration Services project using BIDS. Add a Data Flow task to the design area. On the Data Flow tab, add an OLE DB Source. Name the OLE DB Source Oracle.
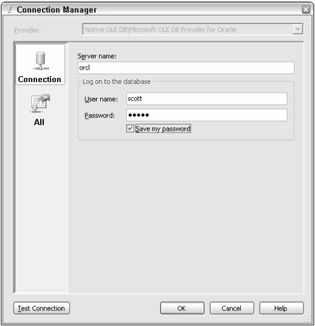
In the Connection Managers area, right-click and choose New OLE DB Connection to open the Configure OLE DB Connection Manager dialog. Click New to open the Connection Manager dialog. Select Microsoft OLE DB Provider for Oracle from the list of providers and click OK. Type the alias from your tnsnames.ora file for Server Name. Type in the user name and password and check Save My Password (see Figure 8-24). This example illustrates connecting to the widely available scott sample database schema. The user name is scott with a password of tiger. Verify the credentials with your Oracle administrator. You will probably want to test the connection to make sure that everything is configured properly. Click OK to accept the configuration.

Figure 8-24
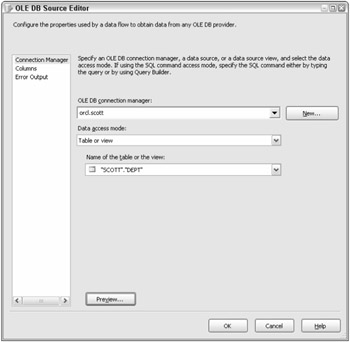
In the custom properties section of the Oracle component's property dialog, change the AlwaysUseDefaultCodePage property to True. Open the OLE DB Source Editor by double-clicking the Oracle source component. With the Connection Manager tab selected, choose the Connection Manager pointing to the Oracle database. Select Table or view from the Data Access Mode. Click the drop-down list under Name of the Table or the View to see a list of the available tables. Choose the "Scott"." Dept" table from the list (see Figure 8-25).

Figure 8-25
Select the Columns tab to see a list of the columns in the table. Click Preview to see sample data from the Oracle table. At this point, you can add a data destination component to import the data into SQL Server or another OLE DB destination. This is demonstrated several times elsewhere in the chapter, so you won't look at it again here.
Importing Oracle data is very straightforward, but there are a few things to watch out for. The current ODBC driver and OLE DB provider are designed for Oracle 7. At the time of this writing, Oracle 10g is the latest version available. Specific functionality and data types that were implemented after the 7 release will probably not work as expected. See Microsoft's Knowledge Base article 244661 for more information.
Now that you have seen how to import data from several sources using SSIS, you'll take a look at using the amazing new XML features.
EAN: 2147483647
Pages: 182