Script Component
The Script Component provides another type of scripting in SSIS. This component can be used only in the Data Flow portion of your SSIS package. The purpose of this component is to provide, consume, or transform data. Script components come in the following three types:
-
Source Type Component: The role of this Script Component is to provide data to your Data Flow task. You can define outputs and their types and use script code to populate them. An example would be reading in a complex file format, possibly XML or something more archaic like a COBOL copybook file from the mainframe. I've worked with several files that were way too complex for any generic flat file reader and required custom coding to read.
-
Destination Type Component: This type of Script Component consumes data much like an Excel or Flat File destination. One use for this type of Script Component is outputting data for batch processing to a mainframe system.
-
Transformation Type Component: This type of Script Component can perform custom transformations on data. It consumes input columns and produces output columns. You would use the component when one of the built-in transformations just isn't flexible enough.
Using the Script Component
Here you'll see how to create and use a Script Component. In this example, you have to process a flat file and make sure the data is good. The good records will go on to their appropriate table while the questionable records will be sent to an error table for manual cleansing.
You're going to import contacts from a mainframe application that allowed the users to enter pretty much anything they wanted into a field. The database has a certain set of requirements for data. If the imported data doesn't meet these criteria, you'll put it in an error queue to be handled manually.
The contacts table is created with the following script:
CREATE TABLE dbo.Contacts ( ContactID int NOT NULL IDENTITY (1, 1), FirstName varchar(50) NOT NULL, LastName varchar(50) NOT NULL, City varchar(25) NOT NULL, State varchar(15) NOT NULL, Zip char(10) NULL ) ON [PRIMARY]
The error queue table is virtually identical:
CREATE TABLE dbo.ContactsErrorQueue ( ContactErrorID int NOT NULL IDENTITY (1, 1), FirstName varchar(50) NULL, LastName varchar(50) NULL, City varchar(50) NULL, State varchar(50) NULL, Zip varchar(50) NULL ) ON [PRIMARY]
The main difference is that all the data fields are nullable and all are varchar(50).
Finally, the data format is fixed-width and is defined as follows.
| Field | Starting Position |
|---|---|
| First Name | 1 |
| Last Name | 11 |
| City | 26 |
| State | 44 |
| Zip | 52 |
The data file will look something like the following:
Jason Gerard Jacksonville FL 32276-1911 Joseph McClung JACKSONVILLE FLORIDA 322763939 Andrei Ranga Jax fl 32276 Chad Crisostomo Orlando FL 32746 Andrew Ranger Jax fl
Create a new package and add a Data Flow. Drag a Flat File Source to the Data Flow editor pane. Double-click the Flat File Source. In the Connection Manager, click New next to the Flat File Connection Manager drop-down. This will bring up the Flat File Connection Manager Editor. Name the Connection Manager "Contacts Mainframe Extract."
Click Browse and select the Contacts.dat file. Change the format to Fixed Width and click Columns on the left. Specify the Row Width as 62. Once you have the column boundaries marked, click Advanced on the left and give the columns meaningful names. Finally, click Preview on the left to see what your imported data will look like. Your preview should look like Figure 7-19.
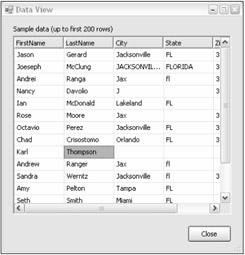
Figure 7-19
Now, add a Script Component to the Data Flow. When you drop the Script Component, you will be prompted to pick the type of component to create, as shown in Figure 7-20. Select Transformation and click OK.
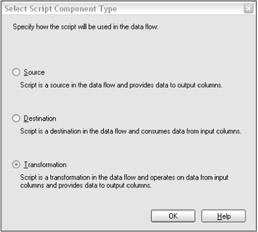
Figure 7-20
Drag a connection from the Flat File Source to the Script Component. Double-click the Script Component to bring up the Script Transformation Editor. You will notice that Input Name is a drop-down with a value of Input 0. You could have more sources pointed to this script component. You would select which columns from each input here.
Select all of the input columns. Now click Input and Outputs on the left. Here you can see the properties for your input and output columns. You can also define multiple outputs.
Expand Output 0, select Output Columns, and then click Add Column at the bottom. Set the name of this column to GoodFlag and change the DataType property to Boolean [DT_BOOL].
Now click Script on the left and then click the Design Script button.
This will open up the now familiar Visual Studio for Applications environment. The script provided is different from the one provided with the Script task.
' Microsoft SQL Server Integration Services user script component ' This is your new script component in Microsoft Visual Basic .NET ' ScriptMain is the entrypoint class for script components Imports System Imports System.Data Imports System.Math Imports Microsoft.SqlServer.Dts.Pipeline.Wrapper Imports Microsoft.SqlServer.Dts.Runtime.Wrapper Public Class ScriptMain Inherits UserComponent Public Overrides Sub Input0_ProcessInputRow(ByVal Row As Input0Buffer) ' ' Add your code here ' End Sub End Class
The imports are different. The three System namespace imports are the same, but the pipeline and runtime wrapper imports are new.
You will also notice that the ScriptMain class now inherits from UserComponent. Gone is the Public Sub Main(). Now you have a new method named Input0_ProcessInputRow that takes an Input0Buffer as its only parameter. If you had more inputs, you would see corresponding methods for each. The Input0Buffer class is auto-generated by the Script Component. It contains all the input and output columns as strongly typed properties (see Figure 7-21).
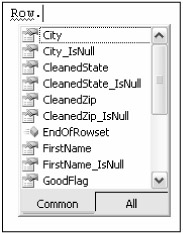 Figure 7-21
If you look in the Project Explorer, you will see three source files: BufferWrapper, ComponentWrapper, and ScriptMain.
BufferWrapper contains the custom-generated ScriptBuffers that your component will use. In this case, the only class in the file is Input0Buffer. Do not edit this code because it will be overwritten by the environment. The same goes for the code in ComponentWrapper, which contains UserComponent, the base class for your ScriptMain class. Finally, double-clicking ScriptMain will take you back to where you started with the ScriptMain class.
The rules for data validation are as follows:
-
All fields are required except for the zip code.
-
The zip code must be in the format DDDDD-DDDD or DDDDD where D is a digit from 0 through 9. If the zip code is valid for the first five characters but not afterward, strip the trailing records and use the first five.
-
The state must be two uppercase characters.
The data will be validated using regular expressions. Regular expressions are a powerful utility that should be in every developer's tool belt. They allow you to perform powerful string matching and replacement routines. An excellent tutorial on regular expressions can be found at http://www.regular-expressions.info.
The regular expressions for matching the data are as follows:
| ^\d{5}([\-]\d{4})?$ | Matches a five-digit or nine-digit zip code with dash |
| \b([A-Z]{2})\b | Ensures that the state is only two capital characters |
Add the following code to the Script Component:
Imports System Imports System.Data Imports System.Math Imports System.Text.RegularExpressions Imports Microsoft.SqlServer.Dts.Pipeline.Wrapper Imports Microsoft.SqlServer.Dts.Runtime.Wrapper Public Class ScriptMain Inherits UserComponent Private zipRegex As Regex = New Regex("^\d{5}([\@@hy]\d{4})?$", RegexOptions.None) Private stateRegex As Regex = New Regex("\b([A@@hyZ]{2})\b", RegexOptions.None) Public Overrides Sub Input0_ProcessInputRow(ByVal Row As Iput0Buffer) 'all fields except zip must have a value Dim isGood As Boolean = False If Row.FirstName_IsNull Or Row.LastName_IsNull Or Row.City_IsNull Or _ Row.State_IsNull Then Row.GoodFlag = False Return End If If Not Row.Zip_IsNull Then Dim zip As String = Row.Zip.Trim() 'zip must match regex if present If zipRegex.IsMatch(zip) Then Row.CleanedZip = zip isGood = True Else 'try to clean up the zip If zip.Length > 5 Then zip = zip.Substring(0, 5) If zipRegex.IsMatch(zip) Then Row.CleanedZip = zip isGood = True Else isGood = False End If End If End If End If If isGood Then Dim state As String state = Row.State.Trim().ToUpper() If stateRegex.IsMatch(state) Then Row.CleanedState = state Else isGood = False End If End If Row.GoodFlag = isGood End Sub End Class This code performs the data rules. First, the two regular expressions are defined that will be used to check the format of zip codes and states. In the Input0_ProcessInputRow method where execution starts, all fields are checked for NULL value except for the zip code. SSIS adds a property for each column in the row with the format ColumnName_IsNull. This property returns true if the particular column is NULL.
Next, if the Zip column is not NULL, its value is matched against the regular expression to see if it's in the correct format. If it is, the value is assigned to the CleanedZip column, since this is the column that will be stored in the destination table. If the value of the Zip column doesn't match the regular expression, the script checks to see if it is at least five characters long. If so, the first five characters are matched against the regular expression. If they match, these five characters are assigned to the CleanedZip column; otherwise, the GoodFlag is set to False.
Before checking the state, the GoodFlag is checked to make sure everything is good so far. If it's not, there is no point in checking the state.
The state is trimmed of any leading or trailing white space and then converted to uppercase. It is then matched against the regular expression. This expression simply checks to see if it's two uppercase letters between A and Z. If it is, the GoodFlag is set to true and the trimmed and uppercased value is assigned to the CleanedState field; otherwise, the GoodFlag is set to False.
To send the data to the appropriate table based on the GoodFlag, you must use the Conditional Split task. Add this task to the Data Flow designer. Connect the output of the Script Component task to the Conditional Split transformation. Edit the Conditional Split transformation and add an output with the condition GoodFlag == TRUE. The rows with this column set to true will be split from the rows where this column is false.
Now, add two OLE DB Destinations to the Data Flow designer. One should point to the Contacts table, the other to the ContactsErrorQueue table. Drag the output of the Conditional Split task to the OLE DB Destination for the Contacts table. Since this task has multiple outputs, select the output with the condition of GoodFlag == TRUE. Now drag the other output of the split to the ContactsErrorQueue destination.
Your final Data Flow should look something like Figure 7-22. A RowCount transformation and Data View have been added for debugging purposes. These will be discussed in the next section.
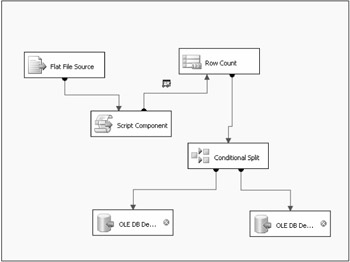
Figure 7-22
If you run this package with the Contacts.dat file provided in the downloadable source code package at www.wrox.com, 13 rows should go to the Contacts table and 2 should go to the error queue table.
Debugging the Script Component
Previously, you looked at using the Visual Studio for Applications environment to debug a Script task using breakpoints and other tools. Unfortunately, you do not have the ability to debug the Script Component using this environment. Any breakpoints that you set will be ignored. Instead, you must resort to inspecting the data stream using the RowCount component or a Data Viewer.
The RowCount task is very straightforward; it simply states how many rows passed through it. The Data Viewer is a much better way to debug your component, however. To add a Data Viewer, select the connector arrow, leaving the component that you want to see data for. In the previous example, this would be the connector from the Script Component to the Conditional Split task. Right-click this connection and select Data Viewers. The Data Flow Path Editor will pop up. Click Add to add the data viewer. On the Configure Data Viewer screen, select Grid as the type. Click the Grid tab and make sure all the columns you wish to see are in the Displayed Columns list. Close out this window and the Data Path Flow Editor window by clicking OK. Figure 7-23 shows the Data Path Flow Editor with a Data Viewer configured on Output 0.
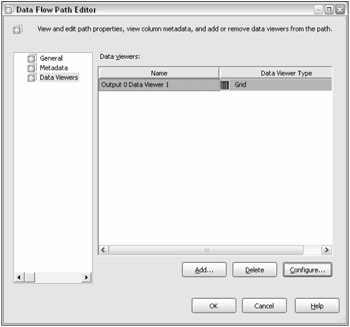
Figure 7-23
Now when you run this package again, you will get a Data Viewer window after the Script Component has executed. This view will show the data output by the Script Component. Figure 7-24 shows an example. Click the Play button to continue package execution, or simply close the window.
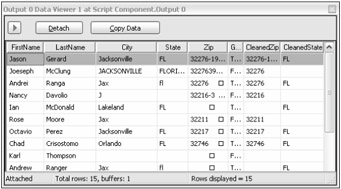
Figure 7-24
While using the Data Viewer certainly helps with debugging, it is no replacement for being able to step into the code. Hopefully future versions of the Script Component will have this ability.
EAN: 2147483647
Pages: 182