Script Tasks
The role of the Script task is primarily to control the flow of the SSIS package. When one of the existing Control Flow Items is not flexible enough to perform the action you desire, you should consider writing a script.
Here you'll create your very first SSIS script. You will create the most basic "Hello World!" example just to see how to add a script to a package, edit it, and execute it.
To create a SSIS project and add a Script task, do the following:
-
Create a new Integration Services Project.
-
Ensure that the Control Flow tab is selected and open the Toolbox.
-
Select the Script task from the Toolbox and drag it to the Control Flow container.
Your screen should look something like Figure 7-7.
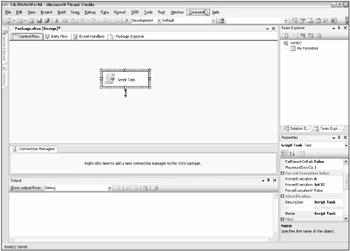
Figure 7-7
To open the Script task, you can double-click it or right-click it and select Edit. This will bring up the Script Task Editor window, as shown in Figure 7-8.
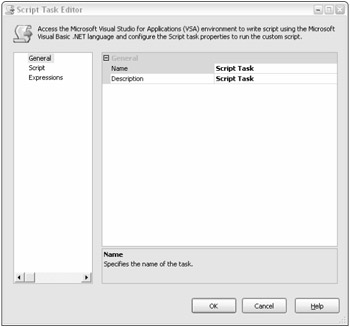
Figure 7-8
This window allows you to set a name for your script and give it a description. Never leave the name set to the default value; always give your script a meaningful name and description. Go ahead and change the Name property from Script Task to HelloWorldScriptTask. Change the description to "Prints 'Hello World!' to the screen."
Now select Script in the left pane. This opens the properties for the actual script as seen in Figure 7-9.
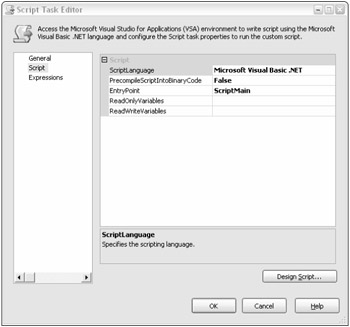
Figure 7-9
You will see five properties on this screen. The following is an explanation of each:
-
ScriptLanguage: This is the language the script will be written in. While it seems that you can set this to something other than its default of Microsoft Visual Basic.NET, you can't. The drop-down provides only this option. Unfortunately, Visual Basic.NET is the only language supported by the Script task in SSIS 2005.
-
PrecompileScriptIntoBinaryCode: When this property is set to true, your script will be compiled before the script executes. This will provide a speed bump on execution. When this flag is set to false, the script isn't compiled until the task is called. This property must be set to true in order to run on a 64-bit system or run as a SQL Server Agent job.
-
EntryPoint: This is the name of the class that contains the Main method that will be called inside your script to begin execution. A class must declare a function named Main in order to be used as an entry point.
-
ReadOnlyVariables: A comma-separated list of SSIS variables that can be read by your Script task.
-
ReadWriteVariables: A comma-separated list of SSIS variables that can be read from and written to by your Script task.
You should also notice a button near the bottom of this window with the caption "Design Script…" This launches the Visual Studio for Applications editor for the script. We'll investigate this later.
The final page available on the left of this dialog is the Expression item. See the "Expressions" section earlier in this chapter for more information on this item.
Ensure that Script is selected in the left pane and then click Design Script. A new window should open that looks like Figure 7-10.
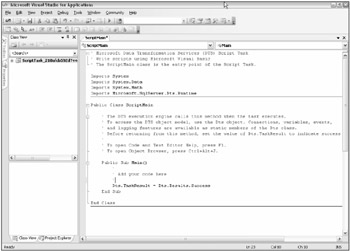
Figure 7-10
All your script editing is done inside the Visual Studio for Applications window. VSA gives you full access to the code editing and debugging features of Visual Studio, including syntax highlighting and IntelliSense.
This script is very basic, but there are a few important things to note. At the top there is a comment that should look like the following:
'Microsoft Data Transformation Services (DTS) Script Task 'Write scripts using Microsoft Visual Basic 'The ScriptMain class is the entry point of the Script Task.
It's a good idea to replace this comment with a description of the script you are writing. Replace this comment with "A script to display 'Hello World!' to the user."
Next you'll notices some Import statements.
Imports System Imports System.Data Imports System.Math Imports Microsoft.SqlServer.Dts.Runtime
These imports are included at the top of every script. Imports serve two main purposes: to show the libraries that are used in this code file and to alleviate excessive typing.
Finally you have your class definition, which should look like this:
Public Class ScriptMain ' The DTS execution engine calls this method when the task executes. ' To access the DTS object model, use the Dts object. Connections, variables, ' events, and logging features are available as static members of the Dts class. ' Before returning from this method, set the value of Dts.TaskResult to indicate ' success or failure. ' To open Code and Text Editor Help, press F1. ' To open Object Browser, press Ctrl+Alt+J. Public Sub Main() ' ' Add your code here ' Dts.TaskResult = Dts.Results.Success End Sub End Class
By now you've probably noticed all the references to DTS. This is because DTS was still the name for SSIS until pretty late in the development cycle. It just wasn't feasible to rename everything everywhere to SQL Server Integration Services, so you may still see references to DTS littered throughout SSIS.
This class definition is bare-bones. It contains a comment on how things work and a reminder to always set the value of Dts.TaskResult. You must always set this value to either a Success or Failure status, otherwise the SSIS runtime will not know if your script succeeded, regardless of any actions it may have performed.
Directly above the line setting Dts.TaskResult, add Msgbox("Hello World"). Now close the VSA editor, and your changes will be saved automatically. Click OK on the Script Task Editor window to close it. To run your script, press the F5 key. This simple task should execute and display "Hello World" in a message box. You must close the message box for the task to complete execution.
The Dts Object
The Dts object is an instance of Microsoft.SqlServer.Dts.Tasks.ScriptTask.ScriptObjectModel. The Dts object is your window into the package in which your script executes. The Dts object has seven properties and one method that allow you to interact with the package. Following is an explanation of these members.
-
Connections — A collection of connections defined in the package. You can use these connections in your script to retrieve any extra data you may need.
-
Events — A collection of events that are defined for the package. You can use this interface to fire off these predefined events and any custom events.
-
ExecutionValue — A read-write property that allows you to specify additional information about your task's execution using a user-defined object. This can be any information you want.
-
TaskResult — This property allows you to return the Success or Failure status of your script task to the package. This is your main way of controlling flow in your package. This property must be set before exiting your script.
-
Transaction — Gets the transaction that is associated with the container in which your script is running.
-
VariableDispenser — Gets the VariableDispenser object that you can use to retrieve variables.
-
Variables — A collection of all the variables that are available to your script. Provides an easier-to-use alternative to the VariableDispenser object.
-
Log — This method allows you to write to any log providers that have been enabled.
This may not seem like much, but the Dts object provides almost everything you need to interact with the executing package. The Dts object is available only in the Script task, not in the Script Component.
Accessing Variables
Variables are an important feature of the Script task. This type of variable is not the typical type that you would create in your script code. Rather, these variables are a communication device between your Script task and the rest of your package.
Variables in SSIS packages take on two forms: read-only and read-write. Read-only variables are variables that have been made available to your script for reading only. You cannot update the value of read-only variables using your script. Likewise, read-write variables can be updated through script code.
Variables can be accessed two ways in a Script task. The VariableDispenser object provides methods for locking variables for read-only or read-write access and then retrieving them. This was the standard way of accessing variables in scripts, but during early testing of SSIS, many users complained of the cumbersomeness of the API.
To retrieve a variable using the VariableDispenser object, you would have to write code like the following:
Dim vars As Variables Dts.VariableDispenser.LockForRead("SomeVariable") Dts.VariableDispenser.GetVariables(vars) MsgBox(vars(0).Value) Using four lines of code to read a variable value is not very efficient, so the Variables collection on the Dts object and the ReadOnlyVariables and ReadWriteVariables properties for the Script task were introduced.
The ReadOnlyVariables and ReadWriteVariables properties tell the Script task which variables to lock and how. The Variables collection in the Dts object then gets populated with these variables. The code to retrieve a variable then becomes much simpler, down to only one line:
Msgbox(Dts.Variables("SomeVariable").Value) Attempting to read a variable from the Variables collection that hasn't been specified in one of the variable properties of the task will throw an exception. Likewise, attempting to write to a variable not included in the ReadWriteVariables property also throws an exception.
| Note | Although Visual Basic.NET is not case-sensitive, SSIS variables are. |
To access Variables inside the Script Component, you must add them to the ReadOnlyVariables or ReadWriteVariables properties. Inside the component, you access them directly off the intrinsic Variables object. To access the value of a variable named StringVariable with a type of String from a Script Component, use code like this:
Variables.StringVariable
Unlike variables stored in the Variables collection, which must be accessed through a Variable object, these variables are of the type they are declared to be in the Variables editor. The above code returns a string since StringVariable is declared as a string.
While it is much easier to use variables in the Script Component, it is inconsistent and cumbersome to have so many different ways to access variables in SSIS scripts.
Events
The Script task can raise events, which can be logged with a log provider. If you have done any Windows GUI programming, you will be familiar with events. An event is a message sent from some object saying that something just happened or is about to happen.
Programs capture events with event handlers. You register an event handler for each event you wish to act upon. Your script can raise events, including custom ones you have defined.
To raise or fire an event, you use the Events property of the Dts object. The Events property is an instance of the IDTSComponentEvents interface. This interface specifies seven methods for firing events:
-
FireBreakpointHit — Fires an event when a breakpoint is hit.
-
FireError — Fires an event when an error occurs.
-
FireInformation — Fires an event with information. You can fire this event when you want some set of information to be logged, possibly for auditing later.
-
FireProgress — Fires an event when a certain progress level has been met.
-
FireQueryCancel — Fires an event to determine if package execution should stop.
-
FireWarning — Fires an event that is less serious than an error, but more than just information.
-
FireCustomEvent — Fires a custom defined event.
In SSIS, any events you fire will be written to all enabled log handlers that are set to log that event. Logging allows you to see what happened with your script when you're not there to watch it run. This is useful for troubleshooting and auditing purposes.
To configure your SSIS package for logging, go to SSIS Logging in the Business Intelligence Designer Studio. The Configure SSIS Log dialog will appear. Select SSIS log provider for XML files in the Provider Type drop-down and click Add. Select <new connection> for the configuration of the XML file provider to bring up the File Connection Manager Editor. For Usage type, select Create File and specify a path to a file name log.xml. Click OK to close the File Connection Manager. Make sure the box next to the provider name is checked so that the log will be used. Your screen should look something like Figure 7-11.
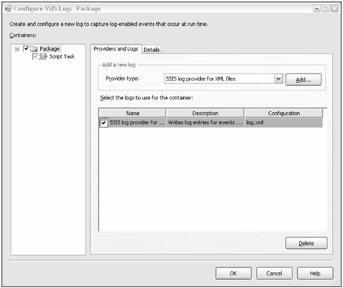
Figure 7-11
Now go to the Details tab and make sure the box next to OnInformation is checked. Only the events that are checked will be logged to the providers.
Edit the script of the HelloWorldScriptTask in your HelloWorld package. Replace the Msgbox("Hello World") line with the following code:
Dts.Events.FireInformation(1, "MyScriptTask", "Some Info here", "", 0, False)
The first argument to the FireInformation method is the information code. It can be anything you want; its purpose is to identify the message. The next argument specifies the source of the event. Again, it can really be anything you want. The third argument is the actual information message. The fourth argument is the path to the help file you wish to associate this information with. It's fine to pass an empty string; a help file is not required. The fifth argument is the help context that identities the help topic in the help file for this message. Since you're not using a help file, 0 is fine. The final argument is a Boolean flag that indicates whether this event should be fired more than once. Firing events can be expensive, so if this flag is set to false, this event will not be fired again for the duration of the package execution, even if this script is called again.
If you run your package, the XML file you specified should be created and have content similar to the following:
<record> <event>OnInformation</event> <message>Some Info here</message> <computer>LAPTOP</computer> <operator>LAPTOP\Jason</operator> <source>Script Task</source> <sourceid>{}</sourceid> <executionid>{}</executionid> <starttime>8/7/2005 9:54:45 PM</starttime> <endtime>8/7/2005 9:54:45 PM</endtime> <datacode>1</datacode> <databytes>0x</databytes> </record>
You'll have other events in the file such as Package Start and Package End, but this is the event that your code fired. This record contains the basic information on the event including the message, event execution time, and the computer and user that raised the event.
You can also specify event handlers to perform other operations when an event is fired. This is done on the Event Handlers view in the package designer. These event handlers, however, are not covered in this chapter. For more information on Event Handlers, see Chapter 13 of this book and also Books Online.
Logging
The Log method of the Dts object writes a message to all enabled log providers. The Log method has three arguments.
-
messageText — The message to log
-
dataCode — A field for logging a message code
-
dataBytes — A field for logging binary data
The Log method is similar to the FireInformation method of the Events property, but it is easier to use and more efficient. The following code logs a simple message with some binary data to all available log providers. This is quite useful for troubleshooting and auditing purposes. You can write out information at important steps in your script and even print out variable values to help you track down a problem.
Dts.Log("my message", 0, myByteArray)
Script Task Debugging
Debugging is an important new feature of scripting in SSIS. Gone are the days of using the Msgbox() function to see the value of variables. Using the Visual Studio for Applications environment, you now have the ability to set breakpoints, examine variables, and even evaluate expressions interactively.
Breakpoints
Breakpoints allow you to flag a line of code where execution pauses while debugging. Breakpoints are invaluable in determining what's going on inside your code. They allow you to step into your code and see what happens as it executes.
You can set a breakpoint in several ways. One way is to click in the gray margin at the left of the text editor at the line where you wish to stop execution. Another way is to move the cursor to the line you wish to break on and hit F9. Yet another way is to select Debug Toggle Breakpoint.
To continue execution from a breakpoint, press F10 to step to the next line or F5 to run all the way through to the next breakpoint.
When you have a breakpoint set on a line, the line gets a red highlight like the one shown in Figure 7-12.
![]()
Figure 7-12
When a Script task has a breakpoint set somewhere in the code, it will have a red dot on it similar to the one in Figure 7-13.

Figure 7-13
Autos, Locals, and Watches
The Visual Studio environment provides you with some powerful views into what is happening with the execution of your code. These views consist of three windows known as the Autos window, Locals window, and Watch window. These windows share a similar layout and display the value of expressions and variables, though each has a distinct method determining what data to display.
The Autos window displays the current statement, as well as three statements behind and in front of the current statement. For the running example, the Autos window would appear, as in Figure 7-14.

Figure 7-14
The Locals window displays variables that are local to the current context. It looks virtually identical to the Autos window.
Watches are another very important feature of debugging. Watches allow you to specify a variable to watch. You can set up a watch to break execution when a variable's value changes or some other condition is met. This will allow you to see exactly when something is happening, such as a variable that has an unexpected value.
To add a watch, select the variable you want to watch inside the script, right-click it, and select Add Watch. This will add an entry to the Watch window.
You can also use the Quick Watch window accessible from the Debug menu or through the Ctrl+Alt+Q key combination. The Quick Watch window is shown in Figure 7-15.
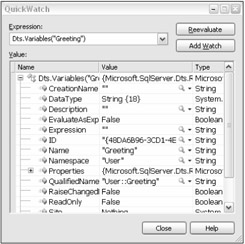
Figure 7-15
This window allows you to evaluate an expression at runtime and see the result in the window. You can then click the Add Watch button to move it to the Watch window.
The Immediate Window
The Immediate window allows you to evaluate expressions, execute procedures, and print out variable values. It is really a mode of the Command window, which allows you to issue commands to the IDE.
| Note | For more information on how to use the Command window and its available commands, see the MSDN documentation for Visual Studio. |
The Immediate window is very useful while testing. You can see the outcome of several different scenarios. Suppose you have an object obj of type MyType. MyType declares a method called DoMyStuff() that takes a single integer as an argument. Using the Immediate window, you could pass different values into the DoMyStuff() method and see the results. To evaluate an expression in the Immediate window and see its results, you must start the command with a question mark (?).
?obj.DoMyStuff(2) "Hello"
Commands are terminated by pressing the Enter key. The results of the execution are printed on the next line. In this case, calling DoMyStuff() with a value of 2 returns the string "Hello."
You can also use the Immediate window to change the value of variables. If you have a variable defined in your script and you want to change its value, perhaps for negative error testing, you can use this window, as shown in Figure 7-16.
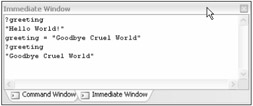
Figure 7-16
In Figure 7-16, the value of the variable greeting is printed out. The value returned from an expression is always printed on the line directly below the expression. After the value is printed, it is changed to "Goodbye Cruel World." The value is then queried again and the new value is printed.
EAN: 2147483647
Pages: 182