The Solution Explorer Window
The Solution Explorer Window is where you can find all of your created SSIS packages, connections, and Data Source Views. A solution is a container that holds a series of projects. Each project holds a myriad of objects for whatever type of project you're working in. For SSIS, it will hold your packages and shared connections. Once you create a solution, you can store many projects inside of it. For example, you may have a solution that has your VB.NET application and all the SSIS packages that support that package. In this example, you would probably have two projects: one for VB and another for SSIS.
After creating a new project, your Solution Explorer Window will contain a series of empty folders. Figure 2-12 shows you a partially filled Solution Explorer. In this screenshot, there's a solution and a project called CalculatedColumns. Inside that project, there are two SSIS packages.
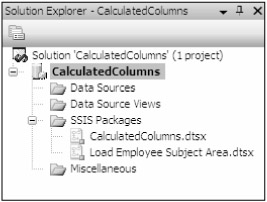
Figure 2-12
To create a new project inside an existing open solution, right-click the solution name in the Solution Explorer Window and select New Project. To create a new item to your project in the folder, right-click on the folder that holds the type of item that you wish to add and select New Data Source, New Data Source View, or New SSIS Package.
If you look into the directory that contains your solution and project files, you'll see all the files that are represented in the Solution Explorer Window. Some of the base files you may see will have the following extensions:
-
.dtsx — A SSIS package, which uses its legacy extension from the early beta cycles of SQL Server 2005 when SSIS was still called DTS
-
.ds — A shared data source file
-
.dsv — A data source view
-
.sln — A solution file that contains one or more projects
-
.dtproj — A SSIS project file
The Toolbox
The Toolbox contains all the items that you can use in the design pane at any given point in time. For example, the Control Flow tab has the items shown in Figure 2-13. This list may grow based on what custom tasks are installed. The list will be completely different when you're in a different tab, such as the Data Flow tab. All the tasks you see in Figure 2-13 will be covered in Chapter 3.
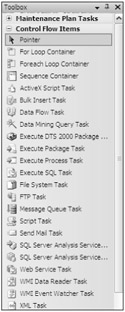
Figure 2-13
The Toolbox is organized into tabs such as Maintenance Tasks and Control Flow Items. These tabs can be collapsed and expanded for usability. As you use the Toolbox, you may want to customize your view by removing tasks or tabs from the default view. You can remove or customize the list of items in your Toolbox by right-clicking on an item and selecting Choose Items. This takes you to the Choose Toolbox Items dialog box shown in Figure 2-14. To customize the list that you see when you're in the Control Flow, select the SSIS Control Flow Items tab, and check the tasks you'd like to see.
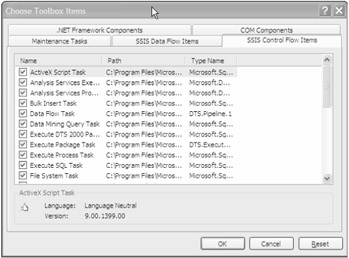
Figure 2-14
If you right-click on a particular task, you'll get a menu that will let you customize your view by adding or removing tabs and adding, renaming, or removing items. You can also change the order in which the items or tabs appear just by clicking and dragging from the source to the destination or by right-clicking and selecting Sort Alphabetically.
The Properties Windows
The Properties Window (shown in Figure 2-15) is where you can customize almost any item that you have selected. For example, if you select a task in the design pane, you'll receive a list of properties to configure, such as the task's name and what query it's going to use. The view will vary widely based on what item you have selected. Figure 2-15 shows a Send Mail task.
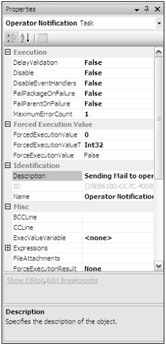
Figure 2-15
Navigation Pane
One of the nice usability features that have been added in BIDS is the ability to navigate quickly through the package by using the navigation pane (as shown in Figure 2-16) in the bottom-right corner of the package. The pane is visible only when your package is more than one screen in size, and it allows you to quickly navigate through the package. To access the pane, left-click and hold on the cross-arrow in the bottom-right corner of the screen. You can then scroll up and down a large package with ease.
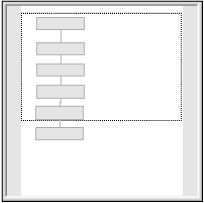
Figure 2-16
Other Windows
At design time, the BIDS has several other windows that you can choose to dock, undock, show, hide, or auto-hide based on your needs or what stage you are at in development. These supplementary windows include the following:
-
Error List window: Shows errors and warnings that have been detected in the package. Double-clicking on an entry in this window will open the editor of the object causing the error.
-
Output window: Shows the results from when you build or execute a package in the BIDS environment. For example, the Output window will show any errors that occur during building or deploying or during runtime.
-
Task List window: Shows tasks that a developer can create for descriptive purpose or as a follow-up for later development.
As you begin to test your packages, you will want to execute them inside of the BIDS. This will shift the mode into runtime, and no editing will be allowed until the package has completed execution. During runtime, the following windows will also appear:
-
Call Stack window: Shows the names of functions or tasks on the stack.
-
Breakpoints window: Shows all of the breakpoints set in the current project.
-
Command window: Used to execute commands or aliases directly in the BIDS.
-
Immediate window: Used to debug and evaluate expressions, execute statements, and print variable values.
-
Autos window: Displays variables used in the current statement and the previous statement.
-
Locals window: Shows all of the local variables in the current scope.
-
Watch windows: Allow you to add specific variables to the window that can be viewed as package execution takes place. You can also directly modify read/write variables in this window. You'll learn more about these in Chapter 13.
EAN: 2147483647
Pages: 182