Precedence Constraints
Precedence constraints, those green, red, and blue arrows, can be used to handle error conditions and the workflow of a package. Figure 13-1 shows a typical example. If the Initial Data Flow task completes successfully, the Success Data Flow task will execute. A green arrow (on the left) points to the Success Data Flow task. If the Initial Data Flow task fails, the Failure Send Mail task executes, sending notification of the failure. A red arrow (in the middle) points to the Failure Send Mail task. No matter what happens, the Completion Script task will always execute. A blue arrow (at the right) points to the Completion Script task.
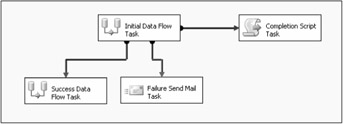
Figure 13-1
By default, the precedence constraint will be a green arrow designating success. To change how the precedence constraint is evaluated, you can right-click the arrow and choose a different outcome from the pop-up menu, as shown in Figure 13-2.
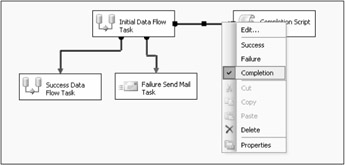
Figure 13-2
In addition to the success, failure, or completion of a task, you can combine the task outcome with a Boolean expression to determine the flow. Using Boolean expressions with precedence constraints will be discussed shortly. Tasks may also be combined into groups by using containers, and the workflow can be controlled by the success or failure of the container. For example, a package may have several Data Flow tasks that can run in parallel, each loading data from a different source. All of these must complete successfully before continuing on to the next step. These tasks can be added to a Sequence Container, and the precedence constraint can be drawn from the container to the next step. Figure 13-3 is an example showing how a Sequence Container might be used. After the Initialization Script runs, the Import Data container executes. Within it, three Data Flow processes run in parallel. A failure of any of the Data Flow tasks will cause the Import Data container to fail, and the failure message will be sent. If all three complete successfully, the Clean Up Script will run.
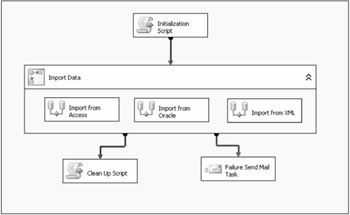
Figure 13-3
Precedence Constraints and Expressions
The workflow within a package can be controlled by using Boolean expressions in place of or in addition to the outcome of the initial task or container. Any expression that can be evaluated to True or False can be used. For example, the value of a variable that changes as the package executes can be compared to a constant. If the comparison resolves to True, the connected task will execute. The way a precedence constraint is evaluated can be based on both the outcome of the initial task and an expression. This allows the SSIS developer to finely tune the workflow of a package. The following table shows the four possibilities for configuring a precedence constraint.
| Evaluation Operation | Definition |
|---|---|
| Constraint | Success, Failure, or Completion |
| Expression | Any expression that evaluates to True or False |
| Expression AND Constraint | Both conditions must be satisfied |
| Expression OR Constraint | One of the conditions must be satisfied |
To configure a precedence constraint to use an expression, double-click the arrow to bring up the Precedence Constraint Editor (see Figure 13-4). There you can choose which type of Evaluation Operation to use and set the value of the constraint and/or supply the expression.
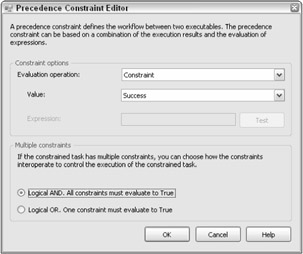
Figure 13-4
In this example, you will simulate flipping a coin to learn more about using expressions with precedence constraints. First, create a new table to hold the results. Connect to a test database in SQL Server Management Studio and run this script:
CREATE TABLE CoinToss ( Heads INT NULL, Tails INT NULL ) GO INSERT INTO CoinToss SELECT 0,0
Start a new SSIS project in BIDS. Create a Connection Manager pointing to the test database where the CoinToss table was created. The steps for creating a Connection Manager are covered in Chapter 3. Add an Execute SQL task to the Control Flow design area. Change the name of the task to Clear Results. Double-click the Clear Results task to open the Execute SQL Task Editor. Set the Connection property to point to the Connection Manager that you just created. Type the following code in the SQLStatement field:
UPDATE CoinToss SET Tails = 0, Heads = 0
Click OK to accept the configuration and dismiss the dialog box. Right-click the Control Flow design area and select Variables from the pop-up menu to open the Variables window. Create a new package-level variable called Result. Set the Data Type to Int32.
Add a For Loop Container to the design area. You will use the container to simulate flipping the coin a given number of times, so name it Coin Toss Simulator. Drag the Precedence Constraint from the Clear Results task to the Coin Toss Simulator. Select the Coin Toss Simulator and open the Variables window. Add a variable called Count, with a Data Type of Int32. In this case, the variable will only be used by the For Loop and the scope will be Coin Toss Simulator. Double-click the Coin Toss Simulator container to open the For Loop Editor. Set the properties as in the following table and click OK.
| Property | Value |
|---|---|
| InitExpression | @Count = 0 |
| EvalExpression | @Count < 100 |
| AssignExpression | @Count = @Count + 1 |
This should look familiar to you if you have programmed in almost any language: The For Loop will execute 100 times.
Drag a Script task into the Coin Toss Simulator. Since the Coin Toss Simulator is a container, you can drag other tasks into it. Name the Script task Toss. Double-click Toss to open the Script Task Editor. In the Script pane, ReadWriteVariables section, type in User::Result. The script will have access only to variables set up in this way.
Click Design Script to open the VSA design environment. Each time this script runs, it will randomly set the Result variable equal to a one or a two. Replace Sub Main with this code:
Public Sub Main() Randomize() Dts.Variables("User::Result").Value = Cint(Int((2 * Rnd()) + 1)) Dts.TaskResult = Dts.Results.Success End Sub Close the VSA design area and click OK to accept the changes. Drag two Execute SQL tasks into the Coin Toss Simulator container. Name one Heads and the other Tails. Connect the Coin Toss Script task to each of the Execute SQL tasks. Double-click the Precedence Constraint pointing to Heads to bring up the Precedence Constraint Editor.
Change the Evaluation Operation from Constraint to Expression. The Expression text box will now become available. Type the following into the Expression property:
@Result == 1
Click OK. The precedence constraint will change from green to blue, meaning completion, and will have an ƒx symbol next to it specifying that the precedence uses an expression.
Open the properties of the precedence constraint pointing to Tails. Change the Evaluation Operation from Constraint to Expression. Type this in the Expression property:
@Result == 2
Click OK to accept the properties. At this point, the package should resemble Figure 13-5.
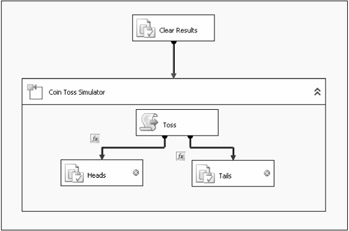
Figure 13-5
Just a couple more details and you'll be ready to run the package. Double-click Heads to open the Execute SQL Task Editor. In the Connection property, set the value to the test database Connection Manager. Type this in the SQLStatement property to increment the count in the CoinToss table:
UPDATE CoinToss SET Heads = Heads + 1
Click OK to accept the changes. Bring up the Execute SQL Task Editor for the Tails object. Set the Connection property to the test database Connection Manager. Type this code in the SQLStatement property:
UPDATE CoinToss SET Tails = Tails + 1
Click OK to accept the configuration and run the package. As the package runs, you can see that sometimes Heads will execute, and sometimes Tails will execute. Once the package execution completes, return to SQL Server Management Studio to view the results by running this query:
SELECT * FROM CoinToss
Out of 100 coin tosses, Heads should have come up approximately 50 times.
This simple example demonstrates how to use an expression to control the package workflow instead of or combined with the outcome of a task. In a business application, maybe the precedence constraint could be used to ensure that the number of rows affected by a previous step is less than a certain value. Or possibly, a task should execute only if it is a particular day of the week. Any variable within scope can be used and several functions and operators are available to build the expression. Any valid expression will work as long as it evaluates to True or False. See Chapter 7 to learn more about building and using expressions.
Multiple Constraints
In your package workflow, you can have multiple precedence constraints pointing to the same task. By default, the conditions of both must be True to enable execution of the constrained task. You also have the option of running a task if at least one of the conditions is True by setting the Multiple Constraint property to Logical Or. One Constraint Must Evaluate to True (see Figure 13-6).
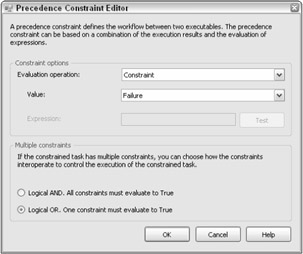
Figure 13-6
The solid arrows change to dotted arrows when the Logical Or option is chosen. Figure 13-7 shows how the Send Mail task will execute if either of the Data Flow tasks fails.
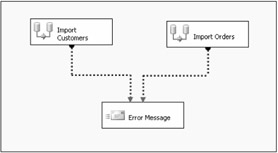
Figure 13-7
By using precedence constraints, you control the order of events within a package. After a task or container executes, and depending on how the precedence constraint between the two components was evaluated, the second task or container runs. With all of these options, you can control the workflow of your package at a very granular level. Drilling down a bit more, you will now learn another way to control package execution: event handling.
EAN: 2147483647
Pages: 182