Chapter 10: Change Management
The challenges of the database administrator have changed drastically since the days of SQL Server 2000. Laws such as HIPAA and Sarbanes-Oxley have caused a DBA's job to become much more ritualistic because of trying to follow policies. In this chapter, you will learn how to create projects for your SQL Scripts and how to integrate those into Source Safe. You'll also learn how to monitor for unauthorized changes by using DDL triggers.
Creating Projects
Visual Studio Projects are generally a foreign concept to DBAs, as the concept originated from the programmer world. The hierarchy in Visual Studio is that you create a solution, which could contain many projects, which could contain many files for the project. For example, you may have a solution called LoanApplication that contains two projects: one for your C# program and another for the DDL to create the database. In the business-intelligence world, these solutions help you group all the related files together, like SSRS reports, SSAS cubes, and the SSIS packages to load the data.
Inside Management Studio, you can create projects as well to hold your scripts and connections for easy access. When you double-click a script, it will automatically connect to the connection associated with the script. By storing it in a project, it enables you to store files easily into Source Safe. This enables you to be able to check code in and out, allowing for a collaborative development environment where only one DBA could be editing the code at one time. We'll discuss this requirement later in this chapter, but version-controlling your scripts is often a requirement for change management. You could also check all of your administrative scripts into Source Safe and share them out amongst all the other administrators.
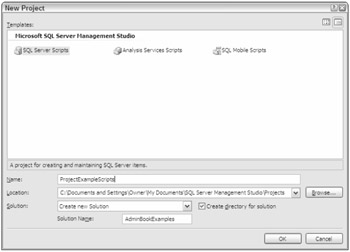
You can create a project in Management Studio by selecting FileNewProject. Select SQL Server scripts as your project template. Call the project ProjectExampleScripts and name the solution AdminBookExamples (shown in Figure 10-1).

Figure 10-1
When you click OK, a new solution and project will be created. You will see three folders created in the project: Connections, Queries, and Miscellaneous. Your database connections will go into the Connections folder, and all of your queries that you'd like to keep together in the project go into the Queries folder. The Miscellaneous folder holds files that don't have a .SQL extension but are files that you'd like to keep in the project, like a readme.txt file that may describe instructions for using the project.
| Note | If you have a tool like Visual Source Safe installed, there will be a checkbox to automatically check the solution into Source Safe upon creation. |
Creating a Connection
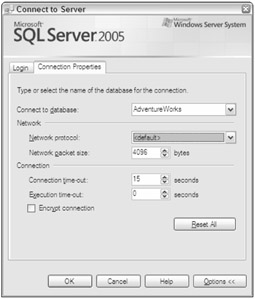
To create a connection, right-click the Connections folder and select New Connection. The Connect to Server dialog box will open. Type your normal server connection information and how you wish to authenticate. Then go to the Connection Properties tab (shown in Figure 10-2) and select AdventureWorks for the Connect to Database option. Note that you can also set the default protocol here if it differs from your default.

Figure 10-2
When you click OK, the connection will be created in the Connections folder. There are other ways to create this connection as well. If you create a query first, you will be prompted for a connection prior to query creation. This would also create a connection in the Connections folder as well and is normally the easier way to create the connection.
Creating a Project Query
The Queries folder is a repository of all the queries for your project. To create a query in the project, right-click the Queries folder and select New Query. You will be prompted to confirm the connection. The default query name will be SQLQuery1.sql. Next, type whatever you wish in the Query Window and click FileSave. Finally, rename the query to SampleQuery1.sql by right-clicking the query and selecting Rename. Click Save All to save the queries and the project.
With the query now saved, you're ready to begin using the query. Close the Query Window and then double-click the query file again. Note that this time, the query opens automatically and does not prompt you for a connection. You can see what connection is associated with the query by right-clicking the query and selecting Properties Window. You then continue to add additional queries until your project is complete.
Again, generally the main point of creating an entire project and solution is for integration with a source-control system. If you are using a source-control system such as Source Safe, each time you add or delete a new script, the entire project will be checked out.
EAN: 2147483647
Pages: 193