Configuration Tools
Now that you have SQL Server installed, or have upgraded to SQL Server 2005, it will probably not be configured specifically for you out of the box. In SQL Server 2005, Microsoft has chosen to reduce the feature set of SQL Server dramatically out of the box by turning off features after installation. The features turned off may vary based on the edition of SQL Server. For example, TCP/IP is disabled in Developer edition by default, and every edition has CLR integration turned off. This makes the environment more usable for you as an administrator by not having features you don't care about crowding your administration screen. It also reduces the options that a hacker can use to penetrate your system.
SQL Server Configuration Manager
The SQL Server Configuration Manager configures the SQL Server services much like the Services applet in the control panel, but it has much more functionality than the applet. For example, the program can also change what ports SQL Server listens on and what protocols each instance uses. You can open the program (Figure 4-1) from Start SQL Server 2005 Configuration Tools.
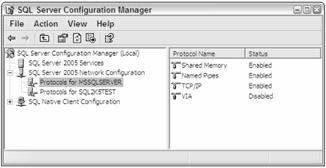
Figure 4-1
You can select the SQL Server 2005 Services tree to configure the various SQL Server services. To configure an individual service such as SQL Server, double-click the service name to open the service Properties page. In the Log On tab, you can configure which account starts SQL Server. We recommend that you start SQL Server with a regular domain user account with minimal rights. The account should not have the privilege to Log on Locally, for example. There is no reason for the account to be a local or domain administrator in SQL Server 2005. Additionally, you should create a nonexpiring password so your SQL Server doesn't immediately cease to start. If you don't see the SQL Server services communicating outside the instance's machine, you could start the service with the Local System account, but the account may have more local rights than you wish. (We talk more about this in Chapter 9.)
In the Service tab, you can specify whether you'd like the service to start automatically, manually, or be disabled. If you go to the Advanced tab (shown in Figure 4-2) for each service, you can configure the more interesting options. For example, here you can turn off Customer Feedback Reporting. This feature enables Microsoft to receive utilization reports from your SQL Server. Even if you wanted to do this, in most production environments your SQL Server may not be able to send the report, due to a lack of Internet access from production servers.
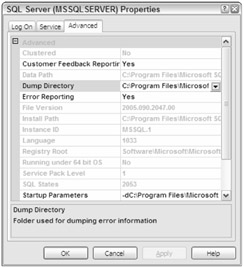
Figure 4-2
The Error Reporting option in the Advanced tab will e-mail Microsoft whenever a critical error has occurred. The minimal information is sent over a secure HTTPS protocol. Alternatively, you may also wish to send these errors to your own internal Corporate Error Reporting (CER) system, which is a product that you can download from Microsoft.
In the SQL Server 2005 Network Configuration page in Configuration Manager, you can see a list of network protocols that SQL Server is listening on by instance. If you wish to turn a protocol on or off, you can do so by right-clicking the protocol and selecting Enable or Disable. By enabling only the Shared Memory protocol, you turn off all communication to the instance outside your single server.
SQL Server Surface Area Configuration
When SQL Server 2005 shipped, it added a large number of new features that some DBAs considered controversial. For example, many DBAs were frightened (to put the term lightly) by the CLR integration feature and did not want it turned on by default. To keep the system secure and more usable, Microsoft decided to turn off many features by default. The SQL Server Surface Area Configuration tool (also called SQL SAC) is the tool you can use to turn on many of the features turned off in SQL Server by default and its ancillary products. When you open the tool, you can choose whether you want to configure the Services and Connections or Features. The Services and Connections page allows you to configure the SQL Server services and networks much like the SQL Server Configuration Manager we covered earlier. The Features page allows you to turn on given features such as SQL CLR Integration.
You can click Change Computer to point the tool at a remote server for configuration, if you have permission to do so. If you click Services and Connections, you can see a part of the tool that in many ways looks like the SQL Server Configuration Manager. For example, a good portion of the tool gives you an interface to configure how the SQL Server services will start (automatic, manual, or disabled).
The most important area to configure in this part of the configuration tool is under the Database Engine tree, under Remote Connections (Figure 4-3). In this section, you can specify whether you wish SQL Server to allow remote connections or only be limited to connections from within your workstation or server. This setting is set to Local Connections Only in the Developer, Evaluation, and SQL Express editions of SQL Server. This is because in usability studies, most used these editions for local development or applications and never required external connections. If you set this setting to Local and Remote Connections, you can specify what protocols you want SQL Server to listen on, and the setting will also be mirrored in the SQL Server Configuration Manager. A similar setting is also available for the Analysis Services service, but the service must be running to enable it.
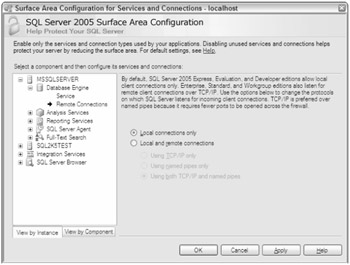
Figure 4-3
| Note | Changing this setting will require that you stop and start SQL Server at some point. |
The biggest part of the product is under the Configuration for Features area of the application, which you can get to from the main page by clicking Surface Area Configuration for Features. The SQL Server services must be started in order to configure the services using this application, and you can only use the tool to manage SQL Server 2005 instances. You can click View by Instance or View by Component to sort the features in different methods.
The Ad-Hoc Remote Queries page allows you to turn on the OpenRowSet and OpenDataSource functions. The functions allow you to connect to a SQL Server and then use that server to connect to other servers and run queries. These two functions are disabled by default because if the functions are not protected, they can be exploited by a hacker. For example, a hacker can use SQL injection to connect to your SQL Server through your Web server and then attack other servers from the valid connection. You should keep this setting off unless you have a strong need to use the feature.
On the CLR Integration page, you can enable one of the most controversial features for an administrator: CLR integration. With this disabled, developers will not be able to use one of the most developer-centric features in SQL Server 2005. If the developer tries to use CLR, he or she will receive an error.
In the DAC page, you can turn on the Dedicated Administrator Connection. Essentially, it allows an administrator to gain access to your SQL Server when the CPU is at full utilization and normal users can't do anything. This connection is given extra priority, and Microsoft was worried that administrators would use the connection for day-to-day work and so disabled it.
You should only use a DAC in special circumstances. For example, in some cases, you may find that a user is running a query that has utilized all of your system's resources. The user may be using so much of the system's resources that no other users, including yourself, can log in to the system to kill the user's connection. This would be a great use for the DAC. Under this situation before, you would have to stop and start the SQL Server if some time had passed. With the DAC enabled, as a DBA you can log in if you have sysadmin rights by qualifying the server with ADMIN:. For example, if you wanted to log in to the localhost machine, you would use ADMIN:localhost. You will receive an error if the feature is disabled.
In the Database Mail page, you can enable the new Database Mail feature. This feature allows you to send e-mail from your database server using SMTP. The stored procedures that this feature uses are not turned on by default and must be enabled here. (We talk more about this feature in Chapter 5.)
In the Native XML Web Services page, you can quickly see in one console which Web services are enabled. Then you can disable services that you do not wish to be listening. The Services Broker page operates much the same way with Service Broker queues.
Two of the most dangerous extended stored procedures in SQL Server are the OLE Automation stored procedures (ones that begin with SP_OA and xp_cmdshell). The OLE Automation extended stored procedures allow a T-SQL programmer to instantiate objects inside a T-SQL script, like objects for e-mail or a third-party component. All of that functionality can be replaced with CLR integration, but the feature was left in, although turned off, for backward compatibility. The xp_cmdshell stored procedure is used by hackers and DBAs to shell out to DOS and run executables. The problem is that hackers can do this to run dangerous commands against your machine.
Two other legacy features are also disabled by default. The SQL Mail feature is what SQL Server 2000 used to send mail through MAPI and has been replaced by Database Mail. The Web Assistant stored procedures allow you to create a Web page from a SQL query and are not generally used by DBAs.
| Note | Most of the options that you set here will require that you stop and start the SQL Server instance that you're configuring in order to make the setting active. |
Startup Parameters
SQL Server has an array of switches you can use to troubleshoot or enable advanced settings for the database engine. You can do this by setting the switches for the service or by running SQL Server from a command prompt. One way you can change the SQL Server service's startup parameters so it uses the switch every time is in SQL Server Configuration Manager. In the SQL Server 2005 Services page, double-click SQL Server (MSSQLServer by default but may vary based on your instance name) and go to the Advanced tab. Add any switches you wish in the Startup Parameters option, separated by semicolons. You can see in Figure 4-4 that one additional switch is enabled: -f. We'll discuss this switch momentarily.
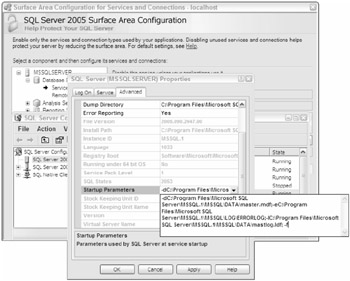
Figure 4-4
The second way to start SQL Server is by running sqlservr.exe from the command prompt. The file is located by default in the C:\Program Files\Microsoft SQL Server\MSSQL.1\MSSQL\Binn directory. You can then turn on any nondefault parameters you wish by adding the switch after sqlservr.exe, as shown in Figure 4-5. This is generally the preferred way to start your SQL Server in a one-off debug mode, since you won't leave any settings intact that you may not want to. You can stop the SQL Server by using the Ctrl+C combination or by closing the command prompt window. Never start SQL Server this way on an ongoing basis; after you log off the machine, your command prompt will close, stopping SQL Server.
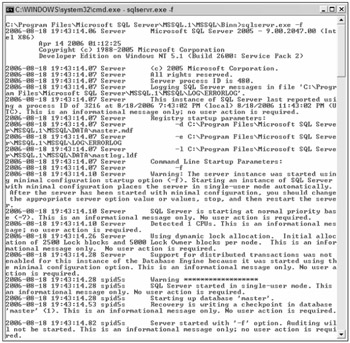
Figure 4-5
The startup options are really useful in troubleshooting a problem or for solving quick, one-off problems. We won't cover all the switches in this section but instead want to give you the ones you may find yourself using on a periodic basis. You can obtain the rest of the switches by using the -? switch. For example, you can change which master database the SQL Server is using, by using the -d and -l switches:
SQLServr.exe -d C:\temp\TempMasterDB.mdf -lC:\temp\TempMasterLog.ldf
The -d switch specifies the database file, and the -l switch specifies the log file. This may be useful if you want to use a temporary configuration of the master database that may not be corrupt. Another useful switch is the -T, which enables you to start given trace flags for all the connections for a SQL Server instance. This can be used, for example, to turn on a trace flag to monitor deadlocks in your SQL Server instance (note that it is uppercase):
SQLServr.exe -T1204
We discuss much more about trace flags later in this chapter. The -g switch is used to reserve additional memory outside SQL Server's main memory pool for use by extended stored procedures, mainly. This should never be turned on unless you see the following error messages in your SQL Server error log:
WARNING: Failed to reserve < n > bytes of contiguous memory. WARNING: Failed to reserve contiguous memory of Size= 65536. WARNING: Due to low virtual memory, special reserved memory used < X > times since startup. Increase virtual memory on server.
The -m switch puts SQL Server in single-user mode and suspends the CHECKPOINT process, which writes data from disk to the database device. This switch is useful when you wish to recover the master database from a backup. The -f switch places SQL Server in minimal mode and only allows a single connection. By placing SQL Server in minimal mode, SQL Server suspends the CHECKPOINT process, and remote connections are not allowed. Probably the most important options disabled in minimal mode are user-defined startup stored procedures. An administrator may have defined a startup stored procedure that is causing problems and not allowing SQL Server to fully start. You can place SQL Server in minimal mode, remove or correct the startup stored procedure, and then start SQL Server again without the switch to repair the problem.
| Note | Make sure you stop SQL Server Agent before placing SQL Server in single-user mode. Otherwise, SQL Server Agent will take the only available connection. |
Startup Stored Procedures
Startup stored procedures execute T-SQL whenever the SQL Server instance is started. For example, you may have a startup stored procedure that e-mails you when the instance starts. You can also use startup stored procedures to create objects in the tempdb when SQL Server starts. These stored procedures run under the sysadmin server role, and only a sysadmin can create a startup stored procedure. Errors written out from the stored procedure will be written to the SQL Server error log. Make sure that you only do the examples in this section against a development server until you're certain you want to do this in production.
By default, SQL Server does not scan for startup stored procedures. To enable it to do so, you must use sp_configure, as follows:
sp_configure 'scan for startup procs', 1 RECONFIGURE
After you run this, you must restart the SQL Server instance to commit the setting. Try a simple example. First, create a table called SQLStartupLog in the master database that will log any time the SQL Server instance is started.
CREATE TABLE master.dbo.SQLStartupLog (StartTime datetime) GO
Next, create a stored procedure to log in to the table. The following stored procedure will do the trick, logging the current date to the table.
CREATE PROC master.dbo.InsertSQLStartupLog as INSERT INTO master.dbo.SQLStartupLog SELECT GETDATE()
Last, you need to use the sp_procoption stored procedure to make the stored procedure a startup stored procedure. The sp_procoption stored procedure sets only one parameter. First, you must specify the stored procedure you wish to set; the only available option name is startup with a value of 1 (on) or 0 (off). Before running the following stored procedure, ensure that your SQL Server will scan for startup stored procedures.
sp_procoption @ProcName = 'master.dbo.InsertSQLStartupLog', @OptionName= 'startup', @OptionValue = 1
Next, stop and start your SQL Server instance and query the master.dbo.SQLStartupLog to see if the record was written. Before you leave this section, make sure that you disable the setting by running the following query:
sp_procoption @ProcName = 'master.dbo.InsertSQLStartupLog', @OptionName= 'startup', OptionValue = 0 USE MASTER GO DROP TABLE master.dbo.SQLStartupLog DROP PROC dbo.InsertSQLStartupLog
Rebuilding the System Databases
If one of your system databases becomes corrupt and your backups cannot be found, it may be time to rebuild the system databases. This will essentially reinstall the system databases and rid your system of anything that may be causing it to act unpredictably. The repercussion of this is that you must reinstall any service packs, and all your user-defined databases, including the Reporting Services support database, will disappear. Additionally, any logins or server configurations will have to be redone.
Rebuilding your system databases should not be taken lightly. It is a high-impact technical decision when all else fails. When you rebuild the system databases, the databases may appear to have disappeared, but their files are still in the operating system and can be reattached or restored. Reattaching the databases is generally the lowest-impact action.
To rebuild your system databases, locate your SQL Server installation media and go to a command prompt. From the command prompt, run setup.exe as if you were installing SQL Server, but you'll need to pass in a few new switches:
start /wait setup.exe /qn INSTANCENAME=<InstanceName> REINSTALL=SQL_Engine REBUILDDATABASE=1 SAPWD=<NewStrongPassword>
The /qn switch will suppress any error or information messages and send them to the error log. You will essentially see a blank screen for a few minutes before the database is finally rebuilt. You can append the /qb switch to see some of the messages. If you are reinstalling the system databases for the default instance, use MSSQLSERVER for your instance name.
After the databases are rebuilt, you are returned to your default configuration and databases. You will need to restore the master database (more on this in Chapter 18) or reattach each user-defined database and recreate the logins. The preferable option, of course, is to recover the master database. Then your logins and databases will automatically appear.
EAN: 2147483647
Pages: 193