9.4.1 Problem You need to configure your application to maintain session state across multiple web servers. 9.4.2 Solution When the data stored in session is easy to recreate or is not critical, configure your application to use the ASP.NET State Service using the following steps: -
Set up a new server with the .NET Framework installed to maintain session state on behalf of your application. -
Start the ASP.NET State Service on the designated machine. -
Modify the mode attribute of the <sessionState> element of the application web.config file on its current web server to specify the ASP.NET State Service. -
Copy the contents of the root folder and subfolders of your application on the current web server to the additional web servers. When it is critical to not lose any session information if server problems arise, use SQL Server to store all session information, as follows : -
In the instance of SQL Server that you will use for this purpose, install the special tables and stored procedures that ASP.NET requires by running the InstallSqlState.sql script provided with the .NET Framework. -
Set up a database user with read/write access to the tempDB database. -
Modify the web.config file, as shown next , setting the IP address to the address of your SQL Server machine and replacing user and pwd with the settings for the database user with read/write access to the tempDB database. <sessionState mode="SQLServer" sqlConnectionString="data source=10.0.1.12;user id= user ;password= pwd " cookieless="false" timeout="20" />
9.4.3 Discussion ASP.NET provides in-process session management much like classic ASP. However, scaling to multiple servers in classic ASP has always been difficult because session information is not shared between ASP servers. There are ways to solve the problem in classic ASP but none is easy and code changes are generally required when you move to a multiple-server configuration. ASP.NET provides two methods for managing session state when you decide to deploy a web application on multiple servers: the ASP.NET State Service and support for session state storage in SQL Server. The ASP.NET State Service is an out-of-process, memory-based session management service that is intended to be used when the data stored in session is easy to recreate or is not critical. The SQL Server-based session management uses SQL Server to store all session information and is intended to be used when it is critical to not lose any session information if server problems arise. As you might expect, the performance of SQL Server in maintaining session state management is not as good as that of the ASP.NET State Service, due to the overhead involved in querying and writing session information in a database. The ASP.NET State Service will not have as good a performance as the default in-process storage of an ASP.NET application, due to the out-of-process communications and network hops involved in communicating with other servers across a network. The out-of-process State Service and SQL Server session management techniques are compatible with each other and require no changes to your code when you move from one technique to another, which you might do, for example, if you are having trouble with losing critical session information. If you choose to make use of the ASP.NET State Service, it is good practice to install and run it on a server separate from the web servers in the web farm. This allows any one of the web servers to be taken down for maintenance or replacement without interrupting access to your application. If the ASP.NET State Service is running on a server that is also running an instance of the application, when that server requires maintenance, your entire application will be unavailable while the server is down. You start the ASP.NET State Service the same way you start any other Windows service. Invoke the Services console by clicking on Start  Control Panel and first selecting Administrative Tools, and then Services. In the Services console window, select the ASP.NET State Service, as shown in Figure 9-2. Control Panel and first selecting Administrative Tools, and then Services. In the Services console window, select the ASP.NET State Service, as shown in Figure 9-2. Figure 9-2. Starting the ASP.NET State Service 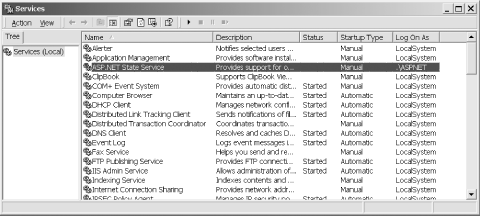
Right-click the ASP.NET State Service and select Properties to open the ASP.NET State Service Properties dialog box. From the Startup type drop-down menu, select Automatic to automatically start the service anytime the server is restarted, and then click the Start button to start the service now, as shown in Figure 9-3. Figure 9-3. Setting the ASP.NET State Service's Startup type property to Automatic 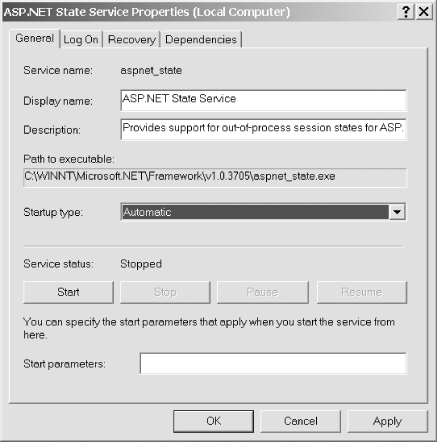
To use the ASP.NET State Service, you must make two changes to the application web.config file on its current web server. First, add a <sessionState> element to the web.config file in the root directory of your application (unless the element is already present). Next, set (or change) the mode attribute to StateServer and modify the stateConnectionString attribute to include the IP address of the server running the ASP.NET State Service. We'll refer to that machine as the state server from here on. Do not change the port number, because this is the port the State Service is listening on. If you must change the port number, you will need to make changes to the registry settings for the State Service, because the port number cannot be changed through the Services console. Here's some sample code that demonstrates the changes we've described: <?xml version="1.0" encoding="utf-8" ?> <configuration> <system.web> .. <sessionState mode="StateServer" stateConnectionString="tcpip=10.0.1.11:42424" cookieless="false" timeout="20" /> .. </system.web> </configuration>
In addition to modifying <sessionState> settings in web.config , you also need to alter the keys used for encryption and generation of unique values. Session management uses these keys to generate session IDs and hash values used in the session collection, so all servers must be configured to use the same values. If the values differ from server to server, the session information will not be understood by all of the servers hosting the application. You control encryption through the <machineKey> element, which you will need to add to the web.config file. By default, the keys are set to automatically generate values that will result in a different key being used on each server. These values should be set to 40-128 hexadecimal characters as a function of the encryption type and level. Note that [YourHexValue] must be replaced with the hexadecimal value you want to use for your application: <?xml version="1.0" encoding="utf-8" ?> <configuration> <system.web> .. <machineKey validationKey=" [YourHexValue] " decryptionKey=" [YourHexValue] " validation="SHA1"/> .. </system.web> </configuration>
After you've tested your application with the ASP.NET state server enabled, you're ready to deploy it to the other servers.  | Your system administrator will need to assist in configuring the appropriate network load balancing, failover, etc. These subjects are beyond the scope of this book. | |
An alternate approach to using the ASP.NET state server is to use SQL Server to store and persist the session information. ASP.NET again makes this a simple configuration change with no code changes required. The first step to using SQL Server for session management is to install the special tables and stored procedures that ASP.NET requires in the instance of SQL Server that you will use for this purpose. You create this support by running the InstallSqlState.sql script provided with the .NET Framework. To run the script, open a command prompt and navigate to the folder \WINNT\Microsoft.NET\Framework\<version> , where <version> is the version of the .NET Framework installed on your SQL Server machine. At the command prompt, type the following, and all of the necessary tables, stored procedures, and the like will be installed. Note that you will need to substitute for password the appropriate password for the sa account. OSQL -S localhost -U sa -P password < InstallSqlState.sql
| | If you need to uninstall the SQL Server state management objects, use the same command line, but substitute UninstallSqlState.sql for InstallSqlState.sql . | |
For a production application, set up a database user with read/write access to the tempDB database. You will use this database user in the configuration described next. The only other change required to use SQL Server for state management is to modify the web.config file, as shown here, setting the mode to SQLServer , setting the IP address to the address of your SQL Server machine, and replacing user and pwd with the settings for the database user with read/write access to the tempDB database: <sessionState mode="SQLServer" sqlConnectionString="data source=10.0.1.12;user id= user ;password= pwd " cookieless="false" timeout="20" />
From now on, when your application runs, it will use SQL Server for storing all of its session information. You can see the results of this by looking at the ASPStateTempApplications and ASPStateTempSessions tables in the tempDB database. You should find entries there for your applications and sessions, respectively. Because the data is stored in binary format, you will not be able to view it. Two other sessionState element attributes are frequently used in conjunction with the other modifications that we've discussed: cookieless and timeout . -
- cookieless
-
Setting the cookieless attribute to false (the default) configures ASP.NET's session management to use a non-persistent cookie to remember the session ID between page requests . Setting cookieless to true causes ASP.NET to include the session ID in the URL instead of using a cookie. This is very useful if your application has to be usable by browsers with cookie support disabled. The following URL is an example of how ASP.NET modifies the URL to include the session ID. You might be tempted to quickly shun this approach because your application has some hardcoded links embedded in the pages. Fear not; ASP.NET modifies all URLs in your pages, whether static or dynamically created, to include the session ID, as shown here: http://localhost/ASPNetCookbook/(3eqccw45tlzqa555hakqrn55)/ChapterMenu.aspx -
- timeout
-
The timeout attribute is used to define the length of inactivity in a session before the session is terminated . The value is in minutes and is 20 minutes by default. | | You may be aware that you can configure the session timeout in IIS. In an ASP.NET application, however, the session timeout that can be configured in IIS is not used. | |
|