Workflow and the Office System
One of the greatest new and sought-after features of the Office 2007 system is the addition of workflow. Organizations have long searched for a cohesive answer to the problem of workflow in Office and SharePoint, and with the help of Windows Workflow Foundation, Microsoft has provided a solution. The rest of this chapter is devoted to covering the ways workflow has been baked into this platform.
SharePoint as a Host
Throughout this book, the fact that the workflow runtime needs a host in which to run has been beaten into your head. In Office 2007, SharePoint plays host to the runtime and takes care of all the plumbing you need to architect custom solutions. It handles persistence so that workflow instances are efficiently dehydrated and hydrated at the appropriate times. Because SharePoint needs to be an extremely scalable platform, the workflow persistence service in SharePoint is meticulous about conserving server resources and taking idle workflows out of memory.
Because SharePoint takes care of everything related to hosting Windows Workflow Foundation in SharePoint, there is some abstraction from the workflow runtime. This includes the fact that as a developer, you are not able to specify that workflow runtime services be added to the workflow runtime. This is partly for security reasons and partly because of the scalability issues already mentioned.
Office Applications as a Front End
If SharePoint is the workflow runtime host, the Office applications - such as Word, Excel, and PowerPoint - are the clients. As previously mentioned, these tools are SharePoint and workflowaware. Therefore, the functionality necessary for interacting in workflows is baked into these applications. For example, Word includes the ability to start, modify, and complete workflows without ever leaving the application.
This functionality is enabled by several technologies. First, Forms Server and InfoPath are used to expose workflow task interfaces from within the Office applications. This means that custom-developed forms for interacting with workflows (a topic discussed later in this chapter) are usable inside Word and the other Office applications. In addition, the SharePoint web services can talk to SharePoint to discover the status of a currently running workflow and then expose the appropriate user interface to the user.
Out-of-the-Box Workflows
The following prebuilt workflows are provided with SharePoint out of the box:
-
Approval
-
Collect Feedback
-
Collect Signatures
-
Disposition Approval
-
Translation Management
-
Three-state
Before using these workflows, you must ensure that they are active within SharePoint. To find out if a workflow is active, you can check the Workflows screen by navigating to Site Actions ![]() Site Settings
Site Settings ![]() Modify All Site Settings and then clicking the Workflows link under Galleries. You are presented with a screen like the one shown in Figure 15-3.
Modify All Site Settings and then clicking the Workflows link under Galleries. You are presented with a screen like the one shown in Figure 15-3.
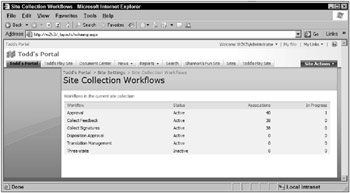
Figure 15-3
Note that the Three-state workflow is marked as Inactive on this screen. To activate a workflow in SharePoint, navigate to the Site Collection Features page from the Site Settings page. From here, you can activate any of the inactive workflows listed. For example, to activate the Three-state workflow (discussed in more detail later), click the Activate button next to the workflow’s description in the list. Then if you refresh the page shown in Figure 15-3, the Status column is updated to show the workflow as active.
Approval
The out-of-the-box Approval workflow covers one of the most common workflow scenarios known to man: document approval. This is a natural fit for SharePoint because of its documentcentric nature. By default, the Approval workflow is associated with the Document content type; therefore, additional configuration to associate this workflow with a particular document library is not necessary. However, if you want this workflow to automatically start whenever a document is added or updated, you need to perform further configuration.
This workflow has some basic steps and custom forms. When an Approval workflow is started on a document, a task is created for each designated approver to either approve or reject the document. In addition, the approver can request changes to the document or reassign the task to another person. Figure 15-4 shows what the Approval workflow form looks like. There are buttons and links to perform the desired tasks. In addition, there is a link back to the document on which the workflow is being performed (in this example, it’s a document called Project Proposal).
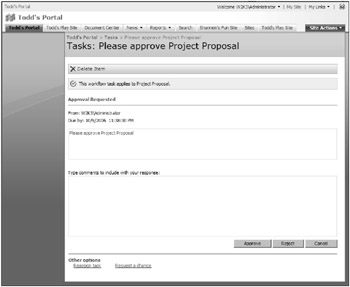
Figure 15-4
When you’re configuring this workflow on a specific document library or a new content type, there are a few options that you can set specifically for this workflow. For example, you can have tasks assigned to users serially or in parallel (if there is more than one approver); custom messages can be provided to workflow actors; and you can specify when the workflow should be canceled, among other things. These workflow-specific options are shown on the second page of the wizard that associates the workflow to a document library or content type - the Customize Workflow page.
Collect Feedback
The Collect Feedback workflow supports any process that involves obtaining comments from one or more people related to a document. Like the Approval workflow, the Collect Feedback workflow is associated with the Document content type by default. Therefore, you can manually start it on any document, and it does not need to be associated with a particular document library to be available. However, you can set additional options on the workflow when associating with a new content type or document library.
The additional configurable options of this workflow type are similar to the options on the Approval workflow. When you configure the workflow association, you can control the task assignment order (serial or parallel), whether actors can reassign tasks, default task values, and similar options.
While the workflow is running, the owner can view the feedback that has been provided up until that point in time. This information is available on the Workflow Status screen, which shows the tasks that have been created for a specific workflow instance as well as the associated workflow instance history list. In addition to the text that workflow actors enter in the feedback comments text area of the workflow’s form, the commenting system in Word can be used to enhance the value of comments. Figure 15-5 shows the Workflow Status page for a completed Collect Feedback workflow instance. This particular instance involved one actor.
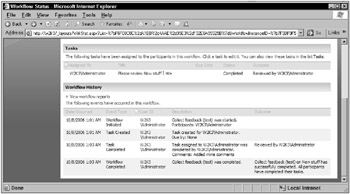
Figure 15-5
Collect Signatures
The Collect Signatures workflow is specific to a feature in Microsoft Office related to digitally signing documents. To use this workflow, a user must first add one or more signature lines to a Word or Excel document from within the application (see Figure 15-6). After the document has been saved to a SharePoint document library, the Collect Signatures workflow can be kicked off from within the client application only.
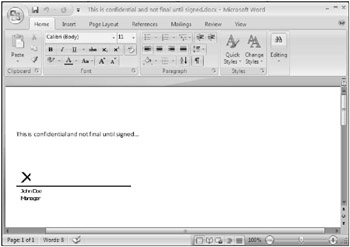
Figure 15-6
When the Collect Signatures workflow is initiated from within Word or Excel, the user is prompted to provide an actor for each signature required in the document. Therefore, if three signatures were added to the document, the user is asked to provide three corresponding people who need to digitally sign each line. From here, the behavior is similar to other workflows: Tasks are created ,and e-mails are sent (if the server is configured to send e-mail). After all signatures are collected, the workflow is considered complete.
Disposition Approval
The out-of-the-box Disposition Approval workflow provides functionality to allow organizations to easily manage expired content. For example, a document library can have a policy that dictates that after a certain amount of time, a document should be expired. This policy can do one of two things when the expiration occurs: delete the document or start a workflow.
The Disposition Approval workflow is a perfect candidate for document expiration policies. Although it can be started manually just like other workflows, it makes perfect sense to start this workflow when a document expires if someone wants to extend the document’s lifetime. If the Disposition Approval workflow is started after a document expires, a task is created that allows further action to be taken. Figure 15-7 shows the task form for this workflow.
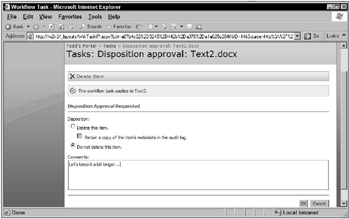
Figure 15-7
To associate this workflow with a document library’s policy, you must first configure the workflow for the document library. You do this the same way as any other workflow. Next, navigate to the document library’s settings and click the Information management policy settings link under the Permissions and Management heading.
On the following page, select Define a Policy and click the OK button. The policy options that include expiration-related items are displayed. If the Enable Expiration box is checked, a few more options appear, such as when document should expire and what should happen when it does. This is where you need to associate the Disposition Approval workflow with the policy to ensure that tasks are created to manage document disposition.
Another feature of the Disposition Approval workflow is that it allows bulk editing of the associated workflow tasks. This feature is useful if you have multiple documents in a particular library that expire on a regular basis, which could require an overwhelming number of tasks to complete. Opening up each task individually and setting its corresponding options would be extremely time consuming or even impossible in some situations.
To edit tasks in bulk, navigate to the Task library and select the Process all tasks option from the Actions menu. On the subsequent page, select desired the task type and click OK.. The editing form that is displayed to the user is exactly like the form used for editing a single task. However, when this form is submitted, the information provided in the form is applied to all the tasks you selected on the first screen. This feature can save a great deal of time for end users.
Translation Management
This workflow type facilitates the process of manually translating a document from one language to any number of other languages. It is unique in that it can be associated only with a translation management library. Therefore, to use the Translation Management workflow, you first need to create a translation management library.
To do this, navigate to the main page of the portal and click the View All Site Content link on the Quick Launch bar. Then click the Create button at the top of the subsequent page. This displays a page that allows you to create various SharePoint items, including document libraries and other list types. Translation Management Library is listed under the Libraries heading. Click the link to create a new library for use with the Translation Management workflow. When you’re creating a new translation management library, you can automatically create and associate a Translation Management workflow with the new library.
After a translation management library is created and a Translation Management workflow is associated with it, any new documents added to the library are duplicated for each language to be translated to as dictated by the translators list associated with the workflow. You are given an opportunity to create a new list of translators and associated languages when you’re configuring the workflow’s settings. This list is used when a new document is added to the document library and its language is set. Translators are assigned to source and destination languages.
Three-state
The Three-state workflow is included as a generic state-machine workflow that has three states. Most likely, this workflow type will be associated with an Issue Tracker list because a simple issue tracking process would commonly have three states. For example, if an issue representing a software bug is created, it generally starts out in a state called something like New or Active. After a developer sees and fixes the documented issue, he or she generally changes the issue’s status to Fixed or Resolved. The issue’s originator then tests the software to make sure the bug was truly taken care of. If everything looks good, the issue transitions to a closed state.
However, the Three-state workflow is not specific to any item or document type. You can configure it to be used for any scenario that requires an item to transition between a beginning, middle, and end state. You can use the choice fields in the document library to customize the workflow’s states. When configuring a Three-state workflow, you must specify a choice field to populate the Initial, Middle, and Final states.
For example, in the issue-tracking scenario, you would choose the list’s Issue Status field as the workflow’s choice field. Then you could set the Initial state to Active, the Middle state to Resolved, and the Final state to Closed. This tells the workflow to change states and create the necessary tasks when these statuses are set during the lifetime of the issue. Applying this workflow to an issue-tracking list in SharePoint adds functionality to an already-useful list in the previous version.
Workflow Features in SharePoint
The following sections cover some of the SharePoint-specific features related to workflows, including tasks, history, reporting, and administration.
Tasks
One of the most important traits of a workflow-enabled system is that it should be able to interact effectively with humans. Generally, workflows communicate most naturally with humans through the use of tasks because tasks provide an artifact that is actionable. Although the concept of tasks in Office and SharePoint is nothing new, workflow-specific tasks were not available in previous versions.
A workflow that has been assigned to a list or content type specifies where tasks for that workflow should be created. For example, an administrator may want all tasks that are created for a feedback collection workflow for a specific document library to appear in one task list and the tasks for all other workflows on the site to appear in another library.
Workflow tasks are unique because they are always associated with specific workflow instances. As a result, they can also be linked back to the originating item, whether it is a Word document or a completed InfoPath form. Workflow tasks can also have distinctly unique interfaces that collect custom data specific to a workflow type. For example, the out-of-the-box Approval workflow needs to collect data specific to that workflow, such as who needs to be involved in the approval process, as well as a description of the approver’s notes.
History
History is a very powerful feature of workflows in the SharePoint environment. Basically, there is an architecture that allows workflows to log useful information at certain points during execution. This can be extremely helpful for debugging and troubleshooting scenarios, but the information logged through the history facilities is also useful from a business perspective. For example, the Approval workflow keeps a record of when tasks were created and completed along with text entered by the user so that this history can be later inspected from a “what happened” perspective.
Just like workflow tasks, history items are recorded in a list specified by an administrator. The list in which workflow history items are added does not to be manually separated from other history items. This is because the history items are viewed from the Workflow Status screen, which filters the items according to the instance in question. Figure 15-8 shows a sample Workflow Status screen. The workflow history items are listed at the bottom the screen. There are several other things going on here, including the display of workflow tasks, reporting functions, and administrative functions (discussed next).
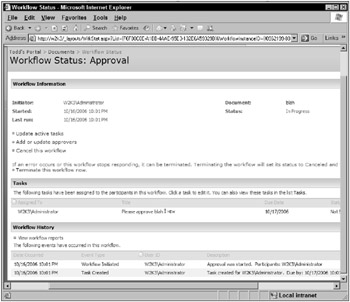
Figure 15-8
Reporting
In SharePoint, reports are generated for each workflow definition associated with a list or content type. The reports are Excel based and provide useful metrics, such as how long it takes an average workflow to complete and any errors that occurred during execution. You access the report page from the Workflow Status screen previously shown in Figure 15-8.
The Activity Duration Report has two tabs. The first tab shows a simple pivot table detailing the duration of each step in all workflow instances as well as a grand total. You can select individual workflows instead of rolling up all instances. The second tab holds the same information that is available in the workflow history list. Having this information in an Excel format makes it easier to read, sort, and filter the data. Figure 15-9 shows an example of this report.
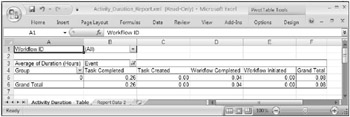
Figure 15-9
The Cancellation & Error Report also has two tabs and is similar to the Activity Duration Report. The first tab contains a pivot table that enables you to view information about how many workflows were cancelled, aborted, and so on. The second tab contains tabular data related to specific errors that occurred during a workflow’s execution. This data is extremely useful in troubleshooting scenarios.
Administration
SharePoint provides administrative features that are related to workflows. For example, you can cancel and terminate running workflows from the workflow status screen shown in Figure 15-8. In addition, this screen enables you to modify and delete workflow tasks. Workflow-specific actions are also incited from this screen - for example, the Approval workflow allows you to add or update approvers.
Workflow Associations
Workflow instances in SharePoint are always associated with a specific item. Items can be documents, events, pictures, links, discussions, and so on. Before you can associate a workflow instance with an item, you need to associate the workflow definition with either a list or content type. Content types are the different types of items in SharePoint. After a workflow definition is associated with a library, list, or content type, it is eligible to be run against that entity. For content types, this includes instances of the specific type; for lists, it is any item in that list.
Associating a workflow to a content type is useful when a specific type of item in SharePoint needs to be involved in a process when created or changed as well as when a workflow is manually started on an item regardless of its location. To associate a workflow to a content type, navigate to the Site Settings page and click the Site content types option under the Galleries heading. The resulting page presents all content types for the current site along with some identifying information.
As an example, the creation or modification of Announcements anywhere across the site must be managed by an Approval workflow. This can be easily configured by clicking the Announcement content type link on the Site Content Type Gallery page. Each content type settings page has a link called Workflow Settings, which is where workflow associations are made. From this page, click the Add a Workflow link.
An association of a workflow to a list or content type defines a few important values. First, and most obvious, the type of workflow that should be available to the list or content type is defined. Any deployed and activated workflow type can be used, including out-of-the-box or custom-developed workflows. Figure 15-10 shows an example of a workflow association page that is tying an Approval workflow to the Announcement content type. The main association page for libraries and lists is virtually identical to the one shown in Figure 15-10 except that the Update List and Site Content Types setting does not exist for lists.
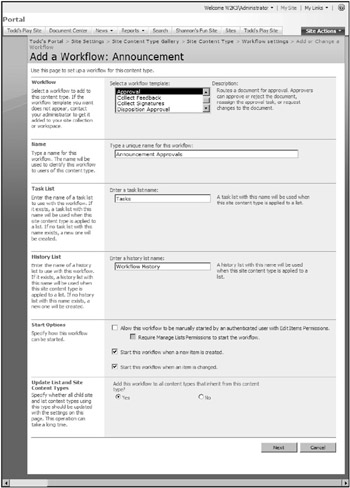
Figure 15-10
This page is standard to all workflow types being associated with a list or type with the exception of the last setting related to content types. (This setting is discussed in a moment.) The first setting at the top enables you to choose the workflow to associate. The second text box, Name, allows you to give the workflow a definitive name according to its purpose. In this case, Announcement Approvals is appropriate.
Because tasks are so important to human workflows in SharePoint, the Task List setting tells the workflow in which SharePoint task list to create new tasks. You can create many different task lists for different workflows or even different workflows associated to individual lists or content types. However, this isn’t always necessary or even recommended. As a rule of thumb, unless you have a special need for individual task lists across your site, you should use the same generic task list. You may want to create individual lists if there are special security requirements for a unique set of tasks.
The History List setting points the workflow association to the list in SharePoint in which to create history items. This list is similar to the Task List in that it probably does not need to be a unique workflow association. These lists are simply buckets to hold workflow-related items and can easily hold items from many different workflows.
The Start Options are very important for workflow associations. They define when workflow instances will be started based on several different events. For the Announcement Approvals workflow shown in Figure 15-10, an Approval workflow will be created every time an announcement is created or modified. If desired, you can allow a workflow to be started manually by a user. In addition, the settings can require a user to have the Manage Lists permission before being able to manually start a workflow on an item.
The Update List and Site Content Types setting dictates whether all content types that currently inherit from the selected content type should be updated with the workflow settings. Because the update goes through the site and updates each content type, this option can take a long time to process after you click the Next or OK button.
Depending on which workflow type you select, there may or may not be another configuration page after this initial page. The button updates itself on the client depending on the item selected in the workflow list box. If the workflow type decrees that further settings are required, the Next button takes you to that workflow’s custom association page.
Running Workflows
As you learned in the previous section, there are different ways to start SharePoint workflows. In addition, there are different places where workflows can be initiated. Based on the settings for a workflow, an instance can be started automatically when a new item is added to a list or a new item of a certain content type is created, when an existing item is modified, or when a user chooses to explicitly start a new instance. All three of these options are mutually exclusive and can be turned on and off independently.
Workflow instances can also be kicked off from either the SharePoint interface itself or from inside an Office application. In SharePoint, a workflow is kicked off according to the settings when a new item is added or when an existing item is modified. Also, a user can start a new workflow manually by expanding an item’s context menu in a list and choosing the Workflows option. This opens the item’s workflow settings page, which has a list of the running workflows associated with the item as well as links at the top of the page to manually start a new instance of whatever workflows are available for that particular item.
You can also interact with SharePoint workflows directly from within Office. Just like uploading a document to SharePoint using the web interface, if an Office document is saved to SharePoint from within Office, any applicable workflow instances are started on the server. In addition, workflows can be manually started from within Office by using the Office button menu. There is a Workflows button in this menu that, when clicked, launches a dialog box (see Figure 15-11), enabling the user to start any workflows allowed for that item depending on the list it is in or its content type.
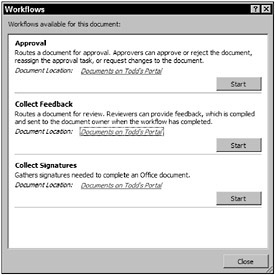
Figure 15-11
Workflow Forms
Because the out-of-the-box and custom-developed workflows require information specific to each workflow type, you can use custom forms to present and provide data. The out-of-the-box workflows ship with their own custom forms, and you can develop forms for custom workflows using different methods, which are covered later in this chapter. Workflow forms can be classified in different buckets.
Association Forms
Association forms allow the person configuring the workflow to enter initial data for any necessary values in the workflow. A few of the out-of-the-box workflows have association forms. For example, the Approval workflow’s association form captures data from the user, such as how to assign tasks to multiple users, how long to give a user to complete his or her task, and when to cancel the workflow, among other things.
Figure 15-12 shows the Three-state workflow’s association screen. This page allows you to specify the values for each of the three workflow states as well as actions that should occur when the workflow kicks off.
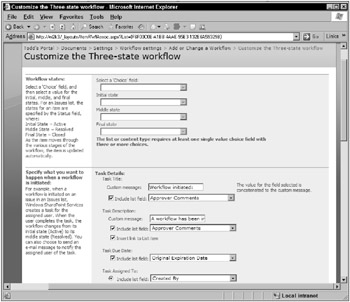
Figure 15-12
Initiation Forms
Initiation forms are the pages that enable users to receive and enter data when a workflow instance is starting. This is useful for selecting which people are to be involved in a workflow or how long to give someone to complete a task. As an example, the initiation form for the out-of-the-box Collect Feedback workflow is shown in Figure 15-13.
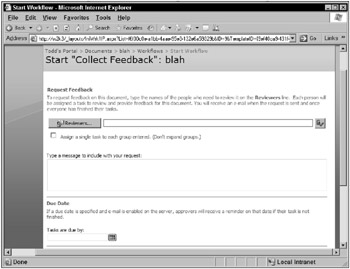
Figure 15-13
Task Completion Forms
Because tasks play such an integral role in workflows in their human interaction, there is a tight integration between tasks and workflow instances. In addition, like the other form types, tasks can expose custom task completion forms that allow users to view and enter relevant data pertaining to the completion of a workflow task.
The completion of a workflow task does not have to be flagged using the traditional method of clicking a check box or changing a status to complete. The logic defined in workflow determines whether a task is complete. For example, a workflow task may be considered complete if the simple condition of text being entered in a text box is met. However, another workflow may not consider a task complete unless several fields are set to no-default values.
Figure 15-14 shows the Collect Feedback workflow’s task completion form. In this workflow, the task is considered complete as soon as the Send Feedback button is clicked.
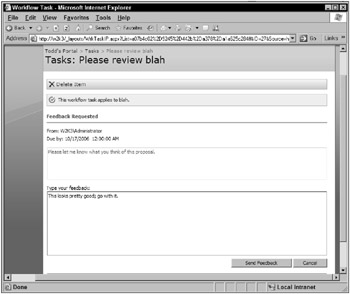
Figure 15-14
Modification Forms
Modification forms provide users with an opportunity to make changes to a live workflow instance. This comes in handy for many scenarios, including reassigning a task or adding another person to a list of active participants, or even a more drastic modification such as skipping steps. Whatever the modification may be, the logic in the workflow determines how the input provided in the form is handled.
Workflow modification forms show up as links on the bottom of a workflow task window. Figure 15-15 shows an example of this for the Approval workflow. Notice the Reassign task link and the Request a change link at the bottom of the page. When the Request a change link is clicked, the user is taken to a page where he or she can request a change from a specific user (likely the originator of the workflow) and enter a description of the change requested.
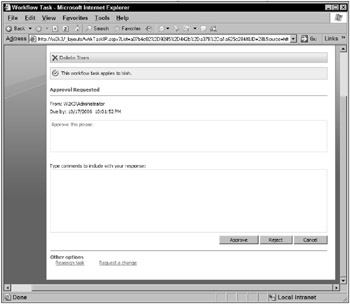
Figure 15-15
EAN: 2147483647
Pages: 118