Implementing Components for MTS
Chapter 8 covered the basics of implementing components that would run in the MTS environment. These fundamentals, which are the same for both data objects and business objects, are repeated here:
- Write single-user, in-process COM components.
- Use explicit interfaces to define the public interface of your objects.
- Use the object context to tell MTS when object state can be reclaimed.
- Use transactions to manage errors.
By now, you understand how to create a new component, add COM classes representing the business objects in that component, and create skeleton interface implementations. In this section, we'll look at some implementation details that commonly arise in conjunction with business objects: composing functionality from other components, providing complex state management, handling errors, and providing programmatic security.
Composing Functionality
Business objects encapsulate real-world business operations. Typically, you'll have some high-level business objects that expose methods corresponding to business tasks. For example, the Island Hopper application contains a bus_AdC component that exposes methods such as PlaceAd. These high-level business objects use the services of other business objects and data objects. This process is known as composing functionality.
When you compose functionality from multiple components, state management and error handling become critical issues. Components are developed individually, possibly without the knowledge of the other components they are working with. When an error occurs in one component, the actions already performed by other components might need to be undone—particularly those actions that modify persistent state.
As we've seen, MTS uses transactions to help manage state and handle errors, and the easiest transactions to use are automatic transactions. Developers declare how their components should participate in transactions. MTS uses this information to automatically enlist objects in the appropriate transactions.
The object context is the key to automatic transactions. The object context contains MTS-managed state information that MTS uses to provide services to your objects, such as the caller's identity, the activity, and the transaction identifier. We've already discussed using the SetComplete and SetAbort methods of the IObjectContext interface to vote on the transaction outcome. Another important feature of IObjectContext is the CreateInstance method. This method is used to instantiate new MTS-managed objects that inherit aspects of the caller's context. Components that run within the MTS environment should always use IObjectContext CreateInstance to create new MTS objects, to ensure that context information flows properly to those objects. Recall that you get a pointer to IObjectContext by calling the GetObjectContext API function. In Visual Basic, your code will look something like this:
Dim ctxObject As ObjectContext Dim subObject As IMyInterface Set ctxObject = GetObjectContext() Set subObject = ctxObject.CreateInstance("MyComponentProgID") If you don't use the object context to create subordinate objects, those objects might not participate in the appropriate transaction. Each subordinate object that requires a transaction will become the root of a new transaction, which probably isn't what you want to happen. When the object context is used, subordinate objects that require or support transactions will be enlisted in the caller's transaction, if one exists. If the subordinate objects require a new transaction, or if they require a transaction and the caller is not enlisted in a transaction, MTS will automatically create a new transaction. Of course, each component should call SetComplete or SetAbort to vote on the transaction outcome and to let MTS know that resources can be reclaimed from the object.
Let's walk through an example to see how transaction boundaries are determined when functionality is composed from multiple components. The following pseudocode shows several simple components:
ComponentA (Transaction Required) public sub MethodA() Dim objB as ComponentB Dim objD as ComponentD on Error goto ErrorHandler Set objB = GetObjectContext.CreateInstance("ComponentB") objB.MethodB Set objD = GetObjectContext.CreateInstance("ComponentD") objD.MethodD DoSomeWork() GetObjectContext.SetComplete exit sub ErrorHandler: GetObjectContext.SetAbort end sub private sub DoSomeWork() ' Do local work for ComponentA. ' If unsuccessful, raise an error. end sub ComponentB (Transaction Required) public sub MethodB() Dim objC as ComponentC on Error goto ErrorHandler Set objC = GetObjectContext.CreateInstance("ComponentC") objC.MethodC GetObjectContext.SetComplete exit sub ErrorHandler: GetObjectContext.SetAbort end sub ComponentC (Supports Transactions) public sub MethodC() on Error goto ErrorHandler GetObjectContext.SetComplete exit sub ErrorHandler: GetObjectContext.SetAbort end sub ComponentD (New Transaction Required) public sub MethodD() Dim objF as ComponentF on Error goto ErrorHandler Set objF = GetObjectContext.CreateInstance("ComponentF") objF.MethodF GetObjectContext.SetComplete exit sub ErrorHandler: GetObjectContext.SetAbort end sub ComponentE (Supports Transactions) public sub MethodE() on Error goto ErrorHandler GetObjectContext.SetComplete exit sub ErrorHandler: GetObjectContext.SetAbort end sub ComponentF (Does Not Support Transactions) public sub MethodF() end sub You are encouraged to map out the transaction boundaries and instantiated objects as you read along. Figure 9-1 illustrates what the transaction boundaries should look like.
Let's start by looking at what happens when a base client creates an instance of ComponentA and calls MethodA. ComponentA is marked as "requires a transaction." Because no transaction exists when MethodA is called, a new transaction is created and the object, A, is enlisted in the transaction as the transaction root. MethodA creates an instance of ComponentB, B, which is marked as "requires a transaction." Since A used the object context to create the new object and A is already in a transaction, B is enlisted in the same transaction.
Now A calls MethodB. MethodB creates an instance of ComponentC, C, which is marked as "supports transactions." Since B used the object context to create C and B is already in a transaction, C is enlisted in the same transaction as B and A. B calls MethodC, which completes its work and calls SetComplete. At this point, the resources for object C can be reclaimed (including object C itself). The transaction is not yet committed, however; C has only placed its vote to commit. When MethodB completes its work, it also calls SetComplete. Now the resources for object B can be reclaimed. Again, the transaction doesn't commit yet, but we have another vote to commit.
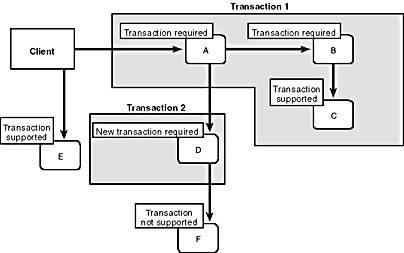
Figure 9-1. Transaction boundaries for simple components in action.
Next MethodA creates an instance of ComponentD, D, which is marked as "requires a new transaction." Even though A used the object context to create the new object and A is already in a transaction, MTS creates a new transaction and enlists D as the root of the new transaction. Now A calls MethodD. MethodD creates an instance of ComponentF, F, which is marked as "does not support transactions." Since F doesn't support transactions, it isn't enlisted in a transaction. D calls MethodF, which completes its work and returns. When MethodD completes its work, it calls SetComplete. Now the resources for object D can be reclaimed. Since D is the root of the second transaction, MTS starts the two-phase commit protocol to commit this transaction. At this point, any updates to managed resources such as databases are committed.
Note that committing the second transaction has no direct impact on whether the first transaction commits or aborts. However, because MethodD completed successfully, MethodA doesn't have any reason to vote to abort the first transaction at this point.
Next MethodA calls a local function, DoSomeWork. Let's say this function raises an error. This error will be caught by the error handler in MethodA. The error handler then calls SetAbort. Because A is the root of the first transaction, the call to SetAbort causes MTS to start the two-phase commit protocol. Since A votes to abort the transaction, the transaction will be aborted.
How does aborting the first transaction impact the other objects? Object B has already completed its work and been deactivated, but since the transaction aborted, any changes object B made to managed resources will be rolled back. Likewise, object C has already completed its work and been deactivated. Any changes it made to managed resources will be rolled back as well, since C was enlisted in the first transaction. On the other hand, changes made by object D are not impacted by the failure of the first transaction. Object D's transaction has already committed.
Let's take a quick look at another example. Suppose our base client creates an instance of ComponentE, E, and calls MethodE. ComponentE is marked as "supports transactions." However, the base client is not part of a transaction when it calls MethodE. Since ComponentE supports transactions but does not require them, MTS will not create a new transaction and object E will not be enlisted in any transaction.
As you can see, automatic transactions and composing functionality can create fairly complex behavior without requiring the component developer to write a lot of code. This capability is one of the key benefits of the application server programming model promoted by MTS.
Managing State
In Chapter 8, we assumed that our data objects were stateless. Every method call ended with a call to SetComplete or SetAbort so that MTS could reclaim object resources. Any state information needed during a method call was either passed in as method parameters by the client or retrieved from a persistent data store.
It's likely that you will encounter situations in your application servers in which these simple assumptions cannot provide the behavior or performance you require. Let's turn our attention to some techniques you can use to fine-tune state management in your components.
Temporarily disabling the commit
You might encounter situations in which an object has done some work but isn't ready to have its transaction commit. The object can exert some control over the transaction by calling the DisableCommit method of the IObjectContext interface. DisableCommit announces that a particular object isn't ready for the transaction to commit. The object will retain its per-object state across method calls. Any attempt to commit the transaction will cause the transaction to abort.
When the object is ready to have its transaction commit, it calls the EnableCommit method or the SetComplete method of IObjectContext. If EnableCommit is called, the object will continue to retain its per-object state across method calls. However, it will not prevent the transaction from committing. (Remember, when the root of the transaction calls SetComplete or SetAbort, MTS will complete the transaction, regardless of whether all the objects in the transaction have cast their vote by calling SetComplete or SetAbort.) If the object calls SetComplete, the object can of course be deactivated by MTS and callers should not rely on its internal state.
In general, this technique should be reserved for scenarios in which a business rule defines some constraint that cannot be easily coded into a single interface method and the business object is not used directly by the presentation layer. For example, in the Island Hopper application, we require every invoice to have a header and at least one detail record. (There's not much point in sending an invoice if an ad has not been placed.) Defining separate AddHeader and AddDetail methods creates an interface that is much simpler to use than attempting to define a CreateInvoiceWithArbitraryNumberOfItems method. (Just imagine what the parameter list would look like!) This technique works for Island Hopper because the invoice is created by another business object when an advertisement is placed—all within the scope of a single transaction on the application server.
The technique doesn't work as well when the client is the presentation layer, particularly if the client must wait for user input between method calls. At best, a transaction will be held open for a relatively long period of time—with all the corresponding database locks, held connections, and so on—while your object is waiting to be called by the remote presentation layer. More likely, the transaction will time out while waiting for the object to reenable the commit, and the entire operation will need to be retried.
The IObjectControl interface
In other situations, you might need to perform some context-specific initialization or cleanup for your objects, and this is the purpose of the IObjectControl interface. You can optionally implement IObjectControl in your components. The interface has three methods: Activate, Deactivate, and CanBePooled.
MTS will call IObjectControl Activate each time an object is activated, before any of its other methods are called. You can use this method to perform context-specific initialization. Normally, you would initialize your objects when they are created, either in the constructor of the implementation class or in the class factory CreateInstance method. However, you cannot access the object context from your class constructor or your class factory CreateInstance method—it isn't hooked up yet. Thus, if you need access to the object context in order to initialize your object, the Activate method is the first chance you'll have to do so. MTS calls IObjectControl Deactivate each time an object is deactivated. You typically use this method to clean up any per-client state you might be holding in the object.
The IObjectControl interface was also designed to handle pooled objects. If you had an object that could be reused from an object pool, you would return TRUE from your implementation of CanBePooled. When an object was pulled from the object pool, IObjectControl Activate would be called. When the object was returned to the pool, IObjectControl Deactivate would be called.
Unfortunately, neither MTS 1.0 or MTS 2.0 support this form of object pooling. In the absence of object pooling, implementing IObjectControl becomes less compelling. Most cleanup can be performed in your implementation class destructor. If your objects are stateless, you need to initialize them on each method call anyway. However, if you have some common initialization work that needs to be done for every method in a stateless object, IObjectControl Activate is a reasonable place to do it. For example, you might get a pointer to the object context and save it for later use.
IObjectControl Activate is also a useful place to initialize context-specific state in stateful objects, if you don't define a specific initialization method in your interface. Note, however, that Activate takes no parameters, so you are restricted to initialization based on values you can retrieve from the object context—for example, the client's user identity or a cookie passed in Internet Information Server (IIS) intrinsic objects. Unless the fact that client-specific state is present is completely hidden from your clients, an explicit initialization will probably make your interface easier to use.
The Shared Property Manager
Finally, remember that one type of state is shared transient state. Shared transient state is state information kept in memory that does not survive system failures but that can be shared by multiple objects across transaction boundaries.
In MTS, shared transient state is managed by using the Shared Property Manager (SPM). The SPM is a resource dispenser that stores state on a process-wide basis and manages concurrency for you. Values stored in the SPM are a lot like global variables except that they are outside the scope of any of your components. Thus, the values can be easily shared by different types of objects. Values stored in the SPM are known as shared properties.
Keep in mind that shared properties can be accessed only by objects running in the same process, which means that the COM classes must be installed as part of the same server package. It is possible for system administrators to move COM classes from one package to another after your application packages have been deployed. If you rely on two COM classes sharing properties through the SPM, you should clearly document that they must be installed in the same package. Also, the SPM should be used only from MTS components, not from base clients. If shared properties are created from a base client, they will be located in the base client process, which probably isn't what you want.
The object model for the SPM is shown in Figure 9-2. To help prevent naming collisions among properties created by different components, the SPM defines the notion of a shared property group. A shared property group establishes a namespace for a set of shared properties. Each property has a name, value, and position within the group. Either the name or the position can be used to retrieve the property value. You access and create shared property groups through the shared property group manager.
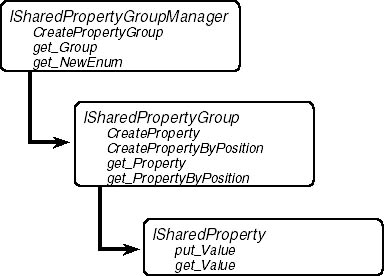
Figure 9-2. The Shared Property Manager object model.
When you create a group, you can specify how the SPM should manage concurrent access to the group's properties. If the isolation mode is set to LockSetGet, the SPM locks access to a property while the value is read or written. This setting ensures that two clients can't read or write the same property at the same time, but it doesn't prevent clients from concurrently accessing different properties in the same group. If the isolation mode is set to LockMethod, all the properties in a group are locked for exclusive use by the client during the current method call. This setting is useful when there are interdependencies among properties in the group or when a client needs to ensure that a read/write operation occurs without interruption. To set the isolation mode to LockMethod, the SPM must have access to the calling object's object context.
You can also specify when properties in a group will be destroyed at the time the group is created. If the release mode is set to Standard, a property is destroyed as soon as all clients have released their references to the property. If the release mode is set to Process, properties are not destroyed until the process terminates.
To use the SPM, you must first create an instance of the shared property group manager. In Visual Basic, you do this by setting a reference to the Shared Property Manager Type Library, MTXSPM.DLL, and creating a new SharedPropertyGroupManager object, as shown here:
Dim spmMgr As New SharedPropertyGroupManager
In C++, you need to include the header file MTXSPM.H to access the interface definitions and you must link to MTXGUID.LIB to access variable definitions for the SPM class identifiers (CLSIDs) and interface identifiers (IIDs). You can create a new shared property group manager by calling CoCreateInstance or the object context CreateInstance method, as shown here:
ISharedPropertyGroupManager* pspmMgr = NULL; HRESULT hr = m_spObjectContext.CreateInstance( CLSID_SharedPropertyGroupManager, IID_ISharedPropertyGroupManager, (void**)&pspmMgr);
Once you have access to the group manager, you can call its CreatePropertyGroup method to create a new shared property group with a given name. If a group with that name already exists, you get back a reference to the existing group. If you know that the group exists, you use the group manager's Group property to obtain a reference to the group. If you need to find out what groups are available, you can use the group manager's NewEnum property to retrieve a standard enumerator.
With a reference to the property group in hand, you can create shared properties in the group. The property group lets you create shared properties by name, using the CreateProperty method, or by position in the group, using the CreatePropertyByPosition method. If the shared property already exists, both methods return a reference to the existing shared property. If you know that the shared property already exists, you can use the group's Property or PropertyByPosition property to retrieve a reference.
Once you have a reference to a shared property, you use its Value property to get or set the data value. Value is a VARIANT property, so you can store any of the standard Automation types into your shared properties. However, this capability complicates using the SPM from C++, since C++ does not provide native support for VARIANTs like Visual Basic does. Of course, the BSTR and VARIANT wrapper classes provided by Visual C++ or the Active Template Library (ATL) can help.
When you have finished using the SPM, be sure to release any references you hold to the group manager, groups, or properties. Otherwise, the SPM will not be able to clean up properly.
NOTE
By default, MTS will shut down a process after three minutes of no activity. If you are using the SPM, you might want to increase the time-out period for your server packages, to reduce the number of times the SPM must be reinitialized.
The SPM is particularly useful for storing values that are frequently accessed or updated within a process. For example, the Island Hopper application uses the SPM to generate new identifiers for customers, invoices, and so on. If the set of available identifiers was stored in a persistent database, reading the database to retrieve the next identifier would become a serious performance bottleneck. The SPM might also be used to cache static data tables that are frequently accessed. Since the SPM stores information in memory, accessing the information is generally faster than accessing the information from a persistent data store. However, this performance gain must be weighed against the fact that state stored in the SPM can be lost if the process terminates unexpectedly.
Handling Errors
Let's switch gears now and discuss another important topic: error handling. We've talked quite a bit about using transactions to handle errors, but this is actually only one part of the error handling story. Transactions impact only state managed by resource managers. In addition, transactions do not immediately abort when an enlisted resource or object calls SetAbort. The transaction does not complete until the root decides to call SetComplete or SetAbort. Thus, you still need to return error codes from your interface methods and check those error codes within your client code so that the client code can decide whether to continue with any remaining work.
At the most basic level, every COM interface method should return an HRESULT value. HRESULTs are used by the COM run time to report any errors in making the method call—for example, communications or security errors. HRESULTs are also used by MTS to tell a client when a transaction has aborted. When the root object completes its work, if the object returns a success code but the transaction aborts, MTS will change the HRESULT returned by the method call to CONTEXT_E_ABORTED. Otherwise, MTS just passes back the HRESULT reported by the object.
An HRESULT is a 32-bit unsigned integer of which specific bits have special meanings, as shown in Figure 9-3. The high-order bit, S, in the HRESULT indicates whether the return value represents success (0) or failure (1). The next four bits, labeled R, C, N, and r, are reserved. The next 11 bits comprise the facility field, which indicates the system service responsible for the error. Only Microsoft can define facility fields. Most user-defined error codes use FACILITY_ITF, which indicates an interface-specific error. The lower word of the HRESULT is the code field, which defines the specific warning or error within the facility or interface.
As you might imagine, HRESULTs can provide only limited information about an error. In particular, HRESULTs don't tell you anything about where the error occurred. All you know is that somewhere within the implementation of a particular method, the error occurred. Determining what text message to display to an end user can also be complicated. In some instances, the client can call the Windows FormatMessage API function to determine the text message for the error. In other cases, the client will probably make up its own message text.
![]()
Figure 9-3. Structure of COM HRESULTs.
For these reasons, Automation has defined mechanisms to supplement the information returned in the HRESULT. The IDispatch Invoke method can return an EXCEPINFO structure. For vtable-binding, Automation defines a standard error object named ErrorInfo and three interfaces for managing the object. A component that uses this mechanism for error reporting implements the ISupportErrorInfo interface. The component uses the ICreateErrorInfo interface to initialize the error object when an error occurs. Clients use the IErrorInfo interface to retrieve information from the error object. Both the EXCEPINFO structure and the ErrorInfo object can hold rich descriptive information about an error, including a text description, pointers to an entry in a help file, and the source of the error.
You might be thinking that this is starting to sound awfully complicated. Fortunately, most developer tools that support COM provide some assistance to make error reporting and/or handling more straightforward. For example, in Visual Basic all COM errors are exposed through the Err object. You use the Err Raise function to set an error and the On Error statement to catch errors. If you are using the Visual C++ COM compiler support, you can use the _com_raise_error class to set an error and the _com_error class to retrieve information about an error. ATL provides the AtlReportError API function for setting error information.
In general, then, you should return an HRESULT for all methods in all your component interfaces. You should initialize the ErrorInfo object for any errors that occur, using whatever mechanism is supported by your development tool. Business objects will generally need to report some interface-specific errors—for example, to indicate that a specific business rule has been broken. These errors should be in the FACILITY_ITF range of errors. In Visual Basic, errors would be defined as an offset from vbObjectError, as shown here:
Public Const ERROR_NUMBER = vbObjectError + 10
In C++, errors can be defined by using the MAKE_HRESULT macro, as shown here:
const HRESULT ERROR_NUMBER = MAKE_HRESULT(SEVERITY_ERROR, FACILITY_ITF, 10);
Alternatively, you can simply figure out the numeric value yourself and hard-code it into a constant definition. Clients should test the return codes to determine whether methods have succeeded before continuing with their work.
That said, HRESULTs and ErrorInfo objects can report information on only one error at a time. And the information provided by the ErrorInfo object is fixed. You can't add another type of information to the ErrorInfo object. If you have additional error information to report, you will need to define a private mechanism for reporting this information. One technique is to fill in a method parameter with information the client will recognize as an error condition. For example, a method might return a Boolean value indicating success or failure. Another method is to provide a method or property on your interface to return a pointer to a custom error object. For example, Microsoft ActiveX Data Objects (ADO) provides the Errors collection on its Connection object so that multiple errors can be reported for a single method call.
You might need to maintain an audit trail for some types of errors or store troubleshooting information when unusual errors occur. On Microsoft Windows NT, you can use the system event log to store this kind of information. The Island Hopper application includes a utility component, util_EventViewer, that you can use to write information to the event log. Island Hopper also includes a higher-level component, ErrPlus, that the Classifieds client application uses to log application specific errors. ErrPlus makes use of the util_EventViewer component.
NOTE
The source code for the util_EventViewer component is located in the \Source\VBClient\Util_EventViewer directory in your Island Hopper installation.
Another approach to logging errors or troubleshooting information is to write the information to a private data store or file. To do this, you create a component that can write generic log messages to your data store or file. This component should either not support transactions or require a new transaction so that logging failures do not cause a "real" transaction to abort. A disadvantage of this approach is that you'll probably need to write a log viewer program too. When the system event log is used, you can use the system event viewer to view and manage log entries. This approach will not work on Microsoft Windows 95 and later, however. If you want to create log entries consistently on all Windows platforms, you can't use the event log.
Securing Access to Your Components
When you create an audit trail for application errors, you generally want to know who was trying to use the application. To determine who is using an application, you must use the programmatic security services provided by MTS. These services also enable you to perform more sophisticated security checks in your components than a simple check of role membership. Let's take a quick look at these services.
Most security needs—even programmatic security—can be met by using role-based security. For example, in a banking application you might have a business rule specifying that a teller can authorize withdrawals of up to $500 from a user's account, but larger withdrawals must be authorized by a manager. In this case, the implementation of the Withdraw method needs to take different actions depending on the caller's role. The object context methods IsSecurityEnabled and IsCallerInRole can be used to handle this scenario, as we saw in Chapter 4.
In those rare instances in which role-based security is insufficient, MTS provides the ISecurityProperty interface, which you can use to access Windows NT user identities. You query the object context to obtain an ISecurityProperty interface pointer. Once you have the pointer, you call one of the following four methods to obtain a security identifier (SID):
- GetDirectCallerSID returns the SID of the external process that called the currently executing method.
- GetDirectCreatorSID returns the SID of the external process that created the currently executing object.
- GetOriginalCallerSID returns the SID of the base client process that initiated the sequence of calls from which the call to the current object originated.
- GetOriginalCreatorSID returns the SID of the base client process that initiated the current activity.
A SID is a Windows structure containing information about a user and any groups the user belongs to. You must use the Windows API to parse a SID. You can use the information in the SID to restrict access to your components or to obtain information for auditing and logging. After you have finished with a SID obtained from the ISecurityProperty interface, you must call ReleaseSID to release the SID.
SIDs are not easily accessible from Visual Basic, so MTS also provides a SecurityProperty object. The SecurityProperty object is defined in the MTS type library. You get a reference to the object using the Security property of the object context, as shown here:
Dim secProperty as SecurityProperty Set secProperty = GetObjectContext.Security
The SecurityProperty object gives you access to the user name only, not to the entire SID. Fortunately, the user name is all you generally need for auditing or logging.
EAN: 2147483647
Pages: 98