Implementing Data Objects
| "; tableStr += " | "; tableStr += ""; tableStr += " | "; tableStr += ""; tableStr += ""; tableStr += " |
| "; tableStr += " | ||
For the remainder of this chapter, we will look at the implementation of some of the data objects from the Island Hopper application. We'll start by looking at the db_CategoryC component, which is implemented in Visual Basic. This component demonstrates how to use the Connection Execute method and Recordset objects to access data using ADO. It also shows how default interfaces are implemented in Visual Basic. Next we'll look at the db_CustomerPasswordC component. This component is implemented in Visual Basic as well, but it exposes two predefined interfaces rather than using the default interface. The db_CustomerPasswordC component also illustrates how to use Command objects to access data. We'll take a brief look at the db_CustomerC component, implemented in Visual Basic, to see how to call stored procedures. Last we'll look at the db_PaymentC component, which is implemented in Visual C++ using the Active Template Library (ATL) and the Visual C++ COM compiler support.
NOTE
Wondering why all the component names end in "C"? This is because there are multiple versions of the Island Hopper sample application, showing how to move from a client/server design to a three-tier design. "Scenario C" is the three-tier, component-based version. All component names end in "C" to indicate that they are part of "Scenario C."
WARNING
If you want to try implementing these components on your own system, you need to take a few extra precautions to ensure that the rest of the Island Hopper application will continue to run. These precautions will be noted in the text prior to each step that might break the application.
Implementing db_CategoryC in Visual Basic
Let's start by looking at the db_CategoryC component. This component manages access to the Categories table in the Island Hopper classified ads database.
NOTE
If you use Microsoft Visual Modeler to design your application, you can use its code generation capabilities to generate the Visual Basic skeleton code.
Creating the skeleton component
The first step is to create a project for the component itself. Remember that an MTS component must be an in-process component. In Visual Basic, you use an ActiveX DLL project to create an in-process component. When you create a new ActiveX DLL project, it will include a single class module. Each class module corresponds to one COM class. The project Name property is used as the name of the component's type library. The project Name and class Name properties together form the programmatic ID (ProgID) for the COM class, <project name>.<class name>, so it's important to set these properties before you build your component.
MTS components should also support the apartment threading model and should not produce any graphical output. (The components typically run on an unattended machine.) To ensure that your component meets these requirements, set the Unattended Execution and Threading Model properties for your project.
That's really all it takes to create a skeleton COM component in Visual Basic. Visual Basic will create the type library and register the component for you when you build it. Visual Basic implements the COM class factory and standard COM interfaces such as IUnknown for you as well. Visual Basic completely hides all the COM details from you. You have a completely functional (but really boring) COM component without writing a single line of code.
Step by Step: Creating the Skeleton db_CategoryC Component
- Start Visual Basic, and create a new ActiveX DLL project.
- Rename the project db_CategoryC and the class Category. This makes the ProgID for this COM class db_CategoryC.Category.
- From the Project menu, choose the db_CategoryC Properties command. On the General tab of the Project Properties dialog box, check the Unattended Execution check box and verify that the Threading Model option is set to Apartment Threaded.
NOTE
If you build the db_CategoryC component at this point on a machine that has the Island Hopper application installed, you will break Island Hopper components that use db_CategoryC. Wait to build the component until you have implemented the skeleton interface methods.- (optional) Build the component by choosing the Make db_CategoryC.dll command from the File menu.
With a class in place, you can turn your attention to implementing the interfaces that class exposes. There are two ways to do this. Most discussions of implementing components using Visual Basic just tell you to implement public methods and properties in your class modules. Behind the scenes, Visual Basic will create an IDispatch-based interface for you that exposes those methods and properties. Visual Basic names this interface _<class name> and marks it as the default interface. This is a perfectly reasonable approach if you know that you need only one interface or that the interface will be implemented by only one component. It is an absolutely necessary approach if you need to access the object from scripting languages (which can access only the default dispatch-based interface).
However, if you are going to implement multiple interfaces or you think the interface might be implemented by multiple classes, you should explicitly define the interfaces outside the component project. We'll take a look at how to do this from Visual Basic in the section "Implementing db_CustomerPasswordC in Visual Basic" later in this chapter.
For now, we will use the default implementation approach. When you use this approach, you need to be very careful about maintaining compatibility with existing versions of your components. Remember, once you publish an interface, it's not supposed to change! To maintain compatibility, select the Binary Compatibility option on the Project Properties' Component tab and verify that the edit control contains the filename of the existing implementation you want to be compatible with.
To decide what properties and methods to implement, look back at your design documentation. For each method you want to expose, you implement a public Sub or a public Function. For each property you want to expose, you either implement a public data variable or property procedures. The easiest way to do this is by choosing the Add Procedure command on the Tools menu. (Or you could just type in the code by hand.) You'll probably need to add a reference to the ADO 1.5 type library at this point, since probably one or more methods will use an ADO Recordset.
Step by Step: Adding Skeleton Interface Methods for db_CategoryC
- If necessary, reopen the db_CategoryC project.
- Choose the Add Procedure command from the Tools menu. In the Add Procedure dialog box, set Name to Add, Type to Function, and Scope to Public, and then click OK to close the dialog box. The following skeleton method will be added to your class module:
Public Function Add() End FunctionThe Add method needs some input parameters. You'll need to type these in yourself, as shown here:
Public Function Add(ByVal strName As String)- Add skeleton methods for other methods exposed by this class, as shown here:
Public Function Delete(ByVal lngCategoryID As Long) Public Function Update(ByVal lngCategoryID As Long, _ ByVal strName As String) Public Function GetById(ByVal lngCategoryID As Long) _ As ADODB.Recordset Public Function GetByName(ByVal strCategoryName As String) _ As ADODB.Recordset Public Function GetBySearchString _ (ByVal strSearchText As String) As ADODB.Recordset Public Function ListAll() As ADODB.Recordset Public Function ListByRange(ByVal intLow As Integer, _ ByVal intHigh As Integer) As ADODB.Recordset- Choose the References command from the Project menu. Locate and check the Microsoft ActiveX Data Objects Library in the list of available references. Doing so will ensure that you don't get any errors when you try to build the project, since the Get and List methods return ADO Recordset objects. Also, locate and check the Microsoft Transaction Server Type Library in the list of available references.
NOTE
If you want to build the db_CategoryC component at this point on a machine that has the Island Hopper application installed, you should select the Binary Compatibility option on the Project Properties Component tab and select IslandHopper\ScenarioC\Source\Server_Components\CompatibleDLLs\db_CategoryC.dll in your Island Hopper installation. If you don't make this adjustment, Island Hopper components that use db_CategoryC will be broken.- (optional) Build the component by choosing the Make db_CategoryC.dll command from the File menu. After you build the component, you should select the Binary Compatibility option on the Projects Properties Component tab. If you haven't selected the prebuilt db_CategoryC DLL that came with Island Hopper, copy the DLL you just built to a safe place and select the DLL file for version compatibility. This procedure will help prevent incompatible modifications to the Category public interface.
Implementing the methods
With the skeleton component in place, we can turn our attention to the interesting part: implementing the data access logic using ADO and using the ObjectContext to tell MTS when we have finished with the application state and whether we have completed it successfully.
To start with, you'll need to add references to the Microsoft Transaction Server Type Library and the Microsoft ActiveX Data Objects Library, if you haven't already done so. The MTS type library provides access to the ObjectContext.
NOTE
The version of the ActiveX Data Objects Library varies depending upon your installation. If you have installed ADO with Visual Studio 6.0, the References dialog will list the Microsoft ActiveX Data Object 2.0 Library.
Next define a couple of global constants, as shown in the following code. The first constant keeps track of the class module name, which comes in handy when you want to report an error. The second constant contains the name of the DSN file you'll use to store information you need to connect to the database. As mentioned, a DSN file helps provide flexibility so that system administrators can change database connection options without requiring changes to your component code.
Option Explicit Const modName = "db_CategoryC.Category" Const fileDSN = "dbCategoryC.DSN"
Each method in a stateless object will have the same basic structure: set up a general error handler, do your work, and call the ObjectContext SetComplete method when you have finished. In the error handler, clean up, call the ObjectContext SetAbort method, and raise an error to the caller. To get a reference to the current ObjectContext, call the GetObjectContext function. The code looks something like this:
Public Function MyMethod() On Error GoTo ErrorHandler ' Do work. . . . GetObjectContext.SetComplete Exit Function ErrorHandler: ' Clean up local variables. . . . GetObjectContext.SetAbort Err.Raise Err.Number, _ SetErrSource(modName, "PROCNAME"), _ Err.Description End Function
SetErrSource is a utility function provided with the Island Hopper application to build error source information that includes the machine, component, and method names. You can find the source for this function in the GLOBAL.BAS file in the \IslandHopper\Source\Server_Components\Globals\ directory on the companion CD. In many cases, bubbling up the error that caused your function to fail is a reasonable choice. You might also choose to raise a component-specific error code.
To perform the database access operation itself, you have three choices. First, you can call the Execute method on a Connection object, as shown here:
Dim conn As New ADODB.Connection Dim rs As ADODB.Recordset conn.Open "FILEDSN=" & fileDSN, "", "" Set rs = conn.Execute strSQL ' strSQL contains the SQL command.
This approach is the easiest to code, but it should be limited to SQL commands that do not return a Recordset or to simple queries to return Recordset objects that will be scanned only once, because the Connection Execute method always returns a read-only, forward-only Recordset.
Second, you can create a Command object and call its Execute method, as shown here:
Dim rs As ADODB.Recordset Dim conn As New ADODB.Connection Dim cmd As New ADODB.Command Dim prm As ADODB.Parameter conn.Open "FILEDSN=" & strFileDSN Set cmd.ActiveConnection = conn cmd.CommandText = strSP ' Assume calling a stored procedure, strSP. cmd.CommandType = adCmdStoredProc Set prm = cmd.CreateParameter(strPRM, strPRMType, adParamInput, _ intPRMLength, strPRMValue) ' Define a parameter. cmd.Parameters.Append prm ' There could be more than one… Set rs = cmd.Execute
This approach is much like the Connection Execute option, except that you can specify parameters for your SQL command or stored procedure. It also returns a read-only, forward-only Recordset.
Finally, you can create a Recordset object and call its Open method, shown here:
Dim rs As New ADODB.Recordset Dim conn As New ADODB.Connection Dim cmd As New ADODB.Command conn.Open "FILEDSN=" & strFileDSN Set cmd.ActiveConnection = conn cmd.CommandText = strSQL ' strSQL contains the SQL command. cmd.CommandType = adCmdText rs.Open cmd
This approach is the most flexible—it lets you specify the cursor type and lock type for your Recordset. You can specify the cursor type and lock type on the Recordset Open call, or you can set the CursorType and LockType properties on the Recordset before you call Open.
In the db_CategoryC component, the Connection Execute approach is used for the Add, Update, Delete, GetByID, GetByName, and GetBySearchString methods. The primary difference is the SQL string passed to the Execute call. The source code for these methods is shown in Listing 8-1.
Listing 8-1. The db_CategoryC source code.
Option Explicit Const modName = "db_CategoryC.Category" Const fileDSN = "dbCategoryC.DSN" '******************************************************************** ' Add ' Purpose: Adds a new category to the database ' Inputs: strName -- the name of the new category '******************************************************************** Public Function Add(ByVal strName As String) Dim intID As Integer Dim dtmCreated As Date Dim strSQL As String Dim rs As ADODB.Recordset Dim conn As ADODB.Connection On Error GoTo ErrorHandler ' Open the connection object to the database. Set conn = New ADODB.Connection conn.Open "FILEDSN=" & fileDSN ' Get the next category ID number from the database. strSQL = "SELECT MAX(Id) as NewId, Count(ID) as TheCount " & _ "FROM Categories" Set rs = conn.Execute(strSQL) If CInt(rs("TheCount")) = 0 Then intID = 0 Else intID = CInt(rs("NewId")) + 1 End If ' Form the SQL INSERT statement, and execute to the database. dtmCreated = Now() strSQL = "INSERT INTO Categories " & _ "(Id, Name, ModifiedDate, CreatedDate) " & _ "VALUES ( " & _ intID & ",'" & _ strName & "','" & _ dtmCreated & "','" & _ dtmCreated & "')" conn.Execute strSQL ' Allow MTS transaction set to proceed. GetObjectContext.SetComplete Exit Function ErrorHandler: If Not rs Is Nothing Then Set rs = Nothing End If If Not conn Is Nothing Then Set conn = Nothing End If ' Roll back MTS transaction set. GetObjectContext.SetAbort Err.Raise Err.Number, SetErrSource(modName, "Add"), Err.Description End Function '******************************************************************** ' Delete ' Purpose: Deletes a category from the database ' Inputs: lngCategoryID -- the unique category ID number '******************************************************************** Public Function Delete(ByVal lngCategoryID As Long) On Error GoTo ErrorHandler Dim strSQL As String Dim conn As ADODB.Connection ' Open the connection to the database. Set conn = New ADODB.Connection conn.Open "FILEDSN=" & fileDSN ' Form the SQL DELETE statement, and execute to the database. strSQL = "DELETE FROM Categories WHERE Id = " & lngCategoryID conn.Execute strSQL ' Allow MTS transaction set to proceed. GetObjectContext.SetComplete Exit Function ErrorHandler: If Not conn Is Nothing Then Set conn = Nothing End If ' Roll back MTS transaction set. GetObjectContext.SetAbort Err.Raise Err.Number, SetErrSource(modName, "Delete"), _ Err.Description End Function '******************************************************************** ' Update ' Purpose: Updates a category with new modified date ' Inputs: lngCategoryID -- the unique category ID number '******************************************************************** Public Function Update(ByVal lngCategoryID As Long, _ ByVal strName As String) Dim strSQL As String Dim conn As ADODB.Connection On Error GoTo ErrorHandler ' Open the connection to the database. Set conn = New ADODB.Connection conn.Open "FILEDSN=" & fileDSN ' Form the SQL UPDATE statement, and execute to the database. strSQL = "UPDATE Categories " & _ "SET ModifiedDate = " & "'" & Now() & "'" & _ " WHERE Id = " & lngCategoryID conn.Execute strSQL ' Allow MTS transaction set to proceed. GetObjectContext.SetComplete Exit Function ErrorHandler: If Not conn Is Nothing Then Set conn = Nothing End If ' Roll back MTS transaction set. GetObjectContext.SetAbort Err.Raise Err.Number, SetErrSource(modName, "Update"), _ Err.Description End Function '******************************************************************** ' ListAll ' Purpose: Lists all the categories in the database ' Returns: A Recordset object containing the category information '******************************************************************** Public Function ListAll() As ADODB.Recordset Dim strSQL As String Dim rs As ADODB.Recordset On Error GoTo ErrorHandler ' Form the SQL SELECT statement and execute to the database. strSQL = "SELECT CategoryId, Name, ModifiedDate, CreatedDate " & _ "FROM Categories ORDER BY Name" Set rs = New ADODB.Recordset rs.CursorLocation = adUseClient ' Execute the SQL command to the database ' using the Recordset Open method. rs.Open strSQL, "FILEDSN=" & fileDSN, adOpenKeyset, _ adLockReadOnly, adCmdText ' Allow MTS transaction set to proceed. GetObjectContext.SetComplete Set ListAll = rs Exit Function ErrorHandler: If Not rs Is Nothing Then Set rs = Nothing End If ' Roll back MTS transaction set. GetObjectContext.SetAbort Err.Raise Err.Number, SetErrSource(modName, "ListAll"), _ Err.Description End Function '******************************************************************* ' GetByID ' Purpose: Gets the category based on the category ID ' Inputs: lngCategoryID -- the unique category ID number ' Returns: A Recordset object containing category information '******************************************************************** Public Function GetById(ByVal lngCategoryID As Long) As ADODB.Recordset Dim strSQL As String Dim rs As ADODB.Recordset Dim conn As ADODB.Connection On Error GoTo ErrorHandler ' Open the connection to the database. Set conn = New ADODB.Connection conn.Open "FILEDSN=" & fileDSN ' Form the SQL SELECT command, and execute to the database. strSQL = "SELECT CategoryId, Name, ModifiedDate, CreatedDate " & _ "FROM Categories WHERE " & _ "CategoryId = " & lngCategoryID & " ORDER BY Name" Set rs = conn.Execute(strSQL) ' Allow MTS transaction set to proceed. GetObjectContext.SetComplete Set GetById = rs Exit Function ErrorHandler: If Not conn Is Nothing Then Set conn = Nothing End If ' Roll back MTS transaction set. GetObjectContext.SetAbort Err.Raise Err.Number, SetErrSource(modName, "GetByID"), _ Err.Description End Function '******************************************************************** ' GetByName ' Purpose: Retrieves category information for this category name ' Inputs: strCategoryName -- the category name ' Returns: A Recordset object containing category information '******************************************************************** Public Function GetByName(ByVal strCategoryName As String) _ As ADODB.Recordset Dim strSQL As String Dim rs As ADODB.Recordset Dim conn As ADODB.Connection On Error GoTo ErrorHandler ' Open the connection object to the database. Set conn = New ADODB.Connection conn.Open "FILEDSN=" & fileDSN ' Form the SQL SELECT statement, and execute to the database. strSQL = "SELECT CategoryId, Name, ModifiedDate, CreatedDate " & _ "FROM Categories WHERE " & _ "Name = '" & strCategoryName & "'" Set rs = conn.Execute(strSQL) ' Allow the MTS transaction set to proceed. GetObjectContext.SetComplete Set GetByName = rs Exit Function ErrorHandler: If Not conn Is Nothing Then Set conn = Nothing End If ' Roll back the MTS transaction set. GetObjectContext.SetAbort Err.Raise Err.Number, SetErrSource(modName, "GetByName"), _ Err.Description End Function '******************************************************************** ' GetBySearchString ' Purpose: Retrieves categories whose name contains the search string ' Inputs: strSearchText -- the search string ' Returns: A Recordset object containing the category information '******************************************************************** Public Function GetBySearchString(ByVal strSearchText As String) _ As ADODB.Recordset Dim strSQL As String Dim rs As ADODB.Recordset Dim conn As ADODB.Connection On Error GoTo ErrorHandler ' Open the connection to the database. Set conn = New ADODB.Connection conn.Open "FILEDSN=" & fileDSN ' Form the SQL SELECT statement, and execute to the database. strSQL = "SELECT CategoryId, Name, ModifiedDate, CreatedDate " & _ "FROM Categories WHERE " & _ "Name = '" & Left(strSearchText, _ (InStr(1, strSearchText, "/") - 1)) & "'" Set rs = conn.Execute(strSQL) ' Allow MTS transaction set to proceed. GetObjectContext.SetComplete Set GetBySearchString = rs Exit Function ErrorHandler: If Not conn Is Nothing Then Set conn = Nothing End If ' Roll back MTS transaction set. GetObjectContext.SetAbort Err.Raise Err.Number, SetErrSource(modName, "GetBySearchString"), _ Err.Description End Function '******************************************************************** ' ListByRange ' Purpose: Retrieves categories whose ID number falls in the range specified ' Inputs: intLow -- lower boundary of the search range ' intHigh -- upper boundary of the search range ' Returns: A Recordset object containing the category information '******************************************************************** Public Function ListByRange(ByVal intLow As Integer, _ ByVal intHigh As Integer) As ADODB.Recordset Dim strSQL As String Dim rs As ADODB.Recordset On Error GoTo ErrorHandler ' Form the SQL SELECT statement. strSQL = "SELECT CategoryID, Name FROM Categories " & _ "WHERE CategoryID BETWEEN " & intLow & " AND " & intHigh ' Execute SQL command to the database ' using the Recordset Open method. Set rs = New ADODB.Recordset rs.CursorLocation = adUseClient rs.Open strSQL, "FILEDSN=" & fileDSN, adOpenKeyset, _ adLockReadOnly, adCmdText ' Allow MTS transaction set to proceed. GetObjectContext.SetComplete Set ListByRange = rs Exit Function ErrorHandler: If Not rs Is Nothing Then Set rs = Nothing End If ' Roll back MTS transaction set. GetObjectContext.SetAbort Err.Raise Err.Number, SetErrSource(modName, "ListByRange"), _ Err.Description End Function |
Step by Step: Implementing the db_CategoryC Add, Update, Delete, and Get Methods
- If necessary, reopen the db_CategoryC project.
- Add the following lines to the General Declarations section of the Category class module to define constants for the module name used in error reporting and the DSN filename used to connect to the database:
Option Explicit Const modName = "db_CategoryC.Category" Const fileDSN = "dbCategoryC.DSN"- Add the GLOBALS.BAS module, located in the \IslandHopper\Source\Server_Components\Globals directory on the companion CD, to the project by choosing the Add Module command from the Project menu. This step will give you the SetErrorSource function used in the method error handlers.
- Add the following code to the Add method to establish the basic framework that calls the ObjectContext SetComplete method when all work has been completed successfully or calls the ObjectContext SetAbort method and raises an error if one occurs:
On Error Goto ErrorHandler ' TODO: Do work. GetObjectContext.SetComplete Exit Function ErrorHandler: ' TODO: Clean up local variables. GetObjectContext.SetAbort ' Rethrow the error. Err.Raise Err.Number, SetErrSource(modName, "Add"), _ Err.Description- Replace the line TODO: Do work in the Add method with the following code, which connects to the database, reads some information, and then creates a new record using the Connection Execute technique:
Dim intID As Integer Dim dtmCreated As Date Dim strSQL As String Dim rs As ADODB.Recordset Dim conn As ADODB.Connection ' Open the connection to the database. Set conn = New ADODB.Connection conn.Open "FILEDSN=" & fileDSN ' Get the next category ID from the database. strSQL = "SELECT MAX(Id) as NewId, Count(ID) as TheCount " & _ "FROM Categories" Set rs = conn.Execute(strSQL) If CInt(rs("TheCount")) = 0 Then intID = 0 Else intID = CInt(rs("NewId")) + 1 End If ' Form the SQL INSERT statement, and execute to the database. dtmCreated = Now() strSQL = "INSERT INTO Categories " & _ "(Id, Name, ModifiedDate, CreatedDate) " & _ "VALUES ( " & _ intID & ",'" & _ strName & "','" & _ dtmCreated & "','" & _ dtmCreated & "')" conn.Execute strSQL- Replace the line TODO: Clean up local variables in the Add method with the following code, which ensures that the Connection and Recordset objects will be cleaned up when an error occurs:
If Not rs Is Nothing Then Set rs = Nothing End If If Not conn Is Nothing Then Set conn = Nothing End If- Repeat step 4 for the Update and Delete methods, changing the second SetErrorSource parameter from Add to Update and Delete, respectively.
- Replace the line TODO: Do work in the Delete method with the following code, which connects to the database and executes a SQL command to delete a record:
Dim strSQL As String Dim conn As ADODB.Connection ' Open the connection to the database. Set conn = New ADODB.Connection conn.Open "FILEDSN=" & fileDSN ' Form the SQL DELETE statement, and execute to the database. strSQL = "DELETE FROM Categories WHERE Id = " & lngCategoryID conn.Execute strSQL- Repeat step 8 for the Update method. The only difference is the SQL statement used, as shown here:
' Form the SQL UPDATE statement, and execute to the database. strSQL = "UPDATE Categories " & _ "SET ModifiedDate = " & "'" & Now() & "'" & _ " WHERE Id = " & lngCategoryID- Replace the line TODO: Clean up local variables in the Update and Delete methods with the following code, which ensures that the Connection object will be cleaned up if an error occurs:
If Not conn Is Nothing Then Set conn = Nothing End If- (optional) Build the component by choosing the Make db_CategoryC.dll command from the File menu.
- Add the following code to the GetById method to establish the basic framework that calls the ObjectContext SetComplete method when all work is completed successfully or that calls the ObjectContext SetAbort method and raises an error if one occurs:
Dim strSQL As String Dim rs As ADODB.Recordset Dim conn As ADODB.Connection On Error Goto ErrorHandler ' TODO: Do work. GetObjectContext.SetComplete Exit Function ErrorHandler: ' TODO: Clean up local variables. GetObjectContext.SetAbort ' Rethrow the error. Err.Raise Err.Number, SetErrSource(modName, "ListAll"), _ Err.Description- Replace the line TODO: Do work in the GetById method with the following code, which connects to the database and executes a SQL query to retrieve a read-only, forward-only Recordset:
' Open the connection to the database. Set conn = New ADODB.Connection conn.Open "FILEDSN=" & fileDSN ' Form the SQL SELECT command, and execute to the database. strSQL = "SELECT CategoryId, Name, ModifiedDate, " & _ "CreatedDate FROM Categories WHERE " & _ "CategoryId = " & lngCategoryID & " ORDER BY Name" Set rs = conn.Execute(strSQL)- Following the call to GetObjectContext.SetComplete in the GetById method, add this line to return the Recordset to the caller:
Set GetById = rs- Replace the line TODO: Clean up local variables in the GetById method with the following code, which ensures that the Connection object will be cleaned up if an error occurs:
If Not conn Is Nothing Then Set conn = Nothing End If- Repeat steps 12 through 15 for the GetByName and GetBySearchString methods, replacing GetById with the appropriate method name. The only other difference in these methods is the SQL statement to execute, as shown here:
' GetByName SQL query strSQL = "SELECT CategoryId, Name, ModifiedDate, " & _ "CreatedDate FROM Categories WHERE " & _ "Name = '" & strCategoryName & "'" ' GetBySearchString SQL query strSQL = "SELECT CategoryId, Name, ModifiedDate, " & _ "CreatedDate FROM Categories WHERE " & "Name = '" & _ Left(strSearchText, _ (InStr(1, strSearchText, "/") - 1)) & "'"- (optional) Build the component by choosing the Make db_CategoryC.dll command from the File menu.
The remaining two methods in the db_CategoryC component are ListAll and ListByRange. These methods use the Recordset Open technique to retrieve a disconnected Recordset that is returned to the caller. The code for these methods is shown in Listing 8-1. Note that it does not create an explicit Connection object. Instead, it passes a connection string to the Recordset Open method. ADO will create a Connection object behind the scenes, but it doesn't assign the object to a variable. This technique is useful when you need to connect to the database for only one Recordset.
When you are creating a disconnected Recordset, keep in mind the following important steps:
- Set the CursorLocation property on the Recordset or Connection object to adUseClient.
- If you use an explicit Connection object, detach it from the Recordset after the Recordset has been populated by setting the Recordset ActiveConnection property to Nothing.
For this particular component, we don't need to return a Recordset that can be updated since the Update method takes individual parameters, not a Recordset. If we wanted to create a Recordset that could be updated, we would need to set the LockType property to adLockBatchOptimistic and the CursorType to adOpenStatic or adOpenKeyset.
With that, the db_CategoryC component is complete. If you've been following along, your db_CategoryC source code should look like that in the \IslandHopper\Source\Server_Components\db_CategoryC directory on the companion CD. We'll see how to set the transactional and security requirements for this component and how to package it for use with MTS in Chapter 10.
Step by Step: Implementing the db_CategoryC List Methods
- If necessary, reopen the db_CategoryC project.
- Add the following code to the ListAll method to establish the basic framework:
Dim strSQL As String Dim rs As ADODB.Recordset On Error GoTo ErrorHandler ' TODO: Do work. GetObjectContext.SetComplete Exit Function ErrorHandler: ' TODO: Clean up local variables. GetObjectContext.SetAbort Err.Raise Err.Number, _ SetErrSource(modName, "ListAll"), Err.Description- Replace the line TODO: Do work in the ListAll method with the following code, which creates a Recordset and retrieves information from the database using the Recordset Open method:
' Form the SQL SELECT statement, and execute to the database. strSQL = "SELECT CategoryId, Name, ModifiedDate, CreatedDate " & _ "FROM Categories ORDER BY Name" Set rs = New ADODB.Recordset rs.CursorLocation = adUseClient ' Execute the SQL command to the database ' using the Recordset Open method. rs.Open strSQL, "FILEDSN=" & fileDSN, _ adOpenKeyset, adLockReadOnly, adCmdText- Following the call to GetObjectContext.SetComplete in the ListAll method, add this line to return the Recordset to the caller:
Set ListAll = rs- Replace the line TODO: Clean up local variables in the ListAll method with the following code, which ensures that the Recordset will be cleaned up if an error occurs:
If Not rs Is Nothing Then Set rs = Nothing End If- Repeat steps 2 through 5 for the ListByRange method, replacing ListAll with ListByRange. The only other difference in the methods is the SQL statement to execute, as shown here:
' ListByRange SQL query strSQL = "SELECT CategoryID, Name FROM Categories " & _ "WHERE CategoryID BETWEEN " & intLow & " AND " & intHigh- (optional) Build the component by choosing the Make db_CategoryC.dll command from the File menu.
Implementing db_CustomerPasswordC in Visual Basic
The db_CustomerPasswordC component manages access to the CustomerPasswords table in the Island Hopper classified ads database. Unlike the db_CategoryC component, db_CustomerPasswordC implements externally defined interfaces. It also illustrates how to use ADO Command objects to interact with the database.
Defining the interfaces
When a COM class exposes multiple interfaces or you think the interface might be implemented by multiple classes, you should explicitly define the interfaces. There are several ways you can accomplish this. First, you can write an Interface Definition Language (IDL) file to describe the interfaces, as we discussed in Chapter 2. You then compile the IDL file using the Microsoft IDL (MIDL) compiler to generate a C/C++ header file and a type library. Depending on the tools used to implement COM classes exposing your interfaces, developers will either include the header file in their source code or import the type library into their component project. This approach gives you the most control over your interface definitions, but you must understand IDL in order to use it.
A second approach is to use features of a programming tool to define the interfaces without generating an IDL file. For example, Visual Basic lets you define interfaces using Visual Basic syntax. You simply create a new ActiveX DLL or EXE project, create a class module for each interface, and add the desired properties and methods to a class module, without putting any code in the procedures. When you build the project, a type library is generated that describes all the interfaces. This technique is convenient if you know Visual Basic. The downside is that you don't have much control over the definition that gets generated. In addition, there is no straightforward way to generate a C-style header file from the type library. However, if you can live with these constraints, this is an easy way to define interfaces.
A third approach is to use a programming tool to generate the IDL file for you. The Island Hopper application uses this technique. It gives you all the advantages of a separate IDL file for your interface definitions, but it doesn't require quite as much knowledge of the IDL syntax. (Exactly how much IDL you need to understand depends on what programming tool you are using.)
For the db_CustomerPasswordC component, Visual C++ was used to generate the interface definitions. Using this approach, you first create an ATL COM AppWizard project. You then use the Insert New Class menu command to define a new ATL class that implements all the interfaces you need, as shown in Figure 8-1. This generates the skeleton IDL file defining the interfaces.
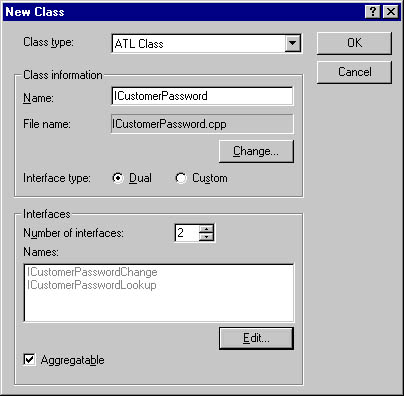
Figure 8-1. Using the Insert New Class option to define skeleton interfaces.
Finally, use the Visual C++ Integrated Development Environment (IDE) to add methods and properties to the interfaces, as shown in Figure 8-2. This will add the method and property definitions to the IDL file. Once all the methods and properties are defined, you simply build the project. In addition to building a skeleton component, this technique compiles the IDL file, generating a C/C++ header file and a type library for your interfaces.

Figure 8-2. Adding a method definition to an interface using Visual C++.
Creating the skeleton component
Once the interfaces are defined and you have a type library, you can implement COM classes in Visual Basic that expose these interfaces. The first step is to create an ActiveX DLL project, just as we did for the db_CategoryC component. Next you need to set a reference in your component project to the type library with the interface definitions, by choosing the References command from the Project menu, so that Visual Basic knows what methods and properties are exposed by each interface.
To indicate that you want to implement interfaces in your Visual Basic class modules, you use the Implements keyword, as shown here:
Implements IDBCUSTOMERPASSWORDLib.ICustomerPasswordChange Implements IDBCUSTOMERPASSWORDLib.ICustomerPasswordLookup
Once you have done this, you need to fill in the code for each method. Visual Basic makes it very easy to generate the skeleton code for each method, as shown in Figure 8-3.
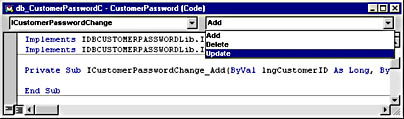
Figure 8-3. Generating a skeleton method for an interface in Visual Basic.
With the code window visible for the class, select the interface name in the Object list box. Then select a method name in the Procedure list box. If a skeleton does not already exist for the method, Visual Basic will generate one. In Visual Basic, an implementation of an interface method is a private Sub or Function with a name in the form <interface name>_<method name>. If you implement interfaces correctly, clients will be able to write code similar to this to access the interface methods:
Dim x as ICustomerPasswordLookup Set x = CreateObject("db_CustomerPasswordC.CustomerPassword") x.Add(lngID, strPassword) Note, however, that if you make the method implementations public, they become part of the default interface, not the interface you are trying to implement. In addition, only the methods on the default interface for the class will be accessible through IDispatch.
Step by Step: Implementing the Skeleton db_CustomerPasswordC Component
- Create a skeleton db_CustomerPasswordC component, following the instructions for the db_CategoryC skeleton component. The project name should be db_CustomerPasswordC, and the class name should be CustomerPassword.
- Choose the References command from the Project menu, and check the IdbCustomerPassword 1.0 Type Library check box. If this option does not appear in the list of available type libraries, you might need to build the IdbCustomerPassword ATL project located in the Source\ Server_Components\Interfaces\IdbCustomerPassword directory in your Island Hopper source installation.
- Choose the References command from the Project menu again. Locate and check the Microsoft ActiveX Data Objects Library option in the list of available references to ensure that you don't get any errors when you try to implement methods that use ADO Recordset objects. Also, locate and check the Microsoft Transaction Server Type Library in the list of available references.
- Open the source code window for the CustomerPassword class and add the following code to indicate that you want to implement the ICustomerPasswordLookup and ICustomerPasswordChange interfaces:
Implements IDBCUSTOMERPASSWORDLib.ICustomerPasswordLookup Implements IDBCUSTOMERPASSWORDLib.ICustomerPasswordChange- For each method of the ICustomerPasswordLookup and ICustomerPasswordChange interfaces, generate the skeleton code by selecting the interface name in the Object list box and the method name in the Procedure list box. You should end up with these method definitions:
Private Sub ICustomerPasswordChange_Add _ (ByVal lngCustomerID As Long, ByVal strPassword As String) Private Sub ICustomerPasswordChange_Delete _ (ByVal lngCustomerID As Long) Private Sub ICustomerPasswordChange_Update _ (ByVal lngCustomerID As Long, ByVal strPassword As String) Private Function ICustomerPasswordLookup_GetByID _ (ByVal lngCustomerID As Long) As ADODB.RecordsetNOTE
If you want to build the db_CustomerPasswordC component at this point on a machine that has the Island Hopper application installed, you should select the Binary Compatibility option on the Project Properties Component tab and select the DB_CUSTOMERPASSWORDC.DLL file located in the Source\Server_Components\CompatibleDlls directory in your Island Hopper source installation. If you don't make this adjustment, Island Hopper components that use db_CustomerPasswordC will not work correctly.- (optional) Build the component by choosing the Make db_CustomerPasswordC.dll command from the File menu. After you build the component, you should select the Binary Compatibility option on the Project Properties Component tab. If you haven't selected the prebuilt db_CustomerPasswordC DLL that came with the Island Hopper application, copy the DLL you just built to a safe place and select that. This step will help prevent incompatible changes to the CustomerPassword class.
Implementing the methods
With the skeleton code in place, you can start filling in the method implementations. We're going to look at only one method for this component in detail: the Add method, which demonstrates how to perform a parameterized query using an ADO Command object. The complete source code for all the methods is shown in Listing 8-2.
Listing 8-2. The db_CustomerPasswordC source code.
Option Explicit Const modName = "db_CustomerPasswordC.CustomerPassword" Const fileDSN = "dbCustomerPasswordC.DSN" Implements IDBCUSTOMERPASSWORDLib.ICustomerPasswordChange Implements IDBCUSTOMERPASSWORDLib.ICustomerPasswordLookup '******************************************************************** ' ICustomerPasswordLookup_GetByID ' Purpose: Gets password information from the database for a ' particular customer ID ' Inputs: lngCustomerID -- the unique customer ID number ' Returns: A Recordset object containing password information '******************************************************************** Private Function ICustomerPasswordLookup_GetByID(ByVal lngCustomerID _ As Long) As ADODB.Recordset Dim strSQL As String Dim rs As New ADODB.Recordset On Error GoTo ErrorHandler ' Form the SQL SELECT statement. strSQL = "SELECT Password FROM CustomerPasswords " & _ "WHERE CustomerID = " & lngCustomerID rs.CursorLocation = adUseClient ' Execute the SQL command to the database ' using the Recordset Open method. rs.Open strSQL, "FILEDSN=" & fileDSN, adOpenForwardOnly, adLockReadOnly ' Allow MTS transaction set to proceed. GetObjectContext.SetComplete ' Return the Recordset object containing the password. Set ICustomerPasswordLookup_GetByID = rs Exit Function ErrorHandler: If Not rs Is Nothing Then Set rs = Nothing End If ' Roll back the MTS transaction set. GetObjectContext.SetAbort Err.Raise Err.Number, SetErrSource(modName, "GetByID"), Err.Description End Function '******************************************************************** ' ICustomerPasswordChange_Add ' Purpose: Adds a new customer password record to the database ' Inputs: lngCustomerID -- the unique customer ID number ' strPassword -- the customer password '******************************************************************** Private Sub ICustomerPasswordChange_Add(ByVal lngCustomerID As Long, _ ByVal strPassword As String) Dim strSQL As String Dim conn As ADODB.Connection Dim cmd As ADODB.Command On Error GoTo ErrorHandler ' Form the SQL INSERT statement. Use the ADODB Command object to make ' the SQL command "SQL safe" _ that is, correctly handle a password ' string that may contain single or double quotes. strSQL = "INSERT CustomerPasswords (CustomerID, Password) " & _ "VALUES ( ?, ? )" Set cmd = New ADODB.Command cmd.CommandText = strSQL cmd.Parameters.Append cmd.CreateParameter(, adInteger, adParamInput, , _ lngCustomerID) cmd.Parameters.Append cmd.CreateParameter(, adVarChar, adParamInput, _ 255, strPassword) ' Open the Connection object ' and execute the SQL command to the database. Set conn = New ADODB.Connection conn.Open "FILEDSN=" & fileDSN Set cmd.ActiveConnection = conn cmd.Execute ' Allow MTS transaction set to proceed. GetObjectContext.SetComplete Exit Sub ErrorHandler: ' Clean up objects on the way out. If Not conn Is Nothing Then Set conn = Nothing End If If Not cmd Is Nothing Then Set cmd = Nothing End If ' Roll back MTS transaction set. GetObjectContext.SetAbort Err.Raise Err.Number, SetErrSource(modName, "Add"), Err.Description End Sub '******************************************************************** ' ICustomerPasswordChange_Delete ' Purpose: Deletes a customer password record from the database ' Inputs: lngCustomerID -- the unique customer ID number '******************************************************************** Private Sub ICustomerPasswordChange_Delete(ByVal lngCustomerID As Long) Dim strSQL As String Dim conn As ADODB.Connection On Error GoTo ErrorHandler ' Form the SQL DELETE statement. strSQL = "DELETE FROM CustomerPasswords WHERE CustomerID = " & _ lngCustomerID ' Open the Connection object ' and execute the SQL command to the database. Set conn = New ADODB.Connection conn.Open "FILEDSN=" & fileDSN conn.Execute strSQL ' Allow MTS transaction set to proceed. GetObjectContext.SetComplete Exit Sub ErrorHandler: If Not conn Is Nothing Then Set conn = Nothing End If ' Roll back MTS transaction set. GetObjectContext.SetAbort Err.Raise Err.Number, SetErrSource(modName, "Delete"), Err.Description End Sub '******************************************************************** ' ICustomerPasswordChange_Update ' Purpose: Updates the customer password record in the database ' Inputs: lngCustomerID -- the unique customer ID number ' strPassword -- the customer password '******************************************************************** Private Sub ICustomerPasswordChange_Update(ByVal lngCustomerID As Long, _ ByVal strPassword As String) Dim strSQL As String Dim conn As ADODB.Connection Dim cmd As ADODB.Command On Error GoTo ErrorHandler ' Form the SQL UPDATE statement. strSQL = "UPDATE CustomerPasswords SET Password = ? " & _ "WHERE CustomerID = ?" Set cmd = New ADODB.Command cmd.CommandText = strSQL cmd.Parameters.Append cmd.CreateParameter(, adVarChar, adParamInput, _ 255, strPassword) cmd.Parameters.Append cmd.CreateParameter(, adInteger, adParamInput, _ , lngCustomerID) ' Open the Connection object ' and execute the SQL command to the database. Set conn = New ADODB.Connection conn.Open "FILEDSN=" & fileDSN Set cmd.ActiveConnection = conn cmd.Execute ' Allow MTS transaction set to proceed. GetObjectContext.SetComplete Exit Sub ErrorHandler: ' Clean up objects on the way out. If Not conn Is Nothing Then Set conn = Nothing End If If Not cmd Is Nothing Then Set cmd = Nothing End If ' Roll back MTS transaction set. GetObjectContext.SetAbort Err.Raise Err.Number, SetErrSource(modName, "Update"), Err.Description End Sub |
When you use an ADO Command object to implement a parameterized query, you need to populate the Parameters collection. For each parameter, first call the Command object CreateParameter method to create a new Parameter object. Then call the Parameters collection Append method to add the Parameter object to the collection, as shown here:
cmd.Parameters.Append cmd.CreateParameter _ (, adInteger, adParamInput, , lngCustomerID)
Be sure to append the parameters in the order in which they appear in the SQL statement or stored procedure you want to execute. You will get better performance if the parameter types you create match the types expected by the database, since data conversion can be eliminated. Once the Parameters collection is populated, you call the Command object's Execute method to retrieve a read-only, forward-only Recordset. If you need a more flexible Recordset, you can create a Command object and pass it as the first parameter of the Recordset Open method call.
Step by Step: Implementing the db_CustomerPasswordC Add Method
- If necessary, reopen the db_CustomerPasswordC project.
- Add the following lines to the General Declarations section of the CustomerPassword class module to define constants for the module name used in error reporting and the DSN filename that is used to connect to the database:
Option Explicit Const modName = "db_CustomerPasswordC.CustomerPassword" Const fileDSN = "dbCustomerPasswordC.DSN"- Add the GLOBALS.BAS module, located in the \IslandHopper\Source\Server_Components\Globals directory on the companion CD, to the project by choosing the Add Module command from the Project menu. This step will give you the SetErrorSource function used in the method error handlers.
- Add this code to the Add method to establish the basic framework:
Dim strSQL As String Dim conn As ADODB.Connection Dim cmd As ADODB.Command On Error GoTo ErrorHandler ' TODO: Do work. GetObjectContext.SetComplete Exit Sub ErrorHandler: ' TODO: Clean up local variables. GetObjectContext.SetAbort Err.Raise Err.Number, SetErrSource(modName, "Add"), _ Err.Description- Replace the line TODO: Do work in the Add method with the following code, which creates a Command object, populates the Parameters collection, and executes the command:
' Form the SQL INSERT statement. Use the ADODB command object to ' make the SQL command "SQL safe"--that is, correctly handle a ' password string that might contain single or double quotes. strSQL = "INSERT CustomerPasswords (CustomerID, Password) " & _ "VALUES ( ?, ? )" Set cmd = New ADODB.Command cmd.CommandText = strSQL cmd.Parameters.Append cmd.CreateParameter _ (, adInteger, adParamInput, , lngCustomerID) cmd.Parameters.Append cmd.CreateParameter _ (, adVarChar, adParamInput, 255, strPassword) ' Open the Connection object ' and execute the SQL command to the database. Set conn = New ADODB.Connection conn.Open "FILEDSN=" & fileDSN Set cmd.ActiveConnection = conn cmd.Execute- Replace the line TODO: Clean up local variables in the Add method with the following code, which ensures that the Connection and Command objects will be cleaned up if an error occurs:
If Not conn Is Nothing Then Set conn = Nothing End If If Not cmd Is Nothing Then Set cmd = Nothing End If- (optional) Build the component by choosing the Make db_CustomerPasswordC.dll command from the File menu.
A Quick Look at db_CustomerC
The db_CustomerC component is very similar to the db_CustomerPasswordC and db_CategoryC components, so we won't look at it in any great detail. Instead, let's just take a quick look at how the db_CustomerC query methods are implemented—by using a call to a parameterized stored procedure in the database. This is a common thing to do, so the actual code to call the stored procedure is separated out into a global function, RunSp.
The code for the db_CustomerC implementation of ICustomerLookup ListByLastName method is shown in Listing 8-3.
Listing 8-3. The db_CustomerC source code for the ICustomerLookupListByLastName method.
'******************************************************************** ' ICustomerLookup_ListByLastName() ' Purpose: Retrieves customer information from the database ' for a particular last name ' Inputs: strLastName -- the customer last name ' Returns: A Recordset object containing customer information '******************************************************************** Private Function ICustomerLookup_ListByLastName(ByVal strLastName _ As String) As ADODB.Recordset Dim rs As New ADODB.Recordset On Error GoTo ErrorHandler ' Execute the stored procedure to the database. Set rs = RunSp(fileDSN, "Customer_ListByLastName", 1, _ Array("@vLastName"), Array(adChar), Array(30), Array(strLastName)) ' Allow MTS transaction set to proceed. GetObjectContext.SetComplete ' Return a Recordset object containing the customer information. Set ICustomerLookup_ListByLastName = rs Exit Function ErrorHandler: ' Clean up the object on the way out. If Not rs Is Nothing Then Set rs = Nothing End If ' Roll back MTS transaction set. GetObjectContext.SetAbort Err.Raise Err.Number, SetErrSource(modName, _ "ICustomerLookup_ListByLastName"), Err.Description End Function |
Notice that the basic structure is exactly the same as that for every other data object method we've seen: set up a general error handler, do your work, and call the ObjectContext SetComplete method when you have finished. In the error handler, you clean up, call the ObjectContext SetAbort method, and raise an error to the caller. What's different is the code that does the work, shown here:
Set rs = RunSp(fileDSN, "Customer_ListByLastName", 1, _ Array("@vLastName"), Array(adChar), _ Array(30), Array(strLastName)) RunSp is where all the interesting bits are. The source code for RunSp is shown in Listing 8-4.
Listing 8-4. The RunSp source code, used to execute a parameterized stored procedure.
'******************************************************************** ' RunSp() ' Purpose: Calls a stored procedure in the database ' Inputs: ' strFileDSN -- the name of the DSN file pointing to the database ' strSP -- the name of the stored procedure to run ' intPRMCount -- the number of parameters sent to the stored procedure ' strPRM -- Variant containing the names of the parameters sent ' strPRMType -- Variant containing the types of the parameters sent ' intPRMLength -- Variant containing the sizes of the parameters sent ' strPRMValue -- Variant containing the values of the parameters sent ' Returns: A Recordset object containing the information returned by the ' stored procedure '******************************************************************** Function RunSp(strFileDSN As String, strSP As String, _ intPRMCount As Integer, strPRM As Variant, strPRMType As Variant, _ intPRMLength As Variant, strPRMValue As Variant) As Object ' Set up Command and Connection objects. Dim rs As New ADODB.Recordset Dim conn As New ADODB.Connection Dim cmd As New ADODB.Command Dim prm As ADODB.Parameter ' Run the procedure. conn.Open "FILEDSN=" & strFileDSN Set cmd.ActiveConnection = conn cmd.CommandText = strSP cmd.CommandType = adCmdStoredProc Dim i As Integer For i = 0 To intPRMCount - 1 Set prm = cmd.CreateParameter(strPRM(i), strPRMType(i), _ adParamInput, intPRMLength(i), strPRMValue(i)) ' PART OF WAY 1 cmd.Parameters.Append prm Next i rs.CursorLocation = adUseClient rs.Open cmd, , adOpenStatic, adLockBatchOptimistic Set RunSp = rs End Function |
TheRunSp function creates an updatable, disconnected Recordset. It starts by creating aConnection object to the database specified in thestrFileDSN parameter, as shown here:
conn.Open "FILEDSN=" & strFileDSN
Next it creates a Command object, connects it to the Connection object, and specifies that the command to execute is the stored procedure passed as the strSP parameter, as shown here:
Set cmd.ActiveConnection = conn cmd.CommandText = strSP cmd.CommandType = adCmdStoredProc
Now RunSp needs to set up the parameters for the stored procedure. Each parameter for the stored procedure includes four pieces of information: name, data type, size, and value. The intPRMCount parameter indicates how many stored procedure parameters need to be set up. The remaining four RunSp arguments, strPRM, strPRMType, intPRMLength, and strPRMValue are arrays containing the name, type, size, and value of each stored procedure parameter. RunSp iterates through these arrays to create Parameter objects that are added to the Command object, as shown here:
Dim i As Integer For i = 0 To intPRMCount - 1 Set prm = cmd.CreateParameter(strPRM(i), strPRMType(i), _ adParamInput, intPRMLength(i), strPRMValue(i)) cmd.Parameters.Append prm Next i
With the Command object initialized, RunSp can call Recordset Open to retrieve the records, using batch optimistic locking and a static cursor type, as shown here:
rs.CursorLocation = adUseClient rs.Open cmd, , adOpenStatic, adLockBatchOptimistic Set RunSp = rs
The other query methods in db_CustomerC are implemented the same way. Note that the call to RunSp in ListByLastName uses explicit data types, not Variants. Unless you have a true Variant data type, you should use explicit data types in calls to the database and as data variables or parameters within your source code. In addition, you should use the same type for data variables or parameters as you use in the database. Doing so will improve performance by eliminating the need for data conversion.
At this point, you should understand how to implement a data object in Visual Basic. If you are building stateless data objects that own one SQL Server database table each, all your data objects will look a lot like the db_CategoryC, db_CustomerPasswordC, and db_CustomerC components discussed here. If you have lots of data objects, you might want to move the standard functionality into a set of global functions you can reuse, much as we did with the RunSp function in the Island Hopper application.
Implementing Data Objects in Visual C++
Visual Basic is a great language for implementing data objects because it provides extensive support for using COM objects such as ADO. However, Visual Basic isn't the right choice for everyone. In the remainder of this chapter, we'll look at writing a data object, db_PaymentC , using Visual C++. Conceptually, writing a data object in Visual C++ is exactly like writing one in Visual Basic. You have the same options for using ADO. You make the same method calls. However, the code you end up with looks very, very different.
The easiest way to create data objects in C++ is by using the Active Template Library (ATL). ATL provides template classes to implement small, fast COM components. It includes standard implementations for IUnknown, IClassFactory, IDispatch, dual interfaces, in-process server entry points, and so on. Unlike Visual Basic, however, all the source code for these implementations is visible to you—either within ATL header files or within your component source code. Visual C++ includes wizards that let you generate skeleton components and COM classes very quickly. Starting with version 5.0, Visual C++ also includes native compiler support for COM. This feature can simplify using existing COM objects, such as ADO from C++.
NOTE
With the Visual C++ wizards, you can easily write components without understanding very much about ATL. However, when you start debugging your components, you'll probably want to understand what all the code the wizards generated is for. The bibliography provides some pointers to more detailed information about ATL.
Creating the skeleton component
The first step is to create a project for the component. You do this by creating a new ATL COM AppWizard project in the Visual C++ IDE. The IDE launches a one-step wizard that lets you specify that a DLL server should be created, as shown in Figure 8-4.
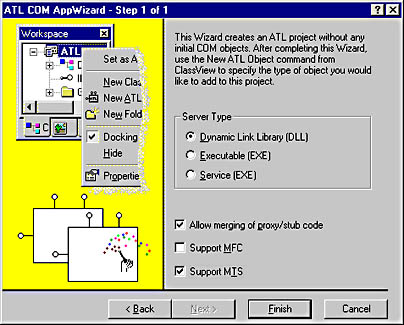
Figure 8-4. Creating a new ATL component.
At this point, the component doesn't include any COM classes, just implementations of the entry points required by DLL servers. To create a COM class, you use the ATL Object Wizard, which is accessed by choosing the New ATL Object command from the Insert menu. The Object Wizard lets you choose the type of COM class to create. For data objects and business objects, you should select Objects from the Category list and MS Transaction Server Component from the Objects list. Click Next, and you will be prompted to enter the names of the C++ class, COM coclass, default interface name, and ProgID you want to use. The MTS tab lets you specify MTS-specific options, as shown in Figure 8-5. You will usually want to implement a dual interface and include support for the IObjectControl interface.
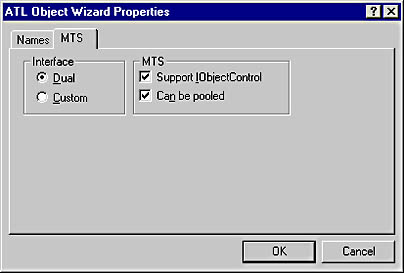
Figure 8-5. Setting MTS options in the ATL Object Wizard.
We haven't talked about the IObjectControl interface yet. It contains three methods: Activate, Deactivate, and CanBePooled. Activate and Deactivate give you a chance to do some initialization or cleanup work during JIT activation or deactivation. CanBePooled was designed to enable components to indicate whether objects could be placed in an object pool instead of being destroyed upon deactivation. However, this method is not called by MTS 1.0 or MTS 2.0.
The real reason to include IObjectControl support in your component is that when you do so, a smart pointer to the object context is added to your COM class. A smart pointer is a wrapper for a COM interface pointer that automatically handles calling the AddRef and Release methods, so you don't need to handle reference counting manually. ATL gets the object context during activation and cleans it up during deactivation, so you always have access to the object context within your COM class.
WARNING
The ATL Object Wizard in Visual C++ 5.0 generates incorrect code for the IObjectControl Deactivate method. You should change the line
m_spObjectContext->Release();to
m_spObjectContext.Release();This is no longer a problem in Visual C++ 6.0.
Step by Step: Creating the Skeleton db_PaymentC Component
- Start Visual C++ and create a new ATL COM AppWizard project named db_PaymentC. Ensure that the Server Type is set to DLL. If you are using Visual C++ 6.0, check Support MTS so that your project build settings are configured to link to the MTS libraries.
- Choose the New ATL Object command from the Insert menu to launch the ATL Object Wizard.
- Select Objects from the Category list and MS Transaction Server Component from the Objects list, and then click the Next button.
- On the Names tab, enter db_Payment as the short name. Change the ProgID to db_PaymentC.Payment. You can accept the default values for all other fields on the Names tab.
- On the MTS tab, click on the Dual Interface radio button and check both Support IObjectControl and Can Be Pooled. (In Visual C++ 5.0, this tab is labeled "MTX" instead of "MTS".)
- Click the OK button to generate the Cdb_Payment class code.
NOTE
If you build the db_PaymentC component at this point on a machine that has the Island Hopper application installed, you will break any Island Hopper components that use db_PaymentC. Wait to build the component until you have implemented the skeleton interface methods.
- (optional) Build the component by selecting the Build db_PaymentC.dll command from the Build menu.
That's all there is to creating a skeleton component in ATL. A boring component, to be sure, since the COM class default interface doesn't expose any methods yet. But you do now have a functioning component.
With the class skeleton in place, you can turn your attention to implementing its interfaces. The class generated by the ATL Object Wizard includes one interface. If you want to add additional interfaces to the class, you will need to add the interfaces to the IDL file and your C++ class manually.
The Visual C++ IDE can help you add methods and properties to your interfaces. To do so, open the Workspace window and switch to the class view. You should see an entry for each of your interfaces. Right-click on an interface to display a pop-up menu with options to add methods and properties, as shown in Figure 8-6. Choosing one of these commands opens a dialog box in which you can enter information about the method or property. The syntax you enter in this dialog box is IDL syntax, not C++. The primary advantage of using the dialog box is that it adds the methods and properties to the IDL file, the C++ class header file, and the C++ class implementation at the same time.
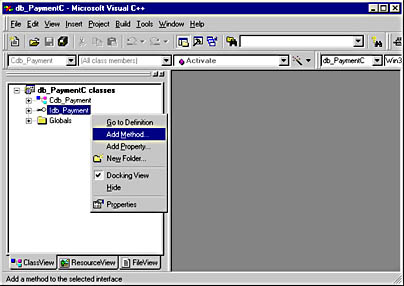
Figure 8-6. Adding a method to an interface in Visual C++.
Step by Step: Adding Skeleton Interface Methods fordb_PaymentC
- If necessary, reopen the db_PaymentC project.
- From the Workspace window, switch to the class view. Expand the class tree until you see the Idb_Payment interface.
- Right-click on Idb_Payment to display the pop-up menu. Choose the Add Method command to open the Add Method To Interface dialog box, and enter these values:
Method Name = AddPayment Parameters = [in] long lngCustomerID, [in] long lngPaymentID, [in, string] BSTR strPaymentMethod, [in] DATE dtmPaymentDate, [in] double dblPaymentAmt, [in] long lngInvoiceID, [in, string] BSTR strCardNumber, [in] DATE dtmExpDate- Click OK to close the dialog box. The method definition will be added to your IDL file and a skeleton method will be added to your C++ class.
- Repeat steps 3 and 4 for the other method exposed by Idb_Payment, GetByCustID, as shown here:
Method Name = GetByCustID Parameters = [in] long lngCustID, [out, retval] LPDISPATCH *ppRecordset- (optional) Build the component by selecting the Build db_PaymentC.dll command from the Build menu.
NOTE
You can ignore the MIDL2039 warning that is generated during the build. MIDL is not able to determine that _Recordset is a dual interface and hence an automation compatible type.
Implementing the methods
With the skeleton code in place, you can fill in the data access logic for each interface method. To do this, you need to figure out how to use ADO from C++. This seems like a simple task: create a COM object using CoCreateInstance or CoCreateInstanceEx, make simple function calls through the interface pointer you get back, and then call Release to clean up the interface pointer. However, ADO makes extensive use of two Automation data types that are a little tricky to use from C++: BSTRs and VARIANTs. Both of these types require initialization and cleanup logic to avoid memory leaks. In addition, neither type corresponds directly to a standard C++ type, so data conversion might be necessary before you can operate on the data values. Visual Basic hides all this from the developer; C++ does not.
NOTE
ADO 2.0 includes a set of extensions to simplify using ADO from C++. These extensions let you map the fields of a Recordset object to C++ variables. Island Hopper is written to be compatible with both ADO 1.5 and ADO 2.0, so it does not use these extensions. For more information, see the topic "ADO VC++ Extensions" in the Visual Studio 6.0 documentation.
Still, one option you have is to use the ADO interfaces directly. These are defined in the header file ADOINT.H. A second option is to use ATL wrapper classes for BSTR ( CComBSTR ) and VARIANT ( CComVariant ), perhaps in conjunction with ATL smart pointers ( CComPtr and CComQIPtr ). The wrapper classes hide the details of initialization and cleanup in their construction and destructor. They also provide useful operator overrides for manipulating data values. Smart pointers wrap interface pointers and automatically call Release when the smart pointer is destroyed. Otherwise, using ADO with these helper classes is very much like using the raw interfaces.
The Island Hopper sample application uses a third technique. Starting with version 5.0, Visual C++ includes native compiler support for COM. The compiler can directly read a type library and translate the contents into C++ wrapper classes for each interface. You use the #import preprocessor directive to indicate that you want to use a type library, as in the following example:
#import "msado15.dll" rename("EOF","ADOEOF") no_namespace This code fragment indicates that you want to use the COM classes and interfaces implemented by MSADO15.DLL. This DLL will contain either ADO 1.5 or ADO 2.0, depending on which version of the DLL is installed on your system. The rename attribute is used to change the name of the Recordset EOF, to avoid a naming conflict with the C run-time library. The no_namespace attribute indicates that the class definitions should not be enclosed in a C++ namespace. This statement will generate two files, MSADO15.TLH and MSADO15.TLI. The .TLH file is a header file containing the class definitions. The .TLI file contains the class implementations. By default, each interface is wrapped by a class with a name in the form <interface name>Ptr.
The wrapper classes take advantage of several helper classes provided by Visual C++ to support the VARIANT ( _variant_t ) and BSTR ( _bstr_t ) types, implement smart pointers( _com_ptr_t ), and encapsulate COM errors ( _com_error ). These helper classes serve the same purpose as the ATL classes, but they promote a slightly different style of coding. The COM wrapper classes include a CreateInstance method and convert COM errors to exceptions.
NOTE
One disadvantage of this method is that the #import statement and other features used by the generated classes are specific to Visual C++. If you are using a different compiler, you might want to use the ATL classes.
As with the Visual Basic methods discussed earlier, each C++ method implementation for a stateless object will have the same basic structure: set up a try/catch exception handler block to handle errors, do your work, and call the ObjectContext SetComplete method when you have finished. In the error handler, clean up, call the ObjectContext SetAbort method, and raise an error to the caller. If you included IObjectControl support in your skeleton component, you can access the ObjectContext through the variable m_spObjectContext in your C++ class. The code looks something like this:
HRESULT CMyInterfaceImpl::MyMethod() { HRESULT hr = S_OK; try { // Do work. . . . if (m_spObjectContext) m_spObjectContext->SetComplete(); } catch(_com_error &e) { // Clean up local variables. . . . if (m_spObjectContext) m_spObjectContext->SetAbort(); LPVOID lpMsgBuf; hr = e.Error(); FormatMessage(FORMAT_MESSAGE_ALLOCATE_BUFFER | FORMAT_MESSAGE_FROM_SYSTEM, NULL, hr, MAKELANGID(LANG_NEUTRAL, SUBLANG_DEFAULT), (LPTSTR) &lpMsgBuf, 0, NULL); AtlReportError(CLSID_MyClass, (LPCOLESTR) lpMsgBuf, IID_IMyInterface, hr); LocalFree(lpMsgBuf); } return hr; } You should always check whether the ObjectContext exists by testing whether m_spObjectContext is NULL before you make a method call. If you are running your component outside the MTS environment, there won't be an ObjectContext and calls will generate faults.
Also, when you catch an error, you'll want to either pass the same error along or generate a component-specific error. The FormatMessage call in the preceding code snippet gets a text description of a system error. The AtlReportError function is used to initialize the COM ErrorInfo object with descriptive information about the error. If you are implementing several components in C++, you'll probably want to wrap this error-handling code in a utility function that all the components can use.
To perform the database access operations themselves, you use one of the three methods discussed earlier: call the Execute method on a Connection object, create a Command object and call its Execute method, or create a Recordset object and call its Open method.
In the db_PaymentC component, the Connection Execute option is used for both Idb_Payment methods. The primary difference is the work required to build the SQL string passed to the Execute call. The source code for these methods is shown in Listing 8-5.
Listing 8-5. The db_PaymentC source code for the Idb_Payment implementation.
#include "stdafx.h" #include "db_PaymentC.h" #include "db_Payment.h" #include "comdef.h" #include "atlconv.h" #include <sstream> using namespace std; ///////////////////////////////////////////////////////////////////// // Cdb_Payment STDMETHODIMP Cdb_Payment::InterfaceSupportsErrorInfo(REFIID riid) { static const IID* arr[] = { &IID_Idb_Payment, }; for (int i=0; i < sizeof(arr)/sizeof(arr[0]); i++) { if (InlineIsEqualGUID(*arr[i],riid)) return S_OK; } return S_FALSE; } HRESULT Cdb_Payment::Activate() { HRESULT hr = GetObjectContext(&m_spObjectContext); if (SUCCEEDED(hr)) return S_OK; return hr; } BOOL Cdb_Payment::CanBePooled() { return TRUE; } void Cdb_Payment::Deactivate() { } //******************************************************************* // AddPayment // Purpose: Adds a payment to the database // Inputs: // lngCustomerID -- the unique customer ID number // lngPaymentID -- the unique payment ID number // strPaymentMethod -- the payment method // (e.g., Amex, Visa, Check) // dtmPaymentDate -- the payment date // dblPaymentAmt -- the total amount of the payment // lngInvoiceID -- the ID of the invoice that corresponds to // this payment // strCardNumber -- the credit card number used to make the // payment // dtmExpDate -- expiration date of the credit card // Returns: N/A //******************************************************************* STDMETHODIMP Cdb_Payment::AddPayment(long lngCustomerID, long lngPaymentID, BSTR strPaymentMethod, DATE dtmPaymentDate, double dblPaymentAmt, long lngInvoiceID, BSTR strCardNumber, DATE dtmExpDate) { HRESULT hr = S_OK; try { // Pointer to an ADO connection _ConnectionPtr pObjADO_Connection; // Create ADO connection. pObjADO_Connection.CreateInstance(__uuidof(Connection)); // DSN file specification bstr_t strFileDSN = L"FILEDSN=dbPaymentC.DSN"; // Open the connection. hr = pObjADO_Connection->Open(strFileDSN, (BSTR) NULL, (BSTR) NULL, -1); // String I/O stream to write SQL statement basic_stringstream<wchar_t> strSQLStatement; // Use variant_t object to convert dates into strings. variant_t vntPaymentDate(dtmPaymentDate, VT_DATE); variant_t vntExpDate(dtmExpDate, VT_DATE); // Write the SQL statement into a string. // Cast variant dates to bstr_t // so that they will be converted to a string. strSQLStatement << L"INSERT INTO Payments (CustomerID, " "PaymentID, PaymentMethod, PaymentDate, PaymentAmt, " "InvoiceID, CardNumber, CardExpDate) VALUES (" << lngCustomerID << L", " << lngPaymentID << L", ‘" << strPaymentMethod << L"‘, ‘" << static_cast<wchar_t *>( (bstr_t) vntPaymentDate) << L"‘, " << dblPaymentAmt << L", " << lngInvoiceID << L", ‘" << strCardNumber << L"‘, ‘" << static_cast<wchar_t *>( (bstr_t) vntExpDate) << L"‘)" << ends; // Parameters of Execute statement bstr_t strSQLStmt = strSQLStatement.str().c_str(); variant_t vntRecordsAffected; // Execute the SQL statement to create a payment record. pObjADO_Connection->Execute(strSQLStmt, &vntRecordsAffected, adCmdText); if (m_spObjectContext) m_spObjectContext->SetComplete(); } catch(_com_error &e) { LPVOID lpMsgBuf; hr = e.Error(); FormatMessage(FORMAT_MESSAGE_ALLOCATE_BUFFER | FORMAT_MESSAGE_FROM_SYSTEM, NULL, hr, MAKELANGID(LANG_NEUTRAL, SUBLANG_DEFAULT), (LPTSTR) &lpMsgBuf, 0, NULL); AtlReportError(CLSID_db_Payment, (LPCOLESTR) lpMsgBuf, IID_Idb_Payment, hr); LocalFree(lpMsgBuf); if (m_spObjectContext) m_spObjectContext->SetAbort(); } return hr; } //******************************************************************* // GetByCustID // Purpose: Gets a payment from the database by customer ID // Inputs: lngCustomerID -- the unique customer ID number // Returns: An ADO Recordset object of payments //******************************************************************* STDMETHODIMP Cdb_Payment::GetByCustID(long lngCustID, LPDISPATCH *ppRecordset) { HRESULT hr = S_OK; try { // Pointer to an ADO connection _ConnectionPtr pObjADO_Connection; // Create ADO connection. pObjADO_Connection.CreateInstance(__uuidof(Connection)); // DSN file specification bstr_t strFileDSN = L"FILEDSN=dbPaymentC.DSN"; // Open the connection. hr = pObjADO_Connection->Open(strFileDSN, (BSTR) NULL, (BSTR) NULL, -1); // String I/O stream to write SQL statement basic_stringstream<wchar_t> strSQLStatement; // Write the SQL statement into a string. strSQLStatement << L"SELECT CustomerID, PaymentID, " "PaymentMethod, PaymentDate, PaymentAmt, InvoiceID, " "CardNumber, CardExpDate FROM Payments WHERE CustomerID = " << lngCustID << L" ORDER BY PaymentDate DESC" <<ends; // Parameters of Execute statement bstr_t strSQLStmt = strSQLStatement.str().c_str(); variant_t vntRecordsAffected; _RecordsetPtr pObjADO_Recordset; // Execute the SQL statement to retrieve records from the // Payments table that contain a matching customer ID. pObjADO_Recordset = pObjADO_Connection->Execute(strSQLStmt, &vntRecordsAffected, adCmdText); // Return IDispatch interface pointer. // (QueryInterface will call AddRef on the interface pointer.) pObjADO_Recordset->QueryInterface(IID_IDispatch, (void**) ppRecordset); } catch(_com_error &e) { LPVOID lpMsgBuf; hr = e.Error(); FormatMessage(FORMAT_MESSAGE_ALLOCATE_BUFFER | FORMAT_MESSAGE_FROM_SYSTEM, NULL, hr, MAKELANGID(LANG_NEUTRAL, SUBLANG_DEFAULT), (LPTSTR) &lpMsgBuf, 0, NULL ); AtlReportError(CLSID_db_Payment, (LPCOLESTR) lpMsgBuf, IID_Idb_Payment, hr); LocalFree(lpMsgBuf); } return hr; } |
Once the Idb_Payment methods have been implemented, the db_PaymentC component is complete. As you can see, the code used to implement data objects in Visual C++ isn't quite as clean as Visual Basic code. However, with ATL and the Visual C++ COM compiler support, you can develop data objects in C++ fairly easily.
Step by Step: Implementing the db_PaymentC and Idb_Payment Methods
- If necessary, reopen the db_PaymentC project.
- Add the following statements to the STDAFX.H file, right above the line //{{AFX_INSERT_LOCATION}}:
#import "msado15.dll" rename("EOF", "ADOEOF") using namespace ADODB;These statements will create the COM compiler support wrapper classes for ADO. If the compiler is not able to locate MSADO15.DLL when you build the project, you should either specify the complete path to the DLL in the #import statement or add its location to your include path.
- Add these statements to the top of the DB_PAYMENT.CPP file:
#include "comdef.h" #include "atlconv.h" #include <sstream> using namespace std;COMDEF.H defines the COM compiler support classes. ATLCONV.H
defines macros for converting between ANSI, Unicode, and OLE strings.
SSTREAM is a C++ standard library file that defines a standard string type.
- Replace the skeleton implementation of the AddPayment and GetBy-CustID methods with the following code to establish the basic frame-work that calls the ObjectContext SetComplete method when all work has been completed successfully or calls the ObjectContext SetAbort method and raises an error if one occurs:
HRESULT hr = S_OK; try { // TODO: Do work. . . . if (m_spObjectContext) m_spObjectContext->SetComplete(); } catch(_com_error &e) { if (m_spObjectContext) m_spObjectContext->SetAbort(); LPVOID lpMsgBuf; hr = e.Error(); FormatMessage(FORMAT_MESSAGE_ALLOCATE_BUFFER | FORMAT_MESSAGE_FROM_SYSTEM, NULL, hr, MAKELANGID(LANG_NEUTRAL, SUBLANG_DEFAULT), (LPTSTR) &lpMsgBuf, 0, NULL); AtlReportError(CLSID_db_Payment, (LPCOLESTR) lpMsgBuf, IID_Idb_Payment, hr); LocalFree(lpMsgBuf); } return hr;- Replace the line TODO: Do work in the AddPayment method with this code, which connects to the database and issues a SQL command:
// Pointer to an ADO connection _ConnectionPtr pObjADO_Connection; // Create ADO connection. pObjADO_Connection.CreateInstance(__uuidof(Connection)); // DSN file specification bstr_t strFileDSN = L"FILEDSN=dbPaymentC.DSN"; // Open the connection. hr = pObjADO_Connection->Open(strFileDSN, (BSTR) NULL, (BSTR) NULL, -1); // String I/O stream to write SQL statement basic_stringstream<wchar_t> strSQLStatement; // TODO: Initialize SQL statement. // Parameters of Execute statement bstr_t strSQLStmt = strSQLStatement.str().c_str(); variant_t vntRecordsAffected; // Execute the SQL statement to create a payment record. pObjADO_Connection->Execute(strSQLStmt, &vntRecordsAffected, adCmdText);The Visual C++ keyword __uuidof is used to obtain the globally unique identifier (GUID) associated with a class or interface. The data types bstr_t and variant_t are #defined as synonyms for _bstr_t and _variant_t .
- Replace the line TODO: Initialize SQL statement in the AddPayment method with the following code:
// Use variant_t object to convert dates to strings. variant_t vntPaymentDate(dtmPaymentDate, VT_DATE); variant_t vntExpDate(dtmExpDate, VT_DATE); // Write the SQL statement into a string. // Cast VARIANT dates to bstr_t // so that they will be converted to a string. strSQLStatement << L"INSERT INTO Payments (CustomerID, " L"PaymentID, PaymentMethod, PaymentDate, PaymentAmt, " L"InvoiceID, CardNumber, CardExpDate) VALUES (" << lngCustomerID << L", " << lngPaymentID << L", ‘" << strPaymentMethod << L"', ‘" << static_cast<wchar_t *>((bstr_t) vntPaymentDate) << L"', " << dblPaymentAmt << L", " << lngInvoiceID << L", ‘" << strCardNumber << L"', ‘" << static_cast<wchar_t *>((bstr_t) vntExpDate) << L"')" << ends;- Replace the line TODO: Do work in the GetByCustID method with the following code, which connects to the database, issues a SQL command, and returns an IDispatch pointer to the resulting Recordset:
// Pointer to an ADO connection _ConnectionPtr pObjADO_Connection; // Create ADO connection. pObjADO_Connection.CreateInstance(__uuidof(Connection)); // DSN file specification bstr_t strFileDSN = L"FILEDSN=dbPaymentC.DSN"; // Open the connection. hr = pObjADO_Connection->Open(strFileDSN, (BSTR) NULL, ( BSTR) NULL, -1); // String I/O stream to write SQL statement basic_stringstream<wchar_t> strSQLStatement; // TODO: Initialize SQL statement. // Parameters of Execute statement bstr_t strSQLStmt = strSQLStatement.str().c_str(); variant_t vntRecordsAffected; _RecordsetPtr pObjADO_Recordset;// Execute the SQL statement to retrieve records from the // Payments table that contain a matching customer ID.pObjADO_Recordset = pObjADO_Connection->Execute(strSQLStmt, &vntRecordsAffected, adCmdText); // Return IDispatch interface pointer. // (QueryInterface will call AddRef on the interface pointer.) pObjADO_Recordset->QueryInterface(IID_IDispatch, (void**) ppRecordset);Notice that Idb_Payment could have been defined to return a _Recordset interface pointer, but instead it has been defined to return a straight IDispatch pointer. When returning interface pointers, you must be careful to return the actual interface pointer, appropriately AddRef 'd, not a pointer to the C++ wrapper class object.
- Replace the line TODO: Initialize SQL statement in the GetByCustID
method with the following code:
// Write the SQL statement into a string. strSQLStatement << L"SELECT CustomerID, PaymentID, " L"PaymentMethod, PaymentDate, PaymentAmt, InvoiceID, " L"CardNumber, CardExpDate FROM Payments WHERE CustomerID = " << lngCustID << L" ORDER BY PaymentDate DESC" <<ends;- Modify the compiler settings to include exception handling by first choosing the Settings command from the Project menu and then se-lecting All Configurations in the Settings For drop-down listbox in the Project Settings dialog box. Select the C++ tab, and then select C++ Language in the Category drop-down listbox. Check Enable excep-tion handling, and then click OK.
- (optional) Build the component by choosing the Build db_PaymentC.dll command from the Build menu.
EAN: 2147483647
Pages: 98