| Lotus Notes is an ideal product for organizing group activities. Notes helps you schedule meetings and invite participants, as well as reserve rooms and resources for those meetings. When you identify a need for a meeting, you must inform all the people involved of the meeting time and placeand, of course, that their attendance is requested. Do this by creating a meeting invitation. The first time you create a meeting invitation, it will take you some time to learn to use all the meeting invitation features, including how to view the free time of others. After you create one or two meeting invitations, you'll find that this task is easy and quick. Follow these steps to create an invitation: Create the invitation. Identify the invitees and others whom you want to inform about this meeting. Check the time of the invitees and (optionally) schedule your meeting time according to their availability. Determine how you want your invitees to respond to your meeting. Mail the meeting invitation.
To begin, open your Calendar and follow these steps: 1. | With your Calendar open, click the Schedule a Meeting button on the Action bar.
| 2. | In the Meeting document (see Figure 10.1), enter a brief description for the meeting in the Subject field.
Figure 10.1. Enter the general meeting information first such as the names of the invitees in the Required (To), Optional (CC), and FYI (BCC) fields. 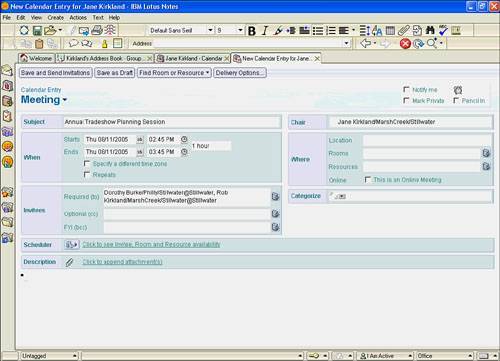
| 3. | Enter or select the Starts and Ends dates and times (click the button at the right end of the field to use a date or time picker, as you learned in Chapter 9, "Using the Calendar").
| 4. | For a meeting that will fall within a different time zone, choose Specify a different time zone. Click the button to the right of the time zone fields to select the time zone. The Local time for the meeting displays below.
| 5. | For a meeting that will occur at regular intervals (such as a monthly meeting), select Repeats and enter your repeat options. For specific information on creating repeated meetings, see Chapter 9.
| 6. | In the Invitees Required (to) field, enter the names of people you want to invite to the meeting (click the button at the right end of the field to select names from an address book).
| 7. | (Optional) To provide a copy of the invitation to someone that informs him and keeps him updated about the meeting but doesn't invite him to the meeting, enter the person's name in the cc or bcc field. Use the bcc field only if you don't want other recipients to see the name of the person receiving an information-only copy of the invitation.
| 8. | In the Description field (see Figure 10.2), enter important facts about your meeting, such as its purpose, directions to the location of the meeting, and so forth. You can embed files in this rich text field, such as supporting data for your meeting, and you can also attach a file by clicking the Click to append attachment(s) link (or the paper clip icon).
Figure 10.2. It's always a good idea to use the description field to provide further explanation about the meeting. This helps the invitees determine how best to prepare for the discussion. 
| 9. | To check the availability of your invitees, click the Click to see Invitee, Room and Resource availability link (or expand the Scheduler button to the left of the link) in the Scheduler section of the form.
| 10. | Be sure the Details radio button is selected in the Show section for this exercise. The Free Time section appears (see Figure 10.3). You can see the free time of each invitee (shown in white) sorted by the names of the invitees, by the week, by who can attend, by who cannot attend, or by whose time wasn't found. If the schedule is okay for everyonethat is, if a green bar appears for all namesgo to step 12.
Figure 10.3. The details view of the Show field displays available times. A green bar indicates that everyone is available; a red bar indicates there is a conflict. 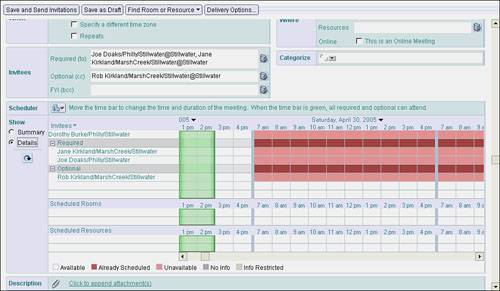
| 11. | If you see a conflict (time shows in red) in the schedule, do one of the following:
Point to the meeting time bar and drag it to a more appropriate time. When everyone is available for the meeting, the bar will turn green and you can release the mouse button. Select a time from a list of recommended times by clicking on the Summary radio button (see Figure 10.4). Double-click a suggested time in the summary, or select it and click the Use Selected Time button. Set a new date or time in the Starts or Ends fields.
Figure 10.4. Summary view of the Show field displays suggested available times for all invitees. 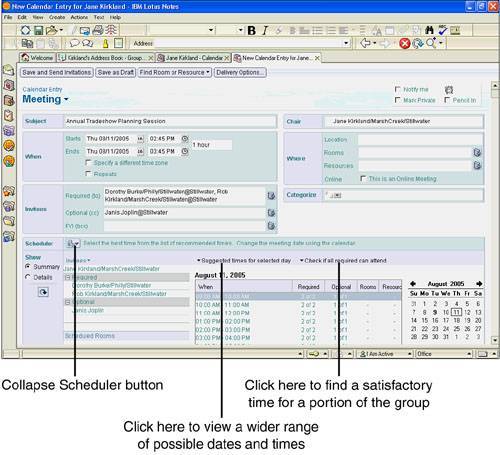
| 12. | When the meeting time is okay (green) for everyone, click the Collapse Scheduler button to close the section and continue with your meeting invitation. To schedule a resource, continue with step 13; otherwise, go to step 14.
| 13. | (Optional) Click the helper button at the right end of the Rooms box to book a room for the meeting. Click the Resources helper button to reserve resources, such as audio-visual equipment, for the meeting. Handling these reservations is covered more fully later in this chapter.
| 14. | (Optional) Check Pencil In if you want to keep the time of this meeting available in your free time schedule. Select Mark Private if you want to prevent people who have access to your Calendar from reading the invitation. If you want to set up a notification for the upcoming meeting, click Notify Me and pick the appropriate Alarm Options. From the Categorize field, select an appropriate category for the meeting.
| 15. | Click the Delivery Options button on the Action bar to set any of the following options, and then click OK to close the dialog box:
Set the Delivery Report and Delivery Priority as you would set them for email delivery. (Refer to Chapter 3, "Email Basics," for more information.) Check the Return Receipt box if you want notification that your meeting invitation has been received by the recipient(s). I Do Not Want to Receive Replies from Participants sends the invitation as a broadcast message that doesn't require a reply. Use this for large, general meetings where attendance is always required or there is such a large number of people invited that individual responses would be overwhelming. Prevent Counter-Proposing stops the recipient from proposing a different time schedule for the meeting. Prevent Delegating keeps the recipient from delegating attendance to another individual. Sign adds a digital signature to the invitation to guarantee that you are the person who sent it. Encrypt encrypts the invitation so only intended recipients can read it.
| 16. | Save the invitation and send it to the invitees by clicking the Save and Send Invitations button on the Action bar. Alternately, click Save as Draft on the Action bar to save the invitation as a draft and send it at a later time.
|
Meetings can be held online, too, if your group uses IBM Lotus Instant Messaging and Web Conferencing (formerly known as Lotus Sametime). In such a meeting, each attendee remains at his or her computer and connects to an online meeting in which, optionally, there may be a whiteboard and one attendee or another can share the content of his or her screen with the other attendees. The attendees typically talk with each other by telephone. If you check This is an Online Meeting in the Where section of the Meeting form, new fields appear. Choose a TypeCollaboration, Moderated presentation/demo, or Broadcast meetingand enter the location (or click the button on the right to select one from the Directory) for the meeting in Place. You can also add meeting attachments, such as presentations, and assign a password to the meeting. |