|  Viewing the Cash Flow Center 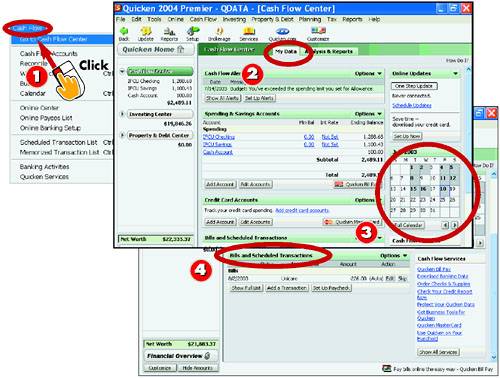 -
 | Choose Cash Flow, Go To Cash Flow Center . | -
 | Quicken opens the Cash Flow Center window and displays the My Data tab by default; it lists alerts, spending and savings accounts, and credit card accounts. | -
 | The calendar highlights days in which transactions were made or scheduled. | -
 | View bills that are due in the Bills and Scheduled Transactions area. | INTRODUCTION Use Quicken's Cash Flow Center for a visual picture of your financial status. The Cash Flow Center window includes the My Data tab, which shows information about your cash flow accounts, and the Analysis & Reports tab, which includes graphs and reports based on your cash flow accounts. |
TIP Opening the Cash Flow Center Another way to open the Cash Flow Center is to click the Cash Flow Center link at the top of the Account bar. |
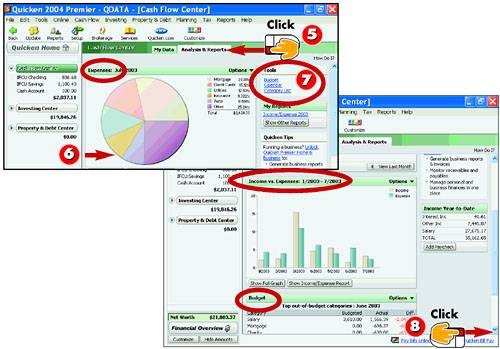 -
 | Click the Analysis & Reports tab to view summaries and snapshots of your financial status presented in graphs and charts . | -
 | The Expenses pie chart shows your expenses for the current month. | -
 | The Tools area gives you quick access to cash flow tools, such as setting up a budget and editing the category list. | -
 | View a snapshot comparing income and expenses in the Income vs. Expenses area. | TIP Create a Budget See Part 11, "Setting Up a Budget," to learn how to use Quicken's budgeting tools to set up a budget. |
TIP Need a Report? You can generate all kinds of reports about your financial data in Quicken. See the tasks "Viewing Cash Flow Reports" and "Creating a Customized Report" later in this section to learn more. |
Setting Up Cash Flow Alerts 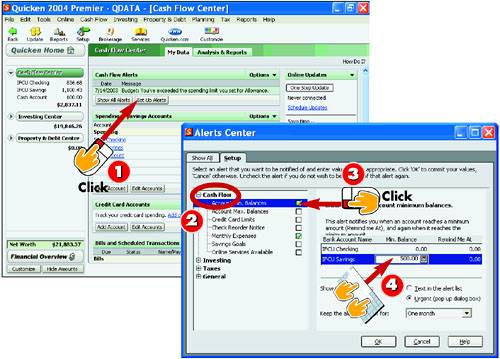 -
| | From the Cash Flow Center, click the Set Up Alerts button. | -
| | Quicken opens the Alerts Center window and displays the Cash Flow alerts. | -
| | Click the check box next to the item to which you want to assign an alert. Quicken displays options related to the item you selected. | -
| | Click the value you want to change and type a new value. | INTRODUCTION Alerts warn if you go over or under a specified figure in an account. With your cash flow accounts, you might use an alert to let you know if you drop below your checking account's minimum balance. Alerts appear at the top of the Cash Flow Center window so you can easily spot them when they occur. |
TIP Finding the Center To quickly access the Cash Flow Center, click the Cash Flow Center link at the top of the Account bar. You can also click Tools, Set Up Alerts to display the Alerts Center window. |
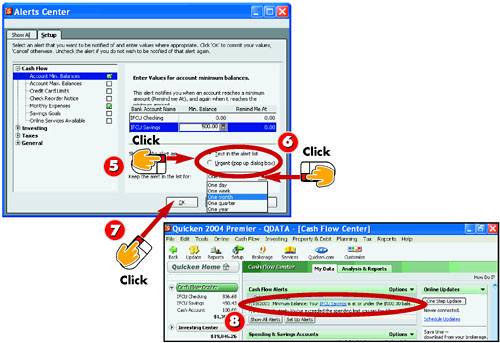 -
| | Select an option for displaying the alert. To see the alert listed at the top of the Cash Flow Center window, select Text in the Alert List option. | -
| | To display the alert for a set amount of time, set the time using the Keep the Alert in the List For option. | -
| | Click OK to save your settings and close the window. | -
| | When circumstances occur that meet the alert criteria, the alert appears in the Cash Flow Center. | TIP Alert Prompt Box If you'd rather set a more obvious alert, choose the Urgent option in the Alerts Center window. With this option activated, the alert appears as a prompt box. Click OK to close the box and continue working with Quicken. |
HINT Remove an Alert To remove an alert you no longer want, reopen the Alerts Center window and deselect the check box beside the item to which an alert is assigned. |
Viewing Cash Flow Reports 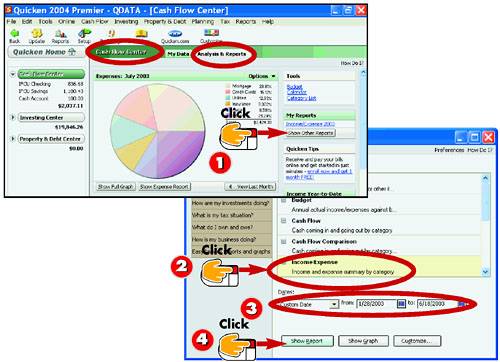 -
| | From the Cash Flow Center, click the Analysis & Reports tab, and then click the Show Other Reports button. | -
| | Quicken opens the Reports and Graphs window. Select the report type you want to view. | -
| | Select the date or range for the report. | -
| | Click the Show Report button. | INTRODUCTION Quicken reports are a great way to analyze your financial data. Cash flow reports can help you analyze your spending habits and find ways to improve your financial situation. Quicken installs with numerous predefined reports and graphs. The Cash Flow Center includes reports such as Banking Summary, Income/Expense, Itemized Categories, and Spending, to name just a few. |
TIP Another Route You can also get to the Reports and Graphs window by clicking the Reports menu and choosing Reports and Graphs . |
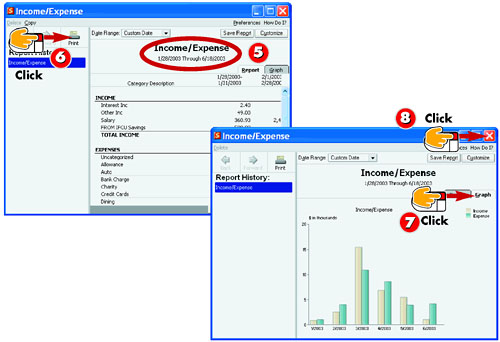 -
| | Quicken opens the report window and displays the report. | -
| | To print the report, click the Print button. | -
| | To view a graph of the report, click the Graph tab. | -
| | Click the Close button to close the report. | HINT Customize It You can create a customized report of your cash flow information. See the next task to learn how. |
TIP EasyAnswer Reports Quicken's EasyAnswer reports answer specific questions, such as "How much did I spend on ?" Select the EasyAnswer Reports and Graphs tab in the Reports and Graphs window, and then click the question and view a report. |
Creating a Customized Report 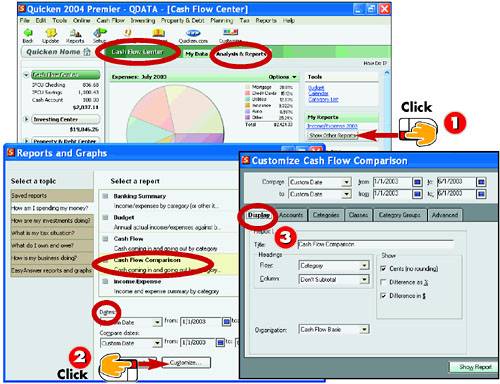 -
| | From the Cash Flow Center, click the Analysis & Reports tab, and then click the Show Other Reports button. | -
| | Choose the report type you want to view, select a date or range, and then click the Customize button. | -
| | The Customize dialog box for the report type opens. Use the Display tab options to control how report items appear. | INTRODUCTION Customized reports show only the data you want and can be saved to use again. For example, you might create a cash flow report of your expenses, but choose to chart your checking account only. The Customize dialog box offers you a variety of customizing features, from setting the report title to controlling which categories and classes are used in the report. |
TIP Before or After You can customize a report before or after you generate the report. To customize the report after creating the report, click the Customize button in the Report window. |
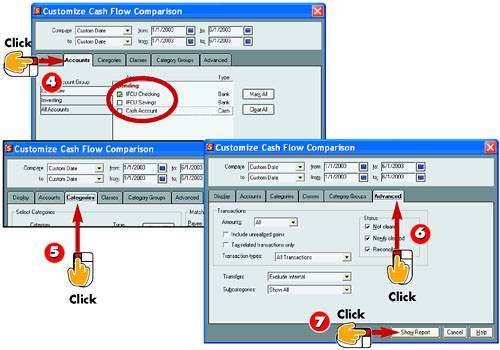 -
| | Click the Accounts tab and click which accounts to include in the report. | -
| | Click the Categories tab to click which categories to include in the report. | -
| | Click the Advanced tab to set options for how transactions are used in the report. | -
| | After setting any customizing options, click the Show Report button to view the finished report. | TIP Save It After you customize a report, you can save the settings and view the report again. Click the Save Report button, and in the Save Report dialog box, type a name for the report, select a center to associate with the report, and click OK . |
HINT Reopen a Saved Report To reopen a report you previously saved, open the Reports and Graphs window, click the Saved Reports tab and double-click the report you want to view. |
Tracking Your Pocket Cash 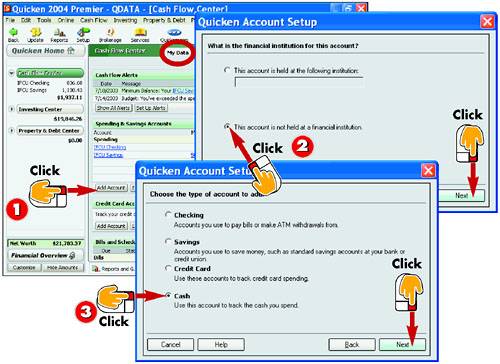 -
| | From the Cash Flow Center, click the Add Account button on the My Data tab. | -
| | The Quicken Account Setup dialog box opens. Click the This Account Is Not Held at a Financial Institution option and click Next . | -
| | Click the Cash option and click Next . | INTRODUCTION You can create a special account to track your pocket cash, or in the case of a business, petty cash. Like your account registers for checking and savings, a cash account allows you to manage where your pocket money goes and lets you keep track of your spending. |
TIP More Accounts You can create all kinds of accounts in Quicken. See Part 2, "Setting Up Accounts," to learn more about setting up additional types of Quicken accounts. |
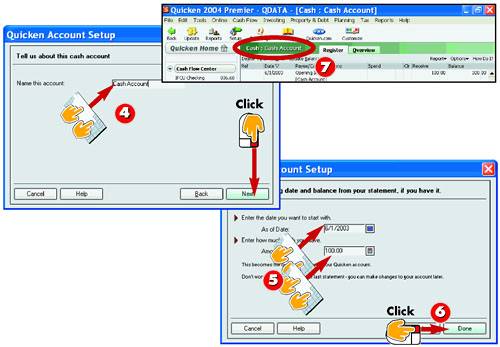 -
| | Type a name for the account or use the default name, and then click Next . | -
| | Type a start date for the account and a start balance. | -
| | Click Done . | -
| | Quicken creates and opens the account register. You can record your spending by entering transactions the same as in a checking account. | TIP Delete It You can easily delete a cash account you no longer want to track. Open the Account List window, select the account, and click Delete . Type Yes and click OK to permanently remove the account and all of its transactions. |
 |