|  Using Pop-Up Calendars 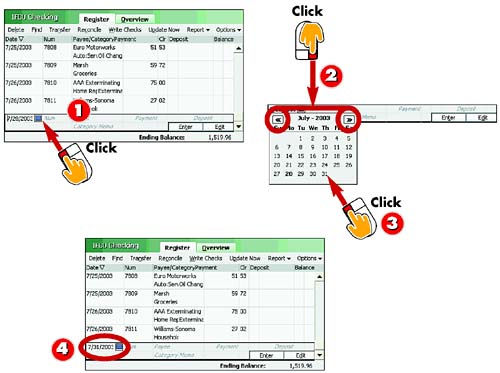 -
 | Anytime that you encounter a date field in Quicken, a Calendar icon appears next to the field. Click the Calendar icon to activate the feature. | -
 | You can click the scroll arrow buttons to move back and forth a month at a time in the monthly display. | -
 | To select a date, click the date. | -
 | Quicken immediately inserts the full date into the field. | INTRODUCTION Although you can certainly type in dates whenever they're required, you might find it faster to select a date from a pop-up calendar. This is true if you need to see the date in context with other dates. Pop-up Calendar icons are available throughout Quicken and are extremely easy to use. |
TIP View a Full Calendar You can view a full calendar of transactions and scheduled transactions. Click Tools, Calendar to view the feature. The Calendar window differs from the pop-up calendars you use to assign dates. |
Using Pop-Up Calculators 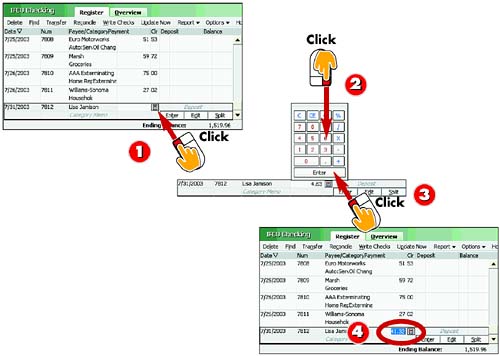 -
| | Anytime that you encounter an amount field in Quicken, a Calculator icon appears next to the field. Click the Calculator icon to activate the feature. | -
| | Click the numbers you want to add, subtract, multiply, or divide, along with the appropriate operator. | -
| | Click the Enter button to calculate the results. | -
| | Quicken immediately inserts the results into the field. | INTRODUCTION Another useful tool you can use to speed up your work in Quicken is the pop-up calculator. Calculator icons are located near any field in which an amount is required. When you activate the Calculator icon, Quicken displays a minicalculator you can use to quickly add, subtract, multiply, or divide. |
TIP Larger Please Click Tools, Calculator to open a larger version of Quicken's Calculator, which includes a few more features. To move any results you calculate with the larger calculator, click in the field where you want them to appear and then click the Paste button on the Calculator. Click the Close button to close the feature. |
Using QuickFill with New Transactions 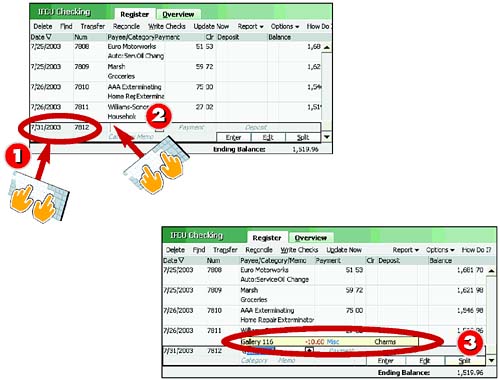 -
| | Fill in the date and check number for the transaction. | -
| | Click in the Payee field and start typing the payee name . | -
| | If Quicken recognizes the payee as a memorized transaction, it automatically displays the payee name for you. | INTRODUCTION As you enter payee names and other details, Quicken memorizes the information and keeps a running list called the Memorized Transaction List . The next time you type the first few letters of a name, Quicken's QuickFill feature attempts to fill in the rest based on previous uses of the same payee name. This is handy feature if you enter the same transactions regularly. |
TIP Keep Typing If several of your payee names are similar, you may need to type more letters of the name before Quicken displays the correct payee. |
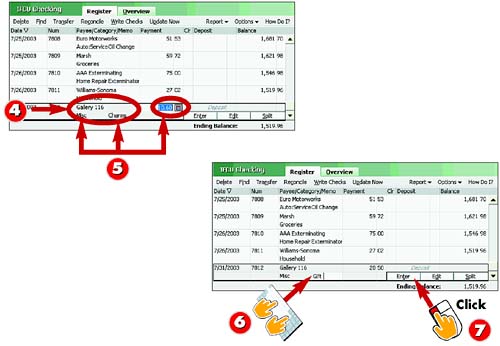 -
| | Press the Tab key to accept the memorized payee name and Quicken adds it to the field. | -
 | The QuickFill feature also fills in the remaining transaction fields based on the previous details of the same transaction. | -
 | You can edit the fields, as needed, by typing directly into each field. | -
 | Click Enter to record the new transaction. | TIP Turn It Off If you write checks to the same payees over and over, you may prefer to turn the QuickFill feature off. Click Edit, Preferences, Quicken Program , select the QuickFill preference type and deselect the options you want to turn off. |
HINT Look Carefully! If the QuickFill transaction corresponds with a monthly bill, be sure to check the amount due against your new billing statement. The amount might vary by a few cents , or the payee might have made an increase or added a fee. |
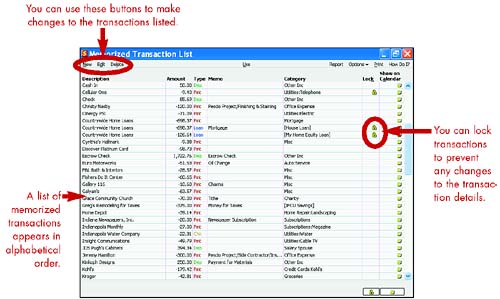
Viewing Memorized Transactions 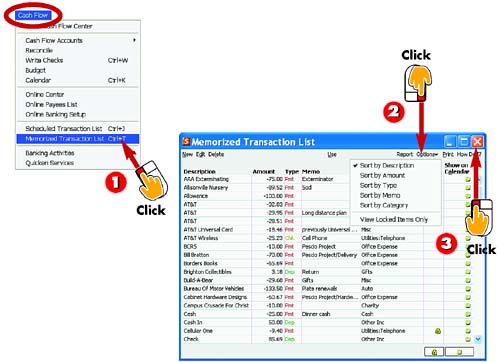 -
| | Click Cash Flow, Memorized Transaction List . | -
| | Quicken opens the Memorized Transaction List window, showing transactions sorted by description. To sort another way, click Options and choose a new sort order. | -
| | Click the Close button to close the list window. | INTRODUCTION Quicken memorizes a payee and the accompanying transaction information and places that information on your Memorized Transaction List. You can open the Memorized Transaction List to view and make changes to it. After you've opened the transaction list, you can sort it to list the transactions in a different order so that the one you enter most often will be the one Quicken uses to fill in your transaction data. |
TIP Using a Transaction Click a transaction in the Memorized Transaction List and then click the Use button on the toolbar to insert a copy of that transaction in the currently open account register. You can also double-click the transaction to use it. |
Editing the Memorized Transaction List 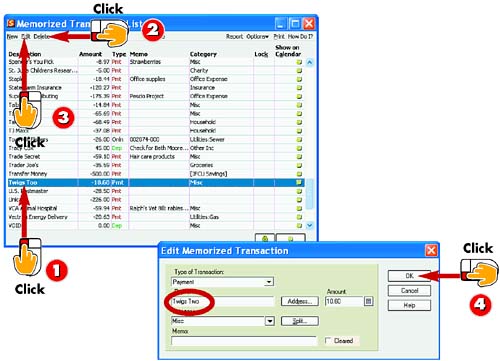 -
| | Open the Memorized Transaction List and select the transition you want to edit. | -
| | To delete a transaction you no longer need, click Delete on the toolbar. | -
| | To change transaction details, click Edit on the toolbar. | -
| | Make any changes you want to the transaction information and click OK . | INTRODUCTION You can edit a transaction in the Memorized Transaction List. The next time you use QuickFill to use a copy of the memorized transaction, the transaction displays the edited information. You should periodically delete old transactions. |
TIP Use Caution You cannot undo your changes to a memorized transaction or recall a memorized transaction if you delete it, so be sure you're making the change you want before you begin. |
HINT List Only Edits to the memorized transactions affect only the new transactions you enter into the register. Existing transactions are not affected by changes you make to the Memorized Transactions List. |
Adding a New Memorized Transaction 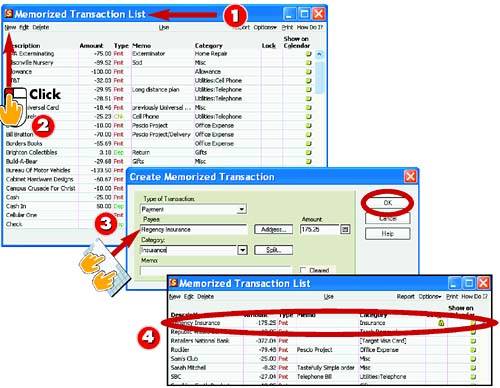 -
| | Open the Memorized Transaction List window. You can press Ctrl+T on the keyboard or click Cash Flow, Memorized Transaction List . | -
| | Click the New button. | -
| | Fill in the information for each field and click OK . | -
| | Quicken adds the new transaction to the list and locks the information from any changes. | INTRODUCTION You can add new memorized transactions to the Memorized Transaction List window to use later. For example, you might want to create a memorized transaction for a new insurance agency you will start paying soon. After creating the memorized transaction, you can use it the next time you enter checks into your register. |
TIP Locked or Not Locked? By default, new transactions you record in the register are not locked, but transactions you add directly in the Memorized Transaction List are. |
Locking and Unlocking Memorized Transactions 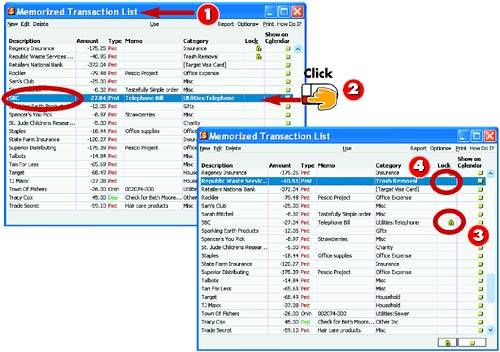 -
| | Open the Memorized Transaction List window. You can press Ctrl+T on the keyboard or click Cash Flow, Memorized Transaction List . | -
| | Select the transaction you want to lock, and then click the Lock column for the transaction row. | -
| | Quicken adds a lock icon to the transaction. | -
| | To unlock a transaction, click the Lock icon in the Lock column for the transaction row. | INTRODUCTION If you use QuickFill but make a slight change to the transaction, such as changing the payment amount, Quicken also makes that change to the memorized transaction. To prevent any changes to a memorized transaction, you can lock the transaction in the Memorized Transaction List. Later you can unlock the transaction if you do need to change it. |
HINT List Shortcut You can press Ctrl+T on the keyboard to quickly open the Memorized Transaction List window. |
Scheduling a Transaction 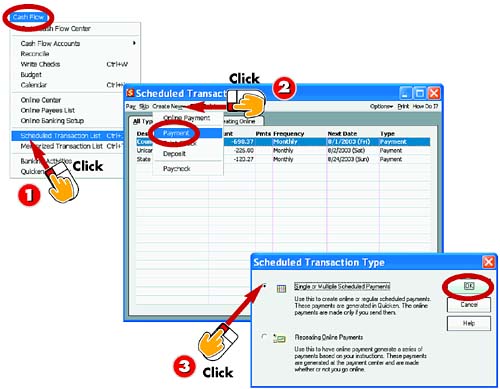 -
| | Choose Cash Flow, Scheduled Transaction List . | -
| | Quicken opens the Scheduled Transaction List window. Click the Create New button and select the type of transaction you want to schedule. | -
| | The Scheduled Transaction Type dialog box opens. Select a payment type and click OK . | INTRODUCTION You use the Scheduled Transaction List to create and manage scheduled transactions. You can create a scheduled transaction for a bill, such as your mortgage, or a deposit, such as your pay deposit. Quicken reminds you of each scheduled transaction and can even enter the transaction for you, if you tell it to. |
HINT Scheduled Transaction Tab You can also click the Scheduled Transaction tab at the bottom of the register and click the Add a Transaction button to start a new transaction. |
 -
| | The Create Scheduled Transaction dialog box opens. Click the Account to Use drop-down arrow and specify which account to associate the transaction to. | -
| | Enter a payee for the transaction. You can click the Payee drop-down arrow and select from your list of memorized transactions. | TIP Printing Checks? You need to choose Print Check from the Type of Transaction drop-down list if you want to print a check for the scheduled transaction. |
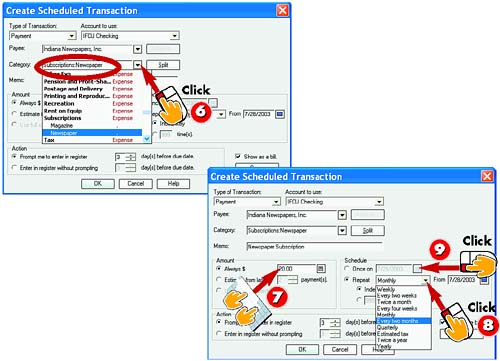 -
| | Click the Category drop-down arrow, assign a category to the transaction, and then enter any memo text you want to include. | -
| | Enter an amount for the payment. | -
 | Specify a schedule for the payment. For repeat payments, select the Repeat option and specify how often. | -
 | For single payments, click the Once On option and specify a date. | INTRODUCTION After you create a scheduled transaction, Quicken lists it when it is due in both the Quicken Home page and in the Cash Flow Center window. |
TIP Allow Enough Time For payments scheduled on the actual bill due date, increase the Record This Many Days in Advance setting to at least seven. Now you can print and mail the check a week before, avoiding a late payment. |
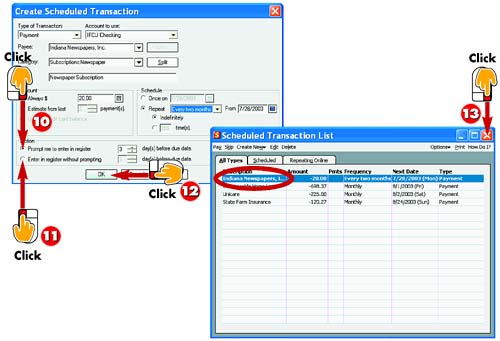 -
 | If you want Quicken to prompt you to record the transaction, select this option and specify how far in advance you want to be reminded. | -
 | If you want Quicken to record the transaction for you, select this option and specify how far in advance to record the transaction. | -
 | Click OK . | -
 | Quicken adds the transaction to the list. Click the Close button to exit the window. Quicken lists any scheduled transactions on the Quicken Home page window. | TIP Scheduled Deposits If you receive a paycheck every two weeks, make sure you choose Two Weeks from the Repeat drop-down list. |
HINT Don't Forget to Write the Check! Quicken can help you remember to enter a scheduled transaction, but it doesn't remind you to print the checks for these transactions. This burden falls on your shoulders. |
Viewing the Scheduled Transaction List 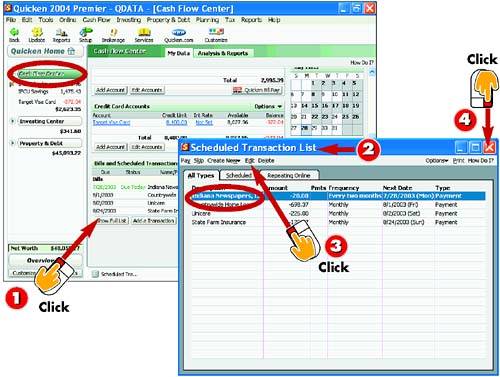 -
| | Click the Cash Flow Center link and scroll to the bottom of the page to view scheduled transactions; then click the Show Full List button. | -
| | Quicken opens the Scheduled Transaction List window. Each transaction is listed along with the amounts, scheduled frequency, and date. | -
| | To make any changes to a scheduled transaction, select it and click the Edit button. | -
| | Click the Close button to close the window. | INTRODUCTION After you set up one or more scheduled transactions, you can use the Scheduled Transaction List window to view all your scheduled transactions. The Scheduled Transaction List window includes options for editing your scheduled transactions. |
TIP Another Way to the Window If the Cash Flow Center is displayed, you can click the Show Full List button that appears under the Bills and Scheduled Transactions heading to open the Scheduled Transactions List window. |
Applying a Scheduled Transaction 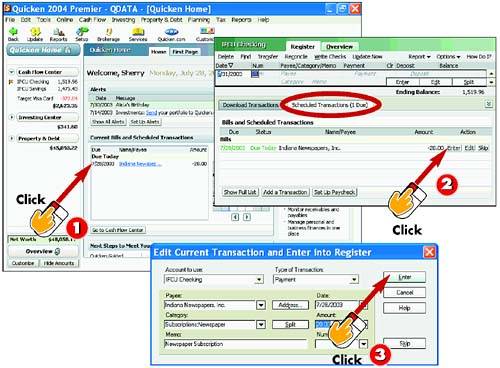 -
| | When you start Quicken, scroll down to check for due transactions on the Quicken Home page, and then click the scheduled transaction you want to record. | -
| | Quicken opens the associated account register. Click the Scheduled Transactions tab, and then click the Enter button. | -
| | The Edit Current Transaction and Enter into Register dialog box appears. Click Enter and the transaction is recorded. | INTRODUCTION When you open Quicken, upcoming scheduled transactions are listed on the Quicken Home page as well as in the Cash Flow Center window. You should get in the habit of checking this list to make sure you enter any scheduled transaction. You can use the Scheduled Transaction List to select and enter the next instance of the scheduled transaction into the register. |
TIP Entered Automatically You should especially check the home page for scheduled transactions Quicken enters automatically, to be sure you remember to print checks for these transactions. |
Editing a Scheduled Transaction 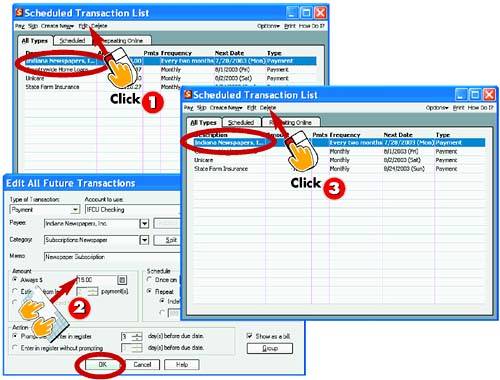 -
| | Open the Scheduled Transaction List window, select the scheduled transaction you want to change, and click the Edit button. | -
| | Make the necessary changes to the transaction details and click OK . | -
| | To remove a transaction entirely, select it and click the Delete button. Click OK in the prompt box that appears. | INTRODUCTION You can make changes to a scheduled transaction through the Scheduled Transaction List window. For example, you may want to change the frequency or date, or you may want to remove the scheduled transaction entirely. |
HINT Windows Shortcut You can press Ctrl+J on the keyboard to quickly open the Scheduled Transaction List window. |
TIP Skip It You can skip a scheduled transaction by clicking the Skip button in the Scheduled Transaction List window. A confirmation box appears; click Yes to skip the transaction. |
Using Alerts 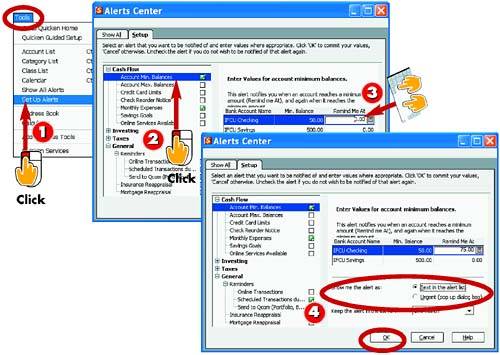 -
| | Choose Tools, Set Up Alerts . | -
| | The Alerts Center window opens. Click the Cash Flow alerts to expand the category and click the type of alert you want to create. | -
| | Select the item to which you want to assign a value and type in the value. | -
| | Select how you want the alert to appear and click OK . Quicken activates the alert and if you meet the criteria, a warning prompt box appears. | INTRODUCTION Alerts remind you about maximum balances , check reorders, scheduled transactions, and more. For example, you can set up an alert that tells you if you drop below your minimum required checking account balance for the month. If you do meet the alert criteria, Quicken displays a prompt box warning you of the problem or lists the alert on the Quicken Home page. |
TIP List Them To view a list of your alerts, click Tools, Show All Alerts . To remove an alert, select it and click the Delete button in the Alerts Center window. |
Using Paycheck Setup 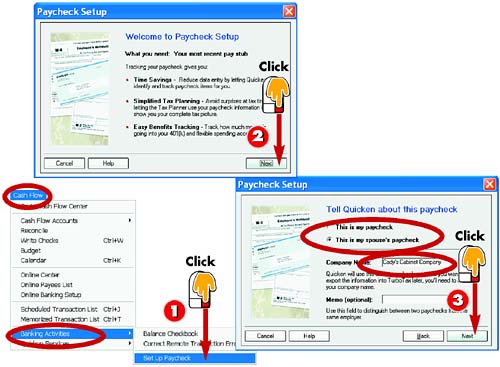 -
| | Choose Cash Flow, Banking Activities, Set Up Paycheck . | -
| | Review the information in the first dialog box and then click Next . | -
| | Fill in information about the paycheck, as directed, and then click Next . | INTRODUCTION Paycheck Setup automates how you record your paycheck into your account register and tells Quicken how to enter each pay and tax component of your paycheck on payday. This feature is especially useful if your paycheck is the same amount each time. If you want Quicken to prepare tax information for you, it needs to know each tax amount withheld from the paycheck. |
HINT Not Taxing? If you don't plan to use Quicken for tax planning or to track information for tax time, you can simply enter a transaction for the net pay, the amount after taxes, each time you receive a paycheck. |
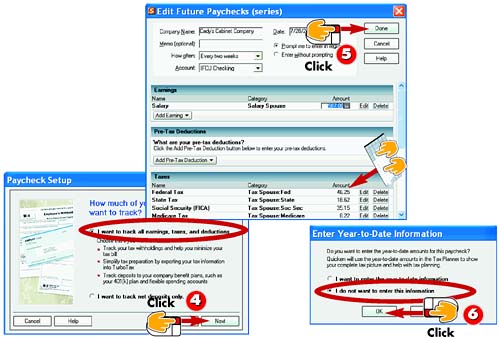 -
| | Specify how you want Quicken to track the paycheck and click Next to continue. | -
| | Fill out all the paycheck details, making sure to scroll through to see all the fields. Then click Done . | -
| | Quicken prompts you to record year-to-date information. Click the negative option and click OK . Quicken records the paycheck as a scheduled transaction. | TIP Going Back You can click the Back button while using Paycheck Setup to return to a previous dialog box and change your entries or choices. |
TIP Edit the Paycheck Details You can return to Paycheck Setup and edit the check details. Click the Setup Paycheck button on the Scheduled Transactions tab, select the paycheck, and click the Edit button. |
|