|  Recording a Check 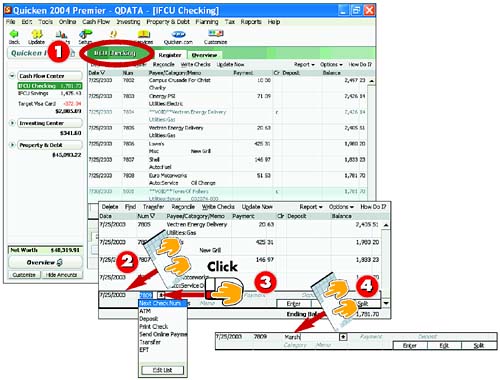 -
 | Open the register for the checking or savings account you want to add a transaction to by clicking the checking account link under the Cash Flow Center. | -
 | In the empty transaction line, type the check date, using the mm/dd/yyyy format. | -
 | Click the drop-down arrow next to the field in the Num column, and then click Next Check Number . You can also type a specific check number into the Num field. | -
 | Click in the Payee field and type a payee name . | INTRODUCTION You can record every check you write as a transaction in your checking account register. Each time you enter a transaction into the register for a checking account, Quicken automatically recalculates the current ending balance for your account, making sure you always have a handle on what your spending limits are. Use the new transaction line to enter your new transaction. |
HINT Today's Dateline If you enter one or more postdated transactions, a blue highlight line appears above the first postdated transaction. The line sets off the postdated or future transactions from the current transactions. |
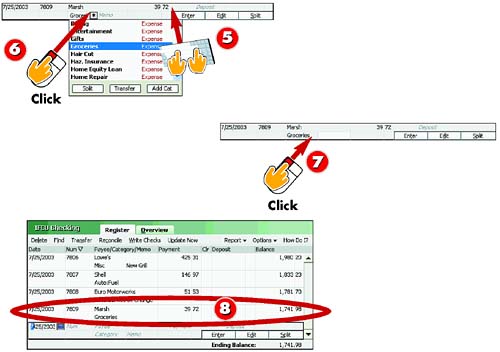 -
 | Click the Payment field and type a payment amount. | -
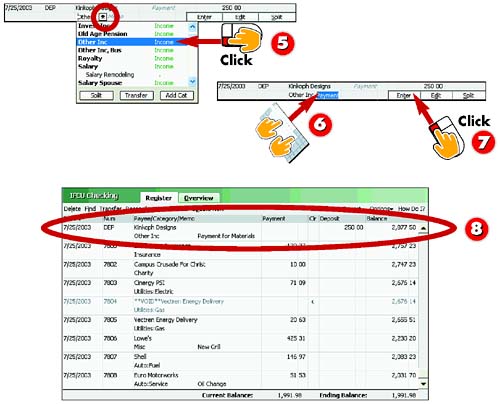
 | Click the Category field drop-down arrow and select an expense category or subcategory . | -
 | Click the Memo field and type memo information if desired. Click the Enter button. | -
 | Quicken records the check and adds another empty transaction line to the bottom of the register. | TIP Tab It You can also press the Tab key to move from field to field in a transaction. |
TIP Name That Payee Each time you enter a new name in the payee field in the register, the QuickFill feature remembers the transaction information. You can learn more about using QuickFill in Part 4. |
TIP Use Those Categories! Categories are key to tracking where your money goes. Be sure to make full use of Quicken's categories when entering transactions into your account registers (see Part 2, "Setting Up Accounts"). |
Entering a Deposit 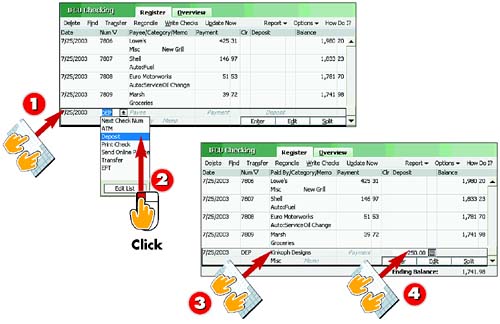 -
| | In the empty transaction line, type the deposit date using the mm/dd/yyyy format. | -
| | Click the Num field and then click Deposit or click EFT (if your employer deposits your paycheck electronically rather than giving you a paper check). | -
| | Click in the Paid By field and type the name of the person or company from which you received the funds. | -
| | Click the Deposit field and specify a deposit amount. | INTRODUCTION The money you deposit into an account can come from your paycheck, interest deposited into your account by the bank, loose cash you deposit via an ATM, gifts you receive from relatives, and so on. Every time you deposit money into your account, be sure to enter a corresponding deposit transaction in the Quicken account. |
HINT No Numbers in the Num Field When you enter a withdrawal or deposit transaction, make sure you don't type a number into the Num field. Quicken allows this, but doing so creates confusion with the check numbers you enter. |
 -
| | Click the Category field and select an income category or subcategory. | -
| | Click the Memo field and type memo information if desired. | -
| | Click the Enter button. | -
| | Quicken records the transaction. By default, Quicken sorts the transactions based on date entered and then by the Num field, placing this transaction earlier in the register. | TIP Categorizing Income Categorizing your income is just as important as categorizing your expenses. For example, if a relative gives you large gifts, you need to track whether the gift amounts total enough to compel you to pay taxes on them. |
TIP Paycheck Time If you categorize a deposit as Salary, a Paycheck Setup dialog box might ask whether you want to use that feature to automate your paycheck entries. For more information on using this feature, see Part 4. |
Splitting a Transaction 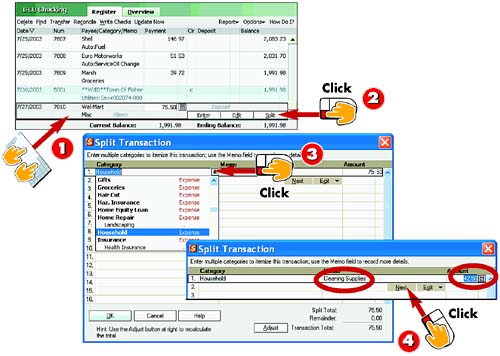 -
| | Fill in the Date, Num, Payee , and Payment or Deposit fields for the new transaction you want to split. | -
| | Click the Split button. | -
| | The Split Transaction window opens. Select a category from the Category drop-down list for the first split item. | -
| | Type Memo and Amount entries and click Next . | INTRODUCTION Some checking activities require you to write a check that covers several expenses. To handle such situations, Quicken enables you to split a transaction. When you split a transaction in a bank account, you apply more than one category or subcategory and specify what portion of the transaction falls into each category or subcategory. |
 -
| | Specify the next Category and Memo . Edit the Amount entry or simply continue if the calculated amount is correct. | -
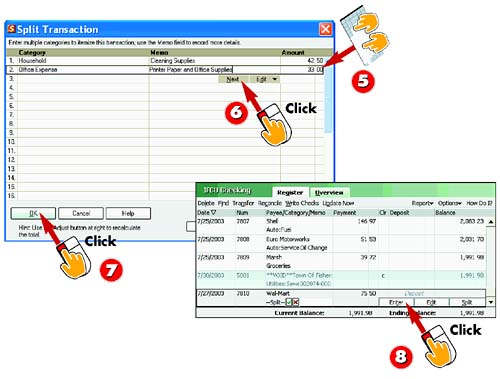
| | Click Next and repeat step 5 as many times as necessary to add other categories. | -
| | Click OK to finish entering the categories for the split and return to the register. | -
| | Click the Enter button to finish recording the entry. | TIP Identifying Split Transactions When you split a transaction, Quicken enters Split as the category for that transaction in the register. |
Creating a New Number Field Label 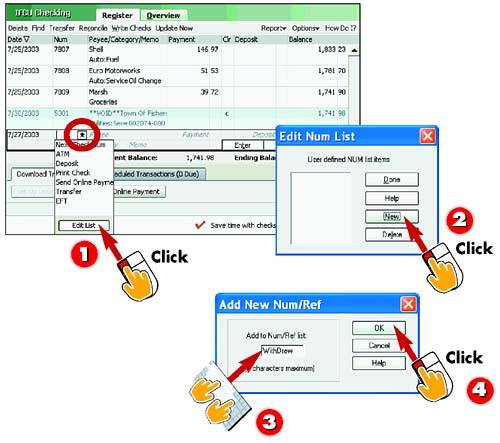 -
| | Click the Num field and click the Edit List button. | -
| | Quicken opens the Edit Num List dialog box. Click the New button. | -
| | Quicken opens the Add New Num/Ref dialog box. Type up to a 9-character title for the label you want to create. | -
| | Click OK . | INTRODUCTION When recording your transactions, you can choose from Next Check Num, ATM (automated teller machine), Deposit, Print Check, Send Online Payment, Transfer, and EFT (electronic funds transfer). Some of your transactions, such as withdrawals or debit card purchases, may require a more descriptive field. You can add new fields to the Num list as needed. |
TIP Label Ideas You can add WD for Withdrawal as a label for withdrawals, or Debit as a label for your debit card purchases. |
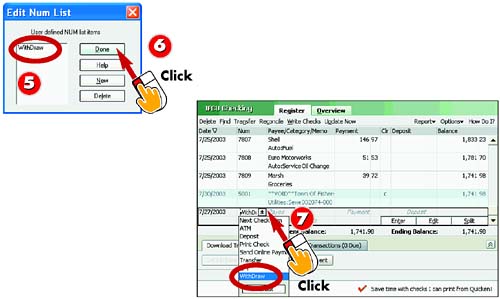 -
| | The new label appears in the Edit Num List dialog box. | -
| | Click the New button to add another label following step 4, or click Done to close the dialog box. | -
| | The new label is now listed among the Num field choices. Click the Num field to view the choices. | TIP Remove a Label To remove a label you no longer want, reopen the Edit Num List dialog box, select the label, and click Delete . Click Done to close the dialog box again. |
Entering a Withdrawal 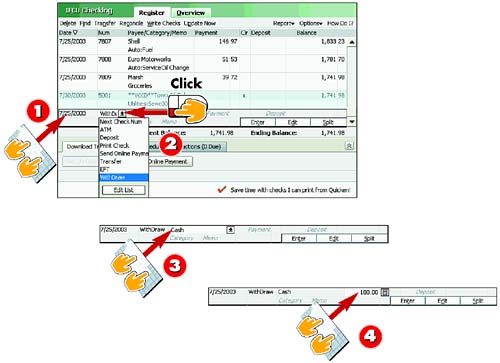 -
| | In the empty transaction line, type the withdrawal date. | -
| | Either skip the Num field or click the Num field and click the name for the withdrawal choice if you created one in the previous task. | -
| | Click the Payee field and type a payee name, such as the cash recipient's name, or something generic, such as Cash . | -
| | Click the Payment field and specify a withdrawal amount. | INTRODUCTION Whenever you walk into a bank and use a withdrawal slip to take money out of a checking, savings, or money market account, you need to enter a corresponding withdrawal transaction in the Quicken account for that real-world account. |
HINT Withdrawal Nums The Num field doesn't include a withdrawal choice. You can add new choices to the list. See the previous task to learn how. |
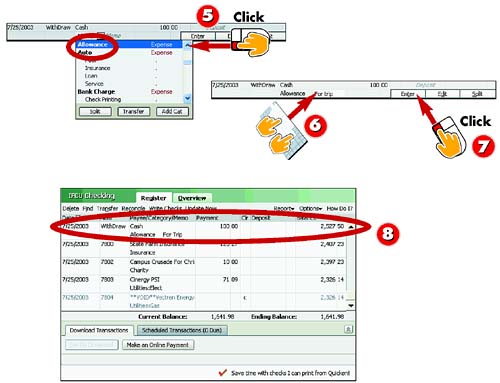 -
| | Click the Category field and select an expense category or subcategory. | -
| | Optionally, click the Memo field and type in memo information. | -
| | Click the Enter button. | -
| | Quicken records the transaction. | TIP List of Payees? If you select the Payee field in any transaction and a list opens, it holds memorized transactions. See Part 4 to learn how to work with memorized transactions. For now, simply type the entry you want. |
TIP Withdrawal Category Quicken provides a category you can use for miscellaneous account withdrawals ”the Cash expense category. Otherwise, you should choose the category that best reflects how you spent the money. |
Entering an ATM Transaction 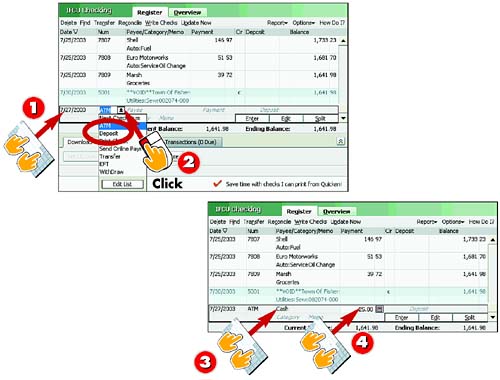 -
| | Type the ATM transaction date. | -
| | Click the Num field and then click ATM . | -
| | Click the Payee field and type a payee name. You can use something generic such as Cash or name the deposit source. | -
| | Click the Payment field or Deposit field and specify an amount. | INTRODUCTION Keeping track of all your ATM receipts can require a lot of organizational skills. If you maintain the same discipline you use to record other account transactions to record your ATM transactions, you won't have to worry about the status of your account balance. |
TIP Tossing Your Receipts? Don't trash your ATM withdrawal receipts. Use those receipts as the basis for ATM transactions you enter into Quicken. |
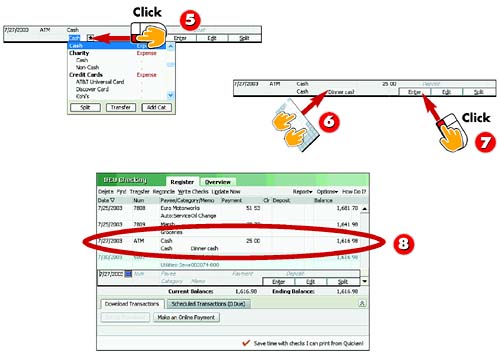 -
| | Click the Category field and select an expense category, such as Cash , or a subcategory. | -
| | Click the Memo field and type in any memo information. | -
| | Click the Enter button. | -
| | Quicken records the transaction. | HINT ATM Fees Depending on the type of account you have, you might incur a fee each time you use your ATM. This is especially true if you use an ATM at another bank. If you're using your bank's ATM, you might be able to accurately include the ATM fee as part of the ATM transaction; however, to ensure you're entering accurate ATM fees, you should wait until you receive your bank statement and enter a separate transaction for each fee. |
Transferring Funds 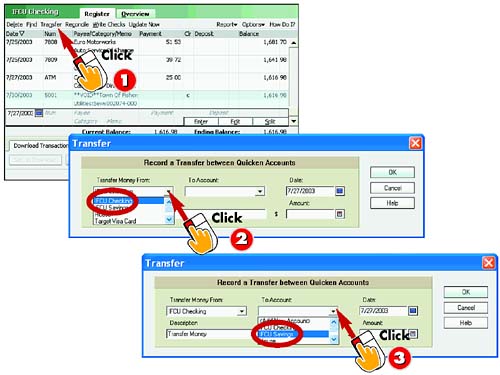 -
| | Click the Transfer button at the top of the register window. | -
| | Quicken opens the Transfer dialog box. Click the Transfer Money From drop-down arrow and select an account. | -
| | Click the To Account drop-down arrow and select an account. | INTRODUCTION It is quite common to have multiple bank accounts. For example, you might have both a checking and a savings account, or you might have multiple savings accounts ”one for yourself and spouse and one for each of your kids . When you move money from one account to another, you can record the transfer in Quicken using the Transfer category. |
TIP Transfer Label To record transfers, fill out the transaction in the register as you normally would, assigning the Transfer label in the Num field. Click the Category drop-down arrow, scroll to the bottom of the list, and choose a transfer account. |
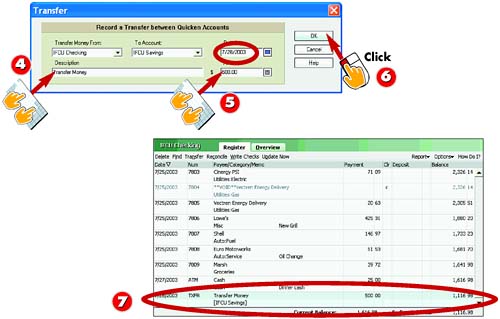 -
| | Specify a date for the transaction and type a description for the transfer. | -
| | Type the amount of the transfer into the Amount field. | -
| | Click OK . | -
| | Quicken records the transaction in both the account you are transferring from and the account you are transferring to. | TIP Good Descriptions You can't assign a category or subcategory to a transfer transaction, but it's important to use the Description field to describe the reason for the transfer. Such recordkeeping enables you to verify when you've made a needed transfer. |
Editing a Transaction 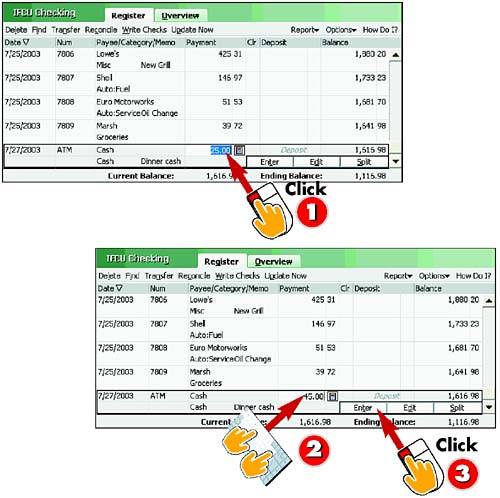 -
| | Scroll through the register to find the transaction you want to edit, and click any field in the transaction to select it. | -
| | Make your changes to the transaction fields, as needed. | -
| | Click the Enter button to finish entering the changes, or press Esc to cancel edits. | INTRODUCTION You can edit a transaction to change the payment or deposit amount, the category, or some other field. For example, if you enter a payment in advance of receiving its bill, you might need to go back and adjust the payment amount before you print the check. Make the change to a transaction right in the register. |
TIP Using the Edit Button For other types of edits, click the transaction and click the Edit button. Select a command from the menu that appears. For example, to delete a transaction, click Delete Transaction . |
HINT Watch Out! Avoid changing a cleared transaction. When you do change a cleared transaction, Quicken asks you to verify the change. See Part 5, "Balancing Accounts," to learn more about reconciling and clearing transactions. |
Voiding a Transaction 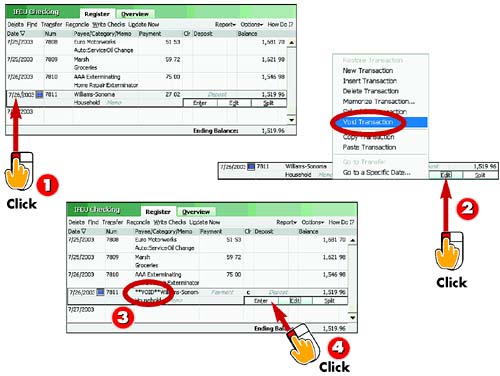 -
| | Click any field in the transaction to select the transaction. | -
| | Click the Edit button and then click Void Transaction . | -
| | Quicken immediately adds **VOID** in the Payee field. | -
| | Click the Enter button to record the edit. | INTRODUCTION You can void a check and leave the check number recorded, but delete any amounts associated with the transaction. This helps Quicken correctly number later checks and helps you account for the gap between valid check numbers. Quicken inserts **VOID** in the Payee field for a voided check and marks the check as cleared. |
TIP Fixing a Printed Check If you find an error on a check you've printed but not mailed, don't void it. Edit and reprint the check. You can learn more about printing checks later in this section. |
Finding a Check or Transaction 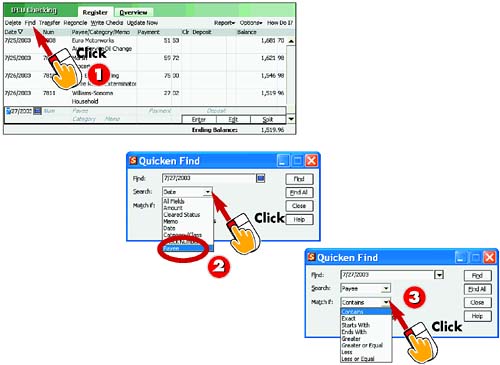 -
| | Click the Find button on the register window's toolbar. | -
| | The Quicken Find dialog box opens. Click the Search drop-down arrow and select the type of information to match. | -
| | Optionally, select an operator from the Match If list to further narrow your search criteria. | INTRODUCTION When you need to double-check or change the information in a transaction, you can use the Find feature to jump to the transaction you need. When you perform a Find, you enter information that appears in the transaction, such as a specific check number. Quicken takes you to the matching transaction in the register. |
TIP Controlling Search Precision Use the Match If choice to specify how narrow or broad the search should be. The Exactly choice narrows results the most; found transactions must match exactly when this is selected. |
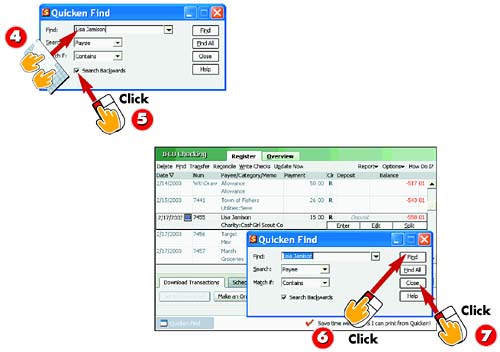 -
| | Specify the information to match by typing it into the Find text box or by selecting from the text box's list. | -
| | If you want to search forward through the register, click to remove the check mark from the Search Backwards check box. | -
| | Click Find to jump to the first matching record in the register. Repeat to find subsequent matches. | -
| | Click Close to finish the search and work with the found transaction. | TIP Finding Multiple Matches Click Find All in the Quicken Find dialog box to display a window listing all matching records in the current account and other accounts in the same Quicken file. To go to a particular transaction in the register, double-click the transaction. |
HINT Finding Again The Quicken Find dialog box remembers your last search settings. If you closed the Quicken Find dialog box, you can click Find on the toolbar to redisplay your find choices. |
Changing the Register Display 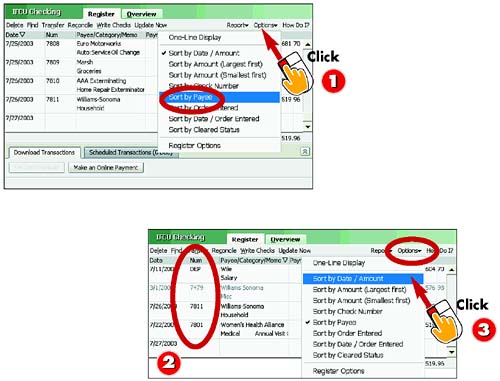 -
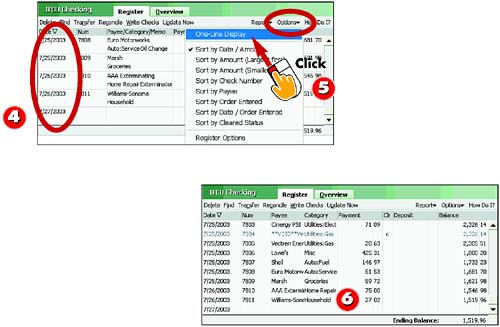
| | Click the Options button on the toolbar and then click a new sort order to use. | -
| | Quicken applies the new sort to the transactions. | -
| | To return to the original order, click the Options button and click Sort by Date/Amount . | INTRODUCTION By default, the register organizes transactions according to the transaction date. You might want to display the transactions in another order, instead. For example, you might want to sort the transactions by payee, so you can review recent payments to that payee. You can also choose to view transactions on one line instead of two. |
HINT Sorting Caution Some sorting orders cause your balance to calculate incorrectly, so return to the Date/Amount sort order to get an accurate balance calculation. |
 -
| | Quicken sorts the transactions by the date again. | -
| | Click the Options button on the toolbar and then click One-Line Display . | -
| | Quicken displays the register transactions on a single line instead of the default two. | TIP Back to Two Lines To return to the regular display, click the Options button on the toolbar and then click One-Line Display again. |
TIP As You Like It You can customize how the register looks and works, including whether Quicken memorizes transaction information you enter. Click the Options button and then click Register Options . |
Creating Checks to Print 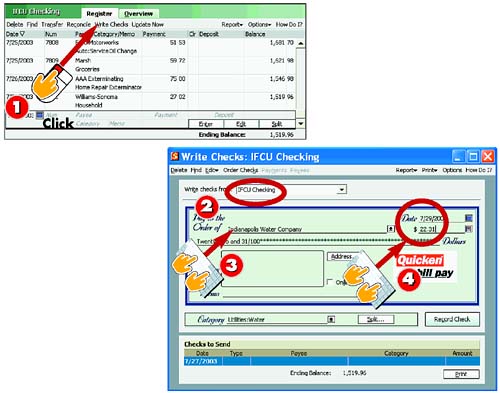 -
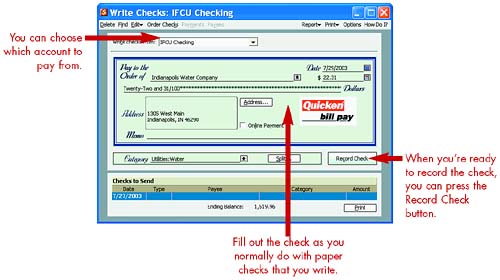
| | Click the Write Checks button in any account register window. | -
| | Quicken opens the Write Checks window. Make sure the correct account is selected in the Write Checks from field. | -
| | Type a date for the check and then click the Pay to the Order of field. Type the payee name, or click the drop-down arrow and select a name from the list. | -
| | Type an amount for the check. Quicken writes the dollar amount out for you. | INTRODUCTION You can also write and record checks into your account register at the same time. Using the Write Checks window, you can specify which account to use and write your check data just as you do a regular paper check. After writing the checks, you can then instruct Quicken to print the checks. |
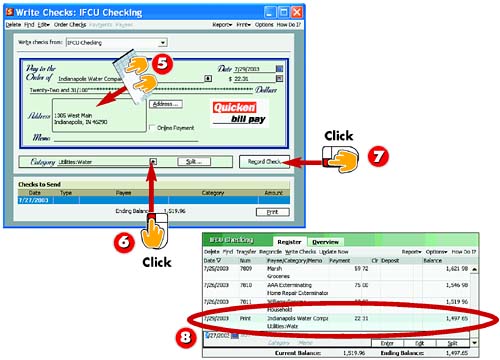 -
| | If you mail your checks in a window envelope, you can enter the payee's address in the Address field. | -
| | Enter a memo, if needed, and then click the Category drop-down arrow and choose a category for the check. | -
| | Click the Record Check button and then click the Close button to close the window. | -
| | Quicken records the check in the account register and identifies it with a Print label in the Num field. The check is also added to the list of checks to print. | HINT Made a Mistake? As long as you haven't printed the check yet, you can press the PgUp or PgDn key to move back and forth through your check transactions in the Write Checks window and make changes to the entries. |
TIP Keep Going The Write Checks window stays open for as long as you need it. If you want to record several checks, keep entering the check information and then click the Record Check button to record each check that you write. |
Printing Checks 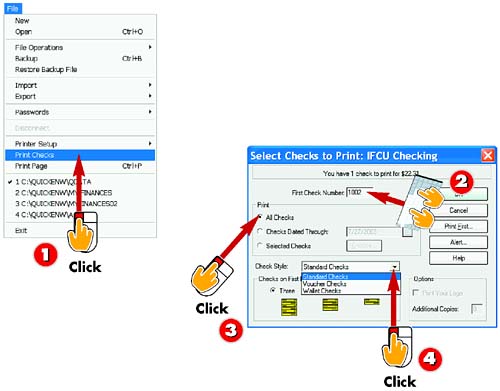 -
| | Load the check paper into your printer and then click File, Print Checks . | -
| | The Select Checks to Print dialog box opens. Type the first check number to be printed. | -
| | To print all the checks you have written so far, leave the All Checks option selected. Choose one of the other print options to specify the checks to be printed. | -
| | Click the Check Style drop-down arrow and select the type of checks you purchased. | INTRODUCTION Printing checks in Quicken consists of two stages: purchasing paper checks and then setting up your printer for printing them. Visit Quicken's Web site or check the catalog that came with the program to order check paper for your printer. After you've received your checks, you should follow the printer setup process to ensure that your checks print correctly. |
TIP Printing Test To print test checks on blank paper, choose File, Printer Setup, For Printing Checks . Click Align and click a check alignment button. Next, click Print Sample . |
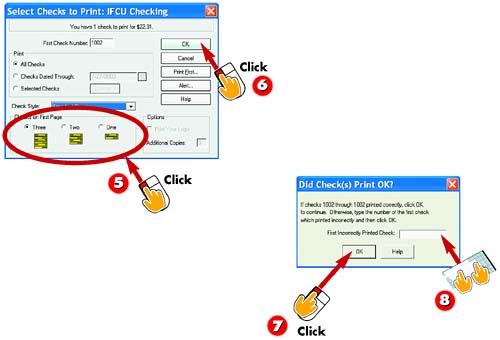 -
| | If the first page of checks is partial, make a choice in the Checks on First Page area. | -
| | Click OK to send the checks to the printer. | -
| | After the checks print, click OK when the Did Check(s) Print OK? message box appears. | -
| | If you encountered a problem, enter the check number that misprinted and click OK to return to the Select Checks to Print dialog box and try again. | TIP Reprinting a Check To later reprint a check, change the check transaction Num field entry to Print Check and click the transaction Enter button. Choose File, Print Checks , specify the correct First Check Number , and click OK . |
TIP Use the Write Checks Window You can also open the Select Checks to Print dialog box from the Write Checks window. Click the Print button. |
Printing the Account Register  -
| | Display the register you want to print and then choose File, Print Page . | -
| | The Print Register dialog box opens. In the Title text box, type the phrase that you want to display at the top of the printout. | -
| | To print only transactions with date entries from a particular period, change the From and To dates by clicking the Calendar icon and selecting a date. | -
| | If you want to include all the category information for split transactions, check Print Split Transactions . | INTRODUCTION The register gives you detailed information about each transaction in your account, so you can check the account history anytime you want. For example, if you want to review recent transactions for an account with your spouse or a financial planning professional, you can print the relevant transactions from the register rather than huddling around your computer. |
TIP When to Print You don't have to print your account every week or month to have a safe copy of your data. Instead, back up your Quicken file on disk, as described in Part 13, "Managing Quicken Data Files." |
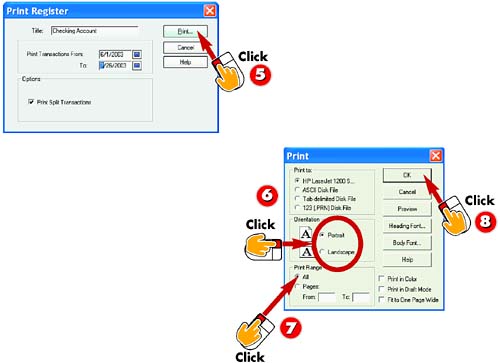 -
| | Click the Print button. | -
| | The Print dialog box opens. Click the Portrait or Landscape orientation option button. | -
| | To print all the pages, leave the All option selected. To print selected pages only, click Pages and enter the first and last page in the From and To boxes. | -
| | Choose any other print options that apply and click OK to print the register. | TIP Is It a Report? Printing the register is not the same as printing a Quicken report. See the next task to learn how to view a register report. |
HINT Control the Printout You can use the Heading Font and Body Font buttons to display dialog boxes in which you can change the fonts used for your printout. You can click the Preview button to view what your printout looks like before printing. |
Creating a Register Report 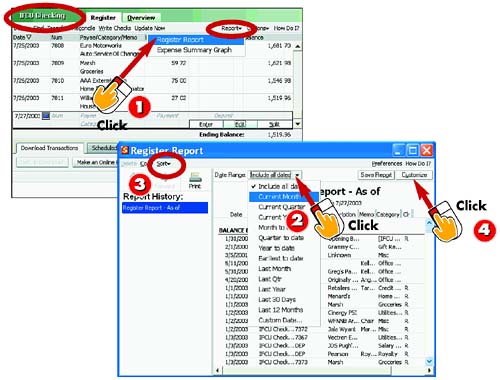 -
| | Display the register window you want to create a report for; then click the Report button and choose Register Report . | -
| | Quicken opens the Register Report window. Select the date or range for the report. | -
| | To change the transaction order, you can click the Sort button and choose a sort. | -
| | To customize the report, click the Customize button. | INTRODUCTION Quicken reports are a great way to analyze your register transactions. You can control the range of transaction dates listed in the report, as well as how the transactions are sorted. You can also customize the report to show just the categories you want or view transactions from multiple accounts. |
TIP Print a Report To print the register report, click the Print button to open the Print dialog box, select any additional options, and click OK to print. |
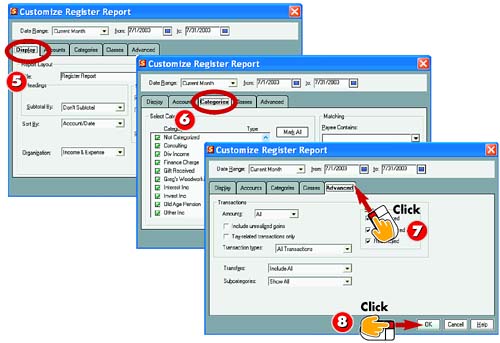 -
| | The Customize dialog box for the report type opens. Use the Display tab options to control how report items appear. | -
| | Click the Categories tab to choose which categories to include in the report. | -
| | Click the Advanced tab to set options for how transactions are used in the report. | -
| | Click OK to view the customized report. | TIP Save It You can save any report's settings you customized to view the report again later. After creating the customized report, click the Save Report button. In the Save Report dialog box, type a name for the report, select a center to associate with the report, and click OK . |
TIP Reopen a Saved Report To reopen a report you previously saved, open the Reports & Graphs window, click the Saved Reports tab, and double-click the report you want to view. |
Viewing Transactions in the Calendar 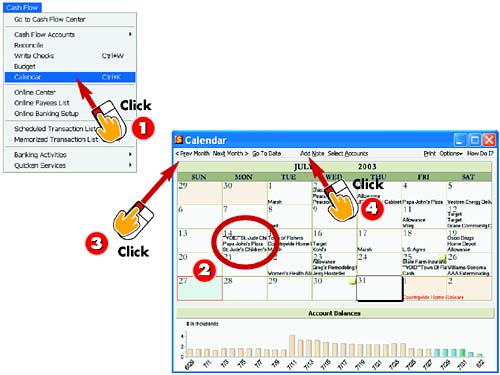 -
| | Click Cash Flow, Calendar . | -
| | Quicken opens the Calendar window. Transactions are displayed on the date in which they were recorded. | -
| | You can click the Prev Month and Next Month buttons to scroll back and forth in the Calendar view. | -
| | To add a note to the calendar, select the date on the calendar and then click the Add Note button. | INTRODUCTION The Quicken Calendar keeps track of all your transactions and lists them in a monthly calendar display. You can use the Calendar window to view transactions, including those you previously recorded as well as future transactions you scheduled. You can even add a reminder note to the Calendar window to remind you about an important transaction or financial matter. |
TIP Go To Date To view a specific date in the Calendar window, click the Go to Date button, type the date, and click OK . |
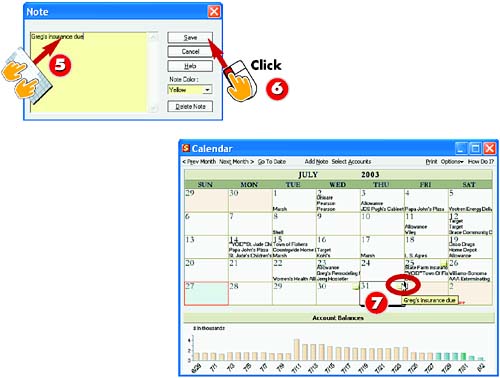 -
| | Quicken opens the Note dialog box. Enter your note text. | -
| | Click the Save button. | -
| | To view the note, move the mouse pointer over the Note icon or click the note to open the Note dialog box. Click the Close button to close the Calendar. | HINT Remove a Note To delete a note from the Calendar window, select the date containing the note, open the Note dialog box, and click Delete Note . |
TIP Select Accounts To control which account transactions appear, click the Select Accounts button. In the Calendar Accounts dialog box, specify which accounts to view and click OK . The Calendar displays only the selected account's transactions. |
 |