61. Add and Customize an Effect  BEFORE YOU BEGIN BEFORE YOU BEGIN
58 About Preset Effects 68 About the Properties Panel
 SEE ALSO SEE ALSO
65 Create and Save a Preset 67 About Keyframing 75 Control a Video Effect with Keyframes
Every one of Premiere Elements's effects, whether it's a preset, a motion effect, or a transition, can be tweaked and customized until you achieve precisely the effect for which you're looking. (And after you've changed the settings for an effect, you can save the modified effect as your own personal preset; see 65 Create and Save a Preset.) In fact, it's often more effective, and more fun, to think of preset effects as merely starting points for more elaborate effects. 1. | Select the Clip to Be Affected
Click the clip you want to modify on your Timeline. A default list of the clip's properties appears in the Properties panel, including Image Control, Motion, Opacity, and Volume (as applicable to the clip).
| 2. | Apply the Effect
Locate an effect in the Effects and Transitions panel and drag and drop it on the clip in the Timeline.
For this example, I used the Spherize effect, which can be found in the Video FX collection in the Distort category. The Spherize effect, which ultimately produces a fish-eye distortion, is one of many effects that doesn't display an immediate change when applied to the clip. Adding the effect gives you access to a control panel for the effect rather than producing an immediate change. After you change a few settings, you'll see the effect at work.
61. Add and Customize an Effect 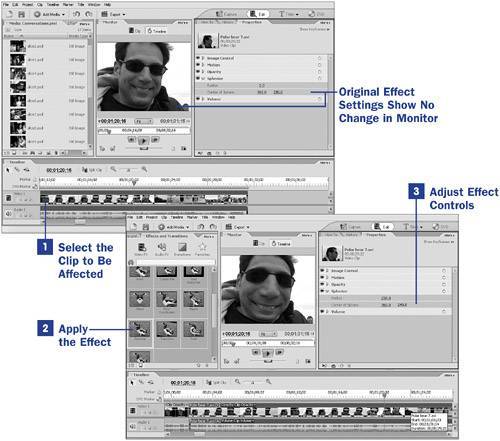
 NOTE NOTE
The center of your video frame is presented as a measurement in pixels, half the width and half the height of a video frame. In other words, in the NTSC system, the center point of your screen image is 360/240. In the PAL system, the center of the frame is 393/288. | 3. | Adjust Effect Controls
Click the triangle next to your effect in the Properties panel to reveal the control panel for that effect's details. The Spherize effect offers controls for designating the radius of the sphere (in pixels) and the sphere's center point.
Type new numbers into these settings and view the results in the Monitor panel. As an alternative, you can mouse over either setting's numbers until your mouse pointer looks like a hand with a double-headed arrow, and then click and drag left or right to increase or decrease the numbers more fluidly. The results are displayed in your Monitor panel.
|
TIP After you begin applying effects to your clip, you'll notice that the quality of the image played back in the Monitor has apparently deteriorated. On slower computers, playback might even seem jumpy or irregular. This is because you are looking at a soft render of your clipdrawn on the fly by your computer as you play the affected clip. (A clip that should be hard rendered is indicated by a red line above the clip on the Timeline.) To see a better example of what your clip will look like on final output, press Enter to render the Timeline. The red line above the clip turns green when rendering is complete, and the quality of your playback will be an accurate representation of what your final output will look like.
|