8. Capture Analog Video  BEFORE YOU BEGIN BEFORE YOU BEGIN
4 About Video Capture
 SEE ALSO SEE ALSO
9 Capture Video or Audio Only 10 Capture to the Timeline or Media Panel 11 View Captured Clips 12 About Troubleshooting Capture Problems 14 Add Media with the Adobe Media Downloader
Analog video includes most of the video systems consumers have been using for the past couple of decades: VHS, VHS-C, 8 millimeter, Hi-8, and S-VHS. Capturing analog video can present some unique challenges. Chief among them is that fact that, because computers must store files in digital code to be able to work with them, the video information from an analog camcorder or VCR must be converted, or digitized, as it is streamed in to your computer. Whatever hardware device or set-up you choose to use to capture your video, it is best to do your capturing with Premiere Elements over a FireWire connection. Although you don't necessarily need a compatible driver to connect a digitizing device, or DV bridge, to your computer, Premiere Elements 2.0 comes loaded with drivers for most digitizing devices capable of converting your analog video to DV-AVIs, the preferred digital file format for editing on a PC. If you don't have a bridge but do own both a digital and an analog camcorder, this task offers an alternative method for analog capture, commonly called a passthrough.  KEY TERMS KEY TERMS
DV bridge A hardware device that connects an analog camcorder to a computer for the purpose of converting the analog video stream into digital video files. Passthrough A method of digitizing analog video by connecting an analog camcorder to a computer through a digital camcorder.
NOTES Premiere Elements marries nicely with virtually all of the top brands of DV bridges, including many higher-end pieces that can cost more than the average home computer! When searching for a DV bridge, your priority should be to choose one that can convert your analog video files to DV-AVIs, the preferred file format for PC-based video editing. The two most popular and affordable analog capture devices are the ADS Pyro AV Link and the Canopus ADVC series, both of which connect easily to your computer with a FireWire connection and produce excellent quality digital files.
8. Capture Analog Video 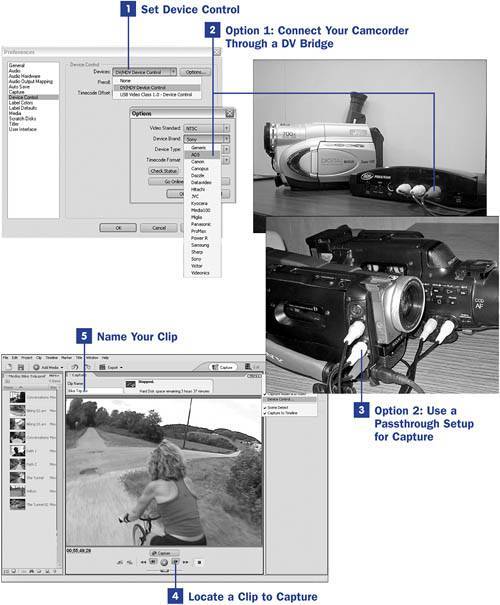 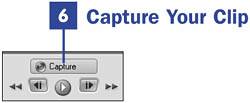
1. | Set Device Control
The only real inconvenience in a properly set up analog capture is that you are not able to control your camcorder with Premiere Elements, as you can during DV capture.
With Premiere Elements in the Capture workspace, click the More button in the Capture Monitor panel and select Device Control. If you are using a DV bridge, as described in step 2, set Device Control to None and then click the Option button. From the Device Brand and Device Type drop-down lists, select the device driver you are using for your capture.
If you are using a DV camcorder as a passthrough as described in step 3, set up your DV connection and device control as you normally would.
| 2. | Option 1: Connect Your Camcorder Through a DV Bridge
Premiere Elements 2.0 is capable of creating a custom connection with all major digitizing devices capable of producing DV-AVIs. These devices have standard AV inputs for connecting to your camcorder or VCR, and an output port that you can plug into your computer's FireWire port.
KEY TERM AV inputs The usually red, white, and yellow (white and yellow only on a monaural unit) RCA-style jacks used for connecting an analog camcorder to a television or other playback device.
After the cabling is connected and your camcorder or VCR is powered on, click the Capture button in the upper-right corner of any workspace to open the Capture workspace. Click the More button in the Capture Monitor panel and select Device Control to display the Device Control page of the Preferences dialog box.
Click the Options button to display the Options dialog box; from the Device Brand drop-down, choose your digitizing device brand. From the Device Type drop-down, choose the model number, if possible, or one of the standard or alternative options. (You might have to experiment to find the best generic driver for your device.)
Click the Check Status button if your device is listed as being Offline. If your device is still listed as being Offline, recheck your connections and setup or go to 12 About Troubleshooting Capture Problems.
NOTE The Scene Detect feature in Premiere Elements is available only for DV capture using IEEE-1394 FireWire or USB Video Class 1.0. You can break your analog footage into clips based on content or timing, if you'd prefer, by using a third-party program called Scenalyzer (available at www.scenalyzer.com) to run your capture. Because the files captured using Scenalyzer are still DV-AVIs when the software is used with one of the digitizing methods recommended here, they can be easily imported and used in your Premiere Elements video project. | 3. | Option 2: Use a Passthrough Setup for Capture
A passthrough setup can be a very effective alternative to using a DV bridge to capture your analog video.
To set up a passthrough, connect your analog camcorder's AV inputs to the AV inputs of a DV camcorder connected to Premiere Elements by FireWire or USB Video Class 1.0. (See 5 Capture Digital Video Using FireWire or 6 Capture Digital Video Using USB for instructions on setting up your DV connection.)
Ensure that there is no tape in the DV camcorder and set it to VTR mode.
Your analog tape is played through the DV camcorder and across the cable connection to your computer, where Premiere Elements saves it as a DV-AVI. (You are not able, of course, to operate your camcorder with Premiere Elements's playback controls.)
Although this setup usually works quite effectively, every DV camcorder has its quirks, and you might have to do some additional setup, such as ensuring that your DV camcorder's AV inputs are set to receive the incoming signal. Also note that some DV camcorders allow for AV output but not AV input. Naturally, these camcorders are not capable of functioning as a passthrough.
| 4. | Locate a Clip to Capture
Operating your analog camcorder with the camcorder's physical playback controls, locate the clip you want to capture.
| 5. | Name Your Clip
Type the name you'd like to give your clip in the space in the upper-left corner of the Monitor panel. By default, your clip is given your project's name.
NOTE During analog capture, Premiere Elements will sometimes give you warnings of dropped frames or even abort your capture completely. This is because the program has become confused by the nonstandard connection. If you're receiving these warnings but your clips look fine on playback, you can turn off the warnings and the Abort on Dropped Frames option as explained in 12 About Troubleshooting Capture Problems. | 6. | Capture Your Clip
Start your analog tape rolling at least five seconds before you want to begin capture and immediately click the Capture button in the Monitor panel. (It takes a few seconds for capture to kick in, so a little extra start-up time is better than too little.)
Your video should play in the Monitor, and the Capture button becomes a Stop Capture button.
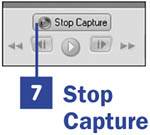
| 7. | Stop Capture
Click the Stop Capture button to stop your capture. Your new clip is added to the Media panel. To review your captured clips, see 11 View Captured Clips.
Stop your video playback with your camcorder's VTR controls or set up for your next clip capture.
|
|