116. Customize an Image As a Chapter Marker  BEFORE YOU BEGIN BEFORE YOU BEGIN
111 About Burning to DVDs 114 Set DVD Chapter Markers 115 Auto-Generate Scene Markers
 SEE ALSO SEE ALSO
117 Customize a DVD Menu Screen Template 119 Create a Motion Menu 122 Preview and Test Drive a DVD Movie 123 Burn Multiple Copies of a DVD 124 About Troubleshooting DVD Output
Scene buttons, which are automatically generated by Premiere Elements and linked to your DVD scene markers, appear on your scenes menu as visual indicators of where the links will take the viewer in the DVD movie project. (For information on how to select and create a DVD menu, see 117 Customize a DVD Menu Screen Template.) 116. Customize an Image As a Chapter Marker 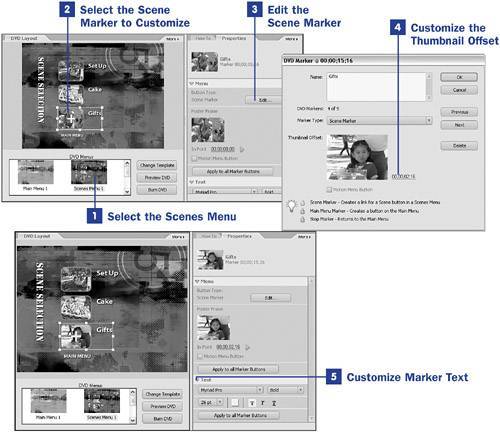
By default, these markers include a thumbnail showing the frame of the video at which you placed your DVD scene marker. You can customize the image that appears as the thumbnail without changing the location of the marker. 1. | Select the Scenes Menu
In the DVD Menus list box at the bottom of the DVD Layout panel, click the Scenes Menu that contains the chapter marker you want to customize. The selected menu screen appears in the DVD Layout panel.
| 2. | Select the Scene Marker to Customize
In the DVD Layout panel's monitor, click the DVD menu button (the scene marker thumbnail) you want to customize. The Properties panel displays the picture and text options for this item.
| 3. | Edit the Scene Marker
Double-click the Edit button in the Menus listing in the Properties panel. The DVD Marker dialog box for that marker opens.
The space adjacent to the word Name at the top of this dialog box is where you name or rename your DVD marker. The text you type in this box is the text that appears with the chapter marker on the scenes menu of your DVD menu.
| 4. | Customize the Thumbnail Offset
The Thumbnail Offset is the icon that appears on the scene menu (or the main menu, in the case of a main menu marker) as a visual indicator of the scene to which the menu button links.
To change the image that appears on the DVD menu button, change the timecode counter to the right of the current Thumbnail Offset image.
The 00;00;00;00 timecode means that the current thumbnail is the exact frame at which the DVD chapter marker is located. You can manually change these numbers, but it's more intuitive to drag your mouse across them. As you do, the numbers scroll up and down, and the video frames will advance or retreat. Note that changing the thumbnail image doesn't affect the location of the markeronly the frame that is displayed on the menu button.
After you have selected the frame that you want displayed, click OK to close the dialog box. To create an animated icon, see 119 Create a Motion Menu.
| 5. | Customize Marker Text
The Text customization area of the Properties panel enables you to select the font, font size, font color, and font style for the text on the menu button. Choose from the drop-down menus to apply these text attributes to the text associated with the currently selected menu button.
Click the Apply to All Markers buttons to apply the picture (the frame) or text settings for this button to all the menu buttons in the currently selected menu.
|
|