93. Show Your Video Through a Shape or Text  BEFORE YOU BEGIN BEFORE YOU BEGIN
61 Add and Customize an Effect 68 About the Properties Panel 95 About Titles 99 Create Rolling and Moving Credits
 SEE ALSO SEE ALSO
13 About the Media Panel 22 Prepare a Still for Video 33 Add or Move a Clip on the Timeline 43 About Rendering the Timeline
The Track Matte effect uses any black or white image, even text, as a sort of cookie cutter through which you can show a video clip. The effect uses black and white (and even grayscale) to define an alpha channelan invisible channel that masks your clip or controls its transparency. (See 94 Frame Your Video with an Image.)  KEY TERM KEY TERM
Alpha channel The area of a graphic or video clip that Premiere Elements reads as transparent. This transparency can be inherent in the native file, as with a Photoshop file that has no background layer, or the alpha channel can be created in Premiere Elements by using the Key effects to define color ranges as transparent.
93. Show Your Video Through a Shape or Text 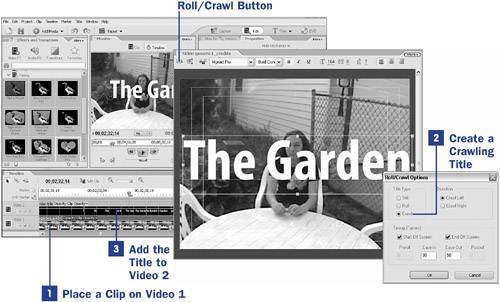 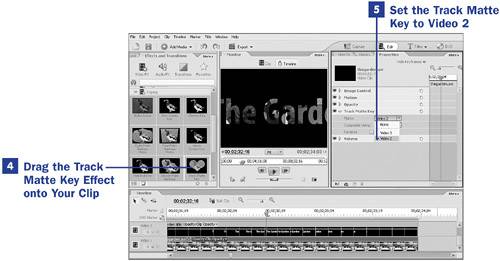
1. | Place a Clip on Video 1
Select the clip you want to play through the cookie-cutter openings of the matte and place it on Video 1.
If you want to cookie cutter the clip and have it appear over another background clip, place the background clip on the Video 1 track and the clip you want to apply the effect to on the video track above it. (See 29 About the Timeline and Video Tracks.)
| 2. | Create a Crawling Title
Click the Titles button in the upper-right corner of the workspace to open the Titles workspace. Select a title template and click OK. As an alternative to using an existing template, you can click the Cancel button to close the templates dialog box, allowing you to create a title from scratch. (See 95 About Titles.)
After you leave the title template area, a New Title dialog box pops up. Type the name you want to give your title in the text box provided and click OK. Your new title is automatically added to the Media panel.
Customize the title text and set the font size to something large, around 150 points. (You can use any font, but the text must be white and might work more effectively if it is boldfaced.)
Click the Roll/Crawl button at the top of the Titler panel and, in the Roll/Crawl Options dialog box, enable the Crawl Left, Start off Screen, and End Off Screen options. Click OK. (See 99 Create Rolling and Moving Credits.)
| 3. | Add the Title to Video 2
Locate your newly created title and place this clip on the Video 2 track, directly above the video clip on Video 1.
NOTE In place of a title created in Premiere Elements, you can use any white text or graphic that has a transparent alpha channel rather than a solid background (the graphics file must be in PSD, PDF, or TIF format) for this effect. | 4. | Drag the Track Matte Effect onto Your Clip
The Track Matte effect can be found on the Effects and Transitions panel, in the Video FX collection, in the Keying category. Drag the effect onto the clip on Video 1 (the clip you want to show through the cookie cutter matte).
TIP You can also use the Track Matte effect with a flat, non-transparent graphicany white shape on a black background. With the Track Matte effect applied to the clip you want to modify and the white shape on the Video track above it, set the Matte drop-down option to the layer where you placed the graphic; from the Composite drop-down list, select Matte Luma. The matte will use the white shape in the specified graphic clip to define the transparent area. | 5. | Set the Track Matte Key to Video 2
With your video clip selected, click the triangle to the left of the Track Matte Key listing in the Properties panel to open the control panel for the effect. From the Matte drop-down list, select Video 2 (the title) track. Ensure that the Composite drop-down list is set to Matte Alpha.
Your clip will appear cookie-cutter style within the shape of the title text. And because the title was created as a crawling title, as the clip plays, this text shape moves left across the screen.
The black background that is revealed behind your shape is actually the Premiere Elements default background. If you have a clip on a video track below this matted clip, the non-matted area instead reveals the clip below. (See 29 About the Timeline and Video Tracks.)
Enable the Reverse option in the Track Matte Key control panel, and your text or shape will be made transparent with the clip playing around it.
|
NOTE Keyframing motion to a pattern or text will, strangely, make it immune to the Track Matte in Premiere Elements 1.0. To use a moving object or text as a cookie cutter in version 1.0, you must export the clip of the moving object as a movie (see 104 Output to an AVI Movie)a white object against a black backgroundand then use that newly created clip as your Track Matte pattern.
|