Calling COM from .NET Code
| Most likely a programmer will want to use old COM-based code in new .NET applications (rather than the other way around), for the simple reason that there is probably much more COM code out there than .NET code. (Eventually the momentum will shift and COM will likely be left by the roadside somewhere, but that day is still a long way off.) Let's start with how the mechanism for using COM in .NET works in general, and then we'll continue with an example. When you want to use an old VB6 COM object (or some other language-based COM object) in .NET, .NET wraps a runtime callable wrapper (RCW) around the COM binary. This RCW manifests itself as an assembly named Interop.< assemblyname >.dll , where < assemblyname > is the name of the binary containing your COM code. For example, if I have a VB6/COM DLL named ConvertApp.dll , when I add a reference to this library Visual Studio .NET will read the type library of that binary and generate Interop.ConverterApp.dll . A few housekeeping items have to be managed for calls between .NET and COM to take place successfully. .NET code runs in managed memory. By managed we mean that .NET objects can be moved in memory at any time: the Common Language Runtime manages allocating and reclaiming memory and performing type checking. COM code runs in unmanaged memory. If you move a COM DLL, your application will break. The RCW also needs to marshal .NET types to and from COM types. For example, if a COM type needs a BSTR (pronounced beaster ), which is the COM equivalent of a string, use a .NET string. .NET uses a value typed class, String , to represent strings. The RCW must marshal the .NET value type String to a BSTR to successfully call a COM method that needs a string. Where does the support from Microsoft come in? The support provided for us is that the RCWor Interop assemblyis automatically generated for us. Thus we can write .NET code and call the COM object as if we were calling a .NET object because, from the .NET side of the fence, the RCW makes it look like we are using .NET objects. The marshaling to COM types is done for us. A lot of excellent graphic representations of the relationships between .NET code, the RCW, and COM are available on the Web and in the Visual Studio .NET help documentation, so I won't repeat those here. However, in a moment I will review some practical tools that will help you see the actual output from COM libraries and RCW assemblies. Let's start by walking through all the steps in which you may be involved. These will likely include some degree of authorship of a COM binary and the consuming .NET application. Creating a Test COM ObjectTo ensure that you have some COM code to work with I will provide some here. The output of an ActiveX DLL project in VB6 is a COM binary. Listing 7.1 contains a VB6 project group that contains an ActiveX DLL project and a Standard EXE application that tests the library. This is consistent with a VB6 project you may have lying around. Perhaps you want to reuse the ActiveX library but update the client application to ASP.NET or a Web Service. (Additionally, the Standard EXE project can be used to experiment if you still have VB6. I do, although it is getting dusty .) Listing 7.1 A VB6 ActiveX DLL Project That Converts Temperature UnitsOption Explicit Public Function ToFahrenheit( _ ByVal Temp As Double) As Double ToFahrenheit = Temp * 9 / 5 + 32 End Function Public Function ToCelsius( _ ByVal Temp As Double) As Double ToCelsius = (Temp - 32) * 5 / 9 End Function I created a new ActiveX DLL project in VB6 and added the code shown in Listing 7.1 to the .cls file. If you were writing a math library or an aviation or weather program, the formula for temperature conversion used in this code might be useful. That's really all there is to it. If I compile a project containing the code in Listing 7.1, the result is a COM binary. Depending on style, a simple VB6 user interface to test this library might consist of a form with a label, a text box, and two command buttons , supported by the code in Listing 7.2. Listing 7.2 A VB6 Test Program for the ActiveX DLL ProjectOption Explicit Private Sub CommandCelsius_Click() Dim Converter As ConverterApp.Converter Set Converter = New ConverterApp.Converter On Error GoTo Handler Text1.Text = Converter.ToCelsius(CDbl(Text1.Text)) Exit Sub Handler: MsgBox Err.Description End Sub Private Sub CommandFahrenheit_Click() Dim Converter As ConverterApp.Converter Set Converter = New ConverterApp.Converter On Error GoTo Handler Text1.Text = Converter.ToFahrenheit(CDbl(Text1.Text)) Exit Sub Handler: MsgBox Err.Description End Sub Your style might not match mine because I started programming in C++ before VB1 and, since C++ has strong type checking, I never picked up the habit of the popular VB naming conventions. Nonetheless I think you can follow the code easily.
Add a reference to the ActiveX DLL project. Compile and run the Standard EXE, then try some well-known numbers . For example, passing 32 to ToCelsius should yield 0, and passing 100 to ToFahrenheit should yield 212. Importing a COM Binary into .NETThe preceding section is consistent with steps every VB6 programmer might have performed before .NET was released. Notice there is no dependency on .NET because we are talking about technology that preceded .NET. Now we have to tell .NET about our COM binary. There are two ways to do this. You can run the tlbimp.exe utility that runs with .NET and figure out the necessary switches (which you might want to do if you are a notepad and command-line commando), or you can add a reference to the COM binary and let .NET run tlbimp.exe on your behalf . The easiest way to use the command-line tool is to type tlbimp.exe followed by the name of the COM binary, for example, tlbimp TemperatureConverter.dll . This is a bit like sticking your head in the sand because a dozen or so related issues deal with namespaces, assembly versions, strong names , and how arrays are treated. However, the Visual Studio .NET IDE will handle these issues on our behalf, so we'll rely on that method.
To import a COM binary into a .NET project, follow these steps.
The preceding steps will add a reference to the COM binary and generate the RCW as Interop.< assemblyname >.dll . In our example code you will see the ConverterApp reference and the RCW Interop.ConverterApp.dll added to the Solution Explorer. You need to click the Show All Files button at the top of the Solution Explorer to adjust the view to show hidden files, for example, a generated Interop assembly (Figure 7.2). If you are curious about the code generated by the COM Interop technology, you can open the RCW assembly with the ildasm.exe utility. The command-line statement Ildasm Interop.ConverterApp.dll will open the Interop assembly in the IL disassembler (Figure 7.3). Figure 7.2. The Interop assembly for the COM binary ConverterApp.dll . Figure 7.3. An ildasm view of the generated Interop assembly. Now the capabilities of the COM binary are ready to use just as if you had imported a .NET assembly. In a way you actually did import a .NET assembly; you imported the CodeDOM-generated Interop.ConverterApp.dll . Using Early Bound COM ObjectsThe most direct and easiest way to use the new COM/.NET code is to employ early binding. Just import the namespace and declare an instance of the class, then you are ready to go. By default the generated namespace is the name of the COM binary you imported. There are actually two types you can declare plus an interface. The interface will represent the interface implicitly declared by your VB6 class, the Converter interface. This is named _Converter in IL. Next there is a thin wrapper class named Converter that represents the bare-bones implementation of the Converter implementation in VB6. (VB6 combines interface declaration and implementation in one .cls file.) Finally we have a ConverterClass that was generated for us. ConverterClass mixes in the basic methods of all .NET classes (for example, Equals , GetHashCode , GetType , ReferenceEquals , and ToString ), making ConverterClass the most complete .NET implementation. If you want to implement the Converter interface and provide new implements, use Implements Converter . If you want to declare an instance of the Converter class, use ConverterClass , although Converter will work too.
Listing 7.3 contains a .NET application that is similar to the VB6 test application (Listing 7.2). This application provides an input text box and two buttons for bidirectional conversion. Listing 7.3 A .NET Windows Forms Test Application for the Imported ConverterApp COM DLL1: Public Class Form1 2: Inherits System.Windows.Forms.Form 3: 4: 5: [ Windows Form Designer generated code ] 6: 7: Public Property Temperature() As Double 8: Get 9: Return Convert.ToDouble(TextBox1.Text) 10: End Get 11: Set(ByVal Value As Double) 12: TextBox1.Text = Value.ToString() 13: End Set 14: End Property 15: 16: Private Sub ButtonFahrenheit_Click( _ 17: ByVal sender As System.Object, _ 18: ByVal e As System.EventArgs) _ 19: Handles ButtonFahrenheit.Click 20: 21: Try 22: Temperature = (New ConverterApp.ConverterClass()). _ 23: ToFahrenheit(Temperature) 24: 25: Catch X As Exception 26: MessageBox.Show(X.Message) 27: End Try 28: 29: End Sub 30: 31: Private Sub ButtonCelsius_Click( _ 32: ByVal sender As System.Object, _ 33: ByVal e As System.EventArgs) _ 34: Handles ButtonCelsius.Click 35: 36: Try 37: Temperature = (New ConverterApp.ConverterClass()). _ 38: ToCelsius(Temperature) 39: Catch X As Exception 40: MessageBox.Show(X.Message) 41: End Try 42: 43: End Sub 44: End Class I didn't use an Imports statement for the ConverterApp even though I certainly could have. ( Imports ConverterApp would cover it.) Instead I used a verbose form of object instantiation inline (lines 22 and 37) to show that COM Interop can be treated on an equal footing with other .NET code. Clearly, if you want to, you could provide an Imports statement, declare an instance of the ConverterClass , instantiate the ConverterClass , and then invoke the methodbut these are just extra lines of code. What about Garbage Collection?How does garbage collection fit into the COM model of incrementing and decrementing counters? This is a pretty good question, and the answer has been provided on our behalf. From an assemblies perspective, the COM object is a .NET object represented by the class in the RCW. As a result the wrapper classin our example, ConverterClass is collected by .NET's garbage collector. System.Runtime.InteropServices takes care of managing calls to IUnknown _AddRef and Release for us. (If you are curious, after a cursory glance this behavior is defined in the Rotor source in \sscli\clr\src\bcl\system\runtime\ interopservices\gchandle.cs .) For our purposes, if the COM binary behaves well, the garbage collector should be able to tell it when .NET is done with it; then COM object management behavior should take over. Using Late Bound COM ObjectsAlthough early binding is convenient because you get string type checking and help from Intellisense when using the objects, sometimes you just want or need to defer object creation and employ late binding.
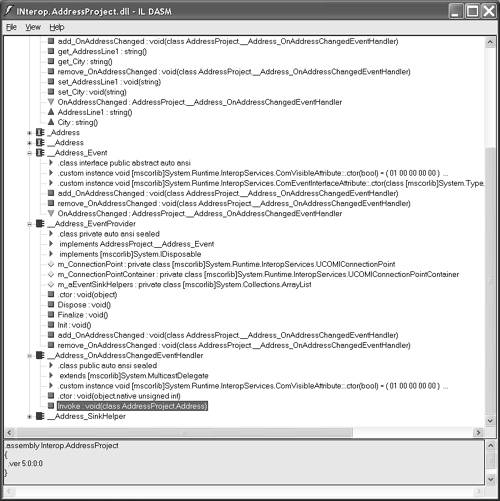
Late binding directly to COM objects is accomplished by using Reflection and the ProgId (name) or CLSID (Globally Unique Identifier, GUID) of the COM object. Get the Type information for the COM object by using the ProgId or CLSID , and use an activator to create an instance of the type. Listing 7.4 is code from VB6.ComLateBinding.sln , a console application that demonstrates a basic late binding example. Listing 7.4 Late Binding Directly to a COM Object Imports System.Reflection Module Module1 Sub Main() Dim T As Type = Type.GetTypeFromProgID("ConverterApp.Converter") Dim Instance As Object = Activator.CreateInstance(T) Console.WriteLine(Instance.ToCelsius(212).ToString()) Console.ReadLine() End Sub End Module In Listing 7.4 I used ProgId because the name is easier to remember and access than the GUID. I should share a couple words of caution at this juncture. Late binding exists to make it easier to get started with VB programming, but it can be an expensive proposition. Late binding is inefficient in terms of executing speed, is often difficult to debug, and is unavailable in VB .NET when Option Strict semantics are on. A big part of the problem is that there is no way for the compiler to perform string type checking on late bound objects. I encourage you to avoid late binding as much as possible. Consuming COM Events in .NETThe .NET event model is based on delegates. When you import a COM binary, .NET ( tlbimp.exe ) generates the necessary delegates to synchronize COM events with .NET delegates. The COM binary is referred to as the source and the .NET client is referred to as the sink . If you look in the Interop assembly for the COM binary, you will see the generated delegates that follow the __ sinkeventinterface _ eventhandler EventHandler naming convention. For example, if we define an Address class in VB6 with an event OnAddressChanged , the .NET type library importer will generate a sink event delegate class named __Address_OnAddressChangedEventHandler . However, by the time the type library importer has finished, all of this complexity will be bottled up in the RCW class and the event will look a managed code event named OnAddressChanged , which you can consume just like a .NET delegate. Listing 7.5 provides a partial business class in VB6 representing an Address class with an OnAddressChanged event. Listing 7.6 shows how easily that same event is consumed in a .NET client. Listing 7.5 A Partially Complete Address Class in VB6 with a Public Event1: Option Explicit 2: 3: Private FAddressLine1 As String 4: Private FCity As String 5: Private FState As String 6: Private FZipCode As String 7: 8: Public Event OnAddressChanged(ByVal Address As Address) 9: 10: Public Property Get AddressLine1() As String 11: AddressLine1 = FAddressLine1 12: End Property 13: 14: Public Property Let AddressLine1(ByVal Value As String) 15: FAddressLine1 = Value 16: AddressChanged 17: End Property 18: 19: Public Property Get City() As String 20: City = FCity 21: End Property 22: 23: Public Property Let City(ByVal Value As String) 24: FCity = Value 25: AddressChanged 26: End Property 27: 28: Private Sub AddressChanged() 29: RaiseEvent OnAddressChanged(Me) 30: End Sub Line 8 declares the public event OnAddressChanged . The event is raised in a single private method, AddressChanged , which is called in the Property Let statements for each of the Address properties defined. As you would expect, when any of the Address properties are used on the left side of an assignment, the Let method is called and then the AddressChanged method is called, raising the event. If you compare the IL for the imported Address class without the event and with the event (Figure 7.4), you will see a significant increase in the amount of code generated to encapsulate the public event in Listing 7.5 to wrap the code into a multicast delegate. The end result is that the COM event looks and works like any other delegate in .NET (see Listing 7.6). Thus COM Interop creates a multicast delegate in the RCW that makes COM events easy to consume in .NET. Listing 7.6 Using COM Interop to Create a Multicast Delegate in the RCW1: Imports AddressProject 2: 3: Public Class Form1 4: Inherits System.Windows.Forms.Form 5: 6: [ Windows Form Designer generated code ] 7: 8: Dim Address As AddressClass 9: Private Sub Form1_Load(ByVal sender As System.Object, _ 10: ByVal e As System.EventArgs) Handles MyBase.Load 11: 12: Address = New AddressClass() 13: AddHandler Address.OnAddressChanged, _ 14: AddressOf OnAddressChanged 15: 16: End Sub 17: 18: Private Sub OnAddressChanged( _ 19: ByVal Sender As AddressProject.Address) 20: 21: TextBoxAddress.Text = Sender.AddressLine1 22: TextBoxCity.Text = Sender.City 23: 24: End Sub 25: 26: Private Sub Button1_Click(ByVal sender As System.Object, _ 27: ByVal e As System.EventArgs) Handles Button1.Click 28: 29: Address.AddressLine1 = "1313 Mockingbird Ln." 30: Address.City = "Lansing" 31: 32: End Sub 33: End Class Figure 7.4. __Address , __Address_Event , __Address_EventProvider , __Address_OnAddressChangedEventHandler , and __Address_SinkHelper were all added to create a .NET delegate representing the COM event OnAddressChanged . In our .NET client (in Listing 7.6) there is no evidence of COM. COM Interop permits us to treat the imported event as if it were any .NET multicast delegate. In effect, the runtime callable wrapper has generated one for us. All we have to do to consume the event is declare and create the object (lines 8 and 12, respectively) and add the event handler (shown in lines 13 and 14). The event handler is defined in lines 18 through 24. There is nothing to indicate the presence of COM. Microsoft programmers have done the heavy lifting for us. |
EAN: 2147483647
Pages: 215