| Essential to creating powerful user interfaces and cutting down on redundant work is creating custom controls. Whenever you contrive a partial solution that can be used more than one time, create a control. The easiest way to create a control is to add a UserControl to your project. The UserControl acts as a drawing surface that you can paint a variety of controls onto and reuse that control. To create a user control and add it to the toolbox, follow these steps: -
Create a new Windows Control Library. -
From the Visual Studio .NET main menu, click Project, Add User Control. -
Add the controls, code, and events to describe the behavior supported by your user control. -
Compile the Class Library containing your user control. -
Drag the UserControl.vb file from the Solution Explorer to the toolbox. User controls in Visual Basic .NET are subclassed from System.Windows.Forms.UserControl. Their power is in their ease of use, and the ability to visually design them using the same technique you would use if you were designing a form. Adding Controls to a UserControl There are no differences between adding controls to a form and adding them to a UserControl. If a control can be added to a UserControl, that control will be enabled in the Windows Forms toolbox when the UserControl designer has the focus. Some controls, like a MainMenu control, cannot be supported for UserControl objects. Adding Events to a UserControl The custom UserControl shown in Figure 16.7 demonstrates a control that implements an Open Picture dialog box. The control allows the user to preview various kinds of images, and to select a particular image by clicking the Open button (see Listing 16.9). Figure 16.7. The OpenPictureDialog custom UserControl. 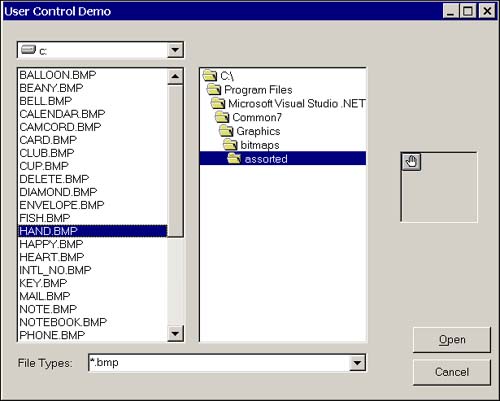 Listing 16.9 A custom UserControl that allows the user to preview images 1: Imports System.Windows.Forms 2: Imports System.Drawing 3: Imports Microsoft.VisualBasic 4: 5: Public Class OpenPictureDialog 6: Inherits System.Windows.Forms.UserControl 7: 8: [ Windows Form Designer generated code ] 9: 10: Public Sub UpdateFilePath(ByVal Path As String) 11: FileListBox1.Path = Path 12: End Sub 13: 14: Public ReadOnly Property FullName() As String 15: Get 16: Return GetFullName() 17: End Get 18: End Property 19: 20: Public Overloads Function GetFullName() As String 21: Return FileListBox1.Path & "\ " & FileListBox1.FileName 22: End Function 23: 24: Public Sub UpdatePictureBox(ByVal PictureName As String) 25: Try 26: PictureBox1.Image = Image.FromFile(PictureName) 27: Catch 28: Beep() 29: End Try 30: End Sub 31: 32: Public Sub UpdateDirectory(ByVal DriveName As String) 33: 34: Try 35: DirListBox1.Path = DriveName 36: Catch x As Exception 37: MsgBox(x.Message, MsgBoxStyle.Exclamation) 38: End Try 39: 40: End Sub 41: 42: Public Sub UpdateFilePattern(ByVal Pattern As String) 43: FileListBox1.Pattern = Pattern 44: End Sub 45: 46: Private Sub DirListBox1_Change(ByVal sender As Object, _ 47: ByVal e As System.EventArgs) Handles DirListBox1.Change 48: UpdateFilePath(DirListBox1.Path) 49: End Sub 50: 51: 52: Private Sub FileListBox1_SelectedValueChanged(_ 53: ByVal sender As Object, ByVal e As System.EventArgs) _ 54: Handles FileListBox1.SelectedValueChanged 55: 56: UpdatePictureBox(FullName) 57: End Sub 58: 59: Private Sub DriveListBox1_SelectionChangeCommitted(_ 60: ByVal sender As Object, ByVal e As System.EventArgs) _ 61: Handles DriveListBox1.SelectionChangeCommitted 62: 63: UpdateDirectory(DriveListBox1.Drive) 64: 65: End Sub 66: 67: Private Sub ComboBox1_SelectedValueChanged(_ 68: ByVal sender As Object, ByVal e As System.EventArgs) _ 69: Handles ComboBox1.SelectedValueChanged 70: 71: UpdateFilePattern(ComboBox1.Text) 72: 73: End Sub 74: End Class The UserControl has a DriveListBox, FileListBox, and DirListBox all available in the Microsoft.VisualBasic namespace. (The fact that these are legacy controls is not relevant to our discussion; any control is fair game.) The controls were all painted on the canvas of the UserControl in the same manner you would paint them on a form. Several public methods are added to allow a consumer to modify the state of any aspect of the UserControl programmatically without interacting with specific controls. This choice would allow you to change the controls used without adversely affecting consumers. You can easily add events when working with a user control in the control designer or the code editor. If you double-click on the control, the default event will be generated for that control. Alternatively, if you select the Class Name and Method Name in the code editor, you can implement any event, again, just as you would generate events for controls on a form. Adding Code to a UserControl A class is a class is a class. One of the benefits of Visual Basic .NET is that the language is more consistent. If an entity is a class, you can interact with that class as you would any other class. You can generalize the class and add new elements to the class. You can create instances of the class and use properties, fields, events, and methods. Adding a UserControl to Visual Studio .NET When you have tested your UserControl, you can compile the library containing the control. To add the control to Visual Studio .NET, you can drag the control from the Solution Explorer by dragging the .vbproj file to the toolbox, or through the toolbox context menu. To add the control to the toolbox using the toolbox context menu, follow these steps: -
Right-click over the Windows Forms toolbox. -
Click the Customize Toolbox menu item. -
In the Customize Toolbox dialog box, click the .NET Framework Components tab. -
Click the Browse button and navigate to the .DLL assembly containing your component or components. -
When you have selected the component, ensure that the checkbox in the Name column of the Customize Toolbox dialog box is checked. The component will show up in the toolbox, and you can drag and drop it onto any suitable container, like a form (see Figure 16.8). Figure 16.8. The OpenPictureDialog control added to the Windows Forms toolbox.  Associating a Toolbox Bitmap with Your Control You can associate a custom bitmap with your control by adding the ToolboxBitmapAttribute to your control's class definition. You can type the literal name of the .bmp file, including the path, or use the Type information of an existing type. To associate the bitmap used for the OpenFileDialog with our OpenPictureDialog control, add the following attribute statement before the class statement before line 5 in Listing 16.9: <ToolboxBitmap(GetType(OpenFileDialog))> _ The constructor for the ToolboxBitmapAttribute class is overloaded and supports using the path information, too. <ToolboxBitmap("c:\ myimage.bmp")> _ Recall that by convention we drop the Attribute suffix for attribute classes. | 