Objective 4.1: Designing an Access Control Strategy for Directory Services
A proper access control strategy begins with identifying the methods by which it will be enforced. There are several approaches you can take when designing security; your first step should be in identifying which one fits your organization s needs, and designing the strategy accordingly . Let s start by breaking down the access control strategy into two parts :
-
Access This strategy calls for granting fairly open access to files and resources and then locking it down according to need. This philosophy has its advantages but seems to give priority to the idea of access over security. Needless to say, this can pose a larger security threat to your network.
-
Control This strategy give priority to security and tends to start off by locking down resources to a maximum and then relaxing security gradually as the need arises. This approach ensures higher security but also makes it harder and more complicated to gain access.
So, which design strategy is right? There is no perfect answer for all situations; what you need is the perfect blend between access and control for your environment. You don t want to expose your resources unnecessarily, but you also don t want to lock down to the point where your design is unusable and impractical . Based on your company s nature and its approach to security, you should be able to formulate a good medium. However, because this guide is security oriented and the corresponding exam will be security focused, we recommend that you select the most restrictive access control (often referred to as least permissions ) and then relax those permissions as needed.
It is good to note, though, that based on the evolution of the Windows operating system and new out-of-the-box security enhancements, you will notice that Microsoft s strategy shifted from being access oriented with Windows 2000 and earlier, to being control oriented with Windows Server 2003. This change is mostly noticeable with the default settings that are given to NTFS and share permissions. With Windows 2000 and earlier, the Everyone group had full control by default on any new files or folders you created. Windows Server 2003 tightens this security by granting the Everyone group read and execute permission on NTFS files and folders, and restricting Everyone to only read permission on shared files and folders.
Access control lists (ACLs) are comprised of two layers of security: the NTFS permissions and the share permissions. Share permissions apply to users who are connecting across the network to a resource. NTFS permissions are applied on the actual files and folders. When requesting access to a resource, the most restrictive access of the combination of security between the NTFS and the share permissions is applied. Best practices call for leaving the share permissions at their default settings, and then using the NTFS permissions to restrict access. This is due to a number of disadvantages that share permissions have, including:
-
Share permissions cannot be backed up; therefore, if you ever need to restore resources you will lose the permissions.
-
Share permissions cannot propagate through the directory structure, so if you create files and folders under the main folder, the permissions can t be inherited.
-
Share permissions aren t as flexible as NTFS permissions and are limited to read, change, and full control.
-
Share permissions are lost if you decide to unshare the folder.
-
Share permissions cannot be audited .
NTFS permissions, however, do not suffer from the preceding disadvantages and tend to support more complex file and folder structures, where you can drill down to subfolders and set proper permissions. Figure 8.1 shows the basic security that can be implemented using NTFS.
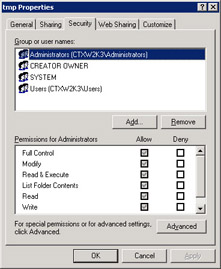
Figure 8.1: NTFS Permissions Configuration Window
So, how does designing a proper ACL help increase security in your network? Before answering this question, we have to identify the enemy ”who are you re attempting to secure your network from . Security can be breached on a network by either internal users or external users, and as such when designing security we should never neglect the task of securing our network against attack or misuse by internal users. Usually, we are focused on keeping external users out of our network, and this is mostly because of the media coverage and propaganda that hackers and virus makers get when they are able to breach security on networks. However, internal users can be as malicious and damaging (if not more so) in many instances.
ACLs are mostly used as a tool for securing against external attackers , but can also be used for protecting against internal users who are potentially in search of data theft or espionage, or just poking around out of simple curiosity . By not properly locking down files and folders at the NTFS security level, you expose these files and folders for data theft or deletion. Consider this scenario, one that reinforces the earlier point about finding a good medium for security on your network. A manager in your Human Resources department is working on a weekend where technical support is not available, and is trying to access files and folders that he or she should legitimately be able to access. Come Monday morning, this manager raises a complaint about how she commuted two hours into the office, only to be useless because she was unable to work. Let s say further that, as a result, you are asked to relax security on some network shares. Now it s several weeks later and you are getting swamped with calls about how important files are missing, or have been moved or modified. This demonstrates not only the importance of securing your files properly, but also of having appropriate levels of auditing enabled on your network. (We ll talk about auditing a bit later on.)
Now, if we switch our focus to external users, you will notice that the fight with external users begins at the firewall level or at the network perimeter, where you try to prevent them from ever gaining access to your network. They will try to find entry points to reach your data. So, for these types of users, the ACL would be considered your second line of defense, but still a necessary one in case an intruder managed to breach your firewall or perimeter network.
Analyzing Risks to Directory Services
Today s networks are so diversified and large that it is imperative to understand the vulnerabilities that an attacker can use to create risks within your directory services architecture. One thing you should always keep in mind is that, with user accounts, usernames are easy to guess because they are usually a predictable sequence like First Initial Last Name or some other similar combination. You can make this a bit harder to guess by appending the employee ID to the end of the username, for example, thus making it harder for an attacker to guess. Any additional information you add to the username that is unique to that user makes the username less vulnerable to being guessed. By doing this, if an attacker knows that a particular person works for this company, he or she will have to figure out the second ID appended to the username. Again, keep in mind you are trying to make it harder for a hacker to get any information that can help him or her compromise security on your network.
Now, if an attacker does figure out a legitimate username, this still leaves him or her with the dilemma of figuring out or cracking the password. In other words, the security to your entire network is one password away from broken. Weak passwords are something an attacker lives for. For this reason, your passwords should be complex and not easy to guess, especially passwords for administrative accounts.
Even though you can implement complex passwords for your network, if you do not obtain buy-in from your management staff you ll notice that they will resist these measures, and might ask you to relax the complexity requirements. This again leads us back to the strategy of least permissions, in that you should always make sure that you don t give a user account more rights and permissions than the user needs access to in order to go about his or her daily job.
You should also be very vigilant about disabling and/or deleting accounts of users who have either left the company or have been on vacation for a long time. You want to make sure that you have a security policy in place where your Human Resources department always informs you about employee turnover , so that you don t allow a malicious user time to log in with his or her account and wreak havoc on the files and folders he or she has access to. This is especially critical when IT personnel are either fired or leave the company for any reason.
Assigning Rights and Permissions
Before you can assign rights and permissions, you need to know the distinction between the two. The terms seem to mean the same thing, but there is a world of difference between them:
-
Rights allow a user to perform a specific task, such as the right to restart or shut down the system or maybe the right to change the time on the system.
-
Permissions are assigned to an object, file, or folder and grant a user access to the resource such as the ability to change, delete, or read it.
The same way that you can grant rights and permissions, you can of course take away rights and deny permissions. For example, you can deny users from logging on locally to a domain controller (DC), or you could deny permissions to sensitive files and folders. User rights and permissions are assigned via group policy, and resource permissions can be applied manually by accessing the Properties tab of a file or folder.
Permissions can also be assigned using group policy, which can make this task easier to manage and maintain. To configure File and folder permissions using group policy, work through Exercise 8.01. (For the purposes of this example, we will edit the Default domain policy for a domain. You can also implement a group policy at the site or organizational unit (OU) level and follow the same steps.) In the following exercise, we ll go over the necessary steps to set permissions via group policy.
| |
-
Open Active Directory user and Computers , and right-click the root of the domain, and click on Properties .
-
Edit the Default Domain Policy .
-
Browse to Computer Configuration Windows Settings File System .
-
Right-click File System and click Add .
-
Browse to the file or folder you want to set permissions on as shown in Figure 8.2 and click OK .
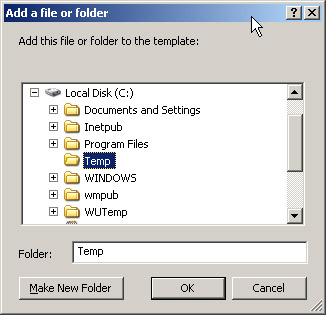
Figure 8.2: Setting Permissions on Folders via Group Policy -
Set the proper permissions, specify the groups, and then click OK .
-
Select whether to inherit and propagate permissions to subfolders or to replace existing permissions and click OK .
-
Once you have added a file or folder, you can always right-click on it in the right control pane (see Figure 8.3) of the File System window and click on Properties and modify it.
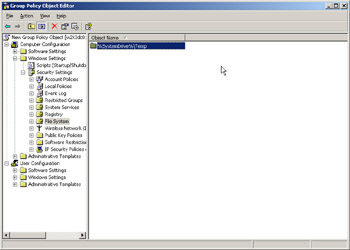
Figure 8.3: Files and Folder Permissions Configured in Group Policy
| |
| Test Day Tip | Keep in mind that there are several ways you can edit Group Policy in Windows 2000 and Windows Server 2003. You can use ADUC as in the examples shown, or you can open a Microsoft Management Console (MMC) by going to Start Run MMC and pressing Enter . You can then add the Group Policy Object Editor and then make changes to your policies. |
Considerations for Using Administrative and Service Accounts
Another potential security concern is the use of service accounts. Many applications that are installed on your network will require some type of service accounts, and many of these applications will use the Local System account for that purpose. It is critical that you change this and create an account that has enough rights to perform everything the application needs to run properly. If a malicious user knows that a particular application is installed on your network and also knows that this application uses the default Local System account, this provides a tempting target to attempt to take over the security context of the Local System account to create denial-of-service (DoS) or elevation-of-privilege attacks. A good example of how this can be misused was the Blaster worm of 2003, which exploited a vulnerability in the RPC/DCOM service, caused DoS attacks and crashed the computers it infected by constantly rebooting them. This worm took advantage of the fact that the RPC service runs under the Local System account. Another example might be an IIS vulnerability where an attacker could change the contents of your Web site. (We ve seen this happen with the Code Red worm in 2000, as well as other vulnerabilities.)
To change the service account that an application uses, you can go to Start Control Panel Administrative Tools Services . Right-click the particular service; then click on the Properties option and then select the Log On tab (see Figure 8.4). You will notice in Figure 8.2 that the Citrix XML port is using the Local System account; you can select the second button and choose a different account that this service will use to run.
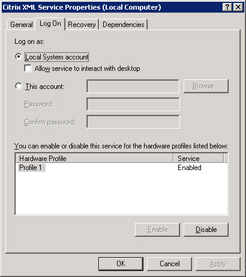
Figure 8.4: Changing the Account a Service Uses to Start
One thing you should try not to do is to use an Administrative account as a service account, because as we ve already seen, attackers can exploit vulnerabilities in software that can allow them administrative access using this administrative server account. Another possibility would be if an attacker were a former IT employee (seeking revenge , for example). If that person is aware of the service account name, and the password hasn t been changed, he or she can use it to attack the network and leave no traces. For this reason, your service account passwords should be changed regularly and should only have enough rights to perform the action it is assigned to do.
However, you might sometimes run into a situation where an application will only run with administrative rights. If this happens, you can mitigate the risks to your network by giving the service account a long and complicated name and a complex password that is changed frequently.
| Test Day Tip | When selecting an account to act as a service account, try to always make that account local to the server it is being used on rather than making it a domain account if possible. Using a local account can limit the scope of damage that an attacker can cause to the local machine only, whereas if you use a domain account with elevated privileges, the damage can quickly spread to other parts of the domain. |
| |
A Decoy Administrative Account
Rename the Original but Keep a Fake
We are sure you are aware that best practices call for renaming the administrator account because that poses a direct security threat (since the attacker already knows 50 percent of what he or she needs to hack your account, which is the username). Renaming the administrator account is definitely recommended, but this still doesn t provide 100-percent security, because the administrator account has a unique Security Identifier (SID) that will identifies it regardless of what its name is. Therefore, a smart hacker, for example, will notice that you don t have an administrator account, and might be even more intrigued because you raised the challenge by renaming it. (Remember in Chapter 1, Designing a Secure Network Framework, where we talked about external hackers who are motivated by the challenge of attacking a network? This is a prime example.) What the hacker might do at that point is run a utility like SID2USER to figure out what your administrator account name is using its unique SID.
Because of this, an additional step needs to be taken together with renaming the administrator account to harden security. After renaming the authentic administrator account, create a fake one and make sure the fake account has the exact same description as the original would have had. You can then set auditing on the decoy account, and even configure your system so that you are paged or e-mailed whenever anyone tries to access it.
As soon as this account is attacked , you should receive notification and should take immediate action because you know no one should be using this account, not even IT staff members .
| |
Designing Effective Password Policies
All the security measures in the world will be of little use if your organization adopts a weak password policy, because one compromised password can expose your network to any number of attacks, starting from DoS attacks and ending in theft or destruction of your data. Using Windows Server 2003 Group Policy, you can design an effective password policy that can protect against users and even administrators who might otherwise use weak passwords.
Group Policy allows you to force all domain users to use complex passwords that consist of uppercase letters, lowercase letters , numbers , and special characters . You can also implement a password history, where once a password expires you cannot reuse it or any of a certain number of passwords that you previously used. You can also set a password expiration period, where which after a certain amount of time your users will be prompted to change their passwords.
Objective 2.2.4: Establishing Account Security Policies
Establishing a strong account security policy is crucial, because the user account is the single most important entity in Active Directory that links to all rights and permissions on the network. Windows 2000 and Windows Server 2003 allows us to implement security on accounts via Group Policy using the following steps:
-
Open an MMC console and add the Active Directory Users and Computers snap-in.
-
Right-click the root of the domain in the left control pane and click on Properties .
-
Click on the Group Policy tab, and then select the Default Domain Policy and click Edit .
-
Expand the Computer Configuration node and maneuver your way to \Windows Settings\Account Policies . You will notice it has three configurable policies under it: the Password policy, the Account Lockout policy and the Kerberos policy as shown in Figure 8.5.
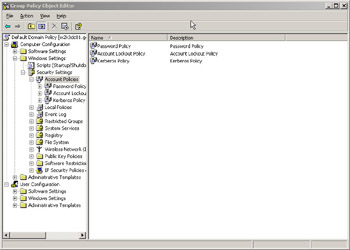
Figure 8.5: Account Policies Window in Group Policy
We will cover the Password policy later in this chapter and the Kerberos policy in the next few sections. Let s focus our attention on the Account Lockout policy, which has configurable options that are listed next .
User Rights Assignments
By configuring the different user rights, you can grant access to users to perform certain functions, or you can forbid users from completing a certain task. The configurable settings are detailed in the following sections.
| Test Day Tip | Since this is a security-oriented exam, user rights assignment will most definitely come up. Make sure that you know what each right will allow an attacker to do so if it comes up in a scenario question you will be ready for it. |
Access This Computer from the Network
This right specifies which users and/or groups can connect to a computer or server over the network. It is good to note here that Terminal Services is not affected by this setting, which means you don t have to enable this for TS users.
Act as Part of the Operating System
This right allows its bearer to imitate any user account without having to supply credentials for authentication to gain access. In other words, you can access any resources the account you re imitating has access to with the added advantage of not supplying credentials. This right is very dangerous and should not be used unless absolutely necessary. It is also worth noting here that the local system account already has this right. This right might be needed for applications that were written for operating systems prior to Windows Server 2003 (such as Windows 2000 and NT) for authentication purposes.
Add Workstations to the Domain
This right gives users or groups the ability to add workstations to the domain. A scenario where this can be useful is when you are rolling out workstations in your organization and have consultants who need the ability to add workstations to the domain.
Adjust Memory Quotas for a Process
This privilege allows its bearer to modify the maximum memory used by a process, and is given by default to administrators. This right can be potentially misused if given to the wrong user account, and can create a DoS attack against your network by setting the memory requirements for a certain process low enough to prevent it from running properly. An attacker can use this the other way around as well, by setting the memory utilization for a process very high so that it consumes all the available memory on a server or workstation.
Allow Log On Locally
This right allows a user or group to log on through the console of the machine by pressing Ctrl + Alt + Del . The terminology here is a bit tricky: logging in to the local machine usually means that you have a user account created on that machine, and when you go to log in you specify the local machine name in the domain drop-down box. This right allows the user or group to log on to a domain from the console of a machine. Basically, this right allows you to walk up to the console and log on, rather than accessing the computer across the network.
Allow Log On through Terminal Services
This right determines which users and groups can connect to a terminal server. This setting would need to be enabled if, for example, you have Citrix MetaFrame or other products that use the Terminal Services technology in Windows Server 2003.
Log On as a Batch Job
This right allows a user to be logged in as a batch job. The best way to illustrate what this setting does is to take the example of the Task Scheduler in Windows. When a user submits a task, the scheduler logs this user on as a batch job, rather than running the Scheduler interactively from the GUI. Logging the user as a batch means that the scheduled task will run at the specified time and date even if no user interactively logs on to the machine or server. This is helpful because without this right, the scheduler would not run the job until a user logged on through Ctrl + Alt + Del.
Back Up Files and Directories
This right enables its bearer to back up files and folders. Use caution when assigning this right, and only give it to trusted users since it can be misused to steal data or for espionage purposes. This right is equal to the following permissions given to a user or group: Read, List, Traverse Folder, and Read Extended Attributes.
Bypass Traverse Checking
This right overrides any permission set on directories and allows the user to traverse the directory. The user will not be able to list the contents of the directory, but will be able to navigate through it and through other subdirectories in it.
Change the System Time
Users or groups with this right can modify the internal system clock (time and date) on the local machine. This can have an effect on any files or folders created or modified, whereby the time and date stamp will reflect that of the local clock. Moreover, any events logged in the Event Viewer will bear the local timestamp. This can be used maliciously to attack the validity of system auditing, where you can t tell (or can t prove ) that a certain action took place at a specific time.
Create a Pagefile
This privilege enables a user or group to create a pagefile by calling an API, or application programming interface. This functionality is used by the operating system, and is rarely given to users or groups.
Create a Token Object
This right enables a process to use the account with this privilege to create an access token and gain access to local system resources. This is usually an operating system function, and is rarely assigned to a user account. When the need arises for this functionality, you can use the Local System account, which has this right by default.
Create Global Objects
This right allows Terminal Server users to create global objects. By default, TS users have the right to create only session objects. In rare instances, you might need to grant this additional privilege to your TS users. It is worthwhile to note that this right was introduced in Windows 2000 SP4, and is still available in Windows Server 2003.
Create Permanent Shared Objects
This right enables an account to be used by a process to create a directory object in Windows 2000 Professional and Server, Windows XP, and Windows Server 2003 families. The process is a kernel-level process and as such is used by the operating system to extend namespace objects and to load .DLL files at boot time. Any process running in kernel mode already has this right and as such does not need to have it specifically assigned.
Debug Programs
This right is usually assigned to developers to allow them to debug the operating system or a third-party application; developers do not need this right if they are debugging applications they have written. This right is needed in cases where the developer needs to debug the kernel or an application new to him. Obviously, this right grants the developer a lot of power by revealing critical data, so use caution when granting this right.
Deny Access to This Computer from the Network
This right denies access to this computer from the network. This overrides the earlier right of Allow Access to this computer from the network. If a user has both rights applied to him or her, this one will take precedence and the user will be denied access.
Deny Log On as a Batch Job
This setting denies a user the ability to log on as a batch job. It supersedes the Log on as a Batch Job right, so if a user is subject to both policies, he or she will be denied this ability.
Deny Log On as a Service
This setting prohibits a user account from being registered as a service. This security right supersedes the Allow log on as a service, and as such, if a user is subject to both policies, this policy takes precedence.
Deny Log On Locally
This setting reverses the effect of the Allow log on locally security setting we discussed earlier, and prohibits users or groups from logging on to machines at the console.
Deny Log On through Terminal Services
This setting reverses the Allow Log On through Terminal Services, and as such, users and groups subject to this policy will be denied the ability to use their Terminal Services Client and access Terminal Server. If you have products such as Citrix MetaFrame in your environment, enabling this setting can disrupt the proper functionality of said application.
Enable Computer and User Accounts to be Trusted for Delegation
This right determines which users can configure the Trusted for delegation setting on user and computer accounts. Server processes and user accounts that are trusted for delegation can access resources on other computers. Use caution when assigning this right, as it can allow a malicious user to use a virus or a Trojan horse that impersonates users to wreak havoc on network resources.
Force Shutdown from a Remote System
This right allows its bearer to shut down a server or computer system remotely and potentially bring down critical servers and cause a great deal of damage. Use caution when assigning this right, and only do so for trusted users.
Generate Security Audits
This right allows a process to write an entry in the Security log of the Event Viewer. The Security log is used to monitor unauthorized access; the misuse of this right would allow an attacker to hide traces of a security breach.
Impersonate a Client After Authentication
This right allows a service or program to impersonate the user after logon, which means that the service or program can use the credentials that the user used to log in to perform an action, rather than the credentials the service or the program used to launch itself. This is a great security enforcer that was not available with Windows 2000 SP3 and earlier, but was introduced with SP4, and of course is available by default in Windows Server 2003. Prior to Windows 2000 SP4, any service or program could impersonate a user. This is how viruses and Trojan horses were able to exploit RPC vulnerabilities and attack home and business systems.
Increase Scheduling Priority
When this right is granted, a process can change the scheduling priority of another process through the Task Manager GUI, or graphical user interface.
Load and Unload Device Drivers
This right enables a process to load and unload device drivers into the kernel and can cause severe damage if misused. A user can use it to load harmful or dangerous code into the kernel and can take control of your system. Best practices calls for the use of the StartService() API instead. (The StartService() API is a tool used by developers that would allow them to start drivers or services.)
Lock Pages in Memory
This right allows a process to use an account with such rights to determine which data is kept in physical memory and not paged to virtual memory. This can cause severe system performance degradation because of lack of enough random access memory (RAM).
Log On as a Service
This right configures which user account a process can use as a service. In many cases, an application will require a user account to start one of its services on a server. Instead of using the administrator account for this task, which has more rights and can be misused by an attacker, you can create a specific account dedicated to this application and can configure this account with the Log on as Service right. This means that the account would be able to only log in for the purposes of starting the service to which it is assigned.
Manage Auditing and Security Log
This right empowers a user to create and edit an audit policy. It also allows a user to view and clear the Security log in Event Viewer.
Modify Firmware Environment Variables
This right grants users and/or groups the ability to modify firmware environment variables in nonvolatile RAM.
Perform Volume Maintenance Tasks
This privilege grants users and groups the ability to run administrative maintenance tasks such as defragmentation of the file system. Use caution when assigning this right, as it gives the user access to the entire file system.
Profile Single Process
This right allows users to use Performance Monitor on a system to monitor nonsystem resources.
Profile System Performance
This right allows users to use Performance Monitor on a system to monitor system resources.
Remove Computer from Docking Station
When this policy is enabled, a user can undock a laptop computer from its docking station without having to log on to the laptop first. When disabled, a user can obviously undock the machine with no problem.
Replace a Process Level Token
This setting allows a user to call the CreateProcessAsUser() API, which allows a service to start another service. A great example here is again the Task Scheduler, where you can use it to start another service at a given time.
Restore Files and Directories
This right determines which users or groups can overwrite file and folder security permission while performing a restore of files and folders. It also allows the bearer to set the owner of an object.
Shut Down the System
This setting specifies which users who are logged on locally through the console of the machine can use the shutdown command. Use caution when assigning this right, as the consequences can be a DoS for the downed machine.
Synchronize Directory Service Data
This right allows users or groups to synchronize Active Directory data between controllers in a domain or forest.
Take Ownership of Files or Other Objects
This right allows users to take ownership of resources, including files, folders, printers, and Registry keys. Needless to say, the harm this can cause is endless, since the owner of the object has virtually full control over that resource.
Using Restricted Groups
Restricted groups add another layer of security to sensitive user groups such as Domain Admins or Enterprise Admins or even Schema Admins. What this setting allows you to do is to control memberships to sensitive groups, where any users who you don t explicitly specify as members of that group will be removed from it the next time the policy is refreshed. In other words, let s say that John and Bob are the only two users who should be members of the Domain Admins group. However, you have a junior network administrator named Dave who wants to elevate his access, so he opens ADUC and adds himself to the Domain Admins group.
Without Restricted groups, you would need to manually audit the group in order to notice him and remove him from that group. In many cases, the damage is already done. By using Restricted groups, the group policy checks and notices that Dave isn t supposed to be a member of Domain Admins and removes him immediately. Now, group policies are refreshed every five minutes on DCs, so within five minutes Dave would be removed. Similarly, let s say that Dave not only adds himself to the Domain Admins group, but also revokes John and Bob s memberships. In this case, once the policy is refreshed, John and Bob will be restored and Dave will be removed.
Restricted groups can also be used to control the Member Of setting, where you can specify which groups are members of which other groups. Group Policy is responsible for ensuring that these group memberships are always configured properly.
In Exercise 8.02, we ll walk through the steps required to configure Restricted groups in Active Directory.
| |
-
Launch an MMC console by clicking on Start Run , type MMC , and press Enter .
-
Add the Active Directory Users and Computers Snap-In and click on File Add/Remove Snap-in .
-
Click on Add , select ADUC , and click Add .
-
Expand ADUC and right-click at the root of the domain (configuring the policy at the root of the domain ensures it gets applied to all your domain users).
-
Click on Properties . Select the Group Policy tab, then select the Default Domain Policy , and click Edit .
-
Navigate to \ Computer Configuration\Windows Settings\Security Settings\Restricted Groups .
-
Right-click Restricted Groups and click Add Group .
-
Click Browse and type the name of the group you want to configure; for the purposes of this example we will use Domain Admins . Click OK .
-
Next, you are presented with the window shown in Figure 8.6 where you can add the members of this group. In our example, we added the user Eli .
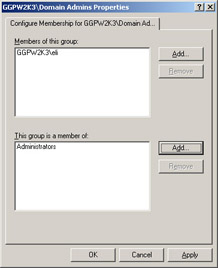
Figure 8.6: Configuring Restricted Groups in Group Policy -
You can also add the Member Of group that Domain Admins should always be a part of, and for the purposes of our example, we used the Administrators group.
-
Click OK .
| |
| Test Day Tip | Make sure you are familiar with how to use Restricted groups. As a very effective method of controlling user memberships to sensitive groups, it is almost certain to be on the test in one form or another. |
Creating a Kerberos Policy
Windows 2000 and Windows Server 2003 both offer support for Kerberos, which is a strong network authentication protocol that relies heavily on cryptography. Windows Server 2003 allows you to configure a Kerberos policy in Group Policy. In this section, we ll discuss some of the configurable settings:
-
Enforce user logon restrictions If you enable this setting, you force every session to validate a ticket using the V5 Key Distribution Center, or KDC, against the User Rights policy of every user. This is disabled by default because of the extra resources it requires, and because it can potentially slow a system while it validates the ticket.
-
Maximum lifetime for service ticket Defines the amount of time a session ticket can access a service (in minutes) before it expires. For example, you can configure it for 15 minutes. If you don t use a service ticket within this timeframe, then it will expire and you will need to request a new session ticket from the KDC. It is good to note that the session ticket is only required for authentication purposes; ongoing communication occurs regardless of ticket validation. After authentication, you can completely disregard the session ticket. The setting should be greater than 10 minutes, and less than or equal to the setting specified in the Maximum lifetime for user ticket.
-
Maximum lifetime for user ticket If enabled, this setting determines the maximum amount of time (in hours) that a user s TGT, or Ticket-Granting Ticket, has before it expires. The default time is 10 hours.
-
Maximum lifetime for user ticket renewal This setting determines the timeframe within which a user s TGT can be renewed. The time is in days and the default is seven days.
-
Maximum tolerance for computer clock synchronization When this setting is configured, it regulates the time difference that Kerberos v5 will tolerate between the client and the DC that is providing the Kerberos authentication service. Kerberos v5 uses the time stamp as part of its protocol, and as such this policy regulates the difference in the clocks that will be permissible.
To create a Kerberos policy, follow these steps:
-
Launch an MMC console by clicking on Start Run . Type MMC and press Enter .
-
Add the Active Directory Users and Computers Snap-in by clicking on File Add/Remove Snap-in . Click on Add , select ADUC , and click Add .
-
Expand ADUC and right-click at the root of the domain (configuring the policy at the root of the domain ensures it gets applied to all of your domain users).
-
Click on Properties . Select the Group Policy tab, and then select the Default Domain Policy and click Edit .
-
Navigate to \Computer Configuration\Windows Settings\Security Settings\Account Policies\Kerberos Policy .
-
In the right control pane you can double-click on Enforce user logon restriction and enable the setting to force every session ticket to be validated .
-
Next, you can double-click on Maximum lifetime for service ticket and set the ticket expiration in minutes.
-
You can then double-click on Maximum lifetime for user ticket and set the appropriate time for the lifecycle of a ticket in hours.
-
Next, you can control how long a user has to renew an expired ticket before he or she would have to request a new session ticket. The value can be set in days. To do this, double-click Maximum lifetime for user ticket renewal and set the appropriate value.
-
You can control the time difference tolerance between the DC s clock and the connecting host s local clock by configuring the Maximum tolerance for computer clock synchronization .
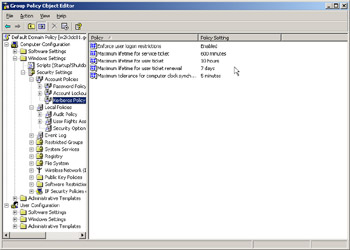
Figure 8.7: Kerberos Policy Configuration
Objective 2.2.4: Establishing Password Security
Windows 2000 and Windows Server 2003 both offer settings enforced through Group Policy that allow you configure tightened password security within your organization. You can create these settings to take effect for all users by configuring the Password policy at the root of the domain. The Password policy has the following configurable settings:
-
Enforce password history When enabled, this policy keeps a record of the passwords a user has used and will not allow a user to reuse an old password. The setting can be between 0 and 24. This is a good policy because it forces users to constantly generate a unique password and prohibits them from having a pool of passwords they rotate between every time their password expires.
-
Maximum password age You can enable this setting to force a user to change his or her password after a certain number of days. Regular password change is a crucial security step. The range is between 1 and 999 days ”as with all security settings, you should look for a happy medium. Best practice calls for a policy that requires the user to change passwords every 30 to 90 days. Experience might show that 30 days might be a bit too frequent, and your company s management might be more in favor of a 60-day expiration. Therefore, a good policy can be between 60 to 90 days for regular user accounts, and might be less for sensitive user accounts.
-
Minimum password age This setting regulates how many days users should use their passwords before they are allowed to change it. In this case, you can set the minimum age to 0, whereby users can change their passwords any time they want or anytime they feel they need to. The setting can be between 1 and 998. When using this setting, make sure the configured setting is less than that in the Maximum password age setting.
-
Minimum password length This setting allows you to force the users to select a password that is of a certain length. The configurable settings are between 1 and 14. For example, if you set it to 8, then the user would have to select a password that is eight characters long at least or the system will refuse it. If you set the setting to 0, then no password length is in effect, which means your users can choose a blank password. This is a huge security concern, since at this point all an attacker would need is the username since the password is blank.
-
Password must meet complexity requirements If this policy is enabled, it will force the user to select a password based on certain criteria:
-
The password cannot contain any part of the username.
-
The password should be at least six characters long; if the Maximum password length is more than six characters, then the user would have to meet that requirement.
-
The password must have at least one uppercase character between A “Z.
-
The password must have at least one lowercase character between a “z.
-
The password must a special character, such $, @, #, and so forth.
-
-
Store passwords using reversible encryption If this setting is enabled, the system stores the user passwords in reversible encryption. This basically means it strips the password of the default levels of encryption offered by Active Directory. You should try to avoid enabling this policy for obvious reasons unless certain applications in your environment require it. For example, CHAP, or Challenge-Handshake Authentication Protocol, requires this setting to be enabled when authenticating via remote access or Internet Authentication Services (IAS). Another example that requires this policy to be enabled is Digest Authentication, which is used with Internet Information Services (IIS).
Exam Warning When applications in your environment absolutely require Store passwords using reversible encryption setting enabled, you can enable this setting on specific user accounts that are required by the application to run properly instead of for all of your domain passwords. Open the Properties of any user account in Active Directory Users and Computers and select the Account tab. In the Account options window you will be able to enable this setting for this particular user account (see Figure 8.8).

Figure 8.8: Enabling Reversible Encryption on a Per-Account Basis
| |
Educating Users on Password Best Practices: User Password Tips
The best approach to protecting a user account is to educate the user on the principles of a password. Setting Password complexity requirements is an excellent idea that further encourages the user to follow your standards. However, if you fail to educate the user on the way he or she should create a secure and safe password, they will find a way to create an easy password that meets your complexity requirements, such as JunkFood! This password meets the complexity requirements you have set up, yet anyone who might know that this is your favorite type of food can easily guess your password and gain access to the network impersonating you.
Similarly, you will notice that no matter how great you think the Account lockout policy can be, a smart hacker can quickly start an attack intentionally providing wrong passwords and thus locking all of your users out of their accounts.
The bottom line is that there is no way around working with your user base (as frustrating as this can be at times) and educating them. A good idea is to create articles that can be published on your corporate intranet or portal that gives them tips on how to create strong passwords, including tips on what not to use. Something like this might be appropriate:
-
Do not use common words or words that are spelled in a goofy way, such as P@as$w0rd for example.
-
Do not add a numeral to the end of your expired password.
-
Do not use passwords that can be guessed by looking at pictures in your cubicle , such as your wife s name, pet s name or favorite sports club.
-
Use passwords that require you to use both hands so no one can guess it by watching you type it one letter at a time.
-
Use uppercase, lowercase, numbers, and special characters in all your passwords.
-
Use characters that require you to hold down the Alt key.
An article like this can greatly help guide your users in choosing strong passwords. Accompany this with a good Auditing policy and you should be well on your way to securing your user account information.
| |
Setting Password Complexity Requirements
You might have noticed that there is a big emphasis on passwords in this section, and the reason is that the password remains an important factor in security. No matter what security precautions you take, if someone guesses your password then that person has complete access to your protected files and resources.
To set up a Password Complexity policy like the one we just discussed, follow these steps:
-
Launch an MMC console by clicking on Start Run . Type MMC and press Enter .
-
Add the Active Directory Users and Computers Snap-in by clicking on File Add/Remove Snap-in . Click Add , select ADUC , and click Add .
-
Expand ADUC and right-click at the root of the domain (configuring the policy at the root of the domain ensures it gets applied to all your domain users).
-
Click on Properties . Select the Group Policy tab, select the Default Domain Policy , and click Edit .
-
Navigate to \Computer Configuration\Windows Settings\Security Settings\Account Policies\Password Policy .
-
In the right control pane, double-click on Password must meet complexity requirements , check the box next to Define this policy setting, and select Enabled as shown in Figure 8.9.

Figure 8.9: Configuring Password ComplexityExam Warning Keep in mind that password policies are applied at the domain level only, which means if you create another policy with password or account lockout configurations, it will not override the Default Domain Policy even if the user accounts are in the OU where the policy is being defined. If you do configure an OU-based Password and Account lockout policy, it will only apply to the Local User Accounts of the servers or workstations in that OU. Be on the alert for trick questions or scenarios that might suggest otherwise.
Creating an Account Lockout Policy
An Account Lockout policy offers you an additional level of control and security by controlling how, when, and why an account can be locked out. The idea behind account lockout is to protect your network against someone trying to crack your passwords by continuously trying to guess them, or by running a password cracker against your account database. Account lockout settings can deter a hacker by locking the account and preventing any further attempts to guess passwords. However, sometimes the security measures we take can be used against us. For example, a hacker might purposely want to lock all of your users accounts and create an uncomfortable situation for you and an effective DoS for your network. Even though security is not compromised in this situation, your users productivity will still be halted for a period of time.
The Account lockout policy offers the following configurable settings:
-
Account lockout duration This setting determines how long an account remains locked out. This setting works in conjunction with the Account lockout threshold setting. The available range is from 0 to 99,999. For example, let s say an attacker is trying a brute-force attack on a user account, is unsuccessful , and ends up locking the account. As a measure of security, the account will not be unlocked until after the duration you set here. If you set the lockout duration to 0, then an administrator would have to manually unlock the account.
-
Account lockout threshold This setting regulates the number of unsuccessful logon attempts that will be allowed against a user account before the account is locked. This means if you set this setting to 3 and you try to log on unsuccessfully three times, your account will be locked out for your protection. The range is between 0 “999. If you set it to 0, the account will never be locked out no matter how many bad password attempts it receives.
-
Reset account lockout counter after This setting determines the amount of time in minutes that the lockout threshold remembers failed attempts during. For example, let s say you try to log on now and you fail. You come back after one hour and try again and fail. If you configure this setting to an hour, then the second attempt will be considered strike two. Now, based on how many failed attempts you have allowed in the Account lockout threshold, your account can be locked out accordingly. However, if you had configured this setting to 30 minutes and you tried again after an hour , then your unsuccessful logon would be considered your first attempt. The configurable settings are between 1 and 99,999.
To create an account lockout policy, follow these steps:
-
Launch an MMC console by clicking on Start Run , type MMC , and press Enter .
-
Add the Active Directory Users and Computers Snap-in by clicking on File Add/Remove Snap-in. Click on Add , then select ADUC , and click Add .
-
Expand ADUC and right-click at the root of the domain (configuring the policy at the root of the domain ensures it gets applied to all your domain users).
-
Click on Properties . Select the Group Policy tab and then select the Default Domain Policy and click Edit .
-
Navigate to \Computer Configuration\Windows Settings\Security Settings\Account Policies\Account Lockout Policy .
-
Double-click on Account Lockout durations and enable it by clicking the check box labeled Define this policy setting. Enter the desired time in minutes; the default is 30.
-
Now, double-click on Account Lockout Threshold and define the setting. The default is five attempts. After five failed logon attempts, the account will be locked for a period of 30 minutes.
-
The last setting is Reset account lockout counter after; again, the default is 30 minutes, which means if a user waits 30 minutes between each logon attempt he or she can continue to have five attempts to authenticate without locking out the account.
Auditing User Account Activity
It is not enough for us to set up policies, regulations, and requirements. All of this is worthless if we don t have a way to monitor whether the policies and requirements that we created are being followed. Auditing is our way of making sure that our users and even administrators and engineers are abiding by and sticking to these policies. In addition, with auditing enabled, you will be able to gather information after a security incident occurs. You will be to tell which computers were compromised, which files were accessed, and other crucial information.
Auditing can also help prevent an attack before it occurs if it is configured properly and your response time is appropriate. Because you can configure auditing to e-mail or page you when specific events are logged, you might be able to stop a security breach before it happens or before it damages data on the network.
No security design is ever complete without using auditing. For this and other reasons, Windows 2000 and Windows Server 2003 offer us auditing capabilities through the use of group policy. The Auditing settings that are available to us are located in Group Policy under \Computer Configuration\Windows Settings\Security Settings\Local Policies\Audit Policy as follows :
-
Audit account logon events This setting monitors the success or failure of users attempting to log on, and creates an entry in the Security log on the DC with the relevant information. You can set it to monitor all success logon events, all failed logon events, or both.
-
Audit account management If you enable this setting, auditing on account management will be turned on and any events will be logged based on whether they succeeded or failed or both. Account management audits include any password changes, account creation or deletion, and so forth.
-
Audit directory service access If this setting is configured, auditing will be enabled on Active Directory objects that have a system access control list (SACL) specified. What this means is when you right-click an object in Active Directory and click on the Security tab, you can assign security on that object. This setting monitors objects that have been configured with the SACL. It can monitor for success or failure or both, and writes an event to the Security log in the Event Viewer on a DC.
-
Audit logon events If you enable this policy, you will be able to monitor logon events. Auditing can be set on successful logons or on failed attempts. The difference between this setting and the Audit account logon events setting is that, with the latter, events are only logged on the DC s Event Viewer when a user authenticates against Active Directory, whereas if you enable this setting, you will be able to monitor user access to resources that reside on servers like file and print servers, for example.
-
Audit object access If enabled, this setting triggers auditing of user access to objects such as files, folders, Registry keys, and so forth. As with the other audit policies, you can either monitor the success or failure of these actions.
-
Audit policy change If you enable this setting, you will be able to monitor any changes that are made to your Audit policies, User Rights Assignment policies, and your Kerberos policies.
-
Audit privilege use This setting allows you to monitor a user based on his or her Rights assignments. Anytime users use any of their rights, an event is logged. Rights were assigned in the User Rights policies, which we covered earlier in this chapter.
-
Audit process tracking If enabled this setting allows you to audit detailed information about a process, such as when a process exits or when duplicates exist of the same process.
-
Audit system events This setting allows you to monitor system events, such as when a server is shut down or restarted, or when the Security log is being manipulated in any way.
Creating an Auditing Policy
You can enable an Audit policy either locally on the server or workstation or via Group Policy. Enabling it via Group Policy makes it a lot easier to manage and update later if the need arises. The following steps outline how to create an Audit policy using Group Policy:
-
Launch an MMC console by clicking on Start Run , type MMC , and press Enter .
-
Add the Active Directory Users and Computers Snap-in by clicking on File Add/Remove Snap-in. Click on Add , select ADUC , and click Add .
-
Expand ADUC and right-click at the root of the domain (configuring the policy at the root of the domain ensures it gets applied to all your domain users).
-
Click on Properties . Select the Group Policy tab, then select the Default Domain Policy and click Edit .
-
Navigate to \Computer Configuration\Windows Settings\Security Settings\Local Policies\Audit Policy .
-
In the right control pane, double-click on the desired settings from the ones we just discussed and configure whether you want to audit the success, failure, or both for any of these categories.
Auditing Logon Events
When you configure this policy, you will be able to track the success or failure of logon events. This policy allows you to track an intruder trying to crack the password on a user account, for example. With this policy, you will also be able to track user accounts that are trying to log on, and computer accounts that are trying to log on. As you know, Windows NT, 2000, XP, and Server 2003 have computer accounts that are objects in Active Directory. When you authenticate, your computer account also authenticates if the computer is part of the domain so that you get an extra layer of security.
| Note | Windows 9 x and Me do not have computer accounts, and as such, you will be unable to track computer accounts of users who are using these operating systems. Therefore, for these users, only the user account logon will be tracked. |
There is one major difference that you should be aware of when dealing with logon events, and that is that the account logon event is recorded in the Security log of the server that authenticates that account. Logon events, however, are recorded in the Security log on the computer the user is actually logging in to.
As an example, let s assume you have Terminal Services deployed in your organization where your users would need to log on through TS to get access to certain applications. In this scenario, when the user account is authenticated against Active Directory, an entry is recorded in the Event Viewer s Security log on the DC that authenticated the account. The Terminal server the user logged on to, however, registers an entry in its own Security log for the user logon (see Figure 8.10).
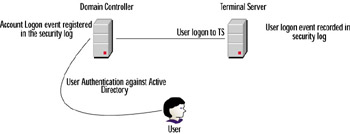
Figure 8.10: Logon Events Registration Process
| Note | When you apply a logon audit policy to servers that have Terminal Services enabled on them, you need to make sure you differentiate between console logons and Terminal Services client logons. |
Best practices calls for always enabling success and failure logon attempts when configuring this kind of policy. The combination of success and failure audits will be useful to you later when conducting an investigation of how the security on your network was breached, for example. It might also be useful in preventing an intrusion if you are set up to be notified of frequent failure attempts on certain sensitive accounts such as Administrator accounts or service accounts.
Auditing Object Access
After enabling the Audit Object Access setting in Group Policy, you will then need to configure auditing for individual objects such as files and folders. Enabling the Audit policy is only one part of the process. For example, let s say you wanted to monitor file access and modifications on your c:\windows directory. After enabling the Auditing policy, you would then do the following in order to set up auditing:
-
Right-click on the Windows folder and click on Properties .
-
Select the Security tab and then click the Advanced button.
-
Click on the Auditing tab.
-
Click on Add and choose the group that you want to monitor. For example, you might want to monitor the Everyone group for Read and Append Data actions, as shown in Figures 8.11 and Figure 8.12.
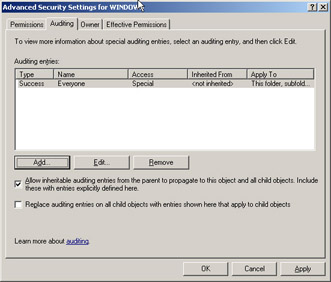
Figure 8.11: Setting Auditing on an Object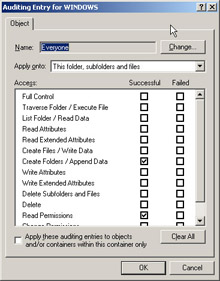
Figure 8.12: Advanced Auditing Settings -
Click Apply and then click OK .
When auditing objects, you should have a clear understanding of what it is you are trying to audit and why. For example, a good Auditing policy would monitor Write and Append Data actions taken against executable files, since viruses, Trojan horses, and worms usually modify, change, or delete these particular types of files, and very few normal user activities would cause these actions to take place.
The reason why you should be careful when setting up auditing is that you can generate a lot of security events, such as if you enable auditing on .TXT files for all possible events. In this scenario, the system might generate numerous log entries each time the file is opened, edited, saved, and so on. This can quickly fill your Event log and create serious performance degradation on your overall system. Having a clear strategy about what to monitor and how much to monitor ensures that your Auditing policy does not affect system performance and overall business productivity.
Another example would be auditing a busy printer: just imagine the logging information that would be created if you monitored all successful print jobs. Your Event Viewer would quickly be full of fairly trivial informational logs that you will never sort through or care to know about.
| Note | Antivirus software can also cause hundreds if not thousands of security logs if Full Control auditing is enabled. This would occur every time a system scan is initiated. |
Objective 4.1.2: Analyzing Auditing Data
Once we ve configured our auditing policy, we need to be able to analyze it and make sense of it all. Windows provides a central repository where auditing and other events are stored for later analysis and troubleshooting. This repository is the Event Viewer, which you can get to either by right-clicking My Computer and going to Manage , or simply by going to Start Run and typing Eventvwr .
The Event Viewer has several different logs, based on what kinds of services are configured on the server you are trying to access. For example, on different servers you might find the Application log, the Security log, the System log, the DNS log, the File Replication log, and others. (All Windows Server 2003 servers will possess the first three; the rest are dependent on what kinds of services the machine is running.) What we are most interested in at this point is the Security log, where all our auditing settings and configuration will be stored. With the Event Viewer, you are able to:
-
Sort events by type, time, and other parameters
-
Filter events
-
View advanced event information
-
Sort events
-
Export the log file to an .EVT, .TXT, or .CSV file
-
Connect to a remote computer s Event Viewer
However, when you have more than a handful of servers in your environment, using the Event Viewer to browse through events can be very frustrating. There are other tools you can use that will query the Event logs on several servers and consolidate only the information you are interested in into files or databases. Consider these scripts that are available in the Windows 2000 Resource Kit and the Windows Server 2003 Resource Kit:
-
Eventlog.pl is a Windows 2000 Resource Kit (Supplement 1) Perl script that allows you to manipulate the properties of the Event Viewer on remote machines. It allows you to do the following:
-
Modify the Event log properties
-
Clear all events in a log
-
Back up or export the event log
-
-
Eventquery.pl is another Windows 2000 Resource Kit (Supplement 1) Perl script that allows you to display events from local and remote machines and offers many ways you can filter the data.
-
Dumpel.exe is a very powerful tool that allows you to dump the events from remote servers into a tab-separated file, which can then be imported into Excel and sorted, filtered, and so forth in order to make sense of the data. Dumpel.exe is a command-line utility and stands for Dump Event Log. It can be downloaded from the Microsoft Web site.
-
EventcombMT.exe is a Windows Server 2003 Resource Kit utility (also available from the Microsoft site) that allows you to query the Event logs of several servers at the same time. The advantage of EventcombMT is that you can specify the criteria you are looking for. For example, if you are interested in logon events only, this tool can query all the Event logs for just this event type and then collect the information for you, rather than just querying the Event logs as a whole like other tools do. You can filter it for any field in the Event log.
If you are interested in further automating these tasks or using a GUI instead, you can use tools from Microsoft such as Microsoft Operations Manager (MOM) or third-party utilities from other vendors such as Tivoli or HP.
Objective 4.1.1: Creating a Delegation Strategy
One of the best enhancements that was introduced in Windows 2000 and continues in Windows Server 2003 is the ability to delegate administration. What this means is that you can design an OU structure, place Active Directory Objects such as users and computers, and then give control of this OU to an administrator in your group. This allows you to have levels of security where administrators have access to only the Active Directory objects for which they are responsible. This is an added layer of security that was not available in the Windows NT days, where any administrator had to be a member of the domain Admins group or any other sensitive group before he or she could do any real work.
Delegation of authority can also be used to organize and isolate departmental or suborganizations in your environment. For example, your HR department might have its own IT staff that requires independent and sole access and management over their users, computers, group policies, and the like.
Service Administrators and Data Administrators
An organization usually delegates administration because of an operational need, an organizational need, or even a legal need. Once delegation is implemented, the delegated administrators can then administer service management and data management.
Delegated administrators fall into two main categories:
-
Service Administrators (Service Management) This type of administrator is responsible for the design aspects of Active Directory, and have autonomy over DCs, directorywide configuration, and services maintenance and availability. Service Administrators can be Data Administrators, but Data Administrators are not typically Service Administrators.
-
Data Administrators (Data Management) This type of administrator is responsible for the information saved in Active Directory, such as users, groups, and OU containers, but they don t have access over the directorywide configuration and delivery of services. This type of administrator can be granted object level access and can be given control over certain sections of the directory.
Isolation and Autonomy
When designing your Active Directory delegation strategy, you have to first understand your organization s delegation requirements. These requirements will generally fall under the following two categories:
-
Isolation Isolation allows for exclusive and independent access to data and services in a particular subset of the directory. This design allows administrators to isolate themselves and not share administrative rights with any other administrators in the forest. They have full and exclusive control over their portion of the directory tree.
-
Autonomy Autonomy allows for shared administrative control over certain data and services. It allows administrators to independently manage all or parts of the services and data management that they are responsible to maintain. For example, a forest might have two domains, and each domain might be managed independently by a different group of administrators. In an autonomous model, however, they are still united by a single forest functioning as a security boundary. As such, Enterprise administrators will still have the ability to log in to and administer either domain.
Clearly, autonomy is less restrictive, and administrators working under this model understand and accept the need to share management responsibility with other equal or higher-level administrators who will be able to access and control their services and data. Administrators working in isolation, however, require sole administrative access to their resources and intentionally block other administrators from being able to access or manage their service and data. These are usually in sensitive areas like Legal or Human Resource departments in an organization.
The only way to implement an isolation strategy, whether it is for the purposes of data isolation or service isolation, is to create a separate forest for that portion of the directory. The forest is the only security boundary that will ensure that no other administrator in an organization can access or compromise any of your information.
However, autonomy can be achieved either by creating a separate domain or even by delegating control over an OU that has all the data and services you are responsible for managing.
| Exam Warning | Isolation and autonomy are new terms, and as such will likely be on the exam. Familiarize yourself with the definitions and concepts, as they will most likely appear in a delegation scenario question. |
Selecting a Delegation Structure
Any delegation structure is divided among forests, domains, and OUs. Based on the type of delegation an organization needs to apply, you can create delegated administration at any of these three container levels. The characteristics of each are as follows:
-
Forest A forest is a collection of domains that share a common configuration and a single schema. Delegating authority at this level will ensure that the forest administrators (usually the Domain Admins group in the root domain of the forest) have full and isolated control across all domains in the forest.
-
Domain A domain is a partition of the Active Directory forest, and the Domain Admins group in each domain will have full control over that domain. However, forestwide operations can still be performed by Enterprise Administrators, and Enterprise Admins can perform management functions within any individual domain within the forest.
-
OU As you know, OUs are containers within a domain, in which objects, computers, and users can be placed. You can delegate autonomous control over one or more OUs manually using ACLs, or using the Delegation of Control Wizard. You can delegate full control of an OU, or a specific subset of tasks like the ability to create user objects or reset user passwords.
The higher in the directory structure you choose to delegate administration, the more isolation that a delegated administrator can have over services and data. Remember, however, that that comes at the price of a more complicated management model, and usually involves a higher cost of deployment and maintenance.
As we just mentioned, at the forest level, the Domain Administrators group of the root domain will have the ability to manage any aspect of the forest, including member domains. At the domain level, the Domain Admins group for that domain will have the ability to independently manage that domain. Finally, within a domain, you can create an OU and you can add workstations, servers, users, and other Active Directory objects into the OU, and then delegate administration of this OU to a user or group within your organization. For example, let s say you have a Citrix team within your IT department that requires the ability to manage their own servers and workstations, the ability to create test users within their OU, and other common administrative tasks. To delegate administration to this group, follow these steps:
-
Open Active Directory users and Computers by going to Start Run MMC and add the ADUC snap-in .
-
Create your OU; for the purposes of this example we will create the OU by right-clicking at the domain level and clicking on New Organization Unit .
-
Type the name of the OU ”in our case, Citrix ”and click OK .
-
Right-click the Citrix OU and click Delegate Control .
-
The Delegation of Control Wizard Starts. Click Next .
-
Click Add and select the group that you want to manage the resources of this OU, click OK , and then click Next .
-
The next screen allows you to either delegate common tasks from a list as shown in Figure 8.13 or to create a custom task to delegate.
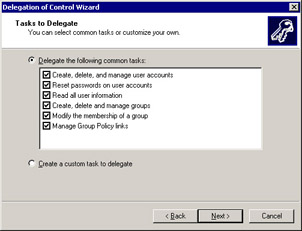
Figure 8.13: Delegation of Control Wizard -
Selecting the second option presents you with a more detailed list of tasks to configure. Make the appropriate selection and click Next .
-
Click Finish .
EAN: 2147483647
Pages: 122