| If you think the buttons you've been making are exciting, just wait. You're about to make some very sophisticated buttons, and you'll have a chance to apply both your new knowledge of basic buttons and a little of what you've learned about animation from previous hours. Animated Buttons Creating an animated button in Flash is easier than you might imagine. Do you want a button that is animating at all times? or one that just animates when the cursor passes over? How about both? You can do anything you want; as you'll see in the next task, you just put an animated movie clip in the appropriate states of the button. That's it. Try It Yourself: Create an Animated Button In this task you'll create a button that animates when the user rolls over it: 1. | In a new file, use the Text tool to type the word Home on the Stage (make it fairly large). Select the text with the Selection tool, convert it to a symbol (by selecting Modify, Convert to Symbol), name it Plain Text, be certain to select the Movie Clip behavior (chances are good it's still defaulting to Button from an earlier task), and then click OK. You will use this symbol extensively.
| 2. | The text onscreen is an instance of the Plain Text symbol, and now you can create a Movie Clip symbol that animates the Plain Text symbol on the Stage. With the Plain Text symbol selected, select Modify, Convert to Symbol, name the symbol Animating Text, select the Movie Clip behavior, and then click OK.
| 3. | Now you can edit the Animating Text symbol. Access the contents of this symbol by double-clicking. Make sure you're in the Animating Text symbol before you do anything else (look at the edit bar to make sure).
| 4. | Inside the master Animating Text symbol, insert a keyframe at Frame 30 and one at Frame 15. (Create Frame 30 before you change the instance at Frame 15 so it ends in the same location as where it starts.) Scale the Plain Text symbol instance in Frame 15 so that it's noticeably larger. Go back and set tweening in Frame 1 and Frame 15 to Motion (by right-clicking each keyframe, individually, and selecting Create Motion Tween). Scrub the Timeline to get a feel for the animation.
| 5. | Go back to the main scene (by clicking Scene 1 at the top left of the Timeline or pressing Ctrl+E). Delete everything on the Stage (by selecting Edit, Select All, and then selecting Edit, Clear or better yet, by pressing Ctrl+A and then pressing Delete). You're not deleting any symbols; they're both safe in the Library. Open the Library by selecting Window, Library or pressing Ctrl+L. Drag an instance of the Plain Text symbol onto the Stage.
| 6. | Now you're ready to create your button. Once again, with the Plain Text symbol selected, convert it to a symbol (by selecting Modify, Convert to Symbol), name it Animating Button, select the Button behavior, and then click OK. By converting the existing Plain Text symbol into the Animating Button symbol, you're using an instance of a symbol to create the button.
| 7. | Now you can edit your button and make it animate. Double-click the Animating Button symbol instance on the Stage; you're taken inside the button which you can confirm already has an instance of the Plain Text symbol in Frame 1.
| 8. | Next, you will place an instance of the Animating Text movie clip in the button's over state (Frame 2). You could drag it from the Library and align it to the Plain Text instance in the up state. However, you're going to do it another way that won't require any manual alignment. Insert a keyframe into the over state (by pressing F6). This copies everything from the Up frame (an instance of the Plain Text symbol).
| 9. | In the Over frame of the button, access the Properties panel and select the Plain Text instance on the Stage). Click the Swap button in the Properties panel, and the Swap Symbol dialog box appears (see Figure 14.6).
Figure 14.6. You can swap the symbol to which an instance is linked without changing any other properties (such as position) of the instance. 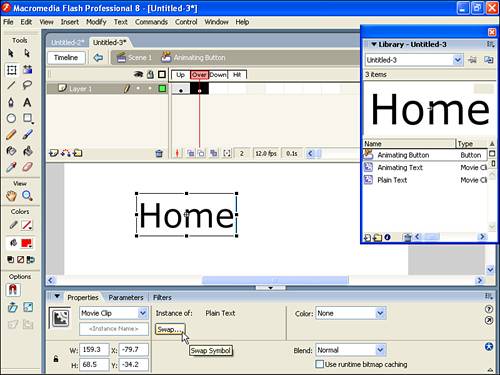
| 10. | The Swap Symbol dialog box shows all the symbols in your Library and a dot next to the one the current instance is linked to (see Figure 14.7). Click Animating Text and then click OK. You've now swapped the instance (previously Plain Text). You should see that the name of the current symbol listed in the Properties panel (next to Instance of:) has changed.
Figure 14.7. In the Swap Symbol dialog box you can select a different symbol. 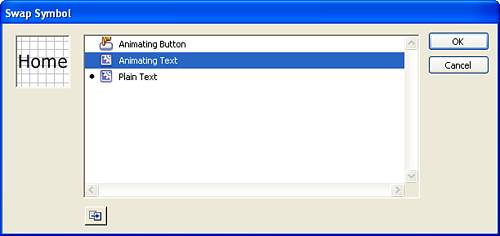
| 11. | The button is lacking a nice large hit state. It has a hit state, but it's kind of a moving target and difficult to access. In the master version of the button's Hit frame, insert a keyframe and draw an oval that is at least as big as the word Home. After you draw the oval, delete the instance of Animating Text that was automatically placed in the Hit frame when you inserted the keyframe; it's not necessary. (Note that you could have used Onion Skin tools to align the oval to the text in the previous frame.)
|
In the preceding task you created a button that uses a movie clip in its over state. However, instead of creating from the "top down" (that is, making the button and then putting a movie clip in the button), you did it from the "specific to the general" (or from "inside out"). First you created a symbol with text (Plain Text). Then you animated Plain Text in the movie clip you named Animating Text. Finally, you created the button and used the Plain Text symbol in the Up frame and the Animating Text symbol in the Over frame. Button Tracking Options A button's tracking option is a subtle attribute that gives you additional control over exactly how the button acts. In Figure 14.8 notice that in the Properties panel, while any button is selected, there's a choice between Track as Button (the default) and Track as Menu Item. Figure 14.8. The Properties panel lets you specify whether a button will track as a button or as a menu item. 
The easiest way to understand tracking is to have more than one button and make sure the buttons have over states that are visually different from their up states. (You could have several instances of the same button.) If you leave them all with the default setting Track as Button, when testing the movie, you can click and hold one of the buttons, and you won't be able to access any other button while you keep the mouse down. Many Flash buttons work this way. For example, if you click a button and keep the mouse pressed while you roll over other buttons, only the one that you clicked initially will be affected. This is the action caused by the default setting Track as Button. Now, if you set several buttons to Track as Menu Item and test again, you'll see that even if you've started to click one button, if you hold your mouse down and roll over other buttons, they will react (and register if you let go). This is similar to regular menus: When you click and hold and then move up and down, you're able to let go on any item in the menu. The difference between these options is very subtle, but you should realize that they're available. It comes up if you design several button from which a user is likely to click, hold, and move their mouse to the preferred button before letting go (in which case you should select Track as Menu Item). Usually the default Track as Button is fine. Sounds in Buttons The simplest way to associate a sound with a button is to place that sound in a keyframe within the button. For a sound to occur when the user's cursor goes over a button, just put a sound in the over state. Fancier effects can get more complicated. For example, making a sound loop while the user's cursor is over the button takes a few more steps. Ultimately, however, to create complicated sounds and effects, you need to learn about ActionScript, covered in Hour 15 and expanded on in Hour 16. For now, we'll cover two basic forms of sounds in buttons: simple sound effects in the over state and looping sounds within a button. Try It Yourself: Create a Button with a Rollover Sound Effect In this task you'll make a button that plays a sound when the user rolls over it: 1. | In a new file, draw a rectangle shape, convert it into a symbol (by selecting Modify, Convert to Symbol or pressing F8), name it Audio Button, select the Button behavior, and click OK.
| 2. | Double-click the instance so you can edit the master button.
| 3. | Inside the master version of the button, you can concern yourself with the over state (where you'll include a sound). Of course you need a new keyframe in the over state because sounds are only placed in keyframes. However, before you insert a keyframe (which, if inserted now, would copy the shape from the Up frame), you need to convert the shape in the Up frame to a movie clip by selecting it all, selecting Modify, Convert to Symbol, naming it Shape of Button, selecting the Movie Clip behavior, and clicking OK. (Be sure to choose Movie Clip because Button is the default after step 1.)
| 4. | Insert a keyframe in the Over frame. (You can tint Shape of Button or scale it if you want a visual effect when the user rolls over the button.) Then, with the Over frame selected, access the Properties panel. Notice that you don't see any sounds listed in the Sound drop-down list because you haven't imported any (see Hour 11).
| 5. | Either import a short sound from a file or use one included in the keyframing.fla file (downloaded from www.phillipkerman.com/teachyourself/sourcefiles). There are several ways to take an audio file out of one Flash file into another. Keep open the file you're working on for this task then open the keyframing.fla file. Open the Library (by selecting Window, Library or pressing Ctrl+L). Press the New Library Window button (at the top of the Library) then select the other file name (perhaps "Untitled-1" if you haven't saved yet). With both Libraries open drag the Breaker Switch sound item into your file's Library. Now select the Over frame and use the Properties panel to select Breaker Switch (because it's been imported into your file), as shown in Figure 14.9.
Figure 14.9. On the over state of the button, you specify a sound to play. 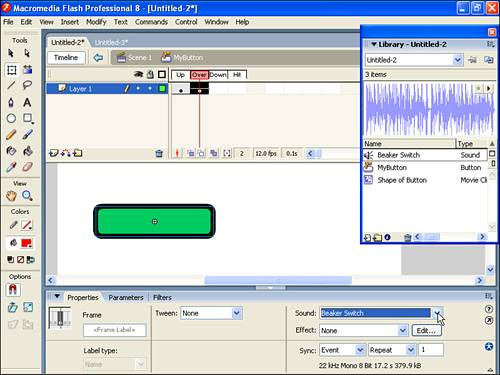
| 6. | Test the movie to see (and hear) if it works.
| 7. | Save this file because you'll use it in the next task.
|
That task wasn't so bad. Just put a sound in the keyframe of the over state of a button! In the preceding task you used the Breaker Switch sound in particular for two reasons. First, it saved you the hassle of finding a sound. Also, it is a short sound. Had you chosen a longer sound, such as Beam Scan, you might have noticed that there's enough time to roll over the button, roll off, and roll back on quickly, which causes a layering effect on the sound that is not exactly pleasant. You can fix that by changing the Properties panel's Sync setting to Start (as you did in Hour 10, "Including Sound in Animations"). You'll see how a long sound (or worse, one that loops forever) requires such additional consideration in the next task. Generally, I suggest that incidental sound effects such as rollover sounds be very short so that they don't become tiresome for users. A gratuitous sound effect that's cute the first time can become really annoying when it repeats. Try It Yourself: Create a Button with Looping Sound In this task you'll make a sound loop while the mouse is over a button: 1. | Edit the master button you created in the previous task. If you aren't already inside the master button, double-click the instance of the button.
| 2. | Select the keyframe in the over state. Change the Repeat drop-down list to Loop. (See Hour 10 for more information on this.)
| 3. | Test the movie. There are some problems. The sound Breaker Switch doesn't loop well. However, that's the least of the problems and one that could easily be rectified with an alternative sound. The serious problems that we'll address are (1) the sound will layer on top of itself every time you roll off and then roll back on the button and (2) when the sound starts, it never stops.
| 4. | You might recall from Hour 10 that three other Sync settings exist besides the default Event. In this case, you want the sound in the over state to start playing only if it isn't already playing. In the master Button symbol, set the Sync setting for the sound in the Over frame of the button to Start (that is, while the frame is selected, use the Properties panel to select Start from the Sync drop-down list). Test the movie again, and you see that you fixed the problem of the sound starting again after it has already started.
| 5. | The sound still continues forever once started. The opportune time to stop the sound is when the user rolls off the button the up state. There happens to be a behavior called Stop All Sounds, but what if you want other sounds to continue playing? You only need the particular sound that's looping to stop. In the up state's keyframe, add the same sound. But this time, select the Stop setting in the Sync drop-down list, to cause only that particular sound to stop. To do this, select the first keyframe (in the up state), and then in the Properties panel, select the same sound you're using in the over state (Breaker Switch) from the drop-down list of sounds available, and set the Sync drop-down list to Stop.
| 6. | Test the movie, and it should work.
|
Invisible Buttons Invisible buttons are very useful. They're easy to make, too, as you'll see in the next task. You'll create an invisible button, and Flash will let you (the author) see the invisible button as semi-transparent cyan; the user won't see anything. It might seem useless to make a button the user can't see, but it's actually quite useful. The only trick is that you'll probably want to place the invisible button on top of something visual. For example, what if you had a map on which you wanted the user to be able to click specific areas (maybe cities) and learn more about the one she clicked? All you would need is one big picture of the map and lots of invisible buttons placed in key locations. This would be more practical than cutting the map into little pieces and making buttons out of each piece. Try It Yourself: Make an Invisible Button In this task you will create and use an invisible button: 1. | Select Insert, New Symbol, name the symbol Invisible, select the Button behavior, and then click OK. This takes you to the master version of the symbol you're creating. Flash expects you to draw something here in the master version of the Invisible button symbol.
| 2. | Leave all the frames of the button blank, but in the Hit frame insert a keyframe. (Because the previous keyframe is blank, this is the same as inserting a blank keyframe.)
| 3. | Draw a circle around the center (the plus) in the Hit frame. (To center it, you can draw a circle and then cut and paste or use the Info panel to set the center to 0,0.) Your button's Timeline should resemble the one in Figure 14.10.
Figure 14.10. An invisible button looks like this nothing in any frame except the Hit frame. 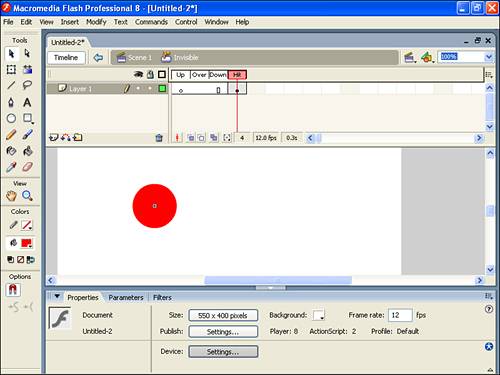
| 4. | Go back to your main scene and drag an instance of this Invisible button from the Library to the Stage. Check it out; it's cyan. Test the movie, and you see nothing (except that your cursor changes when it reaches the button's location).
| 5. | In the main scene, draw a large box and then a few circles in different locations on the box (as shown in Figure 14.11). Imagine that this box is a large map and each circle indicates a city. Then drag an invisible button from the Library for each circle you drew. Line up the buttons and scale them appropriately to cover each circle.
Figure 14.11. Invisible buttons can be placed on top of any drawing. 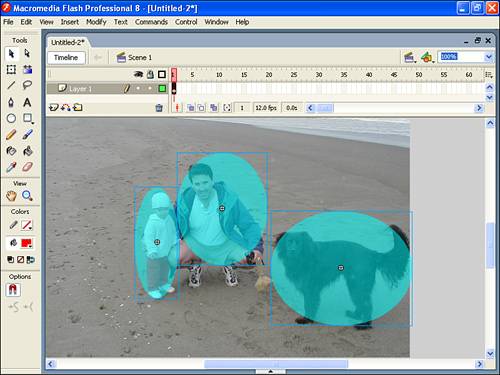
|
For something you can't even see, invisible buttons are actually quite powerful. It's safe to say I've never done a project without them. Their main advantage is they keep the visual elements separate from the button's functionality. You can place invisible buttons on top of anything to effectively create a button the user can see and click. In Hour 23, "Working on Large Projects and in Team Environments," you'll learn how such code data separation can make you more efficient. For now, just realize that invisible buttons (or any buttons, for that matter) don't do anything until you attach behaviors or ActionScript to them. |