Understanding the Brute-Force Animation Technique
| < Day Day Up > |
| If you've ever made a flip-book, you already know how to make a frame-by-frame animation. Each page in a flip-book contains a slightly different image so that when you fan through all the pages, the image is animated. That's basically what you're going to do in this hour. However, instead of drawing something different on each page of a book, you'll be drawing a different image in each keyframe of the Flash Timeline. Whether you draw each image on a page of the book or in a Flash keyframe, I call this the brute-force technique because it's manual and very involved. In this hour you will learn about features and techniques of Flash that make the animation process easier. However, frame-by-frame animation isn't a "feature" of Flash; it's a technique that you implement by using Flash's features. I mention this because I doubt you'll find "frame-by-frame" anywhere in the Flash manual or help files. Enough talk! In the following task you'll make a quick animation, and then we can discuss what you've built. Try It Yourself: Make a Frame-by-Frame Animation In this task you'll make an animation of a stick man taking a walk. Follow these steps:
Previewing an Animation Using Test MovieThere are three ways to watch an entire animation: scrubbing, playing, and testing. Scrubbing the red current-frame marker is a good way to preview as you work. The only problem with scrubbing is that the speed isn't consistent it is only as smooth as you scrub. To play an animation, you select Control, Play or use the Play option on the Controller toolbar or press Enter. However, as you'll see later (when creating buttons the user can click, special effects layers such as masks, and animating using movie clips), playing a movie doesn't always show you exactly what your viewers will see, so I strongly recommend that you avoid previewing by using Play. The best way to view an animation is by selecting Control, Test Movie. Test Movie exports a .swf file into the folder where your file is saved, names this file the same as your file but with a .swf extension, and then launches the Flash Player program so that you can view the results. You'll see how this works when you first save your source .fla file into a new, empty folder. After you use Test Movie, the folder will contain an additional .swf file.
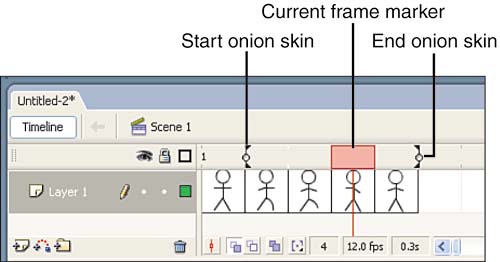
You might have noticed that when you're testing a movie, the menus change. That's because you're actually running Flash Player, which is a different program than Flash. Also, the movie loops by default, which is something you'll learn about later, when you publish a movie to the Web (in Hours 19, "Linking a Movie to the Web," and 24, "Publishing a Creation"). Editing One Keyframe at a TimeThe concept behind the frame-by-frame animation technique is simple. You just put a keyframe on each frame. An entirely different image appears on each frame sometimes drastically different, sometimes only slightly different. The beauty is that you can put anything you want in one keyframe because it doesn't matter what's in the other keyframes. Although frame-by-frame animation is a simple concept, it can be a lot of work. Imagine conventional animation, in which an artist must draw each frame even when only a slight change is necessary. It's detailed, meticulous work and, unfortunately, it's not really any easier in Flash, although Flash provides functions such as Undo that help. You need to realize that this technique is for situations that require it such as when you're working with something that has lots of details, such as an animation of someone walking (which, actually, is one of the hardest things to animate because we all know what it should look like). No other Flash animation technique gives you this level of control to change each frame. Changing the Frame View SettingJust because frame-by-frame animation is a lot of work doesn't mean you can't use a little help. One way to make the process a little easier is by changing the Frame View setting. In Figure 7.3 you can see the Frame View drop-down menu. If you select Preview, each keyframe in the Timeline is displayed as it appears on the Stage. Figure 7.4 shows the stick man animation with Frame View set to Preview. Preview lets you see all the frames of the animation without actually stepping through them. The Preview in Context setting draws the preview in the correct proportions (including blank whitespace), so the stick man would likely appear smaller. Figure 7.3. The Frame View drop-down menu is available to change the size and character of the Timeline. You can make each frame larger or include a visual preview of the contents of the Stage in each frame.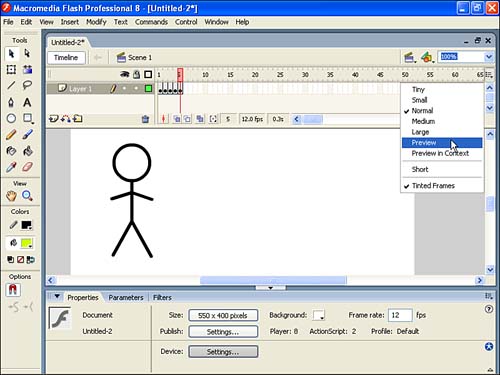 Figure 7.4. The stick man animation is shown with Frame View set to Preview so that an image of the onscreen contents appears in each frame of the Timeline.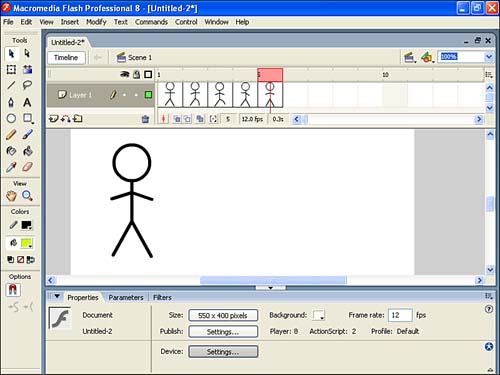 The Frame View settings don't actually change an animation. For example, if you set Frame View to Large, it just makes the Timeline take up more space within Flash; the user will never notice the difference. Also, you can change the Frame View setting any time and change it back without changing the file. Using the Onion Skin ToolsProbably the greatest helpers for frame-by-frame animations are Flash's Onion Skin tools. The onion skin technique was originally developed for conventional animation. When an artist draws each frame by hand, she needs a way to judge how much change in the image is necessary from one frame to the next. She draws a frame on tracing paper (which has the translucency of onion skin) that is placed on top of the previous frame. That way, she can see through to the previous frame and draw the next image accordingly. In Flash, the Onion Skin tools have the same effect, but of course you don't use real onion skin. Flash's Onion Skin feature allows you to edit one keyframe while viewing as many frames before or after the current frame as you want. To begin working with the Onion Skin tools, open the stick man animation file and click the leftmost Onion Skin button at the bottom of the Timeline (see Figure 7.5). Select Large by clicking the Frame View drop-down menu that is just to the right of the Timeline's frame numbers. With Onion Skin turned on, you can place the red current-frame marker on any frame you want and edit that frame, and then you see a dim view of the other frames in the animation. Which frames appear depends on where you position the Start Onion Skin and End Onion Skin markers. These markers can be difficult to grab when you try to move them; I often find myself accidentally grabbing the current-frame marker. It's easiest to grab the markers when Frame View is set to Large. Figure 7.5. When Onion Skin is turned on (via the leftmost button), you can see the contents of adjacent frames.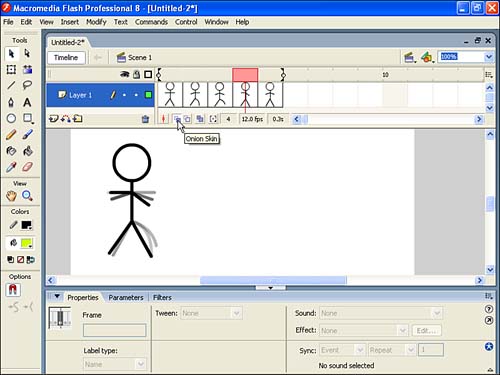 You would probably turn on Onion Skin while creating an animation (instead of after it's done). To practice, in the following task you'll try creating the stick man animation again this time with the help of Onion Skin. Try It Yourself: Use Onion Skin to Help Create an Animation In this task you'll use the Onion Skin feature to ensure natural motion in the way a stick man walks. Here are the steps:
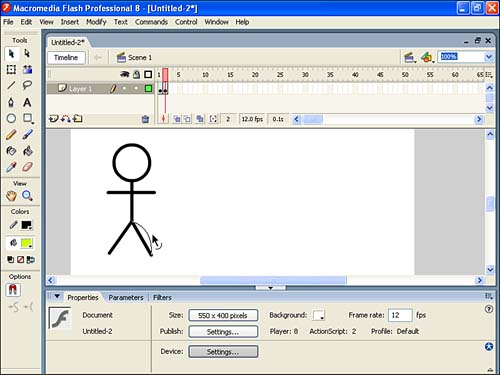
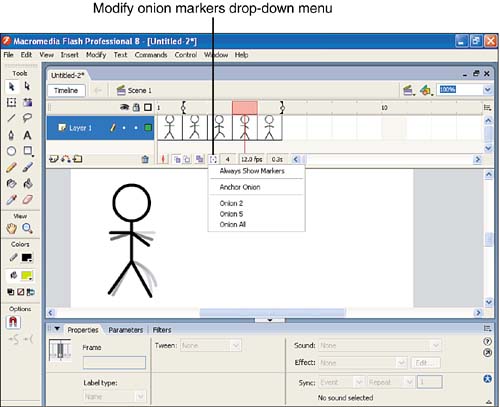
Before we finish with Onion Skin, let's look at two remaining features: Onion Skin Outlines and Edit Multiple Frames. You can choose either Onion Skin or Onion Skin Outlines, but not both. Onion Skin Outlines displays the other frames within the Onion markers as outlines instead of as dim images. Outlines can be helpful when the dim view makes images difficult to distinguish. Edit Multiple Frames is quite interesting because you don't commonly use it to produce an animation. In the previous task, you used onion skinning to see the contents of surrounding keyframes, but you were editing only one frame at a time the current frame. You could move the stick man's leg close to the faded image in the previous frame without affecting the previous frame. Edit Multiple Frames lets you edit the contents of all the frames within the Start Onion Skin and End Onion Skin markers. Generally, Edit Multiple Frames is useful for editing a finished animation. For example, if you have a finished animation for which you want to move the contents of every frame, Edit Multiple Frames is invaluable. In this situation, you just turn on Edit Multiple Frames, select Modify Onion Markers, Onion All, select everything on the Stage (or press Ctrl+A), and move everything anywhere you want. |

| < Day Day Up > |
EAN: 2147483647
Pages: 235