Section 8.2. Style Syntax
8.2. Style SyntaxThe syntax of a styleits "rule," as you may have gleaned from our previous examplesis very straightforward. 8.2.1. The BasicsA style rule is made up of at least two basic parts : a selector , which is the name of the HTML or XHTML markup element (tag name ) that the style rule affects, followed by a curly brace ( {} )- enclosed , semicolon-separated list of one or more style property:value pairs: selector {property1:value1; property2:value1; ...} For instance, we might define the color property for the contents of all the level-1 header elements of our document to be the value green : h1 {color: green} In this example, H1 is the selector, which is also the name of the level-1 header element, color is the style property, and green is the value. Most properties require at least one value, but may have two or more values. Comma-separated values typically indicate a series of options as accepted by the property, of which the first valid value applies to the property, whereas space-separated values each apply separately to the property. The last valid value may override a previous value: selector {property3:value1 value2 value3} selector {property4:value1, value2, value3} For instance, the following display background will be black, not white or gray, even though you specify both white and black values in the rule: body {background: white black} Current styles-conscious browsers ignore letter case in any element of a style rule. Hence, h1 and h1 are the same selector, and COLOR, color, ColOR , and cOLor are equivalent properties. At one time, convention dictated that HTML authors write selector names in uppercase characters , such as h1, P , and STRONG . This convention is still common and is used in the W3C's own CSS2 document. However, current standards dictate , particularly for XML-compliant documents, that element names be identical to their respective Document Type Definitions (DTDs). With XHTML, for instance, all element names are lowercase (e.g., h1, p , and strong ), so their respective CSS2 selectors must be in lowercase. We abide by the latter convention. Any valid element name (a tag name minus its enclosing < and > characters and attributes) can be a selector. You may include more than one tag name in the list of selectors, as we explain in the following sections. 8.2.2. Multiple SelectorsWhen separated by commas, all the elements named in the selector list are affected by the property values in the style rule. This makes life easy for authors. For instance: h1, h2, h3, h4, h5, h6 {text-align: center} does exactly the same thing as: h1 {text-align: center} h2 {text-align: center} h3 {text-align: center} h4 {text-align: center} h5 {text-align: center} h6 {text-align: center} Both styles tell the browser to center the contents of header levels 1 through 6. For most authors, the first version is easier to type, understand, and modify. And it takes less time and fewer resources to transmit across a network, though the effect is trivial. Define styles in the manner that is most comfortable for you. You don't have to use multiple selectors. 8.2.3. Contextual SelectorsNormally, the styles-conscious browser applies document-level or imported styles to a tag's contents wherever they appear in your document, without regard to context. However, the CSS2 standard defines a way to have a style applied only when a tag occurs within a certain context within a document, such as when it is nested within other tags. To create a contextual selector, list the tags in the order in which they should be nested in your document, outermost tag first. Then, when the browser encounters that nesting order, the style properties are applied to the last tag in the list. For example, here's how you might use contextual styles to create a classic outline, complete with uppercase Roman numerals for the outer level, capital letters for the next level, Arabic numerals for the next , and lowercase letters for the innermost level: ol li {list-style: upper-roman} ol ol li {list-style: upper-alpha} ol ol ol li {list-style: decimal} ol ol ol ol li {list-style: lower-alpha} According to the example stylesheet, when the styles-conscious browser encounters the <li> tag nested within one <ol> tag, it uses the upper-roman value for the list-style property of the <li> tag. When it sees an <li> tag nested within two <ol> tags, the browser uses the upper-alpha list style. Nest an <li> tag within three and four <ol> tags, and you'll see the decimal and lower-alpha list styles, respectively. Compare Figure 8-1, displayed from the preceding example, with using the <ol> tag's type attribute to achieve similar effects, as shown in Figure 7-7 in Chapter 7. Figure 8-1. Nested ordered list styles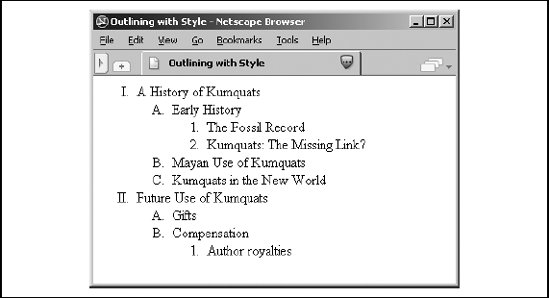 Similarly, you may impose a specific style on tags related only by context. For instance, this contextual style definition colors the emphasis ( <em> ) tag's contents red only when it appears inside a level-1 header tag ( <h1> ), not elsewhere in the document: h1 em {color: red} If there is potential ambiguity between two contextual styles, the more specific context prevails. Like individual tags, you may have several contextual selectors mixed with individual selectors, separated by commas, sharing the same list of style declarations. For example: h1 em, p strong, address {color: red} means you'll see red whenever the <em> tag appears within an <h1> tag, when the <strong> tag appears within a <p> tag, and for the contents of the <address> tag. The nesting need not be exact to match the rule. For example, if you nest the <strong> tag within a <ul> tag within a <p> tag, you'll still match the rule for p strong that we defined earlier. If a particular nesting matches several style rules, the most specific rule is used. For example, if you defined two contextual selectors: p strong {color: red} p ul strong {color: blue} and you use the sequence <p><ul><strong> in your document, the second, more specific rule applies, coloring the contents of the <strong> tag blue. 8.2.4. Universal, Child, and Adjacent SelectorsThe CSS2 standard defines additional patterns for selectors besides commas and spaces, as illustrated in the following examples: * {color: purple; font: ZapfDingBats} ol > li {font-size: 200%; font-style: italic} h1 + h2 {margin-top: +4mm} In the first example, the universal asterisk selector applies the style to all elements of your document so that any text gets displayed in Zapf Dingbat characters. [*] The second example selects a particular child/parent relationship; in this case, items in an ordered list. The third example illustrates the adjacent selector type, which selects for one tag immediately following another in your document. In this case, the special selector adds vertical space to instances in which your document has a level-2 header immediately following a level-1 header.
8.2.5. Attribute SelectorsIt is possible to attach a style to only those HTML/XHTML elements that have specific attributes. You do this by listing the desired attributes in square brackets ( [] ) next to the element name, before the style definition: div[align] { font-style: italic } div[align=left] {font-style: italic } div[title~="bibliography"] { font-size: smaller } div[lang="en"] {color: green } The first example is the simplest: it italicizes the subsequent text contents of only those <div> tags that contain the align attribute, regardless of the value assigned to the attribute. The second example is a bit pickier; it matches only <div> tags whose align attributes are set to left . The third example matches any <div> tag whose title attribute contains the word bibliography , specifically delimited by one or more spaces. Partial word matches do not count; if you used div[title~="a"] , you would match only <div> tags whose title attributes contained a single "a" delimited by spaces (or at the beginning or end of the title). The final example matches any <div> tag whose lang attribute is set to a hyphen-separated list of words, beginning with "en." This example matches attributes such as lang=en, lang=en-us , and lang=en-uk . You may combine the universal selector with attribute selectors to match any element with a specific attribute. For example: *[class=comment] { display: none } would hide all the elements in your document whose class attributes are set to comment . Netscape, Firefox, Opera, and other modern browsers support attribute selectors; for unknown reasons, Internet Explorer does not. 8.2.6. PseudoelementsSome elemental relationships in your documents you cannot explicitly tag. The drop-cap is a common print style, but how do you select the first letter in a paragraph? There are ways, but you have to identify each instance separately. There is no tag for the first line in a paragraph. And sometimes you might want the browser to automatically generate content, such as to add the prefix "Item #" and automatically number each item in an ordered list. CSS2 introduces four new pseudoelements that let you define special relationships and styles for their display ( :first-line, :first-letter, :before , and :after ). Declare each as a colon -separated suffix of a standard markup element. For example: p:first-line {font-size: 200%; font-style: italic} means that the browser should display the first line of each paragraph italicized and twice as large as the rest of the text. Similarly: p:first-letter {font-size: 200%; float: left} tells the browser to make the first letter of a paragraph twice as large as the remaining text and to float the letter to the left, allowing the first two lines of the paragraph to float around the larger initial letter (see Figure 8-2). [*]
Figure 8-2. Use the first-letter pseudoelement to select the first letter of text within a tag's content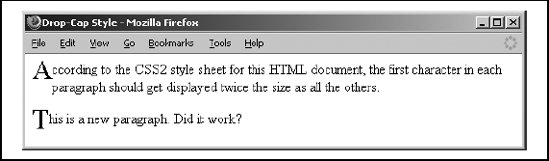 The :before and :after pseudoelements let you identify where in your document you insert generated content such as list numbers and special lead-in headers. Hence, these pseudoelements go hand in hand with the CSS2 content and counter properties. To whet your appetite, consider this example: ul {counter-reset: item; list-style: none} ul li:before {content: "Item #" counters(item, ".") " "; counter-increment: item} ... <ul> <li> This is item number 1.</li> <ul> <li> This is sub-item number 1.1.</li> </ul> <li> This is item number 2.</li> <ul> <li> This is sub-item 2.1.</li> <li> This is sub-item 2.2.</li> ... and so on All the popular browsers support the pseudoelements, generating effects such as that shown in Figure 8-2. However, Internet Explorer does not support the content property and Netscape doesn't support counters. So only the newcomers, Firefox and Opera, properly display the progressively numbered unordered list items, defined by the foregoing example and shown in Figure 8-3. Figure 8-3. Style counters combine with pseudoelements to create outline-line numbering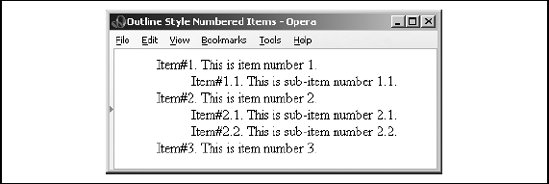 |
EAN: 2147483647
Pages: 189