| Q1: | Why do we use layer masks instead of just using the Eraser tool? |
| A1: | Because layer masks are "non-destructive." You're just covering things up from view, or making them visible, you're not really erasing (or permanently changing) your original image. If you make a mistake, you can just switch your Foreground color and paint over your mistake to make it go away. |
| Q2: | Are the masks attached to adjustment layers different than the ones used with layer masks? |
| A2: | They pretty much work the same way, so you can apply the same principles (that's why I put them both in the same chapter). |
| Q3: | Is it possible to apply filters to my layer mask, for example, to soften the edges of my masked area? |
| A3: | It sure is. Just go to the Filter menu and have at it. When you apply a filter to a layer that has a layer mask, it applies the filter directly to the layer mask by default. 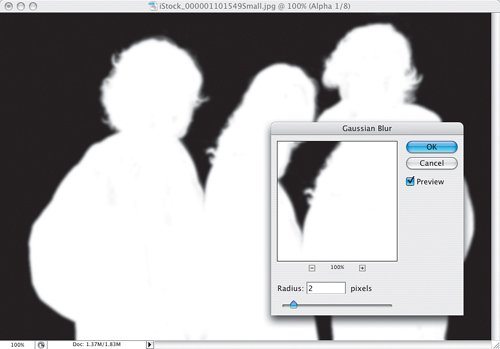 |
| Q4: | What's the advantage of clicking on the Save Selection as a Channel icon as opposed to choosing Save Selection from the Select menu? |
| A4: | Just one thingspeed. If you click the Save Selection as a Channel icon, it doesn't bring up another dialog asking you to name the channelit just instantly saves it. Plus, if the Channels palette is already in view, it's just quicker to click the icon. |
| Q5: | Besides it being temporary, why else would I want to use Quick Mask? |
| A5: | Another advantage of Quick Mask is that you can use it to apply filters to the edges of your selections. Just draw a selection, switch to Quick Mask mode, then apply any filter (try one of the Brush Stroke filters), then switch back to Standard mode and look at the edges of your selection (shown below). Now, Inverse your selection and hit Delete (PC: Backspace). Pretty sweet, eh? 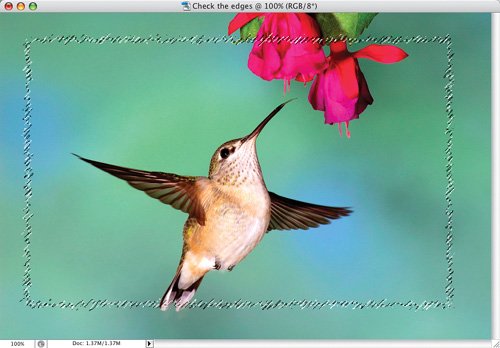 ©ISTOCKPHOTO/TIMOTHY WOOD |
| Q6: | What are the Channel Mixer dialog Load and Save buttons for? |
| A6: | Nobody knows. Adobe doesn't even know. Next question! (Kidding.) Actually, these are buttons that let you save your favorite Channel Mixer settings, and reload them at any time. That way, you can save your favorite black-and-white conversion settings, and load them up again with just two clicks, instead of having to dial in the individual numbers every time. |
| Q7: | Is there a quick way to reverse how Quick Mask displays what's masked and what's visible? |
| A7: | Just Option-click (PC: Alt-click) directly on the Quick Mask icon at the bottom of the Toolbox to toggle your views back and forth.  |
| |
| Q8: | I'm using a video editing application that doesn't support the importing of layered Photoshop documents. How can I get my logo in there, without a white background? |
| A8: | You need to put a selection around just the logo, then save your selection (as shown below), which saves as an Alpha channel. Now, you can save the file as a Photoshop PSD, Targa (TGA), PICT, or TIFF file, and the Alpha channel will be saved along with it. 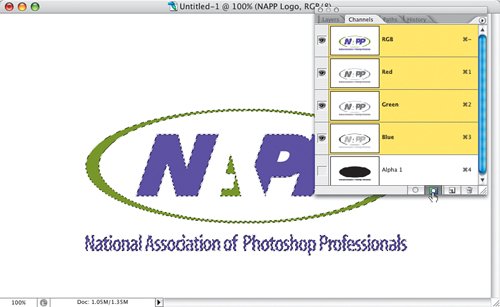 |
| Q9: | What if my video application doesn't support Alpha channels? |
| A9: | Then use the Split Channels command on the Channels palette's flyout menu to output your Alpha channel as a separate document. |
| Q10: | Do I have to do something special to Alpha channels that are imported into AVID? |
| A10: | Most NLEs treat Alpha channels (when keyed) the same way Photoshop does: white areas are revealed (the Photoshop graphic is visible), and black areas are concealed (the background video passes through). But AVID systems treat Alpha channels the opposite, so you need to Invert the channel either in Photoshop, or during Import in your AVID system. |
| Q11: | I need to create a flattened version of my document with an Alpha channel that has all my layer styles still intact, but I don't want to lose all my layers in case I need to edit a layer. Can this be done? |
| A11: | In CS2, do this: First, hide your Background layer so everything is sitting on a transparent background. Then press Command-Option-Shift-E (PC: Control-Alt-Shift-E), which creates a new layer that is a merged version of your layered document (with a transparent background). Now, Command-click (PC: Control-click) on that layer's thumbnail to put a selection around it, then choose Save Selection (from the Edit menu) to save that as an Alpha channel. That's ityou're doneyou can delete that layer, then choose Save As and save the file as a flattened TGA file, and your original layered file is still intact. |
| Q12: | Is there any way to automate this process? |
| A12: | I'm glad you asked (okay, I'm glad I asked). In Photoshop CS2, Adobe included a set of video actions that will create an Alpha channel for you from your visible layer. There is a separate set of actions for AVID users (the one with "Inverted" after its name, as shown here), and one for the other NLEs. You can find these by opening the Actions palette, and then from the palette's flyout menu (at the very bottom of the list) choose Video Actions. 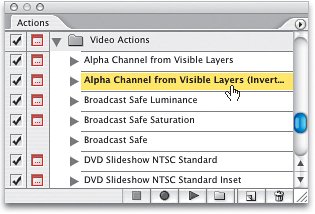 |
| Q13: | Where can I get more information on using channels in video? |
| A13: | My buddy Rich Harrington, from RhedPixel.com (he's one of the lead instructors on the video track at the Photoshop World Conference & Expo), has a free 30-minute online training video that covers Alpha channels and more, and if you're into video, you'll definitely want to check it out at www.photoshopforvideo.com. Click on the Videos link, and you'll see a link to the free downloadable video clip. |