Watermarking and Adding Copyright Info
|
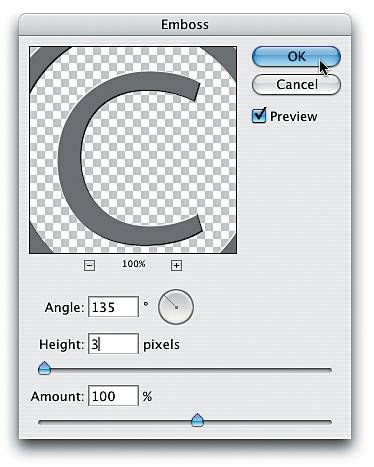
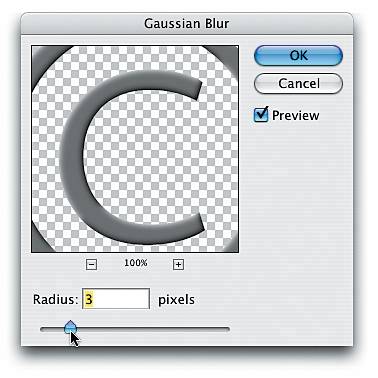
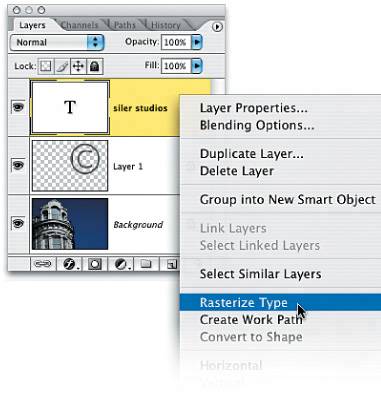
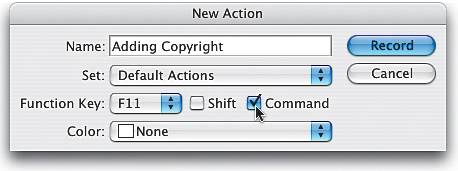
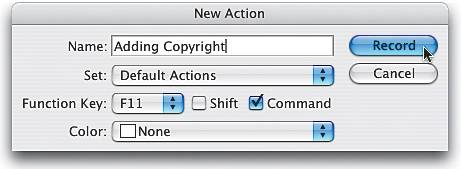
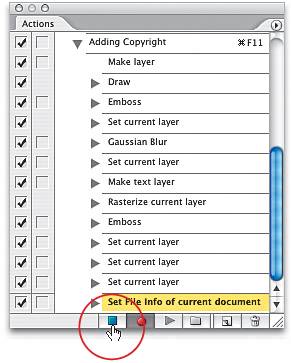
This two-part technique is particularly important if you're putting your proofs on the Web for client approval. In the first part of this technique, you'll add a see-through watermark, so you can post larger proofs without fear of the client downloading and printing them; and secondly, you'll embed your personal copyright info, so if your photos are used anywhere on the Web, your copyright info will go right along with the file. Step OneFirst, we'll tackle the see-through water-mark: Open the image for watermarking. Choose the Custom Shape tool from the Toolbox (or just press Shift-U until you have the tool). 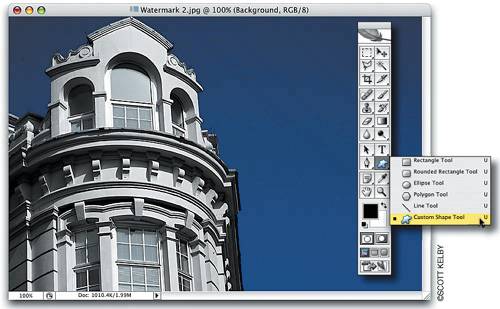 Step TwoOnce you have the Custom Shape tool, go up to the Options Bar and click on the thumbnail to the right of the word "Shape" to bring up the Custom Shape Picker. Choose the Copyright symbol, which is included in the default set of the Custom Shape library. 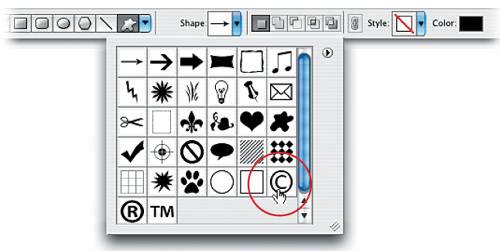 Step ThreeCreate a new blank layer by clicking on the Create a New Layer icon at the bottom of the Layers palette. Press the letter D to set your Foreground color to black. Now, press-and-hold the Shift key and click-and-drag the Copyright symbol over your photo (use your own judgment as to size and placement, but the Shift key will ensure the symbol remains in proportion). Note: If you end up with a Shape layer or a path, look in the Options Bar to make sure that you have Fill Pixels selected (it's the third icon from the left in the first group of icons) before you draw the Copyright symbol. 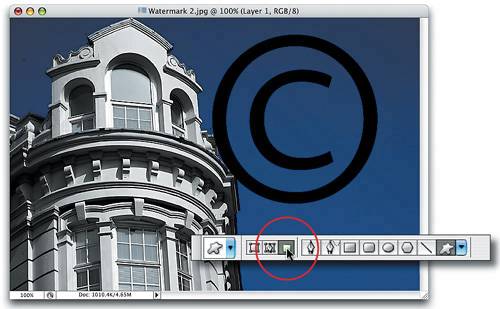 Step FourGo under the Filter menu, under Stylize, and choose Emboss. Apply the Emboss filter set at Angle 135°, Height 3 pixels, and Amount 100% (you can increase the Height setting to 5 pixels if you want the effect to be more pronounced), and then click OK. Step FiveTo smooth the edges of the Copyright symbol, go to the Layers palette, turn on Lock Transparent Pixels (it's the first icon from the left in the Lock section at the top of the palette), and then go under Filter, under Blur, and add a 2- or 3-pixel Gaussian Blur. Step SixGo to the Layers palette and change the layer blend mode of this Copyright symbol layer from Normal to Hard Light, which makes the watermark transparent. 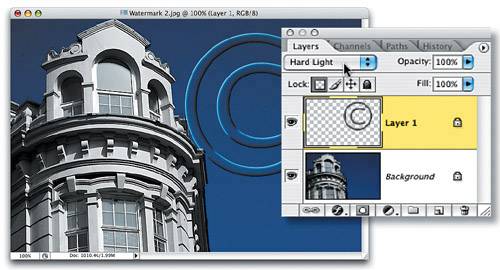 Step SevenPress T to switch to the Type tool, click on your document where you want your studio name to appear, and then enter the name of your studio. (Note: Highlight your type with the Type tool and choose the Character palette from the Window menu to set your type if needed.) Once your type is set, press Enter. 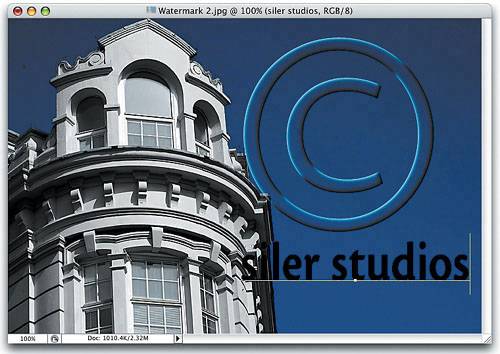 Step EightYou're going to apply the same filter to your type that you applied to the Copyright logo. But to apply a filter to type, you first have to convert your Type layer into a regular Photoshop image layer by Control-clicking (PC: Right-clicking) on the Type layer (in the Layers palette) and choosing Rasterize Type from the resulting contextual menu. Step NineApply the Emboss filter to your rasterized text layer (using the same settings you used in Step 4). Then, change the layer blend mode from Normal to Hard Light to make the text transparent, and lower the Opacity of both of these layers to around 40% so the watermark isn't overwhelming. That completes the first part of this two-part technique. The next part is embedding the copyright info into the file. 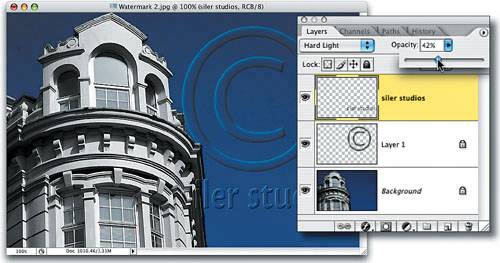 Step TenTo embed the copyright, go under the File menu and choose File Info to bring up the File Info dialog. This is where you enter information that you want embedded into the file itself. This embedding of info is supported by all Macintosh file formats (except GIF), but on Windows only the major file formats are supported, such as TIFF, JPEG, EPS, PDF, and Photoshop's native PSD. 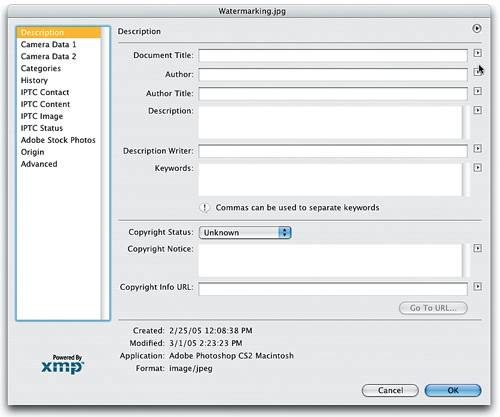 Step ElevenIn the File Info dialog, change the Copyright Status pop-up menu to Copyrighted. In the Copyright Notice field, enter your personal copyright info, and then under Copyright Info URL, enter your full Web address. That way, when clients open your file in Photoshop, they can go to File Info, click on the Go To URL button, and then their Web browser will launch, taking them directly to your website. Click OK and the info is embedded into the file. 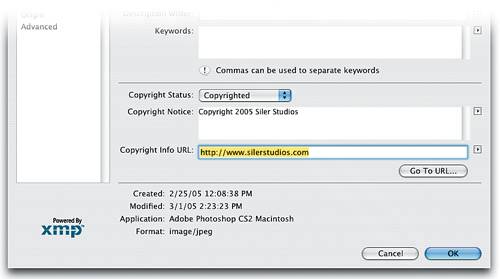 Step TwelveOnce copyright info has been added to a file, Photoshop automatically puts a copyright symbol before the file's name, which appears in the photo's title bar. It also adds the symbol in the Info Bar at the bottom left of the document window. Now, flatten the image by choosing Flatten Image from the Layers palette's flyout menu. 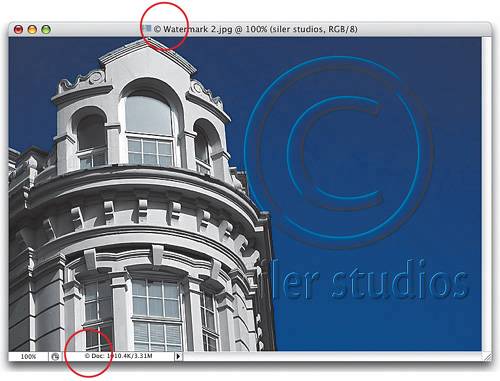 Step ThirteenYou can automate the entire process with the press of a button or two. Start by opening a new photo, then go to the Actions palette (found under the Window menu) and click on the Create New Action icon at the bottom of the palette. When the New Action dialog appears, name the action and choose the Function key (F-key) that you want to use to apply the action. (Note: I added the Command key to my F-key shortcut, but you can really choose any F-key with or without a modifying key.) Step FourteenClick on the Record button, and then repeat the whole process of adding the Copyright symbol and File Info, starting at Step 1 and ending at Step 11 (we stop at Step 11 because you may want to reposition your watermark on your other images; otherwise, go ahead and include Step 12 to flatten your image). As you do, Photoshop will record all your steps. (I know, you're thinking, "Shouldn't you have told me this in Step 1?" Probably, but it wouldn't be as much fun as telling you now.) Step FifteenWhen you're done, click on the Stop icon (it looks like a tiny square) at the bottom of the Actions palette. You can close the Actions palette now, because you can apply the watermark, studio name, and copyright info just by pressing the F-key shortcut you chose in the New Action dialog. Step SixteenIf you want to apply this action to a whole folder full of photos, just go under the File menu, under Automate, and choose Batch to bring up the Batch dialog (or from the Adobe Bridge, go under Tools, under Photoshop, and choose Batch). This command lets you pick one action and automatically apply it to multiple photos. In the Play section (at the top), for Action, choose your action's name. Under Source, choose Folder from the pop-up menu and click on the Choose button, navigate to your folder full of photos, then under Destination choose Save and Close. This will apply the watermark, studio name, and copyright info to your images, and then save and close the documents. If you want to save them to a different folder, or rename them, choose Folder under the Destination section. 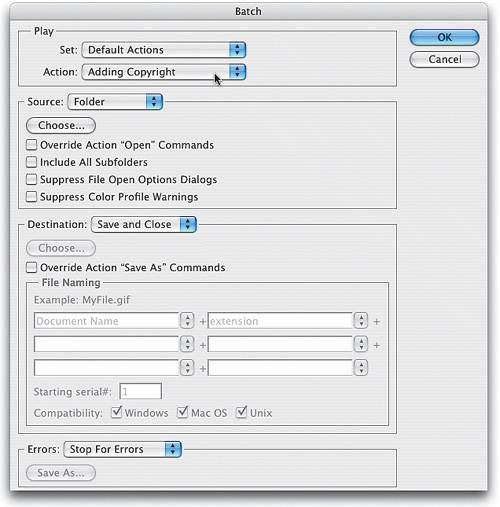 |

|
EAN: N/A
Pages: 187