Working with Lightroom s Modules
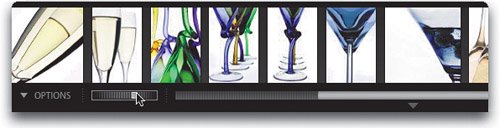
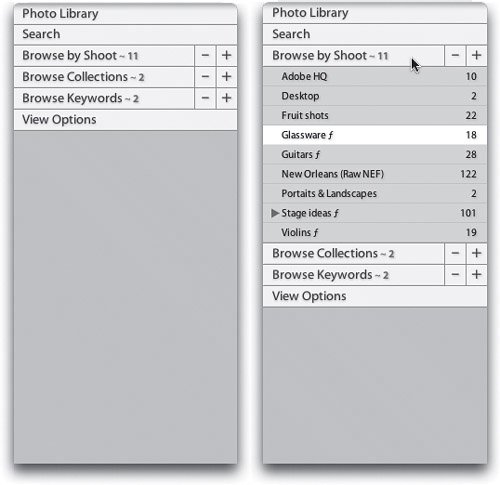
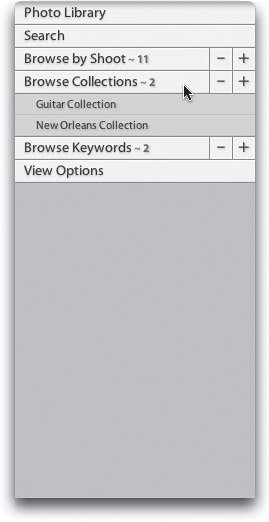
Working with Lightroom's ModulesLightroom has four separate areas (Adobe calls them modules because an in-house committee decided that would be the stuffiest, most engineering-like name possible). You're going to be moving between these four modules quite frequently so we might as well learn the best ways to get where we want to go, and know why we want to go to each area in the first place. Step OneThe name of each module is listed in the top-right corner of the Lightroom window, but those aren't just names they're links, so click right on them to move from module to module (go ahead and click on them now, just so you'll see what I mean). Now, clicking on them is the slow way, so instead try using the keyboard shortcuts: Command-1 takes you to the Library module (which is where you do two things: [1] sort and organize your images, and [2] do basic color corrections and adjustments). Press Command-2 to switch to the Develop module, and press Command-3 to switch to the Slideshow module. If I have to tell you what Command-4 does, I'm not sure you're ready for software of any kind. To jump back to the last module you were at, press Command-/ (forward slash). If you switch modules by accident, just press Command-Z to put you right back where you were. So, from here on out, let's use the keyboard shortcuts to jump from module to module, simply because it's quicker (and time is money, and all that jazz, right?). ©ISTOCKPHOTO/TRACY HEBDEN 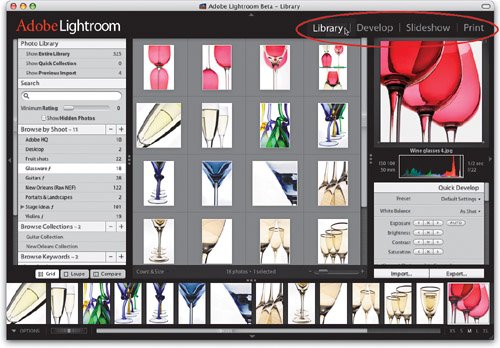 Step TwoNow, click on any photo thumbnail in the Library and then press Command-2 to switch to the Develop module. You can see that everything looks different in this module, except for one thingthe filmstrip running along the bottom of the window. That filmstrip stays there no matter which module you're currently using. Press Command-3 and then Command-4, and you'll see the filmstrip is still there. This is one of my favorite features of Lightroom, because you always have access to all the photos in the current shoot you're working with. So, if you want to fix the color of a different image, or use a different image in your slide show, or print a different image, the other photos are right there, one click awaywithout having to go back to the Library module. 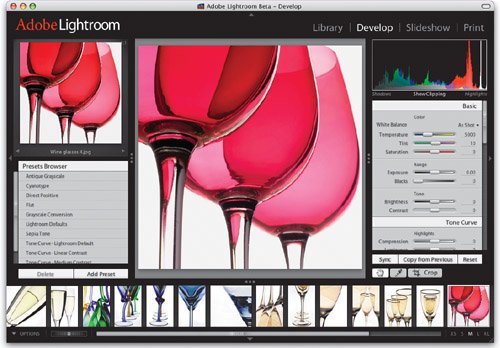 Step ThreeWhile we're on the filmstrip, you can change the size of the thumbnails by clicking on the letters in the bottom-right corner of Lightroom's window. Clicking on XS gives you extra small thumbnails (as shown here) and clicking on XL gives you huge thumbnails (you can imagine what S, M, and L do).  Step FourIf you've got more photos than can be displayed at one time in the filmstrip, there are two ways to move through them: (1) click-and-drag the shuttle control (shown here) in the direction you want to go, or (2) click-and-drag the gray scroll bar at the bottom center of the window. In the Library and Develop modules, you can move individually from photo to photo in the filmstrip by using the Right and Left Arrow keys on your keyboard. Step FiveNow we're going to look at how Lightroom organizes its controls. Photoshop (and most other Adobe programs) uses floating palettes, but Lightroom uses these handy expandable panels instead of palettes, and I have to sayI love 'em. I always know where they are, they're not floating in front of my photos, and they tuck out of the way when I don't need them. They couldn't be simpler to useyou just click on the panel header, and its contents expand into view. Here on the left, you see the Library's panels all neatly tucked away. Click once on the Browse by Shoot panel header and the contents expand (as shown on the right). Step SixSo, now you know how to expand one panelwant to know how to expand them all? Just press-and-hold the Command key, then click on any panel header, and they all expand (pop downwhatever). If this causes your panels to extend down so far that you can't see them all, a gray scroll bar appears on the left side of the panel area (as shown hereit extends along the left side down to the word "Violins." To scroll down farther, you'd click-and-drag the bar downward). To tuck them all back up, do the same thingpress-and-hold the Command key and click on any panel header. Step SevenTo view just one panel and have all the rest close automatically (which is great for clearing all the clutter), press-and-hold the Option key and then click on the panel header (as shown here). Step EightThe little - (minus) and + (plus) signs on the right side of some of the panels are there to let you create or delete new things within that panel. For example, if you want to remove a particular shoot, you'd click on that shoot (you can see the Glassware shoot is selected here) and then click on the minus sign (as shown) to delete it. Of course, it brings up a warning dialog asking if that's what you really want to do (as shown here) just in case you clicked the minus sign accidentally. If you click the plus sign, it just brings up a dialog for you to name your shoot (more on managing your shoots in the next chapterfor now we're just learning how to get around). 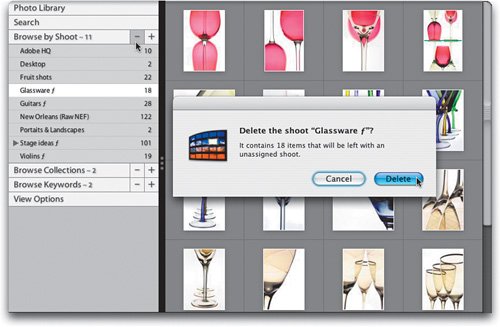 Step NineIf you want a larger preview of your image, you can make a few moves that will enable your preview to jump to a larger size. For example, here I have switched over to the Develop module for a single-image preview in the center of the module. To hide just the filmstrip, click on the downward-facing arrow at the bottom center of the Lightroom window, and the filmstrip tucks out of the way (as shown here). It'll stay like that until you click the arrow (which is now upward-facing) again. 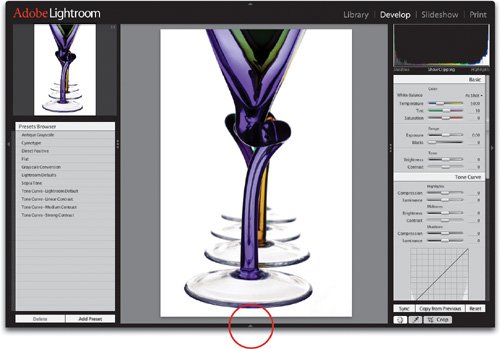 Step TenYou can also resize the panels on the left and right sides of the window. For example, to make the panels on the right larger or smaller, click-and-drag within that black divider line between the photo preview and the panels (as shown here). Just click-and-drag in the direction you want to go (in the example shown here, I clicked-and-dragged to the left, in toward the photo, which made the panels wider). 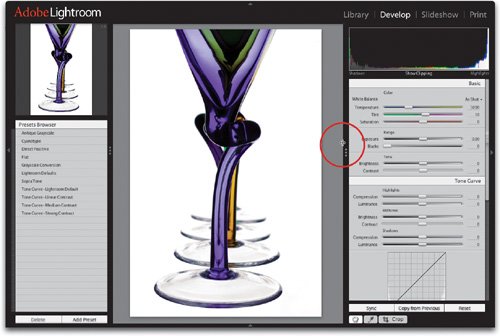 Step ElevenNow try the left panel. Click-and-drag the divider between the left panel and the photo preview to the right a bit, to make that panel larger, and as you do you'll see that the preview adjusts its position, and gets larger or smaller to compensate for your new layout. If you're working with images that have a landscape orientation, making the panels as thin as possible will have a big difference in the size of your preview. 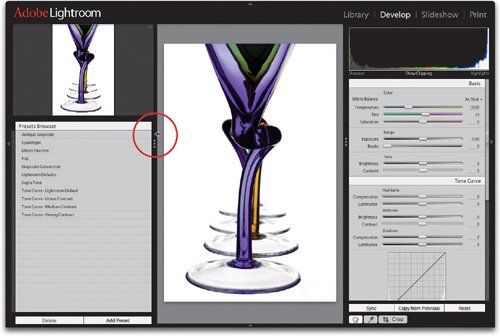 Step TwelveIf you want to work with one of the side panels hidden, just click on the arrow on the far edge of each panel, and they'll stay tucked away until you click on them again (in the example shown here, I hid the adjustment panels on the right). 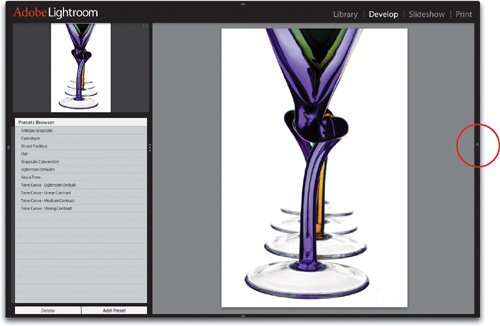 Step ThirteenBy default, Lightroom is like many other Macintosh applicationsit floats in its own separate window (as shown here). However, there are two different modes that let Lightroom take over as much of your screen real estate as possible. It's great for an application to do this because it makes your photos the real star of the show.  Step FourteenTo see the first mode, press the F key on your keyboard and the window expands to fill the entire screen. This is different than clicking the green zoom button in the title bar on the top-left corner of the floating window (you can see that green Mac OS X window zoom button in the screen capture in Step Thirteen), because although that expands your window as far as possible, it's still a window. You can still see the Mac OS X window title bar across the top of your screen and you can click-and-drag the window as you normally would. Instead, when you press the F key, it tucks that title bar away. It's no longer a floating window and gives you the maximum amount of working space. Well, almost.  Step FifteenIf you press the F key once again, you have even more focus on your working area. Now even the menu bar at the top of the screen is goneit's a wall-to-wall application.  Step SixteenNow I know what you're thinking, "But what if I need something that's in Lightroom's menu bar?" (See, I knew you were thinking that.) Just move your cursor up to the top of your screen and the menu bar will temporarily pop down (as shown here). What's nice is, it doesn't shrink or move the work area downit literally pops down over the work area (you can see it's cutting off the top of the letters in the words "Adobe Lightroom" in the top-left corner of the screen). If you like this full-screen uncluttered look, then you're really going to love what's coming next.  |

EAN: N/A
Pages: 71