Flylib.com

Books Software


CREATING TEMPORARY BRUSHES


CREATING TEMPORARY BRUSHES

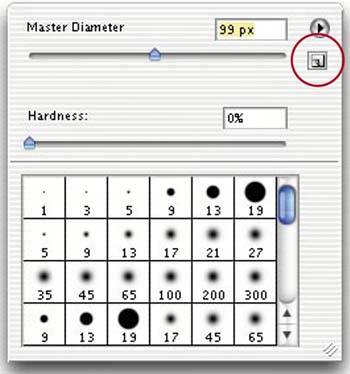
It's easy to create a temporary brush based on your preset brushes in Photoshop CS. Just click on the Brush Sample in the Options Bar to bring up the Brushes Picker. With the Master Diameter slider you can change your brush size from 1 to 2500 pixels. If you like the size of your new brush and you want to save it, just click the New Brush icon at the top right of the dialog. The Brush Name dialog will appear so you can name your new brush. When you click OK, the new brush will immediately be added to your Brushes palette.


REUSING YOUR LAST CURVE SETTING

Once you've applied a curve setting to an image, it's very possible that you'd like to use that exact same setting again, or maybe you'd just like to tweak that setting a bit. Well, you can. To bring up the Curves dialog with the last curve you used still in place, press Option-Command-M (PC: Alt-Control-M).


BRINGING BACK THOSE CROPPED-AWAY AREAS

When you're using the Crop tool to crop images, you'll find that you actually have some options on how the area you're cropping away is handled after the crop. For example, in the Options Bar (as long as you're not on the Background layer) you'll see an option that lets you either Delete the cropped areas or simply Hide them from view (in other words, the areas are still there, they just expand out into the Canvas area). If you choose the Hide option, it crops the image window down to the size of the crop, but since the cropped-away areas are still really there, you can use the Move tool to drag these cropped areas back into view.


FIX THOSE STRAY PIXELS FAST!

Sometimes when making a selection with the Magic Wand tool or Color Range (under the Select menu), Photoshop will leave little stray pixels unselected . You can tell where they are because they appear to twinkle on and off, kind of teasing…nay, taunting you, because your selection is not complete. Luckily, there's a quick way to rein in those renegade stray pixels. Go under the Select menu, under Modify, and choose Smooth. Enter a Sample Radius of 1 pixel and click OK. That will usually do the trickthose stray pixels are now selected.


GETTING MORE CONTROL OVER THE MAGIC WAND

By default, the Eyedropper tool's Sample Size option (in the Options Bar) is set to Point Sample, which comes into play if you're using it to read values for color correction. But for now, it's important to know that the Sample Size option chosen for the Eyedropper tool actually affects how the Magic Wand tool makes its selection (the two have an undocumented relationship). If you increase the Eyedropper's Sample Size to 3 by 3 or 5 by 5 Average, the Magic Wand will select an average of a much larger range of pixels in the sample area. This is important to know, because if you don't have Point Sample chosen and you set the Magic Wand Tolerance to 0, it won't just select the individual pixel you click onit will select all of the pixels that match any of the pixels in a 3 by 3 or 5 by 5 area. The next time your Magic Wand isn't behaving the way it used to, check and see if you have changed the Eyedropper tool's Sample Size.