| The current version of VxVM on HP-UX is version 3.5. This is the version we use in our examples. Many existing HP-UX administrators will be coming to VxVM from a background of understanding and having worked with HP's LVM. If you fit into this category, it is natural to want to compare the technologies of LVM with the technologies of VxVM. Here is a quick comparison between the key terms and technologies used by both LVM and VxVM (Table 7-1): Table 7-1. LVM to VxVM Comparison | LVM | VxVM | | Volume Group | Disk Group | | Physical Volume | Disk Media | | Physical Extent | Subdisk ( nearest comparison) | | Logical Extent | N/A | | Logical Volume | Volume | | Mirrors | Plex (Mirror) | | PVRA/VGRA | Private Region | | Mirror Write Cache | Dirty Region Log | | PV Links | Dynamic Multipathing |
If you are new to LVM and VxVM, Table 7-1 will be of little importance to you or make much sense. If you are an HP-UX administrator familiar with LVM coming to VxVM for the first time, then Table 7-1 may be of some use. Coming from an LVM-led background, I find Table 7-1 useful in that I can start to acclimatize myself with some of the new jargon. Let's walk through Table 7-1 and discuss each VxVM term in turn . If you are new to VxVM, it will give you some idea of the forthcoming concepts. -
Disk Group : This is a collection of physical disk drives that are associated with each other. You group disks into disk groups for management purposes, such as to hold the data for a specific application or set of applications. For example, data for accounting applications can be organized in a disk group called acctdg . You can create additional disk groups as necessary. Disk groups enable you to group disks into logical collections. Disk groups enable high availability because a disk group and its components can be moved as a unit from one host machine to another. Disk drives can be shared by two or more hosts , but can be accessed by only one host at a time. If one host crashes, the other host can take over the failed host's disk drives, as well as its disk groups. From this pool of disk space, we can create individual volumes that can be constructed using various layout policies, e.g., mirrored, striped, RAID 5, and so on. The first disk group created on a system must be called rootdg even if it does not contain root/boot volumes. (LVM comparison = Volume Group.) -
Disk Media : This is the name given to an individual physical disk. VxVM will associate a logical name (Disk Media Name) with each physical disk. By default, the name used is the same as the associated device file. This should be avoided, because even if the device file changes (you rewire a SAN/SCSI interface), the Disk Media Name will remain the same. Using a logical name, e.g., FinanceDisk01, means that regardless of the device file name, the Disk Media name remains the same. (LVM comparison = Physical Volume although LVM doesn't allow us to assign a logical name to a disk.) -
Subdisk : A subdisk is a set of contiguous disk blocks that represent a specific portion of a VxVM physical disk. A subdisk is the smallest unit of allocation in VxVM. A subdisk has no specific, fixed size but is defined by an offset and length (in sectors) on a VxVM disk. (LVM comparison = A Physical Extent is the closest comparison, although a Physical Extent has a fixed size while a subdisk does not.) -
Volume : A volume is a virtual storage device that is used by applications in a manner similar to a physical disk. Due to its virtual nature, a volume is not restricted by the physical size constraints that apply to a physical disk. A volume is comprised of one or more plexes . A volume can span across multiple disks. The data in a volume is stored on subdisks of the spanned disks. A volume must be configured from VxVM disks and subdisks within the same disk group. - - Volume Layouts : A volume's layout refers to the organization of plexes in a volume. Volume layout is the way that plexes are configured to remap the volume address space through which I/O is redirected at run-time. Volume layouts are based on the concept of disk spanning, which is the ability to logically combine physical disks in order to store data across multiple disks. Numerous volume layouts are available, and each layout has different advantages and disadvantages. The layouts that you choose depend on the levels of performance and reliability required by your system. With Volume Manager, you can change the volume layout without disrupting applications or filesystems that are using the volume. A volume layout can be configured, reconfigured, resized, and tuned while the volume remains accessible. Supported volume layouts include:
-
Concatenated -
Striped -
Mirrored -
RAID 5 -
Layered Through the forthcoming examples, we look at all of these volume layouts as well as the concepts of resizing and reorganizing (relayout) a volume's layout. Please note that although VxVM supports RAID 0, 1, 0/1, 1/0, and 5, such a solution would be regarded as software RAID . If you are implementing a RAID solution, it is always best to implement RAID using a hardware RAID array. Software RAID solutions are expensive in terms of server CPU cycles and should be used only where no other solution is possible. (LVM comparison = Logical Volume) -
Plex : A plex is a structured or ordered collection of subdisks that represents one copy of the data in a volume. A plex consists of one or more subdisks located on one or more physical disks. A plex is also called a mirror. The terms plex and mirror can be used interchangeably, even though a plex is only one copy of the data. The terms mirrored or mirroring imply two or more copies of data. The length of a plex is determined by the last block that can be read or written on the last subdisk in the plex. Such a plex is known as a Complete Plex. VxVM allows us to configure other types of plexes, i.e., a Sparse Plex (length less than the Complete Plex; can be used for RAM disk where we have a hot-spot in a volume) and a Log Plex (dedicated to some form of logging associated with the volume). A volume must have at least one Complete Plex that has a complete copy of the data in the volume with at least one associated subdisk. Other plexes in the volume can be complete, sparse, or log plexes. A volume can have up to 32 plexes; however, you should never use more than 31 plexes in a single volume. Volume Manager requires one plex for automatic or temporary online operations. (LVM comparison = Mirror. Be careful with this comparison in that a Volume is always made up of at least one plex. We only see additional plexes when we add mirroring, sparse, or log plexes to a volume.) -
Private Region : Any disk under Volume Manger control has a public and private region created on the disk by Volume Manager commands. The private region is used for storing disk group configuration and Volume Manager header information. This space ensures that Volume Manager can identify the disk, even if it is moved to a different address or controller, and also helps to ensure correct recovery in case of disk failure. The private region is 1024 blocks (1024KB=1MB) in size by default. The remaining space (the public region) can be used for user data, e.g., subdisks. (LVM comparison = PVRA/VGRA.) -
Dirty Region Log : Dirty region logging (DRL) is used with mirrored volume layouts. DRL keeps track of the regions that have changed due to I/O writes to a mirrored volume. Prior to every write, a bitmap is written to a log to record the area of the disk that is being changed. In case of system failure, DRL uses this information to recover only the portions of the volume that needs to be recovered. If DRL is not used and a system failure occurs, all mirrors of the volumes must be restored to a consistent state by copying the full contents of the volume between its mirrors. This process can be lengthy and I/O- intensive . (LVM comparison = Mirror Write Cache.) -
Dynamic Multipathing : The Dynamic Multipathing (DMP) feature of VxVM provides greater reliability and performance for your system by enabling path failover and load balancing. Dynamic Multipathing is the method that VxVM uses to manage two or more hardware paths to a single drive. For example, the physical hardware can have at least two paths, such as c1t1d0 and c2t1d 0, directing I/O to the same drive. VxVM arbitrarily selects one of the two names and creates a single device entry, and then transfers data across both paths to spread the I/O. (LVM comparison = PV Links. Be careful with this comparison because DMP offers load-balancing whereas PV Links doesn't.) Sometimes, these definitions are a little difficult to digest. A simple example is called for. The object of this example is to create two volumes: vol1 = 2GB, vol2 = 1GB. -
Initially both volumes will be made up of one plex that in turn is made up of one subdisk . Each subdisk will be 1GB in size. -
We will then expand vol1 to 2GB. -
On the physical disk, we cannot expand our initial subdisk to 2GB, which would make life easy for VxVM to manage. -
VxVM will create an additional subdisk in order to expand vol1 to the desired 2GB. -
vol1 will be made up of two subdisks . -
Both volumes will still be made up of one plex each, because we haven't set up mirroring. Figure 7-1 shows what it should look like on disk. Figure 7-1. A simple VxVM example. 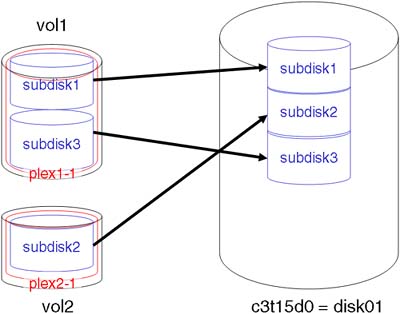
The names used for the subdisk and plexes are not necessarily the names used by VxVM, but they should give you an idea of how things hang together . Before we can create volumes, we need to create the rootdg . If our system is using LVM to host the root/boot volume, we still have to create the rootdg . For historical (or is it hysterical?) reasons, we need to create the rootdg before we can create any volumes. HP-UX 11i now supports the root/boot volumes being managed by VxVM, even on PA-RISC platform (see Section 7.10: VxVM Rootability). The rootdg needs to contain at least one disk, as you would expect. Once rootdg is created, we can then create other disk groups on an application basis, in much the same way as we create volume groups in LVM. If you are not going to use the rootdg to house your root/boot volumes (they're still under the control of LVM), it is not uncommon to use a small (possibly internal) disk just to create the rootdg . After that, we can create other disk groups as we see fit. Before creating the rootdg , ensure that there is nothing on the disk. This includes any old LVM headers. VxVM (and LVM) will complain bitterly if it detects any trace of an LVM header on the disk.
root@hpeos003[] vgreduce /dev/vgSAP /dev/dsk/c4t12d0 Volume group "/dev/vgSAP" has been successfully reduced. Volume Group configuration for /dev/vgSAP has been saved in /etc/lvmconf/vgSAP.conf root@hpeos003[] vgremove /dev/vgSAP Volume group "/dev/vgSAP" has been successfully removed. root@hpeos003[] pvremove /dev/rdsk/c3t15d0 The physical volume associated with "/dev/rdsk/c3t15d0" has been removed. root@hpeos003[]
I regularly use the vxinstall command (performing a Custom Install) to create the rootdg . It is a simple, Menu User Interface (a MUI) that asks simple questions. I first choose to add "One disk at a time," otherwise , vxinstall will create the rootdg with all available disks being members . I can then choose to add a free disk into the rootdg . The steps involved are relatively simple; just make sure that you choose the options that allow you to perform tasks "one at a time." We need to create the rootdg only once, so I won't bore you with all the details of the steps behind the process. Basically, the process involves: -
Ensure that there are a sufficient number (10 is usually enough) of VxVM IO daemons running. -
Reinitialize the VxVM configuration, and start the configuration daemon in disabled mode. (This mode creates a rendezvous file for utilities that perform various diagnostic or initialization operations.) -
Initialize the /etc/vx/volboot file. -
Initialize the rootdg disk group. -
Initialize at least one disk, and add it to rootdg . -
Reinitialize the vxconfigd in full operational mode. I will set up the rootdg using the commands that vxinstall runs on your behalf . Here are steps to create the rootdg by hand:
root@hpeos003[] vxiod set 10 root@hpeos003[] vxconfigd -k -r reset -m disable root@hpeos003[] vxdctl init root@hpeos003[] vxdg list NAME STATE ID root@hpeos003[] vxdg init rootdg root@hpeos003[] vxdisk -f init c3t15d0 root@hpeos003[] vxdg -g rootdg adddisk disk01=c3t15d0 root@hpeos003[] root@hpeos003[] vxdctl enable root@hpeos003[] vxdg list NAME STATE ID rootdg enabled 1067611334.1025.hpeos003 root@hpeos003[] vxprint Disk group: rootdg TY NAME ASSOC KSTATE LENGTH PLOFFS STATE TUTIL0 PUTIL0 dg rootdg rootdg - - - - - - dm disk01 c3t15d0 - 35562666 - - - - root@hpeos003[]
I have purposefully given my disk a disk media name. This is the name associated with this disk. If I don't give the disk a disk media name, it will be known as c3t15d0 . If I were to move the disk to a different interface, the device file would change, e.g., c5t15d0 , but the disk media name would remain the same, i.e., c3t15d0 . This would be confusing; hence, using a disk media name is always a good idea. Now we need to create the two volumes in our simple example. I will use the much-used vxassist command:
root@hpeos003[] vxassist -g rootdg make vol1 1G root@hpeos003[] vxprint Disk group: rootdg TY NAME ASSOC KSTATE LENGTH PLOFFS STATE TUTIL0 PUTIL0 dg rootdg rootdg - - - - - - dm disk01 c3t15d0 - 35562666 - - - - v vol1 fsgen ENABLED 1048576 - ACTIVE - - pl vol1-01 vol1 ENABLED 1048576 - ACTIVE - - sd disk01-01 vol1-01 ENABLED 1048576 0 - - - root@hpeos003[]
The options to vxassist don't need much explaining. In the output from vxprint , we can see that our volume ( vol1 ) is made up of one plex ( vol1-01 ), which is made up of one subdisk ( disk01-01 ). Simple. We can now create vol2 :
root@hpeos003[] vxassist -g rootdg make vol2 1G root@hpeos003[] vxprint Disk group: rootdg TY NAME ASSOC KSTATE LENGTH PLOFFS STATE TUTIL0 PUTIL0 dg rootdg rootdg - - - - - - dm disk01 c3t15d0 - 35562666 - - - - v vol1 fsgen ENABLED 1048576 - ACTIVE - - pl vol1-01 vol1 ENABLED 1048576 - ACTIVE - - sd disk01-01 vol1-01 ENABLED 1048576 0 - - - v vol2 fsgen ENABLED 1048576 - ACTIVE - - pl vol2-01 vol2 ENABLED 1048576 - ACTIVE - - sd disk01-02 vol2-01 ENABLED 1048576 0 - - - root@hpeos003[]
Once again, we can see that the make-up of both volumes is relatively simple and straightforward. We are now ready to increase the size of our first volume to 2GB. Again, we can use the vxassist command along with either the growby or the growto option. I hope I don't need to explain the difference in these options:
root@hpeos003[] vxassist -g rootdg growby vol1 1G root@hpeos003[] vxprint Disk group: rootdg TY NAME ASSOC KSTATE LENGTH PLOFFS STATE TUTIL0 PUTIL0 dg rootdg rootdg - - - - - - dm disk01 c3t15d0 - 35562666 - - - - v vol1 fsgen ENABLED 2097152 - ACTIVE - - pl vol1-01 vol1 ENABLED 2097152 - ACTIVE - - sd disk01-01 vol1-01 ENABLED 1048576 0 - - - sd disk01-03 vol1-01 ENABLED 1048576 1048576 - - - v vol2 fsgen ENABLED 1048576 - ACTIVE - - pl vol2-01 vol2 ENABLED 1048576 - ACTIVE - - sd disk01-02 vol2-01 ENABLED 1048576 0 - - - root@hpeos003[]
We can now see that volume vol1 is made up of two subdisks . LENGTH tells us the size of each object, and PLOFFS shows us the Plex OFFSet; each subdisk is in relation to the plex . It's not that difficult when you know how. Here are some other commands to be going on with:
root@hpeos003[diag.d] vxdg free GROUP DISK DEVICE TAG OFFSET LENGTH FLAGS rootdg disk01 c3t15d0 c3t15d0 3145728 32416938 - root@hpeos003[diag.d]
This lists the areas of free space on each disk in a disk group (or for all disk groups if you don't use the “g group option). From the above output, we can see that we have a single block of free space whose size ( LENGTH ) is 32416938KB and is located ( OFFSET ) 3145728KB from the beginning of the disk.
root@hpeos003[] vxdg list rootdg Group: rootdg dgid: 1067611334.1025.hpeos003 import-id: 0.1 flags: version: 90 local-activation: read-write detach-policy: global copies: nconfig=default nlog=default config: seqno=0.1068 permlen=727 free=724 templen=2 loglen=110 config disk c3t15d0 copy 1 len=727 state=clean online log disk c3t15d0 copy 1 len=110 root@hpeos003[]
The vxdg command lists characteristics of the disk group. The version tells us the capabilities this disk group supports. The man page for vxdg will document what each version supports (remember, some features are not supported by HP-UX). The number of configuration and log copies is determined when a disk is initialized . If we have only one copy, which is lost due to some disk failure, we will not be able to recover a disk after a system crash. It is better if we have multiple copies of both the configuration and log data. The basic layout of a VxVM disk looks like this (see Figure 7-2): Figure 7-2. VxVM disk layout. 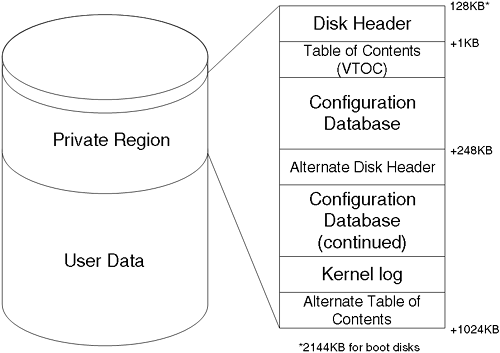
VxVM distinguishes between three types of disk: -
sliced : The disk has hard partitions, following the Extensible Firmware Interface (EFI) standard. Such disks are found on Sun's Solaris and HP's IPF platforms. Each partition is called a slice . -
simple : The disk has only one partition: the whole disk. These disks are the only ones recognized by drivers on HP's PA-RISC platform. -
nopriv : The disk has no private region. The kernel itself has no knowledge of the layout of the on-disk VxVM structures. The vxconfigd is the primary interface for reading information from the disk and loading the relevant kernel data structures via the vols pseudo-driver. The space inside the private region is tightly packed, so much so that most of the structures within it are not human readable. The last part of configuring the rootdg is to remove the file /etc/vx/reconfig.d/state.d/install-db . If this file exists, the startup script /sbin/rc1.d/S092vxvm-startup will exit without starting up any daemons or reattaching volumes. If we were to create the rootdg with the vxinstall command, this file would get removed. As we have created the rootdg by hand, we need to perform this step.
root@hpeos003[] ll /etc/vx/reconfig.d/state.d/ total 0 -rw-r--r-- 1 root sys 0 Feb 18 2003 install-db root@hpeos003[] rm /etc/vx/reconfig.d/state.d/install-db root@hpeos003[]
Let's set up another disk group with four disks in it. I will ensure that each disk contains two copies of the configuration database and kernel logs:
root@hpeos003[] vxdisk -f init c0t4d0 nlog=2 nconfig=2 root@hpeos003[] vxdisk -f init c0t5d0 nlog=2 nconfig=2 root@hpeos003[] vxdisk -f init c4t12d0 nlog=2 nconfig=2 root@hpeos003[] vxdisk -f init c4t13d0 nlog=2 nconfig=2 root@hpeos003[] root@hpeos003[] vxdg init ora1 ora_disk1=c0t4d0 ora_disk2=c0t5d0 ora_disk3=c4t12d0  ora_disk4=c4t13d0 nconfig=all nlog=all root@hpeos003[] vxdg list ora1 Group: ora1 dgid: 1067622419.1110.hpeos003 import-id: 0.1109 flags: version: 90 local-activation: read-write detach-policy: global copies: nconfig=all nlog=all config: seqno=0.1030 permlen=363 free=361 templen=1 loglen=55 config disk c0t4d0 copy 1 len=363 state=clean online config disk c0t4d0 copy 2 len=363 state=clean online config disk c0t5d0 copy 1 len=363 state=clean online config disk c0t5d0 copy 2 len=363 state=clean online config disk c4t12d0 copy 1 len=363 state=clean online config disk c4t12d0 copy 2 len=363 state=clean online config disk c4t13d0 copy 1 len=363 state=clean online config disk c4t13d0 copy 2 len=363 state=clean online log disk c0t4d0 copy 1 len=55 log disk c0t4d0 copy 2 len=55 log disk c0t5d0 copy 1 len=55 log disk c0t5d0 copy 2 len=55 log disk c4t12d0 copy 1 len=55 log disk c4t12d0 copy 2 len=55 log disk c4t13d0 copy 1 len=55 log disk c4t13d0 copy 2 len=55 root@hpeos003[] root@hpeos003[] vxprint -g ora1 TY NAME ASSOC KSTATE LENGTH PLOFFS STATE TUTIL0 PUTIL0 dg ora1 ora1 - - - - - - dm ora_disk1 c0t4d0 - 71682048 - - - - dm ora_disk2 c0t5d0 - 71682048 - - - - dm ora_disk3 c4t12d0 - 71682048 - - - - dm ora_disk4 c4t13d0 - 71682048 - - - - root@hpeos003[] ora_disk4=c4t13d0 nconfig=all nlog=all root@hpeos003[] vxdg list ora1 Group: ora1 dgid: 1067622419.1110.hpeos003 import-id: 0.1109 flags: version: 90 local-activation: read-write detach-policy: global copies: nconfig=all nlog=all config: seqno=0.1030 permlen=363 free=361 templen=1 loglen=55 config disk c0t4d0 copy 1 len=363 state=clean online config disk c0t4d0 copy 2 len=363 state=clean online config disk c0t5d0 copy 1 len=363 state=clean online config disk c0t5d0 copy 2 len=363 state=clean online config disk c4t12d0 copy 1 len=363 state=clean online config disk c4t12d0 copy 2 len=363 state=clean online config disk c4t13d0 copy 1 len=363 state=clean online config disk c4t13d0 copy 2 len=363 state=clean online log disk c0t4d0 copy 1 len=55 log disk c0t4d0 copy 2 len=55 log disk c0t5d0 copy 1 len=55 log disk c0t5d0 copy 2 len=55 log disk c4t12d0 copy 1 len=55 log disk c4t12d0 copy 2 len=55 log disk c4t13d0 copy 1 len=55 log disk c4t13d0 copy 2 len=55 root@hpeos003[] root@hpeos003[] vxprint -g ora1 TY NAME ASSOC KSTATE LENGTH PLOFFS STATE TUTIL0 PUTIL0 dg ora1 ora1 - - - - - - dm ora_disk1 c0t4d0 - 71682048 - - - - dm ora_disk2 c0t5d0 - 71682048 - - - - dm ora_disk3 c4t12d0 - 71682048 - - - - dm ora_disk4 c4t13d0 - 71682048 - - - - root@hpeos003[]
The variety of volume configurations possible with VxVM is quite staggering. This is partly due to the fact that a subdisk configuration is totally under the control of the administrator. You can have striped-mirrors, mirrored- stripes , concat-mirrors, and so on. We don't have the time or the space to discuss every permutation, but we look at some of the key features. |