| NetBeans IDE shows you the status of your files right in the UI using color coding and badges. A file displays its CVS status wherever it appears in the NetBeans UI, whether it is in the Projects window, as shown in Figure 4-3, or in the Source Editor. Figure 4-3. Files displaying their CVS status in the Projects window 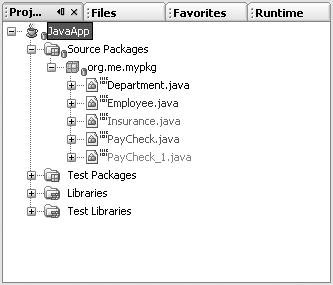
The following colors are used to display file status: Green. Indicates that the file is a new local file that does not yet exist in the repository. Blue. Indicates that the file has been modified locally. Red. Indicates that the file contains conflicts. Gray. Indicates that the file is ignored by CVS and will not be included when calling versioning commands.
The IDE marks folder, package, and project nodes with a badge when these nodes contain files that are not up to date. A blue CVS badge means the node contains locally modified files. A red CVS badge means the node contains files with merge conflicts. To see all the changes in your working directory, right-click any project, folder, or package node in any of the NetBeans navigation windows and choose CVS | Show Changes. The Versioning window, shown in Figure 4-4, appears. Figure 4-4. Versioning window 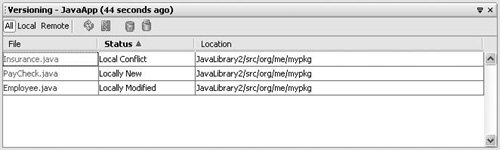
The Versioning window automatically updates to reflect local changes in the location it is monitoring. From the Versioning window, you can: Diff files. Double-click any file to generate a diff for the file, or click the Diff All button  to view all differences. to view all differences. Exclude any file from a commit. Right-click the file and choose Exclude from Commit. The file is displayed with its name in strikethrough. Update files. Click the Update All button  . . Commit changes to the repository. Click the Commit All  button. button. Run CVS commands on individual files. You can right-click any file to access the same CVS commands that are available in the Projects, Files, and Favorites windows.
 | When you use the Commit All and Update Add buttons, the IDE runs the commands on the project or folder that is currently being monitored in the Versioning window. The window's title bar displays the location currently being monitored. |
Viewing Diffs A diff compares the version of a file in your working directory to the version in the repository and displays any differences. NetBeans IDE provides a graphical diff viewer that makes reviewing changes much easier than working with traditional command-line diffs. | By default the IDE ignores whitespace in your diffs. You can turn this setting off by choosing Tools | Options, clicking Advanced Options, and selecting IDE Configuration | Server and External Tool Settings | Diff and Merge Types | Built-in Diff Engine. |
To view the differences between your local copy of the file and the base revision in the repository, do one of the following: Right-click any file, folder, package, or project node and choose CVS | Diff. In the Versioning window, double-click any individual file or click the Diff All button .
The Diff Viewer, shown in Figure 4-5, displays one file at a time. Figure 4-5. Diff Viewer 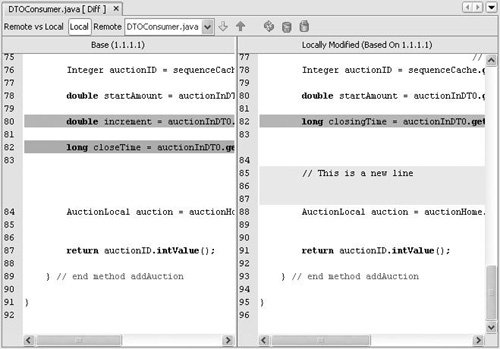
You can use the Next Difference and Previous Difference buttons to navigate through the differences. When you reach the last difference in a file, the Next Difference button takes you to the next file. You can also switch through files using the drop-down list in the Diff Viewer toolbar. The Diff Viewer uses the following colors to display differences: Blue areas mark existing lines that have been changed. Green areas mark new lines that have been added. Red areas mark lines that have been removed.
In addition to viewing the differences between your local version and the latest revision in the repository, you often have to diff files against earlier revisions, tags, or difference branches. To do so: Right-click a file or folder and choose CVS | Search History. In the From field, specify the beginning of the diff. If you just want to diff your current working directory against an earlier revision, leave this field empty. If you want to diff two revisions in the repository, enter a tag, branch name, or date in this field. In the To field, enter the tag, branch, or date you want to diff the files against. You can also specify other search criteria. See Working with Versioning History for more information. Click Search. Each of the files containing differences is listed in the window. Click the Diff button and select any file to view its diff in the bottom panel of the Search History window.
|