| NetBeans Mobility Pack includes the MIDP Visual Designer to assist with the creation of MIDlets. This full-featured designer allows you to create your application's flow rapidly and modify the screen content of standard MIDP 1.0 or MIDP 2.0 components using an intuitive GUI. See the Understanding the Flow Designer and Understanding the Screen Designer sections later in this chapter for an overview of the tool and the following sections for some common task descriptions. Creating a New Visual Design To create a new visual design: In the Projects window, right-click the package you would like to contain your visual design and choose New | Visual Midlet. If that option is not available, select File/Folder. Alternatively, select File | New File (Ctrl-N) from the main menu. Select the MIDP node in the Categories list box and then Visual MIDlet or HelloMIDlet.java in the File Types list, and click Next. Select the MIDP version for your MIDlet to use (according to the version supported by the device you are developing for) and click Finish.
Your visual design opens in the Flow Design view. If HelloMidlet was selected, the MIDlet will already contain a TextBox screen that displays the text "Hello, World!" Adding Objects to the Component Palette User-defined screens and items can be added to the component palette for use with the designer. Though the screen editor does not allow editing of all attributes of user-added components, they can still be used with the Flow Designer: Ensure that the class you want to use is on your project's classpath. Right-click the Palette window and choose the Palette Manager. Click Add from Project. Select the project that contains the object you want added to the component palette and click Next. Select all the objects to add, using the Found MIDP Classes list. All classes inheriting from Displayable or Item on the selected project's classpath are shown in the list. Optionally, use the Add into Category combo box to select the palette category to which the object will be added, and click Finish. Click Close.
Your component(s) will now be available in the chosen category whenever you open the Visual Designer. This is true for any project you open. As such, it is possible that a class in the component palette won't be on your project's classpath. Building a Small Application with the Visual Designer The following steps illustrate how to create the skeleton of a two-screen application that could be used to send an SMS: Create a new visual design document and click the Flow Design button in the designer toolbar. Click and drag the TextBox from the Screens group in the Palette window to the Flow Designer. Click and drag the transition source labeled Start Point on the Mobile Device screen to your newly added TextBox. Your first screen has now been added. If you run the application at this point, the application will start with a text field, with no commands associated with it. Click and drag the OK command from the Commands group in the Palette window to your TextBox screen. Now add an Exit command to the same screen. Click and drag an Alert from the Screens group in the Palette window to the Flow Designer. Double-click the new Alert screen. It will open in the Screen Designer. Click the Device screen where it reads <Enter Text>. This text box will now be editable. Enter the message "SMS Sent" and press Ctrl-Enter to save your changes. Use the combo box at the top of the Screen Designer to switch to the TextBox screen, as shown in Figure 14-9. Figure 14-9. Visual Designer with a TextBox screen added  Click in the text box and delete the <Edit Text> string. Again, press Ctrl-Enter to save your changes. Use the property editor to set the Title property to "Enter SMS text:". Click the Flow Design button in the toolbar to return to Flow Design view. Click and drag the transition source labeled okCommand from the TextBox screen to the Alert screen. Click and drag the transition source labeled exitCommand from the TextBox screen to the Mobile Device screen. The Form Designer should now look similar to what is shown in Figure 14-10. If you were to run the application at this point, it would begin with a textbox screen and OK and Exit options on its soft keys. Pressing the OK soft key would bring you to the alert screen. Pressing the Exit soft key would exit the program. Figure 14-10. Visual Designer in Flow Design view with an Alert screen added 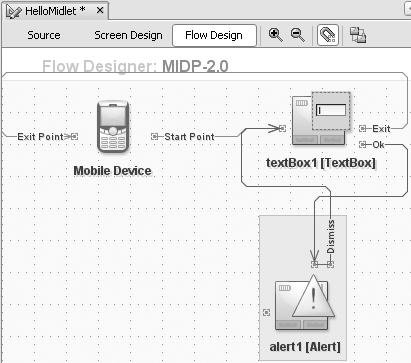 Using the Flow Design, right-click on the transition from okCommand1 and choose Go to Source. There you can enter your code that will do the SMS sending. You have now created a very simple MIDP application.
|