A ColdFusionFlash Application
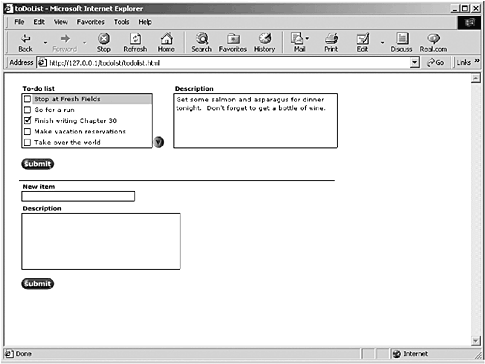
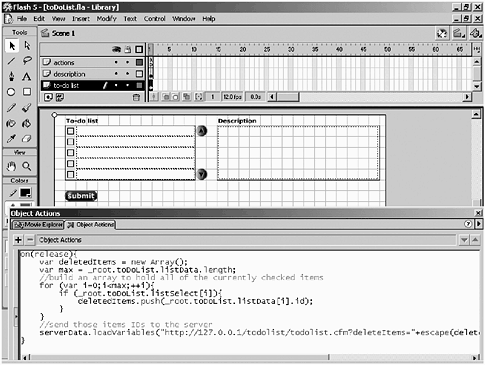
A ColdFusion/Flash ApplicationInstead of having you build this application step-by-step, we are going to walk you through the finished application. Why? Because this application was built using both ColdFusion and Flash and not all of you are going to have access to a ColdFusion Server. However, you should be able to easily translate the ColdFusion to your language of choice. The code itself isn't really all that complex. What's important is that you understand how all the pieces are put together. The application you'll be walking through is a simple To-Do list (see Figure 28.11). This To-Do list lets you do several things. You can add new items to your list, along with a more detailed description for each item. You also can delete items on which you have completed work. You can have as many items in your list as you like. If you exceed five items, the list becomes scrollable. All the information you enter in the list is captured in a database so that you can recall it at any time. Figure 28.11. The To-Do list application lets you create a To-Do list to help you keep on track during the day. You can add new items to the list or check off items as they are completed. All the list information is captured in a database. There are three parts to this application: a database, a Flash file, and a ColdFusion page. The DatabaseThe database for this application ( todolist .mdb) is a simple three-field Microsoft Access database. The fields in the database and their attributes are as follows :
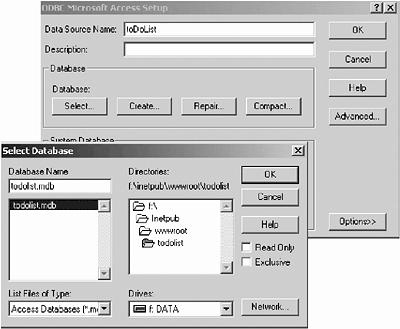
For your application to be able to "talk" to your database, you need to set up what is known as a Data Source Name ( DSN ). This is an alias to your database that makes referring to your database a relatively simple process. Setting up a DSN is going to vary from operating system to operating system, but the general process is as follows:
If you are going to try to set up this file for testing on your own system, you must first set up a DSN. The name expected by the existing ColdFusion file is toDoList. The Flash FileThe Flash file (todolist.fla) itself is somewhat more complicated than the database. There are three main components :
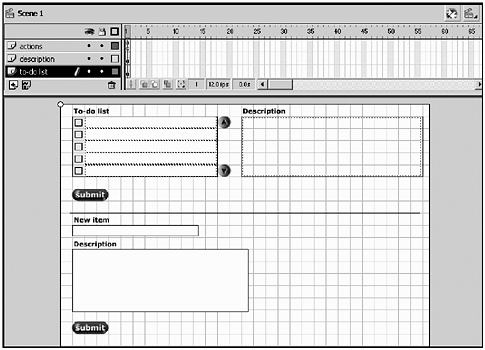
The ColdFusion file (todolist.cfm) handles all the passing of information between the database and the Flash file. It passes information to the Flash file, adds new items to the list, and deletes items that have been checked off as finished. Start by examining the Flash file. After you're familiar with the Flash file, you can take a look at the ColdFusion file to see how the three files are interacting with one another. The actual layout of this file is fairly straightforward. (See Figure 28.13.) In the upper-left corner is the scrolling To-Do list. In the right corner is the Description text box. Beneath the To-Do list are the text fields you can use to enter new information to the To-Do list. Figure 28.13. The To-Do list Flash file shows all the different elements of the application. Both Description text boxes and the New item text box are just thatsimple text boxes. The following list contains a description of each:
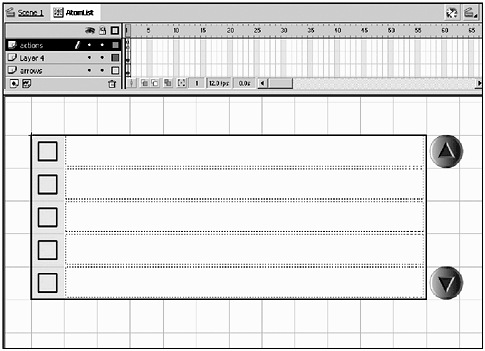
The scrolling list is a bit more complex. The scrolling list is contained in a movie clip called AtomList, which has an instance name of toDoList. As shown in Figure 28.14, inside AtomList are several components: Figure 28.14. The scrolling To-Do list is a single movie clip with a series of movie clips embedded inside it. This is where most of the action in the Flash file takes place.
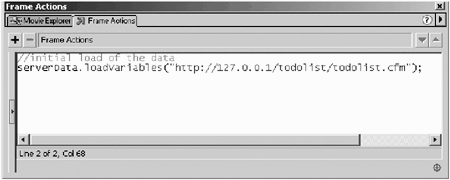
There are a few more items on the Stage about which you should be concerned . There are two submit buttons that handle the submission of new information and the deletion of old information. There also is an empty movie clip named serverData. The instance name is serverData. You know where most of the component parts are. It's time to start breaking down the file to see how it works. Loading the Data for the First TimeAfter the file is first loaded, there is an Action in frame 1 of the main timeline that initi-ates the call to the ColdFusion file and that loads all the resultant data into the serverData movie clip. (See Figure 28.15.) The code in frame 1 looks like this: //initial load of the data serverData.loadVariables("http://127.0.0.1/todolist/todolist.cfm"); Figure 28.15. The initial frame on the main timeline holds the code that loads the data that ColdFusion extracts from the database. Note that the data is loaded into an empty movie clip with an instance name of serverData. For those of you who haven't worked with servers before, 127.0.0.1 (or alternately, local-host) is the address of the local server on your machine. The ColdFusion file runs a query against the database to extract all current information and then orders the returned information by using ItemID: <cfquery name="qGetAllItems" datasource="todolist"> Select ItemID, ItemName, ItemDesc From ToDoList Order by ItemID </cfquery> The ColdFusion file next loops through the returned recordset, dynamically assigns variable names , and then formats the data in a way that Flash can understand. Using a variable called temp to temporarily hold values, ColdFusion begins building a string of information that it then appends to a list called list_flashvars. The variable counter is internal to this ColdFusion file and is used to dynamically create the variable names that will be passed to Flash. The actual code in the ColdFusion file looks like this: <cfloop query="qGetAllItems"> <cfscript> temp = "itemId#counter#=#qGetAllItems.ItemId#" ; list_flashvars = listappend(list_flashvars, temp, "&"); temp = "itemName#counter#=#urlencodedformat (qGetAllItems.ItemName)#" ; list_flashvars = listappend(list_flashvars, temp, "&"); temp = "itemDesc#counter#=#urlencodedformat (qGetAllItems.ItemDesc)#" ; list_flashvars = listappend(list_flashvars, temp, "&"); counter = counter + 1; </cfscript> </cfloop> <cfset list_flashvars = "&" & list_flashvars & "&"> <!--- *** END DB CALL *** ---> <!--- *** Display for flash *** ---> <cfoutput>#list_flashvars#</cfoutput> So, for example, if your database has a single record with the following entries: ItemID: 1 ItemName: Finish writing Chapter 28 ItemDesc: Must finish this chapter or Linda will hunt me down like the lower life form I am The first bit of code: temp = "itemId#counter#=#qGetAllItems.ItemId#" ; list_flashvars = listappend(list_flashvars, temp, "&"); Begins creating the string to be passed to Flash: itemID0=1& The second piece of code adds a little more information: temp = "itemName#counter#=#urlencodedformat(qGetAllItems.ItemName)#" ; list_flashvars = listappend(list_flashvars, temp, "&"); So, the value in list_flashvars now looks like this: itemID0=1&itemName0=Finish%20writing%20Chapter%2028& Notice that the value of the itemName0 variable is URL encoded. All the spaces are replaced by %20. This is necessary because you don't know what values might get entered into the list. As you can imagine, the last bit of code adds the value of itemDesc to the string, so the final value of list_flashvars looks like this: itemID0=1&itemName0=Finish%20writing%20Chapter%2028&itemDesc0=Must%20 finish%20this%20chapter%20or%20Linda%20will%20hunt%20me%20down%20like%20 the%20lower%20life%20form&20I%20am& This string of name/value pairs is then output by the ColdFusion file. In fact, you can test this yourself by browsing to the ColdFusion file itself rather than to the HTML page containing your Flash movie. (See Figure 28.16.) Figure 28.16. By browsing to the todolist.cfm file, you can see the output from the ColdFusion page. Now that you know you have some data to work with, what are you going to do with it? The serverData Movie ClipSo what happens after this string is available to Flash? You know the values are being held inside the serverData movie clip, so the next logical place to look is the Actions attached to that movie clip. The data for the list and for the checkboxes are held in two separate objects: listData and listSelect. These objects actually exist inside the toDoList movie clip. After you've made a call to the ColdFusion Server to load some data, you'll want to make sure you get rid of any existing data. You can do that using the delete operator. As soon as you delete the old arrays, you can build new empty arrays. Next, you can walk through the data that has been loaded and build your new list objects. After you've passed the values from the variables sent in by the server into your new objects, you no longer need to keep the original variables around. So, you can do some house cleaning and delete them. Finally, you call the function that draws your brand new list. The actual ActionScript attached to the serverData movie clip looks like this: onClipEvent(data){ // remove the old data delete _parent.toDoList.listData; delete _parent.toDoList.listSelect; //we need those objects though! _parent.toDoList.listData = new Array(); _parent.toDoList.listSelect = new Array(); //walk through the data, building an object with it var i=0; while (this["itemid"+i] != null){ _parent.toDoList.listData[i] = new Object(); _parent.toDoList.listData[i].id = this["itemid"+i]; _parent.toDoList.listData[i].name = this["itemname"+i]; _parent.toDoList.listData[i].desc = this["itemdesc"+i]; delete this["itemid"+i]; delete this["itemname"+i]; delete this["itemdesc"+i]; ++i; } //tell the list to redraw _parent.toDoList.drawList(); } A lot of the actions that are processed in the serverData movie clip actually send data to the toDoList movie clip, so that's a good place to check next. The toDoList Movie ClipThe toDoList movie clip has three functions: drawList(), scrollUp(), and scrollDown. (See Figure 28.17.) Figure 28.17. The toDoList movie clip instance has three functions: one to draw the list, one to handle what happens when the Scroll Up button is clicked, and another to handle what happens when the Scroll Down button is clicked. The drawList() function, not surprisingly, draws the contents of the list object. Well, it doesn't draw the list object exactly, but it does control the visibility of the five list-item (AtomList item) movie clips. You begin by setting the visibility of all five movie clips to false: function drawList(){ //hide all the items for(var i=0;i<5;++i){ this["item"+i]._visible = false; } Next, you need to determine how many items are currently in listData (remember that this was set up when the movie first loaded): //init info var i=0; var max = listData.length; Now that you know how many items are in listData, you can use that information to start rebuilding the items in your list object. Each list item movie clip inside the toDoList movie clip has an instance name. From top to bottom, the names are item0, item1, item2, item3, and item4. Thus, as long as the counter i is less than 5 and scrollPos (which starts out as 0) plus i is less than the maximum length of the list, you make the list item visible and populate it with the appropriate text. // draw each item while (i<5 && (scrollPos+i) < max){ //make sure the item is visible this["item"+i]._visible = true; //put the text into place this["item"+i].text = listData[i+scrollPos].name; //let each item know which index in the listData array it represents this["item"+i].index = i+scrollPos; //draw the correct select state if (listSelect[i+scrollPos]){ this["item"+i].selectState.gotoAndStop(2); }else{ this["item"+i].selectState.gotoAndStop(1); } ++i; } If there are more than five items in the list, make the necessary arrow buttons visible: // hide or show the scroll arrows, as appropriate if (scrollPos==0){ upArrow._visible = false; }else{ upArrow._visible = true; } if (scrollPos >= max - 5){ downArrow._visible = false; }else{ downArrow._visible = true; } } As the now-visible buttons (which are embedded in movie clips) are pressed, several actions take place. For the Up button, there is this code: onClipEvent(enterFrame){ if (this._visible && isDown){ _parent.scrollUp(); } } For the Down button, there is this code: onClipEvent(enterFrame){ if (this._visible && isDown){ _parent.scrollDown(); } } As you can see, pressing the buttons makes a call to either the scrollUp() or scrollDown() function, both of which are attached to the toDoList movie clip instance. Depending on which button is pressed, the scrollPos variable is either incremented or decremented: // scroll the list up function scrollUp(){ --scrollPos; drawList(); } // scroll the list down function scrollDown(){ ++scrollPos; drawList(); } The complete listing for the Actions attached to the toDoList movie clip is lengthy, but not too daunting. See Listing 28.1. Listing 28.1 The Complete Listing for the Actions Attached to the toDoList Movie Clip Instance function drawList(){ //hide all the items for(var i=0;i<5;++i){ this["item"+i]._visible = false; } //init info var i=0; var max = listData.length; // draw each item while (i<5 && (scrollPos+i) < max){ //make sure the item is visible this["item"+i]._visible = true; //put the text into place this["item"+i].text = listData[i+scrollPos].name; //let each item know which index in the listData array it represents this["item"+i].index = i+scrollPos; //draw the correct select state if (listSelect[i+scrollPos]){ this["item"+i].selectState.gotoAndStop(2); }else{ this["item"+i].selectState.gotoAndStop(1); } ++i; } // hide or show the scroll arrows, as appropriate if (scrollPos==0){ upArrow._visible = false; }else{ upArrow._visible = true; } if (scrollPos >= max - 5){ downArrow._visible = false; }else{ downArrow._visible = true; } } // scroll the list up function scrollUp(){ --scrollPos; drawList(); } // scroll the list down function scrollDown(){ ++scrollPos; drawList(); } scrollPos = 0; drawList(); The other two places that you'll find Actions are on the submit buttons. The submit button that is just below the To-Do list is used to remove any items that have been checked off as being completed. (See Figure 28.18.) Figure 28.18. The top submit button sends the information to ColdFusion that the server needs to delete the checked items from the database. on(release){ var deletedItems = new Array(); var max = _root.toDoList.listData.length; //build an array to hold all of the currently checked items for (var i=0;i<max;++i){ if (_root.toDoList.listSelect[i]){ deletedItems.push(_root.toDoList.listData[i].id); } } //send those items IDs to the server serverData.loadVariables("http://127.0.0.1/todolist/todolist.cfm?delete Items="+escape(deletedItems.toString())); } This passes a string of information back to ColdFusion that tells which items were marked as being complete. ColdFusion then deletes the items from the database. <!--- *** Process Delete *** ---> <cfif len(deleteItems)> <cfquery name="deleteItems" datasource="todolist"> Delete From ToDoList Where ItemID IN (#deleteItems#) </cfquery> </cfif> <!--- *** END DELETE *** ---> The bottom submit button is used to add new entries to the To-Do list, and you know there's always something to add to your To-Do list. on(release){ //send the new item on over serverData.loadVariables("http://127.0.0.1/todolist/todolist.cfm? itemName="+escape(newName)+"&itemDesc="+escape(newDesc)); newName = ""; newDesc = ""; } On the ColdFusion side, you check whether itemName or itemDesc has a value and then you set up the insert to the database: <!--- *** Process Add *** ---> <cfif len(itemName) or len(itemDesc)> <cfscript> if (len(itemname)) { columnlist = listappend(columnlist, "itemname") ; thevalueslist = listappend(thevalueslist, itemname) ; } if (len(itemdesc)) { columnlist = listappend(columnlist, "itemdesc") ; thevalueslist = listappend(thevalueslist, itemdesc) ; } </cfscript> <cfquery name="insertItems" datasource="todolist"> Insert Into ToDoList (#columnlist#) Values(#listQualify(thevalueslist, "'")#) </cfquery> </cfif> <!--- *** END ADD *** ---> As you can see, passing data back and forth between Flash and middleware applications can be very simple or quite complex. At the end of the day, Flash doesn't really care what happens on the middleware side as long as it gets its data back in a form it can under-standname/value pairs. Final ColdFusion Code ListingSo you have a chance to see the whole ColdFusion file, rather than just chunks of it, the entire file is included in Listing 28.2. The only code you haven't seen so far is this: <cfsetting enablecfoutputonly="Yes" showdebugoutput="No"> This code suppresses any whitespace, returns, or extraneous debugging data. Remember: Flash won't be happy with anything but name/value pairs. Additionally, at the beginning of the ColdFusion file, a series of variables gets initialized , as shown in the following code: <!--- *** Initialize Variables *** ---> <!--- These will be sent back from the Flash Movie ---> <cfparam name="deleteItems" default=""> <cfparam name="itemname" default=""> <cfparam name="itemdesc" default=""> <!--- These will be sent into the Flash movie ---> <cfparam name="list_flashvars" default=""> <!--- These are internal variables used in this CF template ---> <cfparam name="counter" default="0"> <cfparam name="columnlist" default=""> <cfparam name="thevalueslist" default=""> <!--- *** END INITALIZE *** ---> Listing 28.2 The Complete Listing for the ColdFusion File That Updates the Database and the Flash Movie <cfsetting enablecfoutputonly="Yes" showdebugoutput="No"> <!--- *** Initialize Variables *** ---> <!--- These will be sent back from the Flash Movie ---> <cfparam name="deleteItems" default=""> <cfparam name="itemname" default=""> <cfparam name="itemdesc" default=""> <!--- These will be sent into the Flash movie ---> <cfparam name="list_flashvars" default=""> <!--- These are internal variables used in this CF template ---> <cfparam name="counter" default="0"> <cfparam name="columnlist" default=""> <cfparam name="thevalueslist" default=""> <!--- *** END INITALIZE *** ---> <!--- *** Process Delete *** ---> <cfif len(deleteItems)> <cfquery name="deleteItems" datasource="todolist"> Delete From ToDoList Where ItemID IN (#deleteItems#) </cfquery> </cfif> <!--- *** END DELETE *** ---> <!--- *** Process Add *** ---> <cfif len(itemName) or len(itemDesc)> <cfscript> if (len(itemname)) { columnlist = listappend(columnlist, "itemname") ; thevalueslist = listappend(thevalueslist, itemname) ; } if (len(itemdesc)) { columnlist = listappend(columnlist, "itemdesc") ; thevalueslist = listappend(thevalueslist, itemdesc) ; } </cfscript> <cfquery name="insertItems" datasource="todolist"> Insert Into ToDoList (#columnlist#) Values(#listQualify(thevalueslist, "'")#) </cfquery> </cfif> <!--- *** END ADD *** ---> <!--- *** Grab all db info and prepare info for Flash *** ---> <cfquery name="qGetAllItems" datasource="todolist"> Select ItemID, ItemName, ItemDesc From ToDoList Order by ItemID </cfquery> <cfloop query="qGetAllItems"> <cfscript> temp = "itemId#counter#=#qGetAllItems.ItemId#" ; list_flashvars = listappend(list_flashvars, temp, "&"); temp = "itemName#counter#=#urlencodedformat (qGetAllItems.ItemName)#" ; list_flashvars = listappend(list_flashvars, temp, "&"); temp = "itemDesc#counter#=#urlencodedformat (qGetAllItems.ItemDesc)#" ; list_flashvars = listappend(list_flashvars, temp, "&"); counter = counter + 1; </cfscript> </cfloop> <cfset list_flashvars = "&" & list_flashvars & "&"> <!--- *** END DB CALL *** ---> <!--- *** Display for flash *** ---> <cfoutput>#list_flashvars#</cfoutput> |


EAN: 2147483647
Pages: 257