| Another way to add dynamic content to a Flash movie is through the use of Generator. One of the great things about Generator is that it can replicate some relatively complex ActionScript functionality, without having to write the ActionScript! A great example of this is the Ticker object that comes with Generator. It can create a scrolling ticker, using data from an external source, without having to write one line of ActionScript. Flash recognizes the resulting ticker as a movie clip, so you can add some relatively simple ActionScript to the movie to make this ticker into a menu. This type of menuing system is great when you want to be able to present more information than comfortably fits on one screen. Of course, you don't want to go overboard; you don't want people to have to wait a long time for their menu option to show up. Conversely, if you have a site that doesn't have a lot of content yet, a scrolling menu can make it look larger than it really issneaky, but it works. Generator content is created on the server side, whereas ActionScript-generated content is created on the client side. Using Generator to replicate the functionality of relatively complex, and potentially processor- intensive , ActionScript can be very useful if your potential audience doesn't have the equipment required to handle what you have to offer. Remember that you're probably creating your Flash content on a relatively high- powered computer, while your audience is often viewing that content on less-capable computers. You must have the Generator authoring extensions installed to complete the following exercise. You do not need the Generator server (Developer Edition or Enterprise Edition) to complete the exercise. When you test, export, or publish the movie with the Generator authoring extensions (or either version of the server) installed, Flash creates an SWF file containing the data from your data source. You can use this SWF file as you would use any other; you don't need to have the Generator server installed to let your users view the menu. If you want to use Generator to update the menu with the most recent data every time a user visits your site, or if you want the menu to be updated without having to open Flash to reexport the movie, you have to use either Generator server. Note You can download the most current version of the Generator authoring templates from http://www.macromedia.com/software/generator/download/. You also can download a trial version of the Generator Developer Edition.
Exercise 15.6 Creating a Menu with Generator In this exercise, you learn how to use Generator to create a continuously scrolling menu, using the Ticker object. You add minimal ActionScript to control the movement of the menu. You also use Generator to create the content for the movie. -
Open tickermenu.fla from the Chapter_15/Assets folder on the CD and save it to your hard drive. As shown in Figure 15.18, this file has three layers : -
Content. This layer has one keyframe, which contains an instance of the Contents Clip movie clip. This movie clip has the instance name Content. -
Ticker. This layer has one empty keyframe, which will contain the scrolling menu that you're going to make. -
Gears. This layer also has one keyframe, which contains an instance of the Gears movie clip. This movie clip contains animated gears, which scroll with the menu. All the ActionScript required for the gears is already set up, so you can take a look at it if you want to see how it's done. Figure 15.18. The movie has three layers. 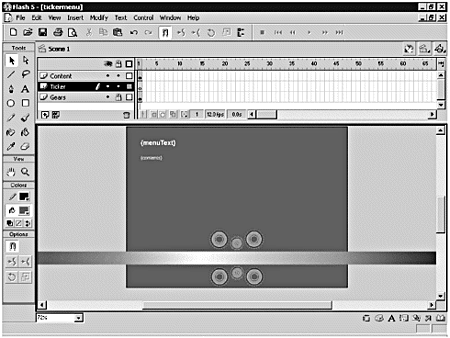 -
Open menuData.txt from the Chapter_15/Assets folder on the CD and save it to the same location as tickermenu.fla on your hard drive. This file contains text that is formatted for use as a Generator data source. You learned about using Generator data sources in Chapter 4, "Flash and Generator," so the formatting should look somewhat familiar. The columns in this data source, as specified by the first row, are as follows : -
Clip. This is a required column for the List, Ticker, and Scrolling List objects. It specifies the movie clip or graphic symbol that you want to insert in the object. The rows that contain the actual data specify alternating clip values Menu Item and Line. The Menu Item movie clip contains some text that's set by the Generator variable menuText. It also has a button, to which you will add some ActionScript in just a bit. -
menuText. This column specifies the text that appears for each instance of the Menu Item movie clip that is inserted in the Ticker object to which it's applied. Notice that the rows that have Menu Item specified in the clip column contain a value for this column. The rows that have Line for the clip value do not have a value for this column because there is no menuText variable specified in the Line movie clip. If you take a quick look back at tickermenu.fla, you can see that the Contents Clip movie clip that's in frame 1 of the Content layer also contains this Generator variable. -
Contents. This column specifies the text that appears in the Contents Clip movie clip. You actually are going to use this data source to generate not only the menu, but also the content. Note The data contained in the menuData.txt file could easily be generated by middleware such as ColdFusion, Active Server Pages (ASP), or PHP, as explained in Chapter 28, "Working with Middleware." -
Now it's time to make your menu. Open the Generator Objects palette (Window > Generator Objects). Select frame 1 of the Ticker layer, and drag a Ticker object placeholder onto the Stage. (See Figure 15.19.) Use the Info panel to set the following (based on the top-left corner of the placeholder): W: 550 H: 30 X: Y: 312 Figure 15.19. Add a Ticker object placeholder and use the Info panel to size and position it. 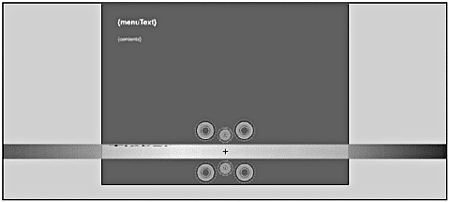 -
You have the ticker on the Stage, but now you need to customize it so that it not only displays your data, but also appears as you want it to. (See Figure 15.20.) Make sure you have the Ticker object placeholder selected, and use the Generator panel to set the following: Data Source: menuData.txt Orientation: horizontal Mask to Box: false Step Size: 5 Spacing: auto Item Space: 20 Horizontal Alignment: left Vertical Alignment: top Instance Name: ticker Figure 15.20. Modify the settings for the Ticker object. 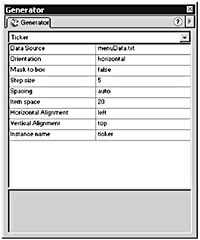 -
Select the Ticker object placeholder on the Stage and choose Insert > Convert to Symbol. Set the Name of the new symbol to Menu and set the Behavior to Movie Clip. Click OK to create the symbol. -
Test the movie. The menu should scroll across the screen. The Contents Clip movie clip won't appear yet because you haven't set it up to do so. In addition, clicking an item in the menu won't cause anything to happen because you haven't added the ActionScript required for that. -
Now you need to add some ActionScript to control the movement of the ticker. You want it to move in one direction if the mouse is on the right side of the Stage, and in the other direction if the mouse is on the left side of the Stage. Select the instance of the Menu movie clip that's on the Stage and add the following ActionScript to it: onClipEvent (load) { movieWidth = 550; _root.scrolling = true; _root.direction = "next"; } onClipEvent (enterFrame) { // check to see if the menu is already supposed to be scrolling if (_root.scrolling == true) { // if the menu is supposed to be scrolling, tell it which way to move (left or right, depending on _xmouse) if (_root._xmouse<movieWidth/2) { ticker.prevFrame(); _root.direction = "prev"; } else if (_root._xmouse>movieWidth/2) { ticker.nextFrame(); _root.direction = "next"; } // if the menu gets to the beginning or end of the ticker, tell it to jump to the appropriate frame if (ticker._currentFrame == 1) { ticker.gotoAndStop(ticker._totalframes); } else if (ticker._currentFrame == ticker._totalframes) { ticker.gotoAndStop(1); } // if the menu is suppsed to stop scrolling, tell it to stop } else if (_root.scrolling == false) { ticker.stop(); } } This ActionScript first initializes a few variables : movieWidth, _root.scrolling, and _root.direction. Then it adds the functionality required to change the ticker's direction, based on the X position of the mouse. Because the ticker that's created by Generator actually has a first and last frame, it doesn't continue indefinitely if you control it with ActionScript; you have to add a little extra functionality to verify whether the ticker is at its first or last frame. If it is, the ActionScript tells it to go to the other end of the ticker's timeline. The last part of this ActionScript verifies whether the variable _root.scrolling is false. If it is, the ActionScript stops the ticker. Note The ActionScript that has to be applied to the instance of the Menu movie clip is contained in tickermenu.txt, which can be found in the Chapter_15/Assets folder on the CD. -
The menu now moves back and forth, but you have to add a bit more ActionScript to make it stop when you mouse over an item in the menu. Open the Menu Item movie clip in Symbol-Editing mode. Select the instance of the Invisible Button symbol that's in the Button layer and add the following ActionScript: on (rollOver) { _root.scrolling = false; } on (rollOut) { _root.scrolling = true; } The menu's movement is all set. Now you have to make it control the content of your movie. In the next steps, you first use Generator to actually insert the content in the Contents Clip movie clip; then, you use some ActionScript to control that content. -
Select the instance of the Contents Clip movie clip that's in the Content layer on the main timeline. Choose Window > Panels > Generator to open the Generator panel. (See Figure 15.21.) Select Replicate from the Generator panel and modify the following settings: Data Source: menuData.txt Expand Frames : true Figure 15.21. Apply the Replicate command to the instance of the Contents Clip movie clip. 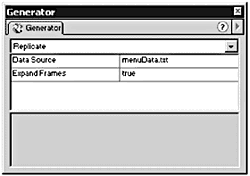 -
The Contents Clip movie clip, when processed by Generator, contains the data from menuData.txt. The frame label, as set in the Frames panel for each frame in the Contents Clip movie clip, is {menuText}. This means that Generator sets the frame label for each replicated frame to whatever the value of menuText is for that row of data. Thus, you need only add some ActionScript that tells the instance of the Contents Clip movie clip to go to that frame. Open the Menu Item movie clip in Symbol-Editing mode again. Select the instance of the Invisible Button in the Buttons layer and add the following ActionScript: on (press) { _root.content.gotoAndStop("{menuText}"); } -
Test the movie. When you move your mouse over the right side of the Stage, your menu should scroll in its default direction. When you move the mouse to the left, the menu should change direction. If you move the mouse over one of the menu items, the menu stops scrolling. When you click a menu item, the text in the instance of the Contents Clip movie clip changes. (See Figure 15.22.) Figure 15.22. When you click one of the items in the menu, the text in the Contents Clip movie clip changes. 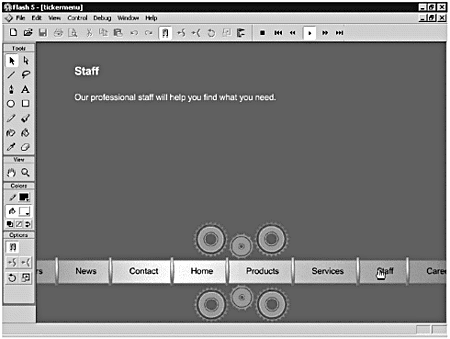  |


