| A simple pop-up, or drop-down, menu can provide navigation for your Flash movie, without taking up a lot of space. Pop-up menus often provide a launch button, which you can click to make the menu expand, providing a large number of menu options within a limited amount of space. You can set up the menu so that it disappears when you click an option or when you click the button that launches it. Pop-up menus are a familiar paradigm for both Windows and Macintosh users. It's a system of menuing to which most people are accustomed and with which most are comfortable. If you want to keep things basic and uncomplicated, this can be a good choice. Of course, this type of menu isn't going to work in every situation. Your design is going to dictate the type of menu system you want to use. Exercise 15.1 Making the Pop-Up Menu In the following exercise, you use some premade graphics to create a simple pop-up menu, which you can preview in popup_done.fla from the Chapter15/Assets folder. This pop-up menu controls navigation through an instance of a movie clip. The menu and the contents are very static; they're not data-driven in any way, and any changes must be done to the text boxes containing the content. -
Open popup.fla from the Chapter_15/Assets folder on the CD. (See Figure 15.1.) This movie has two layers , each of which has a single keyframe: -
Contents. This layer has a keyframe in frame 1. This keyframe contains an instance of the Contents movie clip, with an instance name of myContents. -
Menu. This layer also has a blank keyframe in frame 1. You add your menu to this layer. Figure 15.1. The movie contains two layers. 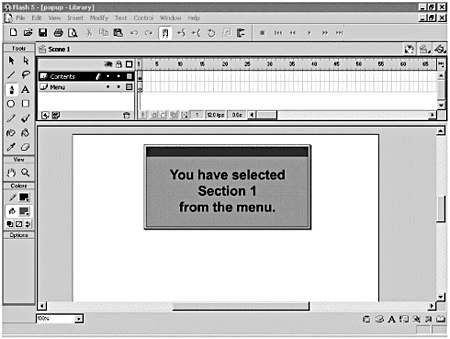 -
Choose Insert > New Symbol to create a new symbol. Set the Name of this new symbol to Menu and set its Behavior to Movie Clip. When you click OK, Flash switches to Symbol-Editing mode. -
Now you have to add a graphic to frame the bottom of the menu that you're building. Name the existing layer in your new Menu symbol Bottom Bar. Open the Library for this movie and drag an instance of the Bottom Bar button from the Menu Assets folder into frame 1 of the Bottom Bar layer. Use the Info panel to position this instance of the button at X: 0 and Y: 0. The center point of the Bottom Bar button is at its top-left corner, so it doesn't matter which point you use to position this symbol. Next you add a graphic to frame the top of the menu, and you add a layer in which your menu items will appear. -
Add a new layer, named menu items, above the Bottom Bar layer. Leave this layer empty for now because this frame will contain the "closed" version of the pop-up menu, so it won't have any menu items. Add another layer above the menu items layer, named buttons . Leave this one empty for now too (for the same reason). Add yet another layer above the buttons layer, and name it Top Bar. (See Figure 15.2.) Drag an instance of the Top Bar movie clip from the Menu Assets folder onto the Stage in frame 1 of this layer. Use the Info panel to position it at X: 0 and Y: -4. This places the Top Bar symbol right above the Bottom Bar symbol. Figure 15.2. Position the Top Bar symbol. 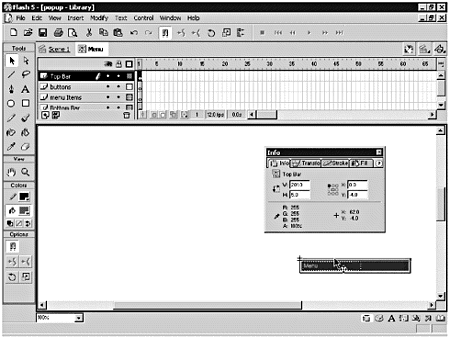 -
Add a fifth layer to the top of the layer stacking order and name it Actions/Labels. Use the Frame panel to label this frame Closed, and use the Actions panel to add the following ActionScript to this frame: stop(); -
Insert a keyframe in frame 2 of the Actions/Labels layer. Use the Frame panel to set this frame's label to Open. Attach a Stop action to this keyframe. -
Insert a keyframe in frame 2 of the Top Bar layer. Use the Info panel to position the Top Bar movie clip that's in frame 2 of the Top Bar layer at X: 0 and Y: -124. Insert a keyframe in frame 2 of the menu items layer and drag an instance of the menu items symbol from the Menu Assets folder onto the Stage. Use the Info panel to set the X to 0 and Y to 119. -
Now you need some buttons to make your menu actually do something. Your buttons will make the Contents movie clip, with an instance of myContents in the main timeline, go to a certain frame number. Insert a keyframe in frame 2 of the buttons layer. Add an instance of the Invisible Button symbol to this layer and position it over the Section 1 text in the menu items layer. Position four more instances of the Invisible Button symbol over the Section 2, Section 3, Section 4, and Section 5 text. (See Figure 15.3.) Figure 15.3. Position an instance of the Invisible Button symbol over the text for each section. 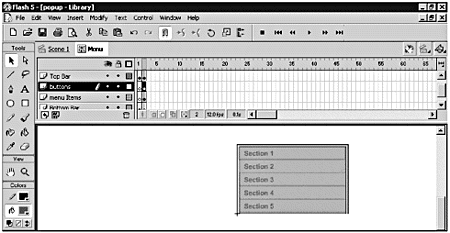 -
Select the instance of the Invisible Button over the Section 1 text and give it the following ActionScript: on (release) { _root.myContents.gotoAndStop(1); } Add the same ActionScript to each of the other four buttons in the buttons layer, changing the argument for the gotoAndStop method to the appropriate number. So, for example, the ActionScript on the button over the Section 2 text should look like this: on (release) { _root.myContents.gotoAndStop(2); } This ActionScript tells the myContents movie clip to go to the appropriate frame number. Thus, when you click the button over the Section 1 text, the myContents movie clip jumps to frame 1. When you click the button over the Section 2 text, the movie clip jumps to frame 2. In the next two steps, you make your menu open and close by jumping back and forth between the frames labeled Open and Close. -
Select the instance of the Bottom Bar button in frame 1 of the Bottom Bar layer. Use the Actions panel to give this button the following ActionScript: on (release) { this.gotoAndStop("open"); } -
Insert a keyframe in frame 2 of the Bottom Bar layer and modify the ActionScript on the button in that frame so that it makes the movie jump to the closed frame: on (release) { this.gotoAndStop("closed"); } -
Choose Edit > Edit Movie to switch to Movie-Editing mode. Select frame 1 of the Menu layer and drag an instance of the Menu symbol from the Library onto the Stage. It doesn't matter where you position it just put it somewhere along the bottom of the Stage. Save your movie. Your simple menu is done. Test the movie to see how the menu works. When you click the Bottom Bar button in the menu, the menu should pop open as it goes to the frame labeled Open. If you click an item in the menu, the Contents movie clip switches to the content for the appropriate section. When you click the Bottom Bar button again, the menu closes as it jumps to the frame labeled Close. (See Figure 15.4.) Figure 15.4. When you click the Section 2 button, the Contents movie clip jumps to the corresponding frame. 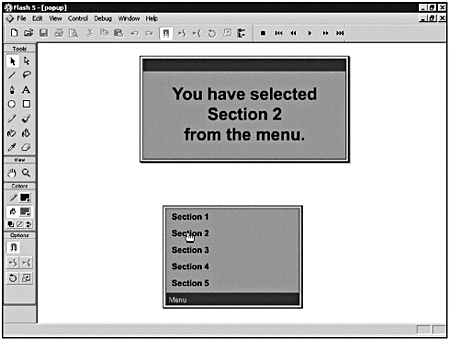  |