Coding the Application
|
We have built the foundations for the application. The next step is to create the ASP.NET pages that make up its superstructure. During the rest of the chapter, we will be using HTML mode for editing the pages - while VS.NET has great support for drag and drop, it doesn't help us to show you exactly what each page requires. We could show you the design view, but then you'd have to guess what each element is! The first page that we will create is, reasonably enough, the starting point of the application: the home page.
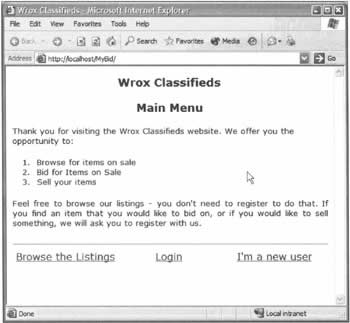
The Home PageThe home page of the application is responsible for welcoming the user to the application, providing some information about what the application is for, and displaying the top-level menu selections that will enable the user to
We'll call the home page Default.aspx (we'll see how to do this in a moment), which means that the user can simply type in the URL of a virtual directory on our web server, and they'll automatically be directed to this page. Try It Out - Creating the Home Page
The output of the code will look like this: This is all created using HTML, and it's quite straightforward, so let's quickly move on.
User Registration and LoginSo, our user has arrived at the site and been presented with Default.aspx, which offers three options:
We'll cover the browsing option later in the chapter; in this section, we'll focus on registration and login.
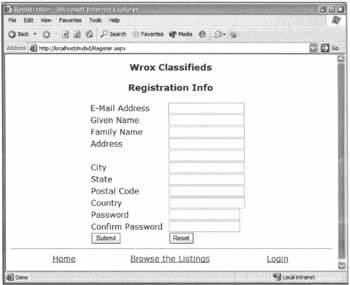
Collecting Registration DetailsIn order to allow a new user to register for the first time, we'll need to collect their details, check their password, and enter all that information into the database. In order to manage this, we'll create a new ASP.NET page called Register.aspx. Try It Out - Collecting Registration Details with Register.aspx
The output of Register.aspx will look like this:
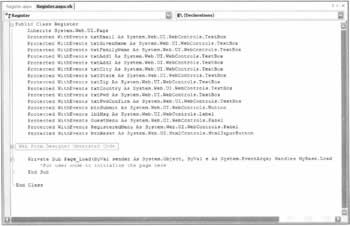
How It WorksThere seems to be quite a lot of code here, but it's not too difficult. The main task of Register.aspx is to present the user with a form that they'll use to submit their registration information. When the user has completed the form, they press the Submit button. The first line in Register.aspx is the Page directive, which (among other things) specifies the code-behind file that we'll be using:
<%@ Page Language="vb" AutoEventWireup="false" Codebehind="Register.aspx.vb" Inherits="MyBid.Register"%> If you look at the Register.aspx file, you can see that we're using a considerable number of web server controls, such as text boxes and labels. (The plain HTML elements are just used to lay out the controls in a pleasing fashion.) Among these, we have a text box called txtFamilyName:
<td><asp:TextBox Runat="server" /></td> Because VS.NET uses the code-behind model, we have to provide a link between the two files. For each ASP.NET web server control in the .aspx file, we have a line similar to this in the .aspx.vb file:
Protected WithEvents txtFamilyName As System.Web.UI.WebControls.TextBox This allows us to refer to the control by its name, and ASP.NET handles the link between the two files. Moving on to Register.aspx.vb, we have event handlers called Page_Load() and btnSubmit_Click(). When the page is loaded, the Page_Load() event handler is called, and we check to see if the user is logged in by using the Tools.IsLoggedIn() method that we discussed earlier in the chapter. We do this because the page not only allows entry of new user details, but also allows editing of existing user details. This saves us from having to write two pages that do exactly the same thing. If the user is logged in, then we are modifying their details, so we use the features of one of our components to fetch the existing data:
Dim myPersonDetails As Bid.PersonDetails = New Bid.PersonDetails() Dim obj As Bid.Person = New Bid.Person() myPersonDetails = obj.GetPersonDetails(Request.Cookies("email").Value) These calls in our code ultimately call stored procedures to fetch the data from the database. We know which user to fetch details for, because we've stored their e-mail address in a cookie. Once the data has been fetched, we display it in the text boxes, like so:
txtFamilyName.Text = myPersonDetails.FamilyName txtGivenName.Text = myPersonDetails.GivenName When the data has been displayed, we hide the menu that's used for new users, and show the menu for registered users:
GuestMenu.Visible = False RegisteredMenu.Visible = True Each of these menus is really just a set of plain HTML controls (tables for layout, and hyperlinks for the menu items), but we've wrapped them in an asp:Panel. The Panel is just a container control that allows us to hide or show whole sections of the interface with ease. If the user isn't logged in, then we simply do the opposite with the menus: we show the one for guests, and hide the one for registered users:
GuestMenu.Visible = True RegisteredMenu.Visible = False That's all for the Page_Load() event handler, so let's look now at what happens when the Submit button is pressed. The first thing we do is check to see if the page content is valid:
Private Sub btnSubmit_Click(ByVal sender As System.Object, _ ByVal e As System.EventArgs) Handles btnSubmit.Click If Page.IsValid Then In fact, since there's no validation, this isn't actually necessary on this page - but it does protect the code in case we add validation later on. We'll talk about this at the end of the chapter. Next, we create an instance of the Person object. This will be used to create or update the user details:
Dim obj As Bid.Person = New Bid.Person() Dim strStatus As String If we're adding a new record, we call the AddCustomer() method, and pass in the details:
If Process = "ADD" Then strStatus = obj.AddCustomer(txtFamilyName.Text, _ txtGivenName.Text, _ txtEmail.Text, _ txtPwd.Text, _ txtAdd1.Text, _ txtAdd2.Text, _ txtCity.Text, _ txtState.Text, _ txtZip.Text, _ txtCountry.Text) This method places one of two things in strStatus: the ID number of the newly added user, or an error message. If the value returned is numeric, we know that adding the customer succeeded, so we can store their details in cookies and send them to the menu for registered users. If the return value isn't numeric, then we display an error message:
If IsNumeric(strStatus) Then Response.Cookies("GivenName").Value = txtGivenName.Text Response.Cookies("EMail").Value = txtEmail.Text Response.Cookies("PersonID").Value = strStatus Response.Redirect("MenuForRegisteredUsers.aspx") ElseIf Len(strStatus) > 1 Then lblMsg.Text = strStatus End If For existing users, the process is much the same, but this time calling the ModifyCustomer() method:
strStatus = obj.ModifyCustomer(txtFamilyName.Text, _ txtGivenName.Text, _ txtEmail.Text, _ txtPwd.Text, _ txtAdd1.Text, _ txtAdd2.Text, _ txtCity.Text, _ txtState.Text, _ txtZip.Text, _ txtCountry.Text) Checking for errors is also similar, but this time we already have a user ID, so we use 1 as the return value for success:
If strStatus = "1" Then Response.Cookies("GivenName").Value = Request.Form("txtGivenName") Response.Cookies("EMail").Value = txtEmail.Text Response.Redirect("MenuForRegisteredUsers.aspx") ElseIf Len(strStatus) > 1 Then lblMsg.Text = "Update Failed! " & strStatus End If OK, that's the user registered - let's look at the login page.
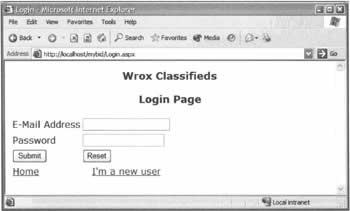
Managing User LoginIf the user has registered on a previous occasion and is now revisiting the site, they wouldn't expect to be asked to go through the registration process again. To allow previously registered users to identify themselves, we present a login page: Login.aspx. Try It Out - The Login Screen and Login Checker
How It WorksCompared to some of the code we've been looking at, this page is extremely simple. As in the registration page, we first check to see if the page content is valid:
If Page.IsValid = True Then We then create an instance of the Person object and call its Login() method, passing in the e-mail address and password. This calls a stored procedure that compares these details with those held in the database:
Dim obj As Bid.Person = New Bid.Person() Dim myPersonDetails As Bid.PersonDetails = New Bid.PersonDetails() myPersonDetails = obj.Login(txtEmail.Text, txtPwd.Text) A valid user will have an ID that's greater than 0; if they are valid, we set the cookie details and send them to the menu for registered users:
If myPersonDetails.PersonID <> 0 Then Response.Cookies("EMail").Value = txtEmail.Text Response.Cookies("GivenName").Value = myPersonDetails.GivenName Response.Cookies("PersonID").Value = myPersonDetails.PersonID Response.Redirect("MenuForRegisteredUsers.aspx") Else lblMsg.Text = "Login failed. Please try again." End If End If That's it for registration and logging in. Let's now see how the menu for registered users differs from the one for guests.
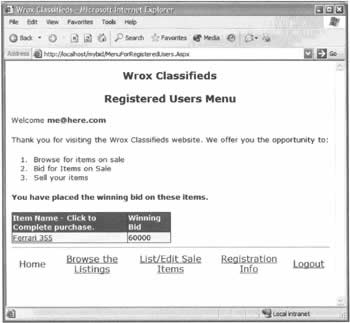
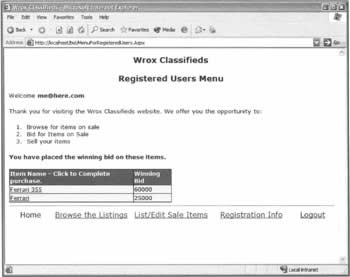
Menu for Registered UsersIn this menu, we want to show not only a list of things a registered user can do (add items, browse, and so on), but also a grid of items that the user has placed winning bids on. This is where we start to see data binding getting into the action. Try It Out - Registered Users' Home Page
If the user doesn't have any winning bids, then the grid will be empty.
How It WorksThe first thing we do in this page (in the Page_Load() event handler) is to decide whether the user is logged in or not:
If Tools.IsLoggedIn Then lblUserName.Text = "Welcome <b>" & _ Request.Cookies("EMail").Value & "</b><br/>" Else Response. Redirect("Default.aspx") End If If the user is logged in, we show them a welcome message. If not, we redirect them to the default menu page. Now, since this page should only ever be seen by a user who is already logged in, you might wonder why we do this. But that's exactly the point: it shouldn't be seen by a user who isn't logged in, but there's nothing to stop someone from typing in this page as part of a URL and jumping to it directly. This means that in theory at least, we should check the login for each and every page.
So, having verified that the user is logged in, we need to load the data. We only do this on the first load of the page, and not when any buttons have been pressed. This saves a call to the database when it's not required:
If Not Page.IsPostBack Then BindGrid() End If lblStatus.Text = Request.QueryString("msg") Loading the data is then extremely simple:
Private Sub BindGrid() Dim intPersonID As Int32 = CInt(Request.Cookies("PersonID").Value) Dim objItemList As Bid.Item = New Bid.Item() myWinningBids.DataSource = objItemList.GetMyWinningBids(intPersonID) myWinningBids.DataBind() End Sub Here, we extract the ID of the user from the cookie, and then pass this into the GetMyWinningBids() method of the Item class. This will fetch those bids that this user has won from the database. The data is returned in the form of a SqlDataReader object, which is set to the DataSource of the grid. Calling BindGrid() reads this data and constructs the grid for us. We now need to look at what happens as each item in the grid is created. Of course, the DataGrid control does most of the footwork for us, but we want to do a little more with our data: we want to show the winning bids together with hyperlinks that will let the user confirm that they wish to buy the items in question. These links will take us to the AcceptBid.aspx page (which we'll describe later). However, we've decided that rather than jump directly to this page, we'd like the user to confirm that they really do wish to buy the item. We could do this in AcceptBid.aspx, but that would mean that if they said no, we'd have to jump back here. Instead, we'll use a JavaScript popup dialog - the user then gets the chance to confirm the purchase, but the underlying page remains the same. What we're doing is adding this popup to the hyperlink, so that it shows before the link takes effect. To get a procedure to run as each item is created in the grid, we've added the following attribute to the grid definition:
OnItemCreated="myWinningBids_ItemCreated" This identifies the procedure to run:
Sub myWinningBids_ItemCreated(ByVal Sender As Object, _ ByVal e As DataGridItemEventArgs) Notice that the arguments for this handler are slightly different from the ones in many of the other procedures we've dealt with. In many of those, the second argument (e) is of type EventArgs. Here, it is DataGridItemEventArgs. For every row in the grid, this procedure is called, and e will contain details of the row. One of those details is Item, which contains the row contents. At this point, we can use another property, ItemType, to determine what type of item we are creating - a Header, an Item, an AlternatingItem, and so on. We are only interested in Item and AlternatingItem, since this is where our data will be shown:
If e.Item.ItemType = ListItemType.Item Or _ e.Item.ItemType = ListItemType.AlternatingItem Then When we know that we're dealing with the correct item type, we need access to the hyperlink. To do this, we use the FindControl() method of the item to find the control by name:
Dim temphypAcceptBid As HyperLink temphypAcceptBid = e.Item.FindControl("hypItemName") Finally, we add an attribute to this hyperlink control. It's this attribute that will provide the JavaScript popup:
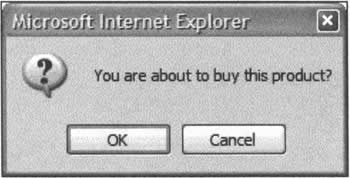
temphypAcceptBid.Attributes.Add("onclick", _ "return confirm('You are about to buy this product?');") There are two arguments to the Add() method. The first is the attribute name, and the second is the value of this attribute. In our case, the attribute is named onclick, which is a client-side event handler. The value for this type of attribute is either the name of a client-side function, or the actual JavaScript code itself. We've chosen the latter, since the code is extremely small. In fact, all it does is to call the confirm() function - which pops up the dialog: This gives us two choices: to confirm our purchase (and return a value of true), or to cancel our purchase (and return a value of false). The really clever thing about this, though, is that we now have a server-side hyperlink control, but we can intercept the user action when they click the link. Our custom code is run before the link takes effect, and the link is only followed if the return value from the popup is true. This may seem like a slightly complex mechanism, but there are two really important lessons to learn here:
It's well worth getting used to these techniques, which can prove extremely useful, especially as the complexity of your applications grows. The final function we added in this section, FormatUrl(), performs some formatting of the URL for us. Often, this isn't necessary, because we can simply bind to data. With this hyperlink, however, we want to pass in two pieces of information: the ID of the item, and the bid value. This means we have to construct the URL manually. Here's a reminder of the binding syntax for this control:
NavigateUrl='<%# FormatURL(DataBinder.Eval(Container.DataItem, "ItemID"), DataBinder.Eval(Container.DataItem, "Highestbid")) %>' The NavigateUrl property is the URL to jump to, but instead of binding it directly to a data item, we are binding to the result of a function, and passing into that function the two items we need:
Public Function FormatURL(ByVal intItemID As Int32, _ ByVal dblWinningBid As Double) As String Return "AcceptBid.aspx?item&blast-para">The function simply takes these two items and constructs a string that represents the URL we need. It's this string that becomes the result of the binding.
Some of this information will be displayed to potential buyers, and some is used internally in the system. And clearly, there's more to managing the 'for sale' items than just adding them to a list - we need a mechanism that allows the seller to edit the details, or to remove an item from listings. We'll cover these interfaces in the following Try It Out sections.
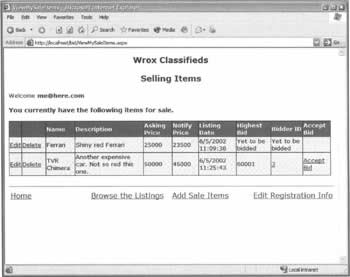
Viewing One's Own Sale ItemsLet's first look at how we view the items that we've put up for sale. You might argue that we should add some items before we start to view them, but the menu structure we have means that the option to add new items is accessed from the view page. Try It Out - Displaying the Items that a User Has for Sale
How It WorksThere really is quite a lot of code here, but once again it's actually not too difficult. Let's start our analysis when the page loads for the first time, when we want to bind the grid to the data and display a welcome message:
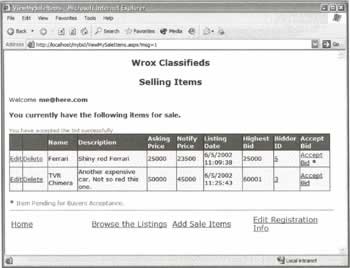
If Not Page.IsPostBack Then BindGrid() lblUserName.Text = "Welcome <b>" & _ Request.Cookies("email").Value & "</b><br/><br/>" After that, we check for any message that's been passed into this page. This will be 1 for successful acceptance of a bid and 0 for an unsuccessful acceptance.
If Request.QueryString("msg") = "1" Then lblStatus.Text = "You have accepted the bid successfully" End If If Request.QueryString("msg") = "0" Then lblStatus.Text = "Bid acceptance Failed." End If End If The method for loading the data and binding it to the grid is similar to the code we've seen before. It first creates an instance of the Item object, and then calls ViewItems(), passing in the ID of the seller. This returns the data that's shown in the grid.
Private Sub BindGrid() Dim intSellerID As Int32 = CInt(Request.Cookies("PersonID").Value) Dim objItemList As Bid.Item = New Bid.Item() myItems.DataSource = objItemList.ViewItems(intSellerID) myItems.DataBind() End Sub We also have an ItemCreated() event handler for the grid, which is similar to the one you saw earlier. This simply finds the hyperlink used to accept a bid, and adds the JavaScript popup confirmation:
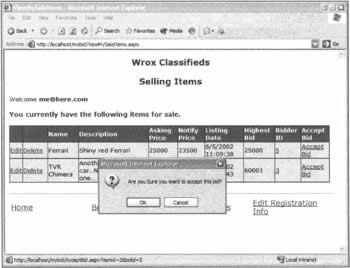
Sub myItems_ItemCreated(ByVal Sender As Object, _ ByVal e As DataGridItemEventArgs) If e.Item.ItemType = ListItemType.Item Or _ e.Item.ItemType = ListItemType.AlternatingItem Then Dim temphypAcceptBid As HyperLink temphypAcceptBid = e.Item.FindControl("hypAcceptBid") temphypAcceptBid.Attributes.Add("onclick", _ "return confirm('Are you Sure you want to accept this bid?');") End If End Sub Let's now look at the editing features of the grid. When we defined the grid, we gave it these attributes:
OnEditCommand="myItems_Edit" OnUpdateCommand="myItems_Update" OnCancelCommand="myItems_Cancel" OnDeleteCommand="myItems_Delete" These identify the event handlers that run in order to edit, update, and delete items from the grid. How does ASP.NET know which procedures to run? The answer lies in the first set of controls added to the grid:
<asp:EditCommandColumn EditText="Edit" CancelText="Cancel" UpdateText="Update" /> <asp:ButtonColumn text="Delete" CommandName="Delete" ItemStyle-Width="50px" /> As we first saw in Chapter 7, the first of these shows a single column with the buttons shown as links. Initially, the column will show Edit, and when Edit is clicked, we are put into edit mode. This then changes the Edit button to show Cancel and Update; selecting either of these takes us out of edit mode, and the Edit button is once again shown. The Delete button is always shown. The EditCommandColumn is a special column that handles all of this button and label changing for us. Moreover, ASP.NET knows that there are three commands (edit, update, and cancel), and automatically maps these to the appropriate On...Command attributes. The Delete button is shown as a separate column, so we use a ButtonColumn for this. Because we want it to participate in the editing, we set the CommandName to Delete - this tells ASP.NET to run OnDeleteCommand when it's pressed. Let's now look at these event handlers. When the Edit button is pressed, the event handler specified by the OnEditCommand attribute is run. In it, we set the EditItemIndex of the grid to the current ItemIndex; that identifies the current row. We then re-bind the grid:
Sub myItems_Edit(ByVal Sender As Object, ByVal E As DataGridCommandEventArgs) myItems.EditItemIndex = CInt(E.Item.ItemIndex) BindGrid() End Sub When we re-bind the grid, and the EditItemIndex is set to a value other than -1, the grid is put into edit mode. This has the following effects:
The great thing about this is that we just have to define what the templates look like (or use bound columns), and ASP.NET takes care of displaying the correct controls. Once in edit mode, the user has the option of canceling any changes they make. For this, we simply set the EditItemIndex to -1 (which takes the grid out of edit mode), and then re-bind the grid to show the original data:
Sub myItems_Cancel(ByVal Sender As Object, ByVal E As DataGridCommandEventArgs) myItems.EditItemIndex = -1 BindGrid() End Sub There's a little more work required for updating the data, but it's still fairly straightforward. The event handler takes two parameters, and you've already seen that the E parameter identifies the current row.
Sub myItems_Update(ByVal Sender As Object, ByVal E As DataGridCommandEventArgs) First, we need to get the key from the grid. This is the unique ItemID, and it's stored in the grid's DataKeys collection. This like a special hidden column, and it's used to store ID values that we need for editing, but we don't want to show on the screen. When we defined the grid, we used the following attribute to identify which column in the data represented the this key:
DataKeyField="ItemID" When the grid was loaded, ASP.NET automatically filled the DataKeys collection with the values from the ItemID column. We can then index into this column (using the current ItemIndex to identify the row) to find the ItemID for this row:
Dim strItemID As String = myItems.DataKeys(CInt(E.Item.ItemIndex)) Next, we need to extract the other editable details from the grid. We use the FindControl() method to find each text box, and extract the value from the Text property:
Dim strItemName As String = _ CType(E.Item.FindControl("txtItemName"), TextBox).Text Dim strItemDesc As String = _ CType(E.Item.FindControl("txtDescription"), TextBox).Text Dim strAskingPrice As String = _ CType(E.Item.FindControl("txtAskPrice"), TextBox).Text Dim strNotifyPrice As String = _ CType(E.Item.FindControl("txtNotifyPrice"), TextBox).Text Once the data is safely stored in some local variables, we create an instance of the Item object, and call its UpdateItem() method, passing in those values.
Dim myItem As Bid.Item = New Bid.Item() Dim strResult As String strResult = myItem.UpdateItem(strItemID, strItemName, strItemDesc, _ strAskingPrice, strNotifyPrice) Like our other update routines, a return value of 1 indicates success, so we show either a successful update message, or an error message:
If strResult = "1" Then lblStatus.Text = "Update Success!" ElseIf Len(strResult) > 1 Then lbIStatus.Text = "Update Failed! " & strResult End If Finally, we set the EditItemIndex to -1 to take the grid out of edit mode, and we re-bind the data:
myItems.EditItemIndex = -1 BindGrid() End Sub Deleting an item is simpler, since we don't have to extract any data. First, we extract the ItemID from the DataKeys collection:
Sub myItems_Delete(ByVal sender As Object, _ ByVal e As DataGridCommandEventArgs) Dim strItemID As string = myItems.DataKeys(CInt(e.Item.ItemIndex)) Dim myItem As Bid.Item = New Bid.Item() Dim strResult As String Then we pass this value to the DeleteItem() method of the Item object. This calls the stored procedure that deletes this item from the database.
strResult = myItem.DeleteItem(strItemID) Finally, we have the check for success, and take the grid out of edit mode.
If strResult = "1" Then lblStatus.Text = "Update Success!" ElseIf Len(strResult) > 1 Then lblStatus.Text = "Update Failed! " & strResult End If myItems.EditItemIndex = -1 BindGrid() End Sub Continuing the story, let's now look at the formatting functions. First, we have the FormatUrl() function, which differs slightly from the one we saw in the last section. It examines the value of the highest bid, and uses this to decide which URL to use:
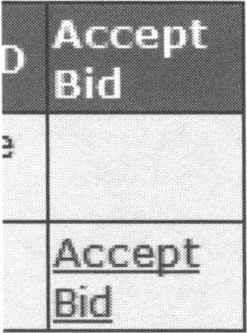
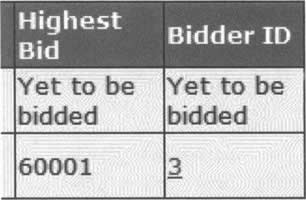
Public Function FormatUrl(ByVal dblHighestBid As Double, _ ByVal intItemID As Int32, _ ByVal intBidID As Int32) As String If dblHighestBid = 0 Then Return " " Else Return "AcceptBid.aspx?item&bidpara">This formatting is used on the URLs in the Accept Bid column. You can see that the first row has an empty cell, whereas the second has a URL. This is because the first row didn't have any bids.
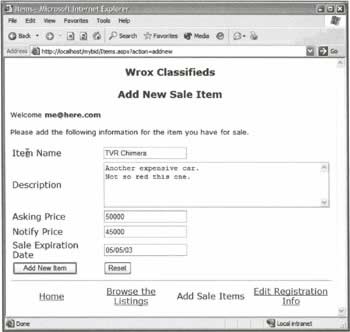
How It WorksThe code that executes on loading the page we've seen before - it just displays a welcome message. For the Add New Item button, we first create a new instance of the Item object:
Dim obj As Bid.Item = New Bid.Item() Dim strStatus As String Next, we call the AddItem() method, passing all of the information for the item.
strStatus = dbj.AddItem(txtItemName.Text,_ txtItemDesc.Text, _ txtAskPrice.Text, _ txtNotifyPrice.Text, _ Request.Cookies("PersonID").Value, _ txtExpDate.Text) Finally, we check the status - if it's numeric, we send the user back to the menu. Otherwise, we display an error message:
If IsNumeric(strStatus) Then Response.Redirect("MenuForRegisteredUsers.aspx") ElseIf Len(strStatus) > 1 Then lblMsg.Text = "Error while adding the item. Please try again." & strStatus End If
Browsing and BiddingWhere have we reached? Well, at this point, any registered user can now place items in the sale listings. The next step is to allow users to browse the listings and bid for the items that are on sale there. For these tasks, we'll write two more new pages: BrowseListings.aspx and BidItem.aspx.
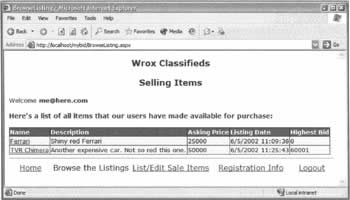
Browsing the ListingsOur system provides a very simple interface for browsing all of the items our users have placed for sale - all of the items are just presented in a list. This leaves the door open for later enhancements to be made. Try It Out - Browsing the Items for Sale
How It WorksThe code for this page is comparatively simple, and you should now be getting quite familiar with the kind of code we're writing. First, we have the code in the Page_Load() event handler that calls a procedure to load the data, and then checks to see if the user is logged in. This page allows both registered and unregistered users, so we display a different message and menu bar depending on which they are:
If Not Page.IsPostBack Then BindGrid() ' Show the appropriate menu If Tools.IsLoggedIn() Then lblUserName.Text = "Welcome <b>" & Request.Cookies("EMail").Value & _ "</b><br/><br/>" GuestMenu.Visible = False RegisteredMenu.Visible = True Else lblUserName.Text = "Welcome guest<br/><br/>" GuestMenu.Visible = True RegisteredMenu.Visible = False End If End If Loading and binding the data to the grid is simple: we just call the ViewItemsForSale() method of an Item object, which fetches all items for sale from the database:
Private Sub BindGrid() Dim objItemList As Bid.Item = New Bid.Item() myItems.DataSource = objItemList.ViewItemsForSale() myItems.DataBind() End Sub We've seen FormatUrl() functions before, but this one shows that you can use other functions as part of the dynamic formatting process. Here, we're checking for a logged in user, and changing the contents of the string returned. For logged in users, this will be a URL to point to the item for sale; for guests, there is no URL. This means that the item becomes read-only for guests:
Public Function FormatURL(ByVal intID As Integer, _ ByVal strName As String, ByVal strDesc As String) If Tools.IsLoggedIn() Then Return "BidItem.aspx?item&itemname=" & _ Server.UrlEncode(strName) & "&itemdesc=" & _ Server.UrlEncode(strDesc) Else Return "" End If End Function
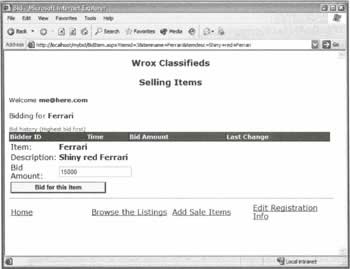
Bidding for an ItemThe FormatUrl() function shown above allows a logged-in user to click on the name of an item. This takes them to the page where they can bid for that item. Try It Out - Bidding for an Item
How It WorksOnce again, the code here is fairly simple. When the page loads, we extract the details of the item from the QueryString, as these are passed in from the calling page:
If Not Page.IsPostBack() Then lblUserName.Text = "Welcome <b>" & Request.Cookies("email").Value & "</b><br/><br/>" lblMsg.Text = "Bidding for <b>" & _ Request.QueryString("itemname") & "</b>" lblStatus.Text = "Bid history (Highest bid first)" lblItemName.Text = "<b>" & Request.QueryString("itemname") & "</b>" lblItemDesc.Text = "<b>" & Request.QueryString("itemdesc") & "</b>" Response.Cookies("ItemID").Value = Request.QueryString("ItemID") btnSubmit.Attributes.Add("onclick", "return confirmbid());") BindGrid() GetHighBid() End If You'll also notice that we use the trick of adding attributes for client-side code. This time, however, we're not just displaying a popup. What we're doing is running the following client-side JavaScript routine:
function confirmbid() ( var highbid; var currbid; highbid = parseFloat(document.Form1.txtHighBid.value); currbid = parseFloat(document.Form1.txtBidAmount.value); if (currbid <= highbid) { alert("You should bid higher than " + highbid + "."); return false; } else return true; } This extracts the current highest bid, compares it to the current bid, and ensures that the current bid is higher. At the end of the chapter, we'll mention another way in which this could be accomplished. The last thing that happens when the page is loaded is that the data is fetched into the grid, and the highest bid is placed into a hidden field (we'll explain why in a moment). Binding the grid is simply a matter of fetching the data using the GetBidDetails() method from our data access layer.
Private Sub BindGrid() Dim intItemID As Int32 = CInt(Request.QueryString("ItemID")) Dim objItemList As Bid.Item = New Bid.Item() myItems.DataSource = objItemList.GetBidDetails(intItemID) myItems.DataBind() End Sub To get the highest bid, we call another method in our data access layer. This just searches through the bids for this item and extracts the highest. We put this into a hidden field on the page, so that the user can't see it. It is actually extracted in the JavaScript function:
Private Sub GetHighBid() Dim obi As Bid.Item = New Bid.Item() txtHighBid.Value = obj.GetHighestBid(CInt(Request.Cookies("itemid").Value)) End Sub When the user submits their bid, the AddBid() method of an Item object is called, which adds the bid to the database. As usual, this returns 1 for a successful operation.
Private Sub btnSubmit_Click(ByVal sender As System.Object, _ ByVal e As System.EventArgs) Handles btnSubmit.Click Dim obj As Bid.Item = New Bid.Item() Dim strStatus As String = obj.AddBid(CInt(Request.Cookies("itemid").Value), _ CInt(Request.Cookies("personid").Value), _ CDbl(txtBidAmount.Text)) If strStatus = "1" Then lblMsg.Text = "Your bid has been accepted." BindGrid() Else lblMsg.Text = "Bid Failed." & strStatus End If End Sub
Completing a SaleThe final section of this chapter explains how we'll tie up a sale. We'll do it by having the seller accept a bid, and then having the successful bidder acknowledge the acceptance and thus complete the sale.
Accepting a BidFirst, we'll look at how we can allow the seller to accept a bid. When this happens, the buyer is notified, and can accept (or reject) the deal at that point. When both parties accept the deal, the information is logged to the database. Try It Out - Accepting a Bid
How It WorksThis code simply confirms the bid and redirects us back to the page we came from. First, we use one of the ServerVariables of the Request to find out which page we came from:
Dim strFrom As String = LCase(Request.ServerVariables("HTTP_REFERER")) If we've come from the ViewMySaleItems page, then we're accepting a bid on one of our items. So, we extract the details from the QueryString, and add this as a sale using the AddSale() method of an Item() object.
If InStr(strFrom, "ViewMySaleItems.aspx") > 0 Then Dim intItemID As Int32 = CInt(Request.QueryString("itemid")) Dim intBidID As Int32 = CInt(Request.QueryString("bidid")) Dim obj As Bid.Item = New Bid.Item() Dim strStatus As String strStatus = obj.AddSale(intItemID, intBidID) We then redirect back to the original page, passing back a message indicating whether the process succeeded.
If Trim(strStatus) = "1" Then Response.Redirect("ViewMySaleItems.aspx?msg=1") Else Response.Redirect("ViewMySaleItems.aspx?msg=Bid-Acceptance-Failed") End If End If If, on the other hand, we've come from the MenuForRegisteredUsers page, then we're a buyer confirming the sale. In this case, we call the CompleteSale() method of an Item object to complete the sale.
' When Buyer accepts the Sale If InStr(strFrom, "MenuForRegisteredUsers.aspx") > 0 Then Dim intItemID As Int32 = CInt(Request.QueryString("itemid")) Dim intBidID As Int32 = CInt(Request.QueryString("bid")) Dim obj As Bid.Item = New Bid.Item() Dim strStatus As String strStatus = obj.CompleteSale(intItemID, intBidID) And finally we redirect, giving an appropriate message.
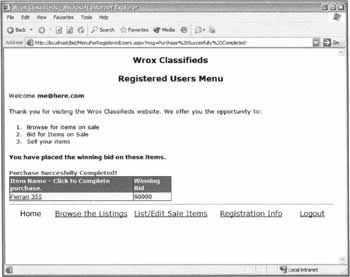
If Trim(strStatus) = "1" Then Response.Redirect( _ "MenuForRegisteredUsers.aspx?msg=Purchase Succesfully Completed!") Else Response.Redirect( _ "MenuForRegisteredUsers.aspx?msg=Sale-Completion-Failed.") End If End If Response.Write(strFrom) Try It Out - Accepting Bids
Let's take a look at how this code works in practice. When you click to accept a bid, you get the notification: If you accept this bid then you are passed to the AcceptBid.aspx page, which logs the details and passes us back again: Here you can clearly see the message that AcceptBid.aspx sent us.
Notifying the BidderNow that all of the database tables have been updated, there's just one last step: notifying the buyer that their bid has been accepted. Try It Out - Notifying the Buyer
The code for accepting a bid by the buyer is in the MenuForRegisteredUsers.aspx page. When the buyer logs in to this application, he will see the list of winning bids in this page. At this stage, you have the option to confirm the purchase by clicking on the item name - this gives you the popup confirmation. If you accept, AcceptBid.aspx is loaded, and you are returned to the menu. Here, you can see that I eventually plumped for the cheaper Ferrari. If only this were for real! | |||||||||||||||||||||||||||||||||||||||||||||||||||||||||||||||||

EAN: 2147483647
Pages: 263