Connection Syntax
|
Having covered the necessary groundwork, we can at last begin to look at using Visual Basic .NET to write ASP.NET pages that use ADO.NET objects to access data stores. To understand this process properly, it's useful to break the discussion into two parts: creating the connection, and using the connection. Each of these parts has three steps, and if you keep these in mind, you'll find that you're able to write the necessary code almost immediately. First up, creating a connection to a data store requires the instantiation of a connection object. Code for doing this is characterized by three features:
Then, once a connection object has been created, the code that makes use of the connection tends to look like this:
Returning to the start of that list, you won't be surprised to discover that the ADO.NET classes, like all of the classes in the .NET Framework class library, are organized into namespaces. A few moments ago, we saw that ADO.NET provides three ways to access data: the SQL Server .NET data provider, the OLE DB .NET data provider, and the ODBC .NET data provider. Accordingly, there are three namespaces, as follows:
In addition to these, we'll almost always find ourselves making use of the System. Data namespace, which contains a large number of classes and other entities that form the 'backbone' of ADO.NET. The classes in this namespace are not specific to a particular data provider.
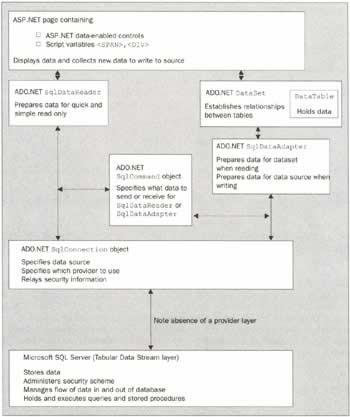
Connections using the SQL Server .NET Data ProviderAs we discussed above, the SQL Server .NET data provider offers a specialized service by virtue of its internal code for communicating with the Tabular Data Stream. On the surface, however, to the ADO.NET programmer, it's almost exactly the same as the OLE DB .NET data provider (and, for that matter, the ODBC .NET data provider). This means that once we understand how to use one data provider, we will be all set to use the other two.
If you compare the following diagram with the generic one we looked at earlier, you'll see that we've included the names of the specialized SQL Server classes (plus DataSet and DataTable, which are used for all data source types), but removed any specific reference to a provider layer - the .NET data provider communicates with the TDS, and no translation is necessary. In the remainder of this section, we'll translate this diagram into ASP.NET code that retrieves data from the MSDE Northwind database we set up in Chapter 1. Later in the book, we'll look at the help for writing data-driven web sites that's provided by the Visual Studio environment, but for now we'll just use a text editor, so that you can see exactly what's going on.
SQL Connection SyntaxEarlier in the chapter, we talked about the three programmatic steps necessary to create an ADO.NET connection object. In summary, these were:
Starting at the top of that list, writing an ASP.NET page that connects to a SQL Server database requires classes from two .NET Framework namespaces: the high-level, more general System.Data (which we'll use in every example we consider), and the task-specific System.Data.SqlClient. In other words, every SQL Server-accessing ASPX file you ever write will start like this:
<%@ Import namespace="System.Data" %> <%@ Import namespace="System.Data.SqlClient" %> Next, in order to create a connection object, we need first to specify a connection string. When it comes to creating a connection object for a SQL Server database (and therefore for an MSDE database), we need to provide at least three pieces of information:
These requirements result in the creation of a connection string that looks something like this, where the items in italics will be replaced with specific values in actual code:
Dim strConnection As String = "server=MyServer; database=MyDatabase; " & _ "integrated security=<true / false>;" Finally, once we have the connection string, we can create the connection object. For SQL Server, this object will be an instance of the System.Data.SqlClient.SqlConnection class, and its creation is as easy as this:
Dim objConnection As New SqlConnection(strConnection) Once created, using a SqlConnection object is a matter of opening it, performing operations on it, and closing it. While that's not our focus in this chapter, it would be hard to prove that everything's working properly without doing something with the data to which we've gained access, so we'll do precisely that in the following example.
Try It Out - Creating a Connection to a SQL Server Database
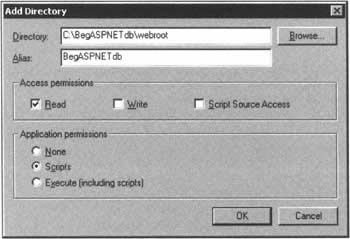
We set up MSDE and the Northwind database in Chapter 1, but there's a little extra work that we should do before assembling our first data-driven ASP.NET page. To keep the examples we write in this book away from any other code, it makes sense to place them in a virtual directory, and that's where we'll begin this part of the story.
How It WorksAfter the opening lines of code that import the namespaces we've already talked about, the rest of the ASPX file breaks into two rather obvious halves. The section contained in <html>...</html> tags is familiar-looking HTML, but a point of interest is the <asp:DataGrid> element:
<asp:DataGrid runat="server" GridLines="None" BackColor="LightBlue" CellPadding="5" CellSpacing="5" BorderWidth="2" BorderColor="Black" ToolTip="Includes only those employees who are at HQ" /> The <asp:DataGrid> element instructs ASP.NET to use a DataGrid web server control in the course of generating the HTML page that's eventually displayed to the client - we can populate it with data, and it will display that data in the form of an HTML <table>. Most of the attributes of the <asp:DataGrid> element just describe how the table should look on the screen (in this case, you can see that we've requested a light blue background, a black border, and so on), but rather more interesting is the id attribute, the purpose of which we will see in a moment.
With the above in mind, we can study the Page_Load() event handler that occupies the second half of the ASPX file. This begins in a way that should be familiar, but after that - in order to get something that's worth displaying - we have to perform a couple of operations that will be new to you.
<script language="VB" runat="server"> Sub Page_Load(Source As Object, E As EventArgs) Dim strConnection As String = "server=(local)\NetSDK; database=Northwind; " & _ "integrated security=true;" Dim objConnection As New SqlConnection(strConnection) The first two lines of this implementation just add some specifics to the generalized discussion of connection strings that you've already seen. We set the server to (local) \NetSDK (the MSDE instance that we set up in Chapter 1).
The next two lines of code create a command object that will soon be used to extract information from the Northwind database. We'll have much more to say on the subject of command objects in the next chapter, but you can already begin to see how they work. When we instantiate it, we pass the SqlCommand constructor a string containing the SQL query we want to execute, and the connection to the database we want to operate on. Once we have it, we can go through the steps that we talked about earlier: open, use, and then close the connection.
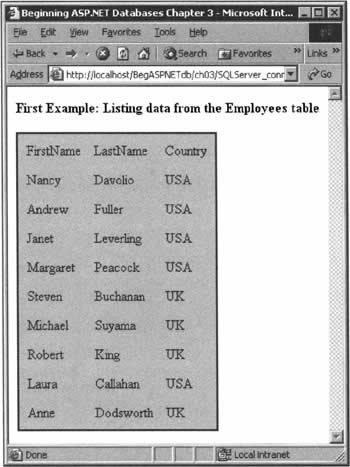
objConnection.Open() dgNameList.DataSource = objCommand.ExecuteReader() dgNameList.DataBind() objConnection.Close() End Sub </script> In general, 'using' the database will involve data reader objects, dataset objects, and data adapter objects, all of which will be discussed in detail in 5. In this case, however, we've short-circuited the process into just two lines of code, making use of the fact that programmatically, the data grid control behaves like an object of class System.Web.UI.WebControls.DataGrid. The first line specifies that the source of data for the data grid named dgNameList (as defined by the id attribute in our HTML section) will be the results that come from invoking the ExecuteReader() method of our SqlCommand object. The second binds the data: it deals with the process of reading the data and putting it into the grid. As you've already seen, the result of this relatively straightforward ASP.NET code is an HTML page containing the names and locations of nine people, extracted from the Northwind database.
Connecting to MS Access using the OLE DB .NET Data ProviderAs you know, we'll be using MSDE databases for the majority of this book. However, since one of ADO.NET's selling points is that it provides near-uniform access to diverse data sources, it makes sense here to look at some alternatives, starting with an MS Access database. Microsoft Access is a great database engine for cutting your teeth on, and its use is widespread, but in truth it was never designed to support more then ten or twenty simultaneous users - degradation in performance occurs when there are more than this. Nevertheless, it's highly likely that you'll be asked to interact with an Access database at some point in your programming career, and it's possible that you'll find an application for one yourself. Either way, you'll need to know how to do it. To make a connection to a database that was created with MS Access, you don't need to have Access installed on your machine, and the code we'll use is really very similar to the code you've already seen. The difference is that we'll be using the OLE DB .NET data provider (which includes the OleDbConnection object), and assembling a connection string that specifies the MDB file created by Access, and the OLE DB-compliant JET provider.
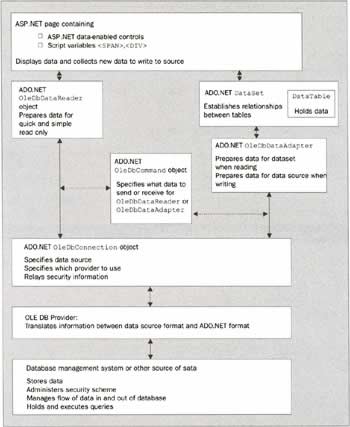
The diagram below displays the relationship of ADO.NET objects as they apply to using an Access file as a data source. Notice that we use specific OLE DB objects, except for the DataSet and DataTable objects, which are generic.
Access Connection SyntaxDespite the choice of a different data source, creating a connection to an Access database involves the same three steps as before: import the appropriate namespaces; create the connection string; instantiate the connection object. When we connect to Access, we use the OLE DB.NET data provider, so we must import the System.Data.OleDb namespace alongside the System.Data namespace.
<%@ Import namespace="System.Data" %> <%@ Import namespace="System.Data.OleDb" %> The connection string is the part of the process that exhibits most changes from what we had with SQL Server. When you're dealing with the OLE DB .NET data provider, it must contain at least two pieces of information: the type of provider we're going to use, and the name of the Access file:
Dim strConnection As String = "Provider=MyProvider; " & _ "data source=MyDataSource;" Apart from the fact that it belongs to a different class, however, creating the connection object involves exactly the same operation we used before:
Dim objConnection As New OleDbConnection(strConnection) A key thing to be aware of here is that when you connect to an Access database, you must specify the file in which the data is stored. With enterprise-capable database management systems (Oracle, Microsoft SQL Server, IBM DB2, etc.), you don't need to worry about how the information in the database is stored. ADO.NET connections to these latter kinds of data stores can switch between different databases within the one connection. If we want to connect to a different Access database, we must create a new connection object. Try It Out - Connecting to an Access Database
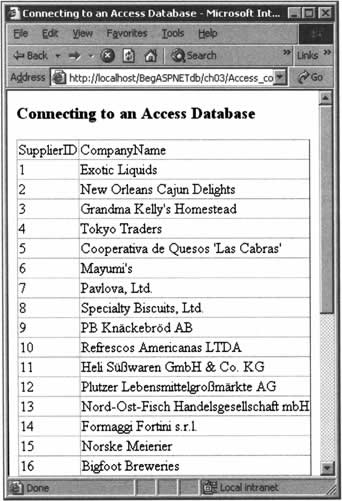
In this example, we'll make a connection to the Access version of the Northwind database using the syntax we just described. For variety - and to make the example a little more interesting - we'll also display the results of a slightly different query from the one we used last time.
How It WorksWe've been at pains to point out that ADO.NET does a good job of hiding the differences between connections to different data stores, so that once you've created them, one connection object is very much like another. Hopefully, the similarity between this example and our previous one has helped to convince you that this is a good thing. Aside from the use of different classes (OleDbCommand and OleDbConnection, rather than their Sql varieties), the only change of note was to the connection string:
Dim strConnection As String = "Provider=Microsoft.Jet.OleDb.4.0;" & _ "data source=C:\BegASPNETdb\datastores\nwind.mdb;" Here, instead of identifying a host data server and the name of a database on that host, we're specifying a data file and a provider that will translate the contents of that file into something that's usable by ADO.NET. Although the objects involved are different, we find that we're able to call the same methods as we used in the SQL Server example.
Connecting to Excel Using the OLE DB .NET Data ProviderThe versatility of the System.Data.OleDb.OleDbConnection object is such that it can act as a conduit for data from any source that has an OLE DB provider - and because the OLE DB standards have been around for so long, they are almost ubiquitous. As an example of this functionality, we can use the OLE DB .NET data provider to connect to Microsoft Excel using the syntax that you're familiar with from our earlier samples.
Excel Connection SyntaxA spreadsheet stores data, but it's not a database, and it doesn't support relational data structures. On the other hand, a spreadsheet is tabular by definition, and an awful lot of database-style information has been stored in spreadsheets over the years. ADO.NET makes it easy to connect to and use Excel data just as though you were communicating with a database. We don't have to fool around with cell addresses; we just work with fields and records. Of course, regardless of the facade that ADO.NET provides, a spreadsheet is not a database, and there are some points that you need to keep in mind when you're working with Excel data:
To reiterate the second point in that list, a common mistake is to try to connect to an Excel spreadsheet that does not have a named range. You cannot, as you might have thought, connect to an entire worksheet or workbook and then extract data from cells by providing cell addresses. In case you haven't done it before, creating a named range is a three-part process:
If you need to, you can select every cell in the worksheet to be part of your named range. You can even select a set of cells that run in the Z dimension, back through several sheets of one workbook. Whatever range you define, though, when you make a connection to an Excel spreadsheet, you have to use a special extended property of the JET provider, specified by adding an attribute to the connection string. You can see this on the last line of the following excerpt:
Dim strConnection As String = "Provider=Microsoft.Jet.OleDb.4.0;" & _ "Data Source=MySource;" & _ "Extended Properties=Excel 8.0;" With such a connection in place, we can write a SQL statement that treats the Excel columns as data fields, and Excel rows as data records:
Dim strSQL As String = "SELECT MyColumn1, MyColumn2 FROM MyRangeName" As you can see, the format of this query is identical to those we've been using for 'real' databases. Once the connection is in place, the fact that we're communicating with an underlying Excel spreadsheet is obscured. Try It Out - Connecting to an Excel Spreadsheet
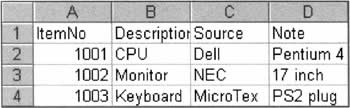
Let's see how the above theory works in practice. We'll create an Excel workbook, read some data from it, and then display it in an ASP.NET-generated web page using ADO.NET.
How It WorksIt's worth reiterating that setting up properly in Excel is critical before you can connect to it with ADO.NET: you must name ranges in order to make the data available. That done, you can use the JET provider to connect to Excel, provided that you include the extended properties attribute in the connection string, as we did here:
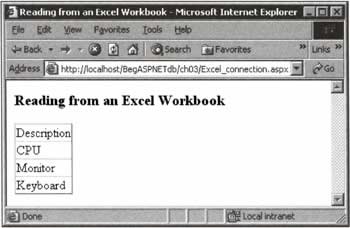
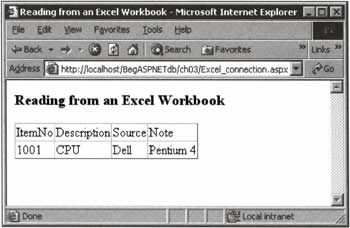
Dim strConnection As String = "Provider=Microsoft.Jet.OleDb.4.0;" & _ "data source=C:\BegASPNETdb\datastores\inventory.xls;" & _ "extended properties=Excel 8.0;" With the connection established, we wrote SQL statements that treat Excel rows as records, and Excel columns as fields. In the first instance, we indicated that we wanted all the fields using the asterisk, and ensured that we'd get all the records by leaving off a WHERE clause.
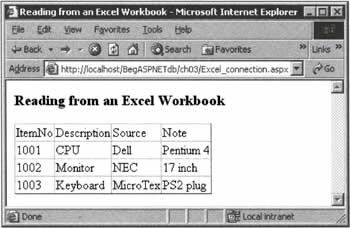
Dim strSQL As String = "SELECT * FROM Items" In the other versions of the file, we just reinforced the way that SQL vocabulary maps to Excel terminology. When, in version two, we specified that we only wanted the Description field, we only got the Excel column headed Description.
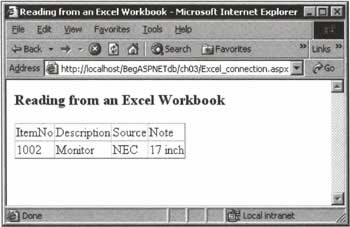
Dim strSQL As String = "SELECT Description FROM Items" In our third version, we added a WHERE clause to give us only those records (rows) in which the value for ItemNo was 1002. (Since this is a numeric value, we do not need quotation marks around it.)
Dim strSQL As String = "SELECT * FROM Items WHERE ItemNo=1002" Lastly, in our fourth version, we saw that if we're searching for rows matching a text value, we must encapsulate the string in single quotes.
Dim strSQL As String = "SELECT * FROM Items WHERE Source='Dell'"
Practicalities of Connections to ExcelAlthough it's easy to connect to Excel for the purposes of a demonstration, the task can become very difficult in the real world. An organization's data may be stored in scores or even hundreds of Excel workbooks, scattered over various parts of a network. They will probably not be on your IIS or data servers, and may not be on any type of server at all. Keep in mind that if you're called upon to access many workbooks that do not have named ranges, you could be in for a lot of preparation work - naming ranges is easy, as long as you have permission to alter the original workbook. It's likely that the sheets you're given will already have named ranges, in which case you should either use existing ranges (and risk the author making changes), or give your new ranges names that will not interfere with existing ones (you could start your range names with w_ for Web, for example). ADO.NET will not open an Excel workbook that's already opened in write mode by some other application. This is cumbersome during development, when you might want to be keeping an eye on the worksheet's named ranges while writing your ADO.NET code. It can also a problem after deployment if the workbook that's the source of data for your ASP.NET page is also in use by other employees as part of their work.
More About Connection ObjectsHaving examined how to make connections using the SQL Server and OLE DB .NET providers, it's worth taking just a little time here to look more closely at the connection objects we've been working with. First of all, it's interesting to discover exactly how the strings that we've been passing as arguments to the SqlConnection and OleDbConnection object constructors cause changes in the objects' behavior. In fact, on being passed to the constructor, the connection strings are immediately assigned to a property called ConnectionString, as the following alternative syntax demonstrates explicitly:
Dim objConnection As New SqlConnection() objConnection.ConnectionString = "server=(local)\NetSDK; " & _ "database=Northwind; integrated security=true;" Regardless of how you set the ConnectionString property, the attributes in that string are then used not only used to make the connection, but also to fill further, read-only properties of the connection object when the connection is opened. Continuing the above example, on execution of objConnection.Open(), objConnection.DataSource will be set to (local) \NetSDK, while objConnection.Database will be set to Northwind.
Additional Connection Object PropertiesAt this point, you've seen the most important attributes that can be placed in a connection string (server, database, and integrated security above; provider, data source and extended properties in earlier examples), but there are numerous others that you can read about in the MSDN documentation. In this section, we'll take a look at two that work exclusively with SQL Server databases: connection timeout and packet size. By default, the size of the packets of data that the database will send to ADO.NET is 8,192 bytes, which is sometimes rather more than you need. Imagine a connection that will only be used to request the results of a query that yields a simple True or False value, or one person's name and membership number - this data would take up very little space, and using a smaller packet size would likely increase performance. We can make the packet size as low as 512 bytes, like this:
Dim strConnection As String = "server=(local)\NetSDK; database=Northwind; " & _ "integrated security=true; packet size=512;" Like the server and database connection string attributes, packet size has an associated connection object property - PacketSize - that will be set to 512 as a result of this statement. Another default setting is that ADO.NET will wait 15 seconds for a connection to open. That time must be adequate to find the server, get a confirmation that the database exists, confirm security permissions, and establish the communication pathway. If these tasks are not complete in 15 seconds, then the attempt will time out and an error will be generated. This is plenty for most installations - imagine the problems we would face if it were not enough! - but in the rare event that it's not (perhaps because we need to connect over a Wide Area Network (WAN) to a SQL Server in another location), we can increase it using the following syntax:
Dim strConnection As String = "server=(local)\NetSDK; database=Northwind; " & _ "integrated security=true; connection timeout=30;" Specifying a timeout value in the connection string like this will result in a change in the value of the read-only SqlConnection.ConnectionTimeout property.
Additional Connection Object MethodsUnlike the majority of connection object properties, ConnectionString is not read-only. However, if you do decide to make changes to the connection string, they won't take effect until you've closed and reopened the connection - a potentially time-consuming process. A partial fix for this problem - at least for SQL Server database users - is provided by the SqlConnection.ChangeDatabase() method, which allows us to switch to a different database on the same server without closing the connection. In use, it looks something like this:
Dim strConnection As String = "server=(local)\NetSDK; database=Northwind; " & "integrated security=true;" Dim objConnection As New SqlConnection(strConnection) Dim strSQL As String = "SELECT * FROM Employees" Dim objCommand As New SqlCommand(strSQL, objConnection) objConnection.Open() ' Perform some operation on the current (Northwind) database objConnection.ChangeDataBase("Master") ' Perform some operation on the Master database objConnection.Close() The OleDbConnection and SqlConnection objects have just a few more methods that you can read about in the MSDN documentation. Among the most important is BeginTransaction(), which we'll be looking at in Chapter 9.
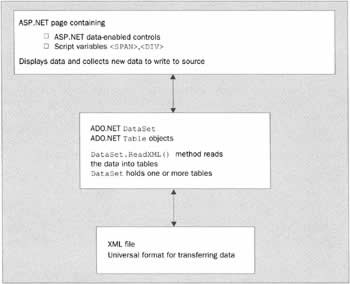
Connecting to XML SourcesAs you know, SQL is a standard language used by almost every platform to communicate between data providers and data consumers - the fact that ADO.NET aims to allow SQL queries to be run against as many different data sources as possible is testament to that. On the other hand, XML is becoming the universal format for data transfer - more and more organizations are using it because it's expressive, it's easy to read (it's just text, after all), and it's easy to manipulate or transform for different tasks. It's also the format in which data is transferred between entities in the .NET architecture. Given all of the above, it's hardly surprising that the ADO.NET objects also provide ways to read from and write to XML files with some ease. We'll take a look at reading XML data in this chapter, and at writing it in Chapter 5, when we discuss datasets in detail.
Extracting data from an XML file using ADO.NET is fairly straightforward, and involves just three steps. First, we need to identify the location on disk of the XML file. Second, we need to create a System.Data.DataSet object and use its powerful ReadXml() method to fill the dataset from the XML file. Third, we have to designate the dataset as the source of data for a DataGrid control, and bind. Depending on whether and how you've worked with XML before, you may have written code for parsing through XML files that involved loops inside other loops. With ADO.NET, there's no need: the DataSet object takes care of that for us. All of the operations that we'll perform on datasets in Chapter 5 apply to DataSet objects that could have been filled from an XML file as easily as they could have been filled from a relational database. It's another example of how ADO.NET insulates us from having to learn different techniques (other than connection strings) for different data sources. The following diagram shows ADO.NET objects interacting with an XML file. The DataSet can use its ReadXml() method to retrieve information without the need for a data adapter, or a command or connection object. Since the DataSet object is universal, there are no separate OleDb... or Sql... versions, and no provider (of either variety) is at work.
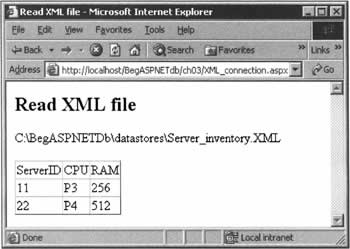
XML Connection SyntaxWithout connection strings and connection objects, the process of getting data from an XML file becomes - for the ADO.NET programmer, at least - a remarkably straightforward one. As described above, the first step in the retrieval code is to identify the name and location of the XML file, like this:
Dim strXMLFile As String = "MyDrive:MyPath\MyFile.xml" Secondly, we create a DataSet object, and use its ReadXml() method to read the contents of the XML file into the dataset. We'll discuss the DataSet class in more detail in the next chapter, but for now you can consider it to be like a table (or rather, a set of tables) of data that's held in the memory of your Internet Information Server, disconnected from its source.
Dim objDataSet As New DataSet() objDataSet.ReadXml(strXMLFile) Conceptually, the third step is no different from our studies of displaying Access and SQL data: we set the source for the data grid, and then perform the bind, as follows:
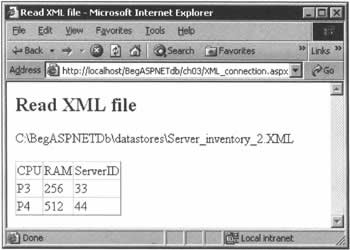
dgNameList.DataSource = objDataSet.Tables(0).DefaultView dgNameList.DataBind() The expression on the right-hand side of the assignment statement simply identifies the default representation of the data contained in the first table of the dataset, which is where the contents of the XML file will have been placed. Try It Out - Reading Data from an XML File
As ever, the process of reading XML data using ADO.NET is best demonstrated through an example. In this one, we'll write a few short XML files, and see what happens when we read data from each of them.
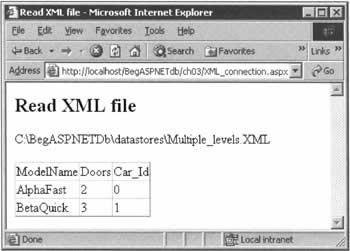
Limitations of Connections to XML DataBefore we leave this section, it's worth mentioning that the DataSet.ReadXml() method can run into difficulties when the XML file in question contains more than one 'level' of items (not counting the root as a level). There's no problem if we have a <Car> tag, and within that we have tags for <Model> and <Color> - but if we were to have a <ColorList>, and then many instances of <Color>, we would have issues. For example, consider the following XML file (named Multiple_levels.xml in the downloads).
<?xml version="1.0" standalone="yes"?> <CarList> <Car> <ModelName>AlphaFast</ModelName> <Doors>2</Doors> <ColorList> <Color>Argent</Color> <Color>Blue</Color> <Color>Chrome</Color> </ColorList> </Car> <Car> <ModelName>BetaQuick</ModelName> <Doors>3</Doors> <ColorList> <Color>Deep Red</Color> <Color>Emerald</Color> <Color>Flying Yellow</Color> </ColorList> </Car> </CarList> The logical output here would be for the DataSet to format the DataGrid with a grid of <Color> items within the <ColorList> cell of each row - but this would rapidly descend into a rather untidy browser view. Instead, ADO.NET and ASP.NET will merely condense the second-level tags into a new column called Car_Id, as below: We'll have more to say about connecting to and manipulating data sources in Chapter 5, when we cover the DataSet object in more detail. | |||||||||||||||||||||||||||||||||||||||||||||||||||||

EAN: 2147483647
Pages: 263