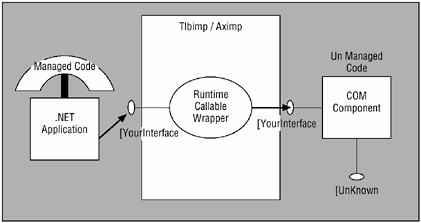
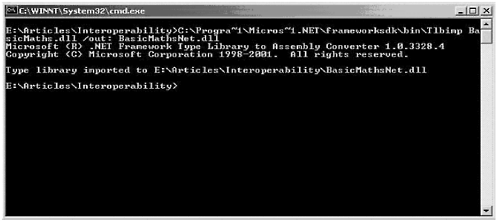
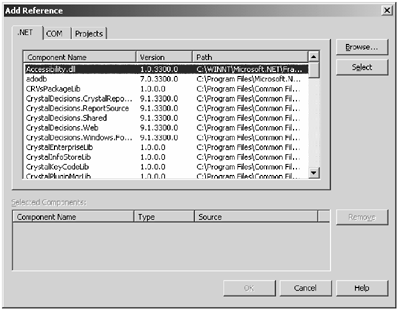
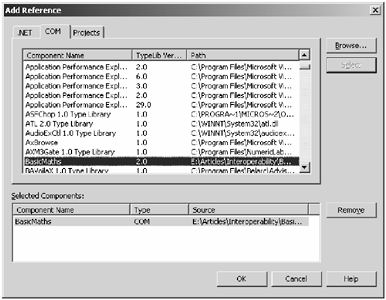
| First we will look at an example of exposing a COM component to the Microsoft .NET Framework. Then we will summarize the process needed to expose an existing COM component to managed code. Figure 10-3 explains what exactly happens when you use a COM component in a .NET application. To demonstrate this concept, we will create a simple COM component called BasicMaths in Visual Basic 6.0. The project name is BasicMaths.vbp and the class name is MathsClass . It can be found in the COM DLL folder. Figure 10-3. Using COM component in a .NET application.   Function Add(ByVal Operand1 As Integer, ByVal Operand2 As Integer) As Integer Add = Operand1 + Operand2 End Function Function Subtract(ByVal Operand1 As Integer, ByVal Operand2 As Integer) As Integer Subtract = Operand1 - Operand2 End Function Function Multiply(ByVal Operand1 As Integer, ByVal Operand2 As Integer) As Long Multiply = Operand1 * Operand2 End Function Function Divide(ByVal Operand1 As Integer, ByVal Operand2 As Integer) As Double Divide = Operand1 / Operand2 End Function Function Add(ByVal Operand1 As Integer, ByVal Operand2 As Integer) As Integer Add = Operand1 + Operand2 End Function Function Subtract(ByVal Operand1 As Integer, ByVal Operand2 As Integer) As Integer Subtract = Operand1 - Operand2 End Function Function Multiply(ByVal Operand1 As Integer, ByVal Operand2 As Integer) As Long Multiply = Operand1 * Operand2 End Function Function Divide(ByVal Operand1 As Integer, ByVal Operand2 As Integer) As Double Divide = Operand1 / Operand2 End Function This COM component has four methods . Once we compile the project through Visual Basic, the COM component gets registered in the machine. Now we want a Microsoft .NET application to make use of this COM component and invoke the functionality provided by it. No error handling logic has been incorporated for the sake of simplicity. Approach 1 (Using the Command Line) Before we write a C# console application (client) for using the COM component, we need to expose the COM component to the Microsoft .NET Framework. COM type definitions reside in a type library. We need to generate metadata from the type library. The resulting assembly is called an interop assembly. The Microsoft .NET Framework provides a tool for converting classes contained in a COM type library to metadata. The tool is called Type Library Importer ( tlbimp.exe ). This tool creates an interop assembly and namespace for the type information automatically. As shown in Figure 10-4, issue the command at the prompt to generate an interop assembly for the COM component BasicMaths.dll that we previously created: Figure 10-4. Executing tlbimp.exe at command prompt.  Type library imported to E:\Articles\Interoperability\BasicMathsNet.dll The output of this command would be the interop assembly file BasicMathsNet.dll . Now we will create a simple C# file, as below using Notepad and compile it using the command line csc.exe . The following code is stored in the file TestMathsAdd.cs . It can be found in the CsharpClient folder for this chapter.  using System; public class TestMathsAdd { public static void Main(string[] args) { BasicMathsNet.MathsClass objMathsClass = new Basic- MathsNet.MathsClass(); Console.WriteLine("Addition of 2 and 3 is " + objMath- sClass.Add(2,3)); } } using System; public class TestMathsAdd { public static void Main(string[] args) { BasicMathsNet.MathsClass objMathsClass = new Basic- MathsNet.MathsClass(); Console.WriteLine("Addition of 2 and 3 is " + objMath- sClass.Add(2,3)); } } Now we will compile the file, and during compilation, we reference the interop assembly created by the tlbimp utility. The following is the command:  csc TestMathsAdd.cs /r:BasicMathsNet.dll Microsoft (R) Visual C# .NET Compiler version 7.00.9372.1 for Microsoft (R) .NET Framework version 1.0.3328 Copyright (C) Microsoft Corporation 2001. All rights reserved. csc TestMathsAdd.cs /r:BasicMathsNet.dll Microsoft (R) Visual C# .NET Compiler version 7.00.9372.1 for Microsoft (R) .NET Framework version 1.0.3328 Copyright (C) Microsoft Corporation 2001. All rights reserved. In this compilation, we are adding a reference to the interop assembly BasicMathsNet.dll that we created previously. This is how a COM component can be exposed to the Microsoft .NET world. Approach 2 (Using Visual Studio .NET) We will create the same console application as previously from Visual Studio .NET. When the project gets created, right-click on the references tag in the solution explorer and select the option Add Reference. Figure 10-5 shows the screen that pops up when you do so. Select the COM tab and then select the COM component BasicMaths that we created previously, as shown in Figure 10-6. Figure 10-5. Adding a reference in Visual Studio .NET.  Figure 10-6. Adding the BasicMaths component in a .NET application.  When you click OK, Visual Studio .NET automatically generates the interop assembly. The following is the code in the project. This code can be found in the cSharpClientInVs folder for this chapter.  using System; using BasicMaths; namespace TestingCOM { class Class1 { static void Main(string[] args) { MathsClass objMathsClass = new MathsClass(); Console.WriteLine("Addition of 2 and 3 is " + ob jMathsClass.Add(2,3)); } } } using System; using BasicMaths; namespace TestingCOM { class Class1 { static void Main(string[] args) { MathsClass objMathsClass = new MathsClass(); Console.WriteLine("Addition of 2 and 3 is " + ob jMathsClass.Add(2,3)); } } } As shown, much less effort is needed to convert a COM component into the interop assembly because Visual Studio .NET does that automatically. |