Section 6.4. HARDWARE
6.4. HARDWARE6.4.1. Add a New Hard DiskTHE ANNOYANCE: I'm running out of disk space, and given how cheap new hard drives are, I figured I'd upgrade. But I don't know where to start; do I just crack open my PC's case and plug it in, or is there more to it? THE FIX: It all depends on whether you want to replace your current hard disk or simply augment it with a second drive. If your PC has an unoccupied drive bay and your old hard disk isn't an antique, it's much easier to install the new drive as a second hard disk. But if you're using a laptop, for instance, and there's only room for one drive, or if your current drive is so old that its capacity is measured in megabytes instead of gigabytes, you'll want to replace the old drive with the new one. The course you choose also determines whether or not you'll need to move all your data to the new drive, a process that can be a bit of an ordeal. Whether you're replacing or augmenting, you'll need to connect both drives to your PC at the same time. Doing so means fussing with cables and changing tiny jumpers. Consult the documentation that came with your PC and drives for details, or visit the drive manufacturer's web site for instructions. So that Windows will still boot, connect the new drive such that your old unit is still configured as the primary hard disk. When adding a new IDE/PATA drive, for instance, you can configure it as a "master" or "slave" device: for now, leave the old drive as the master and configure the new drivetypically by setting a jumper on the back of the unitas a slave. (The master and slave designations are used to prevent conflicts; a single IDE cable should never have more than one master or slave.) Note: Make sure the controller to which you connected the new drive is set to "Auto detect" in your system BIOS. Otherwise, your PC won't see the drive, and neither will Windows. See "Windows Won't Start" for more information, and consult your PC's documentation for specific details. If you're installing an SATA drive, just connect it to a free SATA port. If you're adding a second SCSI drive, leave the old drive set to SCSI ID 0 and set the new drive to ID 1. (Depending on your setup, you may have to temporarily disconnect your CD drive to make room for the new hard disk on the IDE or SCSI chain.) When you're done and you've closed up your PC, start Windows. Go to Start Note: If you have a laptop or a micro desktop PC, odds are you won't find any free slots or drive bays. In this case, your best bet is to temporarily install your new drive in an external enclosure and connect it to your PC with a USB 2.0 or FireWire cable. Figure 6-6. Use the Disk Management utility to configure newly installed hard disks.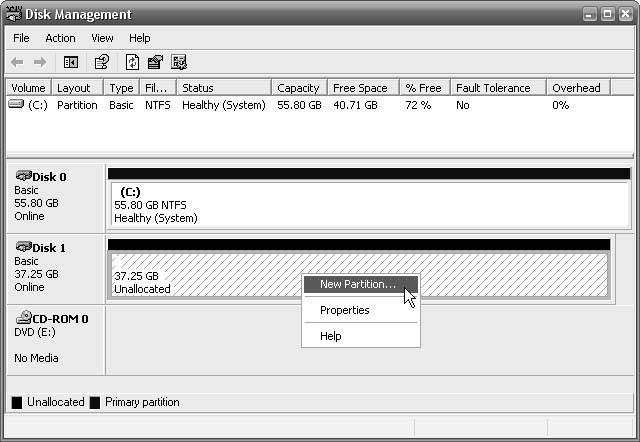 In the New Partition Wizard, select "Primary partition" and then specify the maximum capacity for the partition size. (Chances are the system has already calculated this number for you.) Next, select "Assign the following drive letter" and choose a drive letter that you'll remember from the list, such as J. On the Format Partition page, select "Format this partition with the following settings," choose NTFS for the filesystem, and leave the other settings on the page unchanged. Click Finish when you're done. Depending on the speed and size of the drive, it may take Disk Management a while to format the driveanywhere between a minute and half an hour. When formatting is complete, right-click the new drive in Disk Management and select "Mark Partition as Active." If all you wanted to do was augment your existing storage, you're essentially done. You can begin saving stuff to your new drive, or even move existing files by dragging and dropping them in Windows Explorer (hold the Shift key to move instead of copy). If, on the other hand, you want to replace your old drive with this new one, you'll need to copy everything from the old drive to the new one. This can be tricky, for several reasons. For one, there's more to a Windows installation than just the files; the boot loader, discussed in "Windows Won't Start," is installed on your disk's boot sector and can't be copied. Also, Windows won't let you copy files that are in use, so you can't simply drag and drop all of the folders on drive C: to copy them to your new drive J:. Fortunately, there are a few workarounds that solve these problems:
6.4.2. Stop Heavy Hard Disk UsageTHE ANNOYANCE: At seemingly random times, Windows slows down or even stops responding for a few seconds, during which time I can distinctly hear my hard disk thrashing. What's going on, and how do I stop it? THE FIX: When Windows uses up all your memory, it starts using a portion of your hard disk as "virtual memory." Since hard disks are much slower than memory (RAM), this causes a noticeable drop in performance. Of course, adding RAM will help significantly; the more RAM you have, the less frequently Windows will resort to using virtual memory. The thrashing problem is caused by the way that Windows handles disk virtual memory by default. The space Windows sets aside for virtual memory is called the swap file or paging file, which grows and shrinks as needed. As a result, the swap file can become very fragmented, reducing system performanceand increasing the thrashing sound you've been hearingsignificantly. You can effectively eliminate the problem by first defragging your hard drive (Start Open the System control panel, choose the Advanced tab, and click the Settings button in the Performance section. Choose the Advanced tab here, and click the Change button to show the Virtual Memory window (Figure 6-7). Figure 6-7. Change some settings in the Virtual Memory window to increase performance. Highlight your drive in the list and select "Custom size" below. At the bottom of the window, take the "Recommended" paging file size and add 512. Type this number (e.g., 1534 or 2048) into both the "Initial size (MB)" and "Maximum size (MB)" fields, and then click the Set button. If you typed 2048, it should now say 2048-2048 under "Paging File Size (MB)" at the top of the window. When you're done, press OK in each of the three dialog boxes to confirm your choices. If Windows suggests that you restart your PC, do so now. 6.4.3. Scanner Says It's Not ConnectedTHE ANNOYANCE: I know my scanner is working and properly connected, but sometimes when I try to scan something, the scanner software complains that the scanner isn't connected. I tried unplugging the scanner and plugging it back in, but that didn't help. What gives? THE FIX: You've encountered a bug in Windows XP that affects USB devices. Although many drivers compensate for the problem, some devicesparticularly older scannerswill exhibit the "disconnected" problem as a result. Scanners remain totally dormant, sending no information to your PC until you try to scan something, and Windows misinterprets this inactivity as an opportunity to shut down the USB port to save power. At the time of this writing, Microsoft hasn't released a patch that effectively fixes this problem. My suggested workaround: the next time you see that error, try scanning again right away. It can take Windows a few seconds to reactivate the USB port, and your scanner software may not have waited long enough for this to happen. No luck? Restart Windows, and your scanner should be available immediately. But don't dawdle; Windows gives inactive USB devices only a 1530 minute grace period before cutting power to the port again. Naturally, you can also try visiting the scanner manufacturer's web site for a driver or software update that may provide a more convenient or reliable workaround. 6.4.4. Troubleshoot Multiple MonitorsTHE ANNOYANCE: I connected a larger monitor to an unused monitor port on the back of my PC, but I can't get a picture on it. Am I taking the phrase "plug-and-play" too seriously? THE FIX: Plug-and-play technology allows Windows to recognize newly attached devices and install drivers for them automatically. Sometimes this is sufficient; other times, you need to help things along. If you plug in a USB microphone, for instance, Windows will change your sound settings immediately so the new microphone works, but monitors do not enjoy the same privileged service. Here's how to get it to work. If you're using a laptop, there's probably a key on your keyboard (see Figure 6-8) that switches between the built-in LCD screen and any external monitor that might be attached. Press this key (typically while holding the Fn key) repeatedly until the video shows up where you want it. Figure 6-8. Use this key to switch between your built-in screen and an external monitor, or both simultaneously.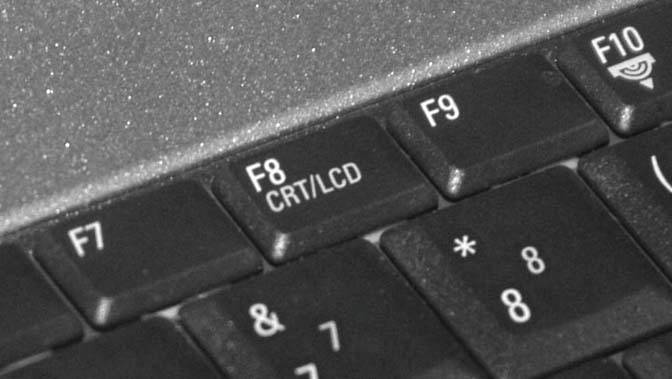 Don't have a monitor key? Want more control? Right-click an empty area of the desktop, select Properties, and choose the Settings tab. If Windows has detected both monitors (as well as both video cards, if applicable), they'll show up here as numbered rectangles (Figure 6-9). If you're not sure which monitor is which, click the Identify button, and an enormous number "1" will appear on the primary monitor. To use both monitors simultaneously side by side, creating one huge desktop, click the #2 rectangle and place a checkmark by the "Extend my Windows desktop onto this monitor" box. If you only want to use the second monitor (and turn off the first one), click the #2 rectangle and then place a checkmark next to the "Use this device as the primary monitor" option. When the numbers switch, click the new #2 rectangle, and remove the checkmark next to the "Extend my Windows desktop onto this monitor" option. If you still have problems, click the Advanced button, choose the Monitor tab, and click the Properties button to verify that the correct drivers are installed for each of your monitors. Then do the same (via the Adapter tab) for your video card(s). Figure 6-9. Use the Settings tab to enable multiple monitors and choose how the displays are oriented.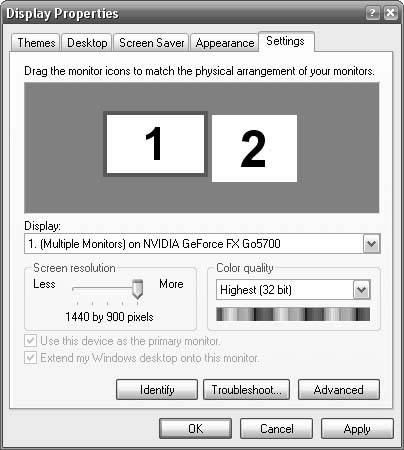 Note: If you're fed up with mice altogether, and sick of the whole "lift and drag" thingnot to mention the wrist painconsider replacing your mouse with a pen and tablet. Tablets, such as those made by Wacom (http://www.wacom.com), allow you to control your pointer with a cordless, battery-less stylus (pen) with much more precision and comfort than any rodent offers. Features such as pressure and title sensitivity also make working with graphics programs (e.g., Photoshop and Illustrator) far more productive and pleasurable. 6.4.5. Fix Cranky MiceTHE ANNOYANCE: When I move the mouse around, the pointer seems to skip around the screen instead of floating smoothly. Can I whip this rodent into shape? THE FIX: Both mice and keyboards suffer from the same types of problems, and for the same reasons: despite the fact that they are the primary interface devices for your PC, they're usually the most cheaply built and poorly designed components of your system. Don't hesitate to replace a cranky mouse or a sticky keyboard, rather than spending hours trying to get it to work. If you're still using a mouse with a little ball on the bottom, you could improve its reliability somewhat by cracking it open and cleaning the rollers and the ball, but you'll be much better off simply replacing it with an "optical" mouse. Optical mice have no moving parts, but rather use a small sensor to more reliably detect the movements of your hand. (If you're in the market for a new one, go down to your local computer store and try out a few models to see which one feels the most comfortable and well made.)
Of course, even top-of-the-line mice aren't entirely trouble-free. Does your pointer jitter when you move the mouse around? If you're using a cordless mouse, this is almost always a reception problem: either the mouse is too far from the receiver or, more likely, the battery needs to be replaced or recharged. If you have a corded mouse that plugs into a USB port, plug it into a different port and see if its performance improves. If you're using a USB hub, try bypassing it by plugging the mouse directly into one of your PC's USB ports. Other USB devices can sometimes suck up too much USB power or use too much bandwidth, which can interfere with the mouse as well, so try disconnecting them one by one to see if you notice a difference.
6.4.6. Disappearing CD and DVD DrivesTHE ANNOYANCE: Recently, my D: drive (a DVD writer) disappeared in Windows Explorer. How do I get it back? THE FIX: The obvious solution is to open up your PC and make sure the cables are firmly connected, but if that doesn't help, an errant Registry setting may be the cause of the problem. Open the Registry Editor (go to Start Highlight the UpperFilters value on the right, press the F2 key, rename the value UpperFilters.old, and press Enter. Do the same for the LowerFilters value. Next, navigateto HKEY_LOCAL_MACHINE\SYSTEM\CurrentControlSet\Services, and click [+] to expand the Services branch to reveal all the subkeys. Look for the Cdr4_2K key on the tree, and delete it if it's present. Do the same for the following keys: Cdralw2k, Cdudf, and UdfReadr. Close the Registry Editor and restart Windows when you're done. THE ANNOYANCE: Thanks to DSL, I haven't used my old dialup modem in years. But now I have to send a document to someone who apparently thinks it's still 1986 and can only accept it via fax. Isn't that modem supposed to let me send faxes? I'm darned if I can figure out how to do it. THE FIX: Windows XP's built-in fax service actually works pretty well, but it's not installed by default, and it's not entirely obvious how to use it once you set it up. Here's how you do it. Open the Add or Remove Programs control panel, and click the Add/Remove Windows Components button on the left. Place a checkmark next to the Fax Services component, click the Next button, and then complete the wizard. (If the Fax Services box is already checked, the required software is installed; click the Cancel button and continue to the next step.) Once the fax service is installed, you'll need to do a little setup. Open the Printers and Faxes control panel, right-click the Microsoft Shared Fax Driver icon (the name may vary), and select Properties. Choose the Devices tab, find your modem in the list (if it's not there, you'll need to install your modem driver), and click the Properties button. On the Send tab, place a checkmark next to the "Enable device to send" option, and type your phone number in the TSID field. Next, choose the Receive tab. If you want to receive faxes with your PC, place a checkmark next to the "Enable device to receive" option. Give this some thought, though, particularly if you use this phone line for other things (such as placing and receiving phone calls). You may not want your PC picking up the phone every time Mom calls (or then again, maybe you do). There's also a "Manual" setting in the "Answer mode" section, which causes the fax service to listen on your line but only pick up when you tell it to. But beware: this "listening" can wreak havoc with some phones and answering machines and may result in dropped calls. When you're done with the fax modem properties page, click OK. Back in the Fax Properties window, choose the Tracking tab to configure the fax monitor. The fax monitor is the little progress window that pops up when you send and receive faxes, from which you can manually receive faxes, cancel an outgoing call, and so on. Finally, choose the Archives tab and specify where you want Windows to store your sent and received faxes (the defaults are subfolders of \Documents and Settings\All Users\Application Data\Microsoft\Windows NT\MSFax\). Finally, to send a fax, open your document in whatever application created it (e.g., Word or Excel), go to File THE ANNOYANCE: I have an old USB webcam that I'd like to use. When I plug it in, Windows recognizes it and prompts me for drivers, but then it tells me that the CD that came with the webcam doesn't have "drivers that match my hardware." What do I do? THE FIX: It sounds like your webcam was made before Windows XP came out, and as a result, the CD that accompanies it doesn't include XP-compatible drivers. This is a really common problem, particularly among the glut of USB devices that hit the market during the Windows 98 era. Since few companies will support every product from the original date of sale until the Morlocks roam the Earth, it's possible thatgaspXP-compatible drivers may simply not exist for your device. But it can't hurt to visit the webcam manufacturer's web site and scour the Support and Downloads sections for any drivers or information for Windows XP. Of course, the manufacturer may no longer offer any drivers for your device. The company may have gone out of business or had its assets bought up by another company. In this case, you'll have to turn to others to find a driver. Start by visiting a driver repository (the web equivalent of an auto salvage yard), such as DriverGuide (http://www.driverguide.com) or DriverFiles (http://www.driverfiles.net). No luck? Search Google for the word "driver" followed by the name or model number of your device. If you don't find anything, it may be wiser to simply cut your losses. Instead of spending half a day trying to get a seven-year-old webcam to work with XP, just spend the $15 on a new webcam, and use the old one as a nifty toy for your cat. THE ANNOYANCE: I'm trying to install the drivers for this new device, and all of a sudden, Windows warns me that the drivers are not digitally signed. Is this something to worry about? THE FIX: Not even a little. A driver with a digital signature is one that has earned Microsoft's esteemed seal of approval, indicating that it has passed a series of rigorous compatibility tests administered by the Windows Hardware Quality Labs (WHQL). In theory, this warning is supposed to scare customers into rejecting any driver that does not come with Microsoft's digital signature, thereby coercing hardware manufacturers into submitting their drivers to the aforementioned WHQL tests. In practice, however, digitally signed drivers are rarely any more stable, reliable, or safe than drivers lacking the signature. In other words, if you see this warning, just click the Install Anyway button and forget about it. If the decision makers at Microsoft had thought about it, they might've applied this sort of warning to all software installations, not just hardware drivers. If Windows users were warned before installing software components that weren't digitally signed, we could probably say goodbye to spyware, viruses, Trojan horses, worms, and all the other forms of malware that can make their way onto your PC without so much as a peep from Windows! THE ANNOYANCE: My PC has four USB ports, and they're all full. Rather than using a USB hub, which I've heard can be problematic, I bought a PCI card that gave me another six USB ports and a pair of FireWire ports to boot. When I installed it, however, Windows appeared to detect it but couldn't properly identify it or accept the installation of the included drivers. THE FIX: There are essentially two reasons why Windows doesn't detect a device, or detects that a device has been added but can't identify it properly: either the device isn't compatible with Windows XP, or some other device is causing a conflict. You can test the first hypothesis pretty easily by consulting the documentation or checking the manufacturer's web site for XP compatibility (see "Find Drivers for Old Hardware" if these turn out to be dead ends). The second possibility is a little harder to troubleshoot. You'll encounter this problem mostly in desktop PCsas opposed to laptopsthat have a bunch of internal expansion slots. (Laptops have fewer expansion options, and thus fewer opportunities for conflict.) The system BIOS and chipset are responsible for parceling out IRQs to all the devices in your system, but when you add a handful of cards to the dozen or so devices already built onto your PC's motherboard, devices must share IRQs, and that's when the conflicts start making life difficult. You can confirm that this is the problem by simply moving the card to a different PCI slot. This fools Windows into thinking the card is an entirely new device, which gives you another shot at installing the right drivers (see "Replace an Incorrect Driver"); the new location may also eliminate a conflict with a device on your motherboard. Despite Windows's plug-and-play capabilities, you may have to shuffle PCI cards in a full system until you find a setup that works. If you still aren't having any luck, enter your PC's BIOS setup screen (see "Boot with the Windows CD"), find the "Reset Config Data" option (sometimes called "Reset NVRAM"), and set it to Yes. When you're done, save your settings and reboot. This setting makes the BIOS reset and reconfigure all your plug-and-play devices every time your system starts, which forces Windows to do the same. The change may increase boot time, but you can turn it off later, and it may be just the thing to get all your devices to work in harmony. THE ANNOYANCE: I installed the wrong driver for a new piece of hardware, and now Windows can't install the correct one. Isn't there any way to uninstall drivers? THE FIX: Yesmost of the timebut it's not always obvious how to do it. You could open the Device Manager (go to Start If it's listed in the Add or Remove Programs control panel, or if there's an uninstaller hiding in your Start menu or in the driver's folder, you may be able to remove the driver completely. However, odds are you'll have to turn to the manufacturer's support web site for help. Search the site for "uninstall," and you might find a procedure or even a downloadable utility to cleanse your system of the driver. If not, search Google for the word "uninstall" and the name of your device. (Don't be surprised if the instructions you find have you deleting obscure Registry keys and renaming DLLs in your \Windows\System32\drivers folder.) The good news is that uninstalling the driver isn't always necessary. Windows ties each detected device to the port or slot to which it's connected. If you pull a sound card out of PCI slot 2 and insert it into PCI slot 3, Windows will detect the card as a brand new device and offer you a chance to install the device correctly. The same goes for hard disks and CD/DVD drives (all IDE/ATA devices, really), all SCSI devices, cards inserted into your laptop's PCMCIA/PC Card slots, and even USB devices; just plug them into different ports to force Windows to re-detect them, and your plug-and-play woes may simply melt away. THE ANNOYANCE: During a recent visit to the Windows Update web site, I was tempted by a driver update listed in the "Hardware, Optional" category. I installed the driver and restarted Windows, and now the device no longer works. Did I do something wrong, or did I just fall for a trap? THE FIX: While Microsoft has the right intentions, it doesn't always have the right drivers. In theory, Windows Update should only suggest a driver upgrade if your device is already using a Microsoft driver, but sometimes it oversteps its bounds. Fortunately, Windows is prepared for this! Open the Device Manager (go to Start Sometimes this doesn't work, though. If Windows complains that it can't roll back the driver, or if the device still doesn't work after the old driver was supposedly restored, your best bet is to dig through your disks and install the original driver that came with your gadget. Better yet, visit the manufacturer's web site, download the latest driver for your model, and install it over the one already on your system. THE ANNOYANCE: I've read of a bug that affects a certain type of motherboard chipset, but this information isn't exactly laser-etched on the front of my PC. How can I find out what's inside my PC without having to pop the hood? THE FIX: Your PC is made up of dozens of separate components, most of which aren't made by your PC vendor. Although you can certainly open up your computer and look at the label on your hard disk or CPU, most of the "devices" are nothing more than chips soldered to your PC's motherboard. Rather than trying to read the microscopic text on each chip, you can use software to scan your system and produce reports in excruciating detail. First, open up Windows's own Device Manager by going to Start One of the best tools for this, and a free one at that, is Everest Home Edition, available at http://www.lavalys.com. (Lavalys also offers commercial versions with more features.) Among other things, Everest displays copious details about your hardware (Figure 6-10), digs into your CPU (indicating, for example, whether or not it can be overclocked), and even performs system diagnostics and memory benchmark tests. Another worthy tool is WCPUID/XCPUID, available for free at http://www.h-oda.com, which provides exhaustive details about your processor (CPU). This tool's output is useful for overclocking, as well as for finding a compatible CPU if you're interested in upgrading. |
 Run, and type diskmgmt.msc to open the Disk Management utility (Figure 6-6). In the lower pane, right-click the box labeled "Unallocated (which represents your new drive), and select New Partition. (If you don't see an unallocated drive, your new disk may already be partitioned and formatted, which means you can skip this step. If the drive doesn't show up, see "Windows Won't Start.")
 Programs
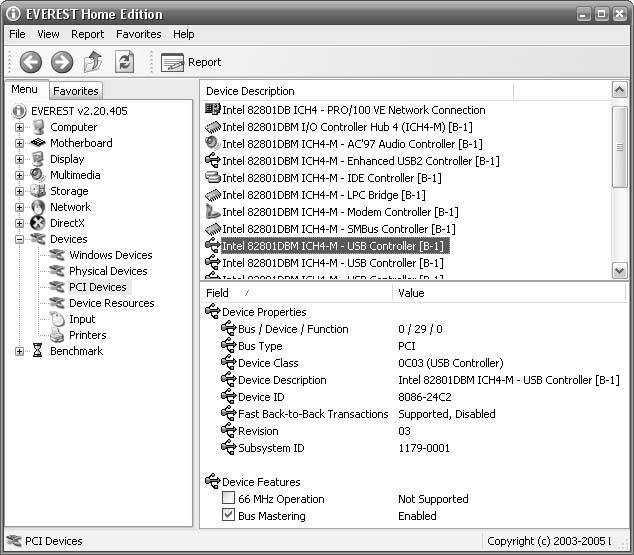
EAN: 2147483647
Pages: 69