Section 3.1. VIDEO
3.1. VIDEO3.1.1. Play Stubborn VideosTHE ANNOYANCE: When I try to open a video clip in Windows Media Player, it says it can't play the file. Not surprisingly, the More Information button doesn't provide any useful information. THE FIX: Chances are you don't have the required codec installed on your system. A codec (which stands for compressor/decompressor) is software responsible for storing data in a video file and subsequently extracting it; in order to play any given video, you must use the same codec that was used to create the video in the first place, regardless of the player application you're using. To figure out what codec was used, you'll need a program such as GSpot (free, http://www.headbands.com/gspot/) or AVIcodec (free, http://avicodec.duby.info). Just drag and drop the video file onto GSpot or AVIcodec, and the program will display the file's codec. (If it doesn't, the file is probably corrupted, or was encoded with a nonstandard scheme.) Armed with the name or four-digit 4CC code of the codec (shown in Figure 3-1), surf over to http://www.fourcc.org/fcccodec.htm and download your codec from the list. If the 4CC code isn't there, a quick Google search should turn up some useful leads. Figure 3-1. Use GSpot to find the codec necessary to play a given video clip.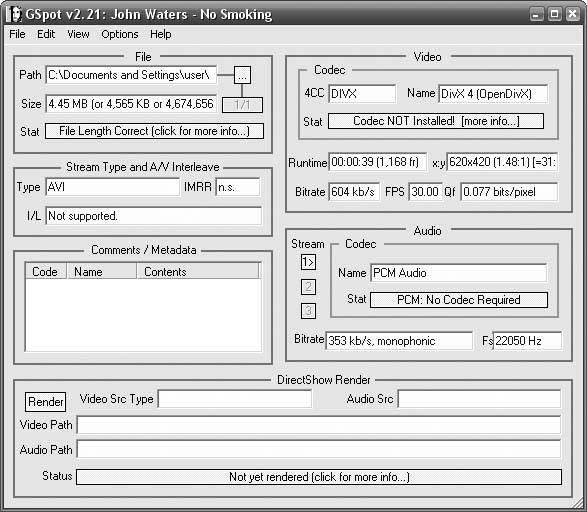 Of course, Windows Media Player might have trouble playing a video because there's something wrong with the video file. First, make sure your video file is complete; if you downloaded it from the Web, download it again. (If it's an incomplete download, see the next annoyance for a workaround.) If you can't get a better version of the file (and it's an MPEG video), you may be able to fix it with the MPEG Header Corrector (free, http://www.vcdhelp.us/html/tutmpegheadercorrector.html).
3.1.2. Play Incomplete DownloadsTHE ANNOYANCE: I'm in the middle of downloading a video and I want to start playing it before the download is complete, but Windows Media Player just gives me an error. This whole "waiting" thing is so passé. THE FIX: For starters, Windows Media Player (WMP) won't play most kinds of videos while they're in use; in this case, while they're currently being saved by another program. (The exception is streaming videofiles with the .asf or .wmv extension.) To get around this limitation, make a copy of the file being downloaded and open it; open the folder containing the file and, using the right mouse button, drag the file to another part of the same folder. Release the mouse button and select Copy Here from the pop-up menu. You should be able to open this duplicate file with no problems. With some video formats (particularly .avi files), there's a catch: the index, essential information about the sequence of frames in the video, is located at the end of the file. An incomplete file thus won't have an index, and can't be played. The solution is to use a reindexing utility to rebuild this data and make the file playable. DivFix (free, http://www.divx-digest.com/software/divfix.html) does this quite nicely, but it only works on true .avi files (see Figure 3-2). If DivFix doesn't work on your file, the Windows Media Encoder (free, http://www.microsoft.com/windows/windowsmedia/9series/encoder/) can index some other types of video files, although you may find some aspects of the interface a bit daunting. Figure 3-2. Use DivFix to reindex incomplete videos so you can play them as-is.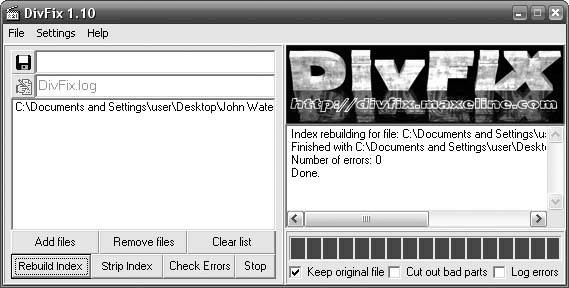 3.1.3. Fix the Aspect RatioTHE ANNOYANCE: The video clip I'm trying to play appears squashed (too narrow) or stretched out (too wide). How do I fix this? THE FIX: Of course, the easy fix is to just look at your computer monitor from an angle so the video appears correct. But if you want a more permanent solution (and not a crick in your neck), update the codec as described in "Play Stubborn Videos"), as a later version may fix the problem. It's also possible that the aspect ratio of the actual video clip is botched. To correct this, you'll have to open the file in a video-editing program that can resize video frames. Although the Windows Media Encoder can crop frames, it can't stretch or shrink a video. To change the aspect ratio of a video clip, use River Past Video Perspective ($29.95, http://www.riverpast.com/en/prod/videoperspective/index.php) or Open Video Converter ($25.00, http://www.008soft.com/products/open_video_converter.htm), or, for more control, try a more advanced video application such as Adobe Premiere Elements ($99.99, http://www.abobe.com). 3.1.4. Shed Light on Blank VideosTHE ANNOYANCE: When I play a video clip in Windows Media Player, I hear something, but I see nothing. I feel like Sergeant Shultz from Hogan's Heroes! THE FIX: First, make sure you have the latest codec (see "Play Stubborn Videos"). If the codec is in order, you likely have a video overlay problem. See if you can temporarily fix the problem by maximizing or resizing the Windows Media Player window, or covering it with another window and then bringing it to the front. If you notice a difference, your video card driver may be to blame. Visit the video card manufacturer's web site and download the latest driver. If this doesn't help, you'll have to downgrade Windows's support for video overlays until you can play videos successfully. In WMP, select Tools Note: Typically, Windows Media Player paints a special rectangle on your screen, and your video driver is responsible for superimposing the moving video over it. This "overlay scheme" allows your PC to play video smoothly, but in some cases it can cause performance problems or compatibility problems (such as blank video). Figure 3-3. Disable some or all of the video overlay features to get videos to play in WMP.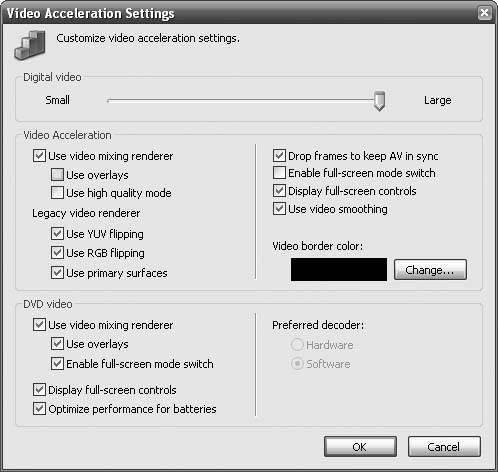 Note: To disable video overlays in RealOne Player, go to Tools  Preferences Preferences  Hardware Video card compatibility. Move the slider to the left until "Enable optimized video and disable overlays appears beneath. Hardware Video card compatibility. Move the slider to the left until "Enable optimized video and disable overlays appears beneath.3.1.5. Skip Intro AdsTHE ANNOYANCE: When I play video clips on some web sites, I have to sit through an ad or intro clip. Is there any way to skip directly to the video I want? THE FIX: Right-click the center of Windows Media Player's video playback area and select Next, as shown in Figure 3-4. This works if the ad(s) and main video are stored as separate files on the server, as it simply instructs the player to jump to the next video in its queue. If Next is grayed out, either the ad and video are part of the same clip, or the publisher has disabled this shortcut. Figure 3-4. You may be able to right-click a video and select Next to skip the ads or intro.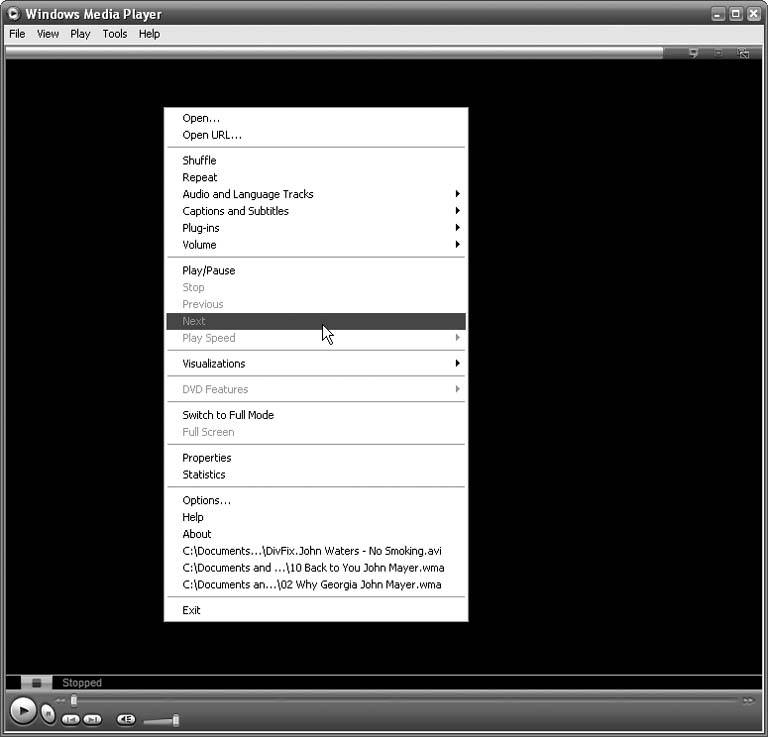 3.1.6. Save Videos from the WebTHE ANNOYANCE: Why can't I save a video clip I'm watching on the Web? There's gotta be a way to do this! THE FIX: This is a tricky one; videos on web sites are often jury-rigged to make downloading very difficult. It's possible in most cases, but it takes a few steps. The first thing you need to do is get the full URL of the video clip. If the video is playing in a standalone Windows Media Player (or RealPlayer) window, it's easy enough: select File Figure 3-5. Get the URL of an online video clip.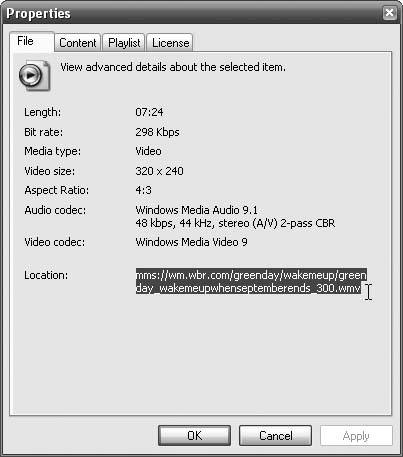 If the video is embedded in a web page (including in a pop-up window), right-click the video itself. If it's a RealPlayer video, you'll be able to select "Play in RealPlayer" to open the clip in a standalone window and nab the URL as described previously. If it's a Windows Media video, you should be able to select Properties to display the Properties window (Figure 3-5), which will show you the URL. Still can't find the video's URL? If you're using Mozilla or Firefox, right-click an empty area of the web page and select View Page Info. Click the Media tab, and then scroll down the list until you see the URL of the video, which will probably be the only entry that isn't an image file (.jpg, .gif, etc.). If you find it in the list, click Save As to save a copy of the file on your hard disk. Note: Most publishers of online videos specifically disable the "Save As" feature that normally appears in Windows Media Player, but if it's there, go ahead and use it. Only if the Save feature is disabled do you have to use this procedure. If you're using Internet Explorer, right-click an empty area of the web page and select View Source (this works in Mozilla/Firefox, too); some familiarity with the HTML language will make it easier to find the information you need. Press Ctrl-F and search the code for text that would likely appear in a video clip URL, such as .asf, .wmv, .ram, or rstp:. Somewhere in the code, you should see a full (or partial) URL for the source video clip, like the one in Figure 3-6. Figure 3-6. Examine the HTML source code of a web page to find the URL of an embedded video clip.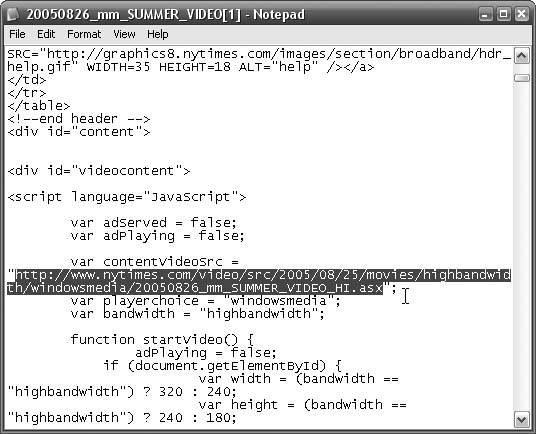 At this point, you should have a URL that looks something like rstp://www.some.server/videos/penguin.asf. Copy the URL (highlight it and press Ctrl-C) and paste it (Ctrl-V) into a program designed to download a video stream, such as WMRecorder ($29.95, http://www.wmrecorder.com) or CoCSoft Stream Down ($39.00, http://stream-down.cocsoft.com; see Figure 3-7). If all goes well, you should have a file on your hard disk in about the same amount of time it would take to watch the video from start to finish; just double-click the file icon to play the clip. Figure 3-7. Use a program like CoCSoft Stream Down to download streaming video clips to your hard disk.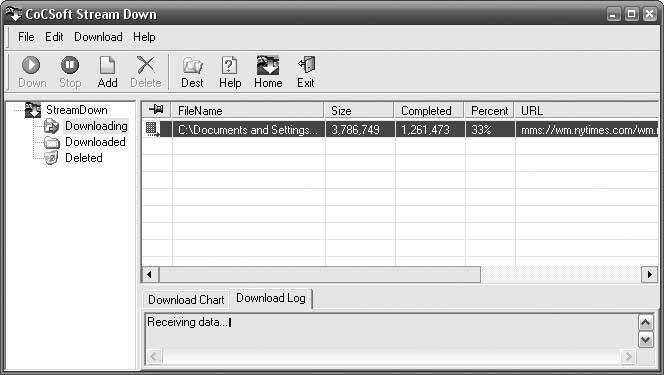 Only streaming videos have URLs that begin with rstp://if your URL starts with http://, you'll probably be able to download the file without any special software. To do this, open Notepad, and type the following code: <a ref="http://www.some.server/videos/penguin.mov">link</a> Save the file to your desktop, and give it the .html filename extension. Double-click the new file to open it in your default browser, right-click the link, and then select Save Link Target As. 3.1.7. Rewind or Fast-Forward Streaming VideoTHE ANNOYANCE: I'm watching a video on the Web and I'd like to be able to skip around in it, but I can't rewind or fast-forward the video. THE FIX: Unfortunately, this is a limitation of the video file, and not simply an option that can be turned on or off. A lot of streaming video clips (particularly .wmv videos) have this problem; since the creators expected you to watch the videos as they download, they didn't anticipate the need to rewind or fast-forward. To rewind or fast-forward a video, it must be indexed, and you can only add an index if the video file is stored on your hard disk. (See "Save Videos from the Web" for a way to download an online video.) To index a .wmv file, download the free Windows Media Encoder from http://www.microsoft.com/windows/windowsmedia/9series/encoder/, and open the Windows Media File Editor. Drag and drop the video onto the Editor window, and select File 3.1.8. Reduce Video BufferingTHE ANNOYANCE: I'm trying to watch a video on a web site, but all it says is "buffering." It's not asking me to wax my car, right? THE FIX: Most online video clips are designed to stream, allowing you to start watching before your PC has finished downloading. To keep the video playing smoothly, video players often download a few seconds of video ahead of the playback (a technique called "buffering" or "caching"), and sometimes this means you have to wait. The good news is that you can choose when to wait: now, or later. Note: The buffering settings have no effect on video clips stored on your hard disk. To eliminate buffering messages altogether, see "Save Videos from the Web." In Windows Media Player, select Tools Unfortunately, entering a small number means that WMP has to stop playback more often to buffer more content. If WMP frequently stops playing to buffer more data, raise the buffer number to 10 or 20 seconds. You'll get smoother playback, but you'll have to wait longer before your online videos play. 3.1.9. Make Your Own Director's CutTHE ANNOYANCE: I downloaded this really long movie, but all I want is a small portion of it. Is there a way to chop it up into little pieces? THE FIX: You can use Windows Movie Maker, which comes with Windows XP, to extract segments of video from a long video clip. (You'll find it in your Start menu, under Accessories.) Note: Before using Windows Movie Maker, run Windows Update to ensure you have the latest version of this tool. Since the original release of Windows XP, Windows Movie Maker has undergone significant changes. From Movie Maker, select File Across the bottom of the window, you'll see something called a storyboard; click the Show Timeline button to switch to the more useful Timeline view. Now, drag your video from the Collection pane to the uppermost Video line (not the Audio/Music line), so that it appears as a horizontal band, as shown in Figure 3-8. Figure 3-8. Use Windows Movie Maker to crop or glue together video clips.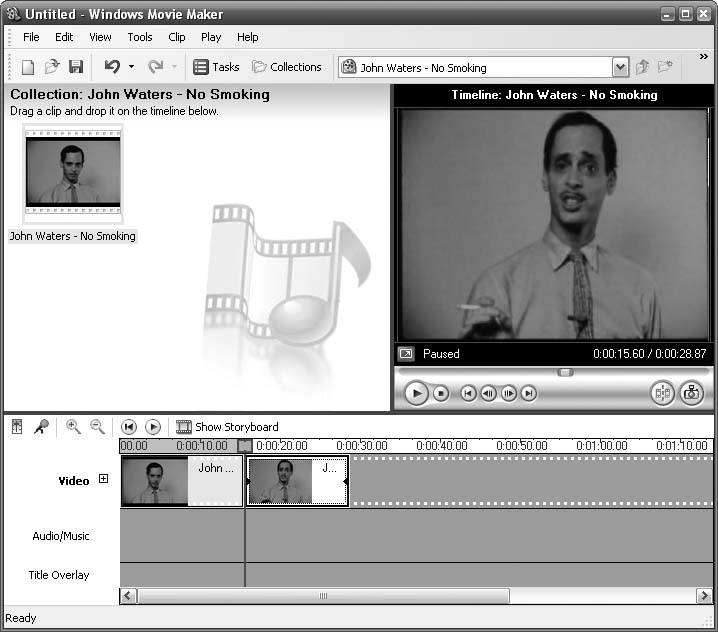 Using your mouse, carefully drag the left and right edges to "crop" the video, removing the material you don't want. As you shrink the rectangle representing your clip, the corresponding video segment gets shorter; when you're done, you're left with only a small segment of the original movie. Test the results by using the player controls in the upper-right corner. Note: Use the magnifying glass tools to zoom in or outwhich effectively expands or shrinks the timescaleso it's easier to see what you're doing. Now, say you want to glue together two or more separate clips from your video. Although Windows Movie Maker doesn't let you "cut" a video segment into separtate usable pieces on the timeline (you'll need a more advanced video-editing application, such as Adobe Premiere, for that), you can drag the original clip from the Collection pane again, creating a second copy in your timeline. Then, shrink down the second clip to a different scene. You can even drag the clips around in the timeline to rearrange them. When you're happy with your selection, select Save Movie File from the File menu. 3.1.10. Make a MontageTHE ANNOYANCE: I have a bunch of short video clips I'd like to play in succession, but the playlists in Windows Media Player are too cumbersome. Is there a way to more permanently glue multiple clips together into one large movie? THE FIX: Windows Movie Maker can do this (see "Make Your Own Director's Cut"); just drag multiple clips into the window, then onto the timeline, and arrange them as you like. Unfortunately, this is somewhat time-consuming, and some quality is lost when the movie is recompressed as it is being saved. Figure 3-9. Use Apple's free QuickTime Player to easily concatenate multiple video clips. Apple's QuickTime Pro Player ($29.99 upgrade from the free player, http://quicktime.apple.com) makes this process a lot easier. Start by opening one of your clips in QuickTime Player, and use the timeline slider to navigate to a point in the clipthe beginning, the end, or anywhere in betweeninto which you'd like to insert another clip. Then, drag and drop the second clip into the middle of the QuickTime Player window. This new clip will show up as a gray stripe on the timeline, as shown in Figure 3-9. (You can continue to add as many movies as you like, provided that QuickTime Player supports the clip formats.) Note: Be careful when installing Apple's iTunes software, which can overwrite your purchased Quicktime Pro software with the latest free QuickTime player software without asking. When you're done, select File 3.1.11. Get an Alternative to Real PlayerTHE ANNOYANCE: I want to play RealMedia-format video and audio, but I really don't like the cumbersome RealPlayer software. Do I have any alternatives? THE FIX: Yes, as a matter of fact, you do! Rather than putting up with the ads, messages, spyware, and other non-sense that comes along with RealPlayer, you can use the ultra-simple Real Alternative player (free, http://home.hccnet.nl/h.edskes/finalbuilds.htm#realalt), shown in Figure 3-10. Figure 3-10. The Real Alternative Media Player Classic allows you to play RealMedia content without the messy RealPlayer.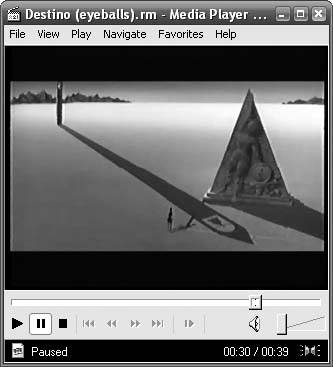 Along the same lines, you can use the QuickTime Alternative player (free, http://home.hccnet.nl/h.edskes/finalbuilds.htm#quicktimealt) instead of Apple's QuickTime Player. 3.1.12. Simplify Windows Media PlayerTHE ANNOYANCE: Windows Media Player 10 is large, cluttered, and difficult to use. How can I trim the fat off this beast? THE FIX: Open the View menu, and select Skin Chooser. In the left pane, click Corporate, and above it, click the Apply Skin button. From now on, you can switch between the full-blown Windows Media Player extravaganza and the bare-bones player by pressing Ctrl-1 and Ctrl-2, respectively. 3.1.13. Use Alt-Tab with Windows Media PlayerTHE ANNOYANCE: When Windows Media Player is running, I can't switch to another program using Alt-Tab. Why won't Media Player let me go? THE FIX: Most of the time, you can press Alt-Tab once to switch from the current window to the window immediately underneath it. But in Windows Media Player, there's a bug that prevents this from working. The problem is caused by a second, hidden window behind Media Player. To work around this, hold Alt and press Tab twice to switch to the other application. 3.1.14. Synchronize Audio and VideoTHE ANNOYANCE: The sound and video on my PC aren't synchronized; whenever I play a clip, it looks like a badly dubbed Kung-Fu movie. THE FIX: This is usually a problem with your hardware drivers. Install the latest drivers for your video card and sound card, and then run Windows Update to make sure you have the latest video-related updates and DirectX drivers (also available at http://www.microsoft.com/directx/). If new drivers don't fix the problem, open the Sounds and Audio Devices Properties window (it's in the "Sounds, Speech, and Audio Devices" category of the Windows Control Panel). Choose the Audio tab, and in the Sound Playback area, click the Advanced button. Choose the Performance tab and move the Hardware acceleration slider a notch closer to None. Click OK, and then click OK again when you're done. Repeat the process until video clips play correctly. Note: If you have syncing problems while playing a DVD movie, press Stop, and then resume playback. Sometimes that's all it takes to get a movie back on track. 3.1.15. Fix Bad Color in VideosTHE ANNOYANCE: The color seems messed up when I play videos in Windows Media Player; sometimes I see colored lines running through the video. THE FIX: Like many other video problems, this one is typically caused by bad drivers and video codecs, all discussed earlier in this chapter. But if your drivers and codecs are up to date, a little tweaking may be all that's necessary to correct the color in your videos. Open Windows Media Player, and select Tools If the problem persists, select View If the video plays fine at first but then develops color problems, disable the video overlay, as described in "Shed Light on Blank Videos." |
EAN: 2147483647
Pages: 69